https://github.com/ternaus/imagenet18
https://github.com/ternaus/imagenet18
Last synced: over 1 year ago
JSON representation
- Host: GitHub
- URL: https://github.com/ternaus/imagenet18
- Owner: ternaus
- License: unlicense
- Created: 2019-09-27T19:44:24.000Z (almost 7 years ago)
- Default Branch: master
- Last Pushed: 2019-09-27T21:25:44.000Z (almost 7 years ago)
- Last Synced: 2025-01-25T18:43:10.619Z (over 1 year ago)
- Language: Python
- Size: 552 KB
- Stars: 2
- Watchers: 2
- Forks: 0
- Open Issues: 0
-
Metadata Files:
- Readme: README.md
- License: LICENSE
Awesome Lists containing this project
README
Code to reproduce ImageNet in 18 minutes, by Andrew Shaw, Yaroslav Bulatov, and Jeremy Howard. High-level overview of techniques used is [here](http://fast.ai/2018/08/10/fastai-diu-imagenet/)
Pre-requisites: Python 3.6 or higher
- Set your `AWS_ACCESS_KEY_ID`, `AWS_SECRET_ACCESS_KEY`, `AWS_DEFAULT_REGION` (example [instructions](https://docs.google.com/document/d/1Z8lCZVWXs7XORbiNmBAsBDtouV3KwrtH8-UL5M-zHus/edit))
```
pip install -r requirements.txt
ncluster spot_prices p3 # check spot prices for regions to find valid zone for p3 instances
export NCLUSTER_ZONE=us-east-1 # set to a zone with cheap p3's
python tools/replicate_imagenet.py --replicas=4 # configure 16 high performance disks
python train.py --machines=4
python tools/replicate_imagenet.py --replicas=4 --delete # delete high performance disks
```
To run with smaller number of machines:
```
python train.py --machines=1
python train.py --machines=2
python train.py --machines=4
python train.py --machines=8
python train.py --machines=16
```
To run as spot prices, add `--spot` argument, ie `train.py --spot`
Your AWS account needs to have high enough limit in order to reserve this number of p3.16xlarge instances. The code will set up necessary infrastructure like EFS, VPC, subnets, keypairs and placement groups. Therefore permissions to create these those resources are needed. Note that high performance disks cost about $1/hour, so make sure to delete them after using.
# Checking progress
Machines print progress to local stdout, log TensorBoard event files to EFS under unique directory and also send data to wandb if WANDB_API_KEY env var is set to API key (it's under https://app.wandb.ai/settings).
## TensorBoard
1. launch tensorboard using `python tools/launch_tensorboard.py`
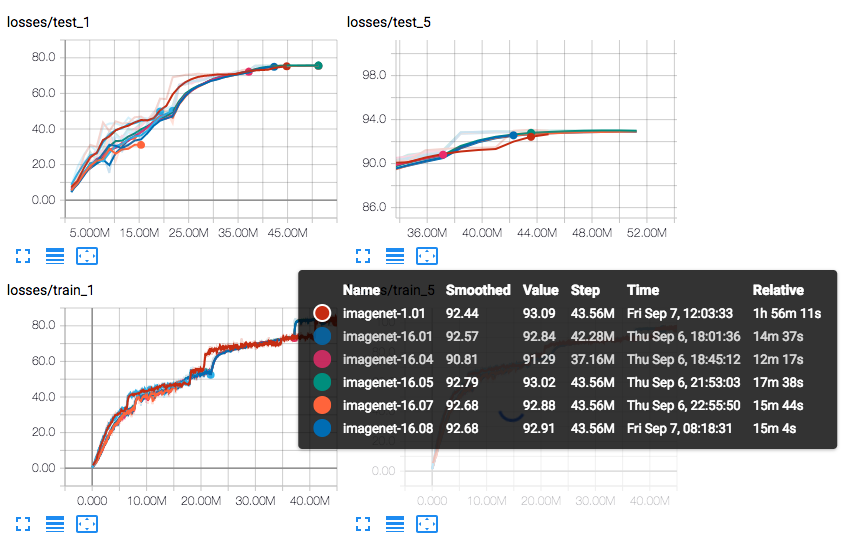
That will provide a link to tensorboard instance which has loss graph under "losses" group. You'll see something like this under "Losses" tab
## Console
You can connect to one of the instances using instructions printed during launch. Look for something like this
```
2019-07-29 15:58:10.653377 0.monday-quad: To connect to 0.monday-quad do "ncluster connect 0.monday-quad" or
ssh ubuntu@184.73.100.7
tmux a
```
This will connect you to tmux session and you will see something like this
```
.997 (65.102) Acc@5 85.854 (85.224) Data 0.004 (0.035) BW 2.444 2.445
Epoch: [21][175/179] Time 0.318 (0.368) Loss 1.4276 (1.4767) Acc@1 66.169 (65.132) Acc@5 86.063 (85.244) Data 0.004 (0.035) BW 2.464 2.466
Changing LR from 0.4012569832402235 to 0.40000000000000013
Epoch: [21][179/179] Time 0.336 (0.367) Loss 1.4457 (1.4761) Acc@1 65.473 (65.152) Acc@5 86.061 (85.252) Data 0.004 (0.034) BW 2.393 2.397
Test: [21][5/7] Time 0.106 (0.563) Loss 1.3254 (1.3187) Acc@1 67.508 (67.693) Acc@5 88.644 (88.315)
Test: [21][7/7] Time 0.105 (0.432) Loss 1.4089 (1.3346) Acc@1 67.134 (67.462) Acc@5 87.257 (88.124)
~~21 0.31132 67.462 88.124
```
The last number indicates that at epoch 21 the run got 67.462 top-1 test accuracy and 88.124 top-5 test accuracy.
## Weights and Biases
Runs will show up under under "imagenet18" project in your Weights and Biases page, is https://app.wandb.ai/yaroslavvb/imagenet18/runs/8fv3xosq
# Other notes
If you run locally, you may need to download imagenet yourself from [here](https://s3.amazonaws.com/yaroslavvb2/data/imagenet18.tar)