https://github.com/testcentricity/testcentricity_apps
TestCentricity™ For Apps core POM test automation framework gem
https://github.com/testcentricity/testcentricity_apps
android appium ios ipados macos-app-automation mobile-app-automation ruby-gem screen-object-model test-automation
Last synced: 6 months ago
JSON representation
TestCentricity™ For Apps core POM test automation framework gem
- Host: GitHub
- URL: https://github.com/testcentricity/testcentricity_apps
- Owner: TestCentricity
- License: bsd-3-clause
- Created: 2024-06-26T02:26:15.000Z (about 2 years ago)
- Default Branch: main
- Last Pushed: 2024-11-13T19:07:01.000Z (over 1 year ago)
- Last Synced: 2025-03-24T00:38:54.062Z (over 1 year ago)
- Topics: android, appium, ios, ipados, macos-app-automation, mobile-app-automation, ruby-gem, screen-object-model, test-automation
- Language: Ruby
- Homepage:
- Size: 2.68 MB
- Stars: 0
- Watchers: 1
- Forks: 0
- Open Issues: 1
-
Metadata Files:
- Readme: README.md
- Changelog: CHANGELOG.md
- License: LICENSE.md
- Code of conduct: CODE_OF_CONDUCT.md
Awesome Lists containing this project
README
# TestCentricity™ For Apps
[](https://badge.fury.io/rb/testcentricity_apps)
[](http://opensource.org/licenses/BSD-3-Clause)


[](http://www.rubydoc.info/gems/testcentricity_apps)
The TestCentricity™ For Apps core framework for MacOS desktop apps and mobile iOS/iPadOS and Android app testing implements
a Screen Object Model DSL for use with Cucumber or RSpec and Appium version 2.x. It also facilitates the configuration of
the appropriate Appium capabilities and driver required to establish a connection with locally hosted MacOS desktop apps,
or locally or cloud hosted iOS and Android real devices or simulators.
The TestCentricity™ For Apps gem supports automated testing of MacOS desktop apps and native iOS and Android apps running
on the following mobile test targets:
* locally hosted MacOS desktop apps (using Appium 2.x, the Mac2 driver, and XCode on macOS)
* locally hosted iOS device simulators or physical iOS devices (using Appium 2.x, the XCUItest driver, and XCode on macOS)
* locally hosted Android devices or Android Studio virtual device emulators (using Appium 2.x, the UIAutomator2 driver, and Android Studio)
* cloud hosted iOS or Android physical devices and simulators from the following service:
* [Browserstack](https://www.browserstack.com/list-of-browsers-and-platforms/app_automate)
* [Sauce Labs](https://saucelabs.com/platform/mobile-testing)
* [TestingBot](https://testingbot.com/mobile/realdevicetesting)
## What's New
A complete history of bug fixes and new features can be found in the [CHANGELOG](https://github.com/TestCentricity/testcentricity_apps/blob/master/CHANGELOG.md) file.
The RubyDocs for this gem can be found [here](https://www.rubydoc.info/gems/testcentricity_apps/).
Three example projects that demonstrates the implementation of a screen object model framework using TestCentricity™ For Apps
and Cucumber can be found at the following:
* [tc_mac_calculator_demo](https://github.com/TestCentricity/tc_mac_calculator_demo)
* [tc_mobile_react_native_demo](https://github.com/TestCentricity/tc_mobile_react_native_demo)
* [tc_mobile_wdio_demo](https://github.com/TestCentricity/tc_mobile_wdio_demo)
Refer to [this wiki page](https://github.com/TestCentricity/testcentricity_apps/wiki/XCUItest-driver-bug-impacts-iOS-dialogs-managed-by-com.apple.springboard) for information on a bug with the latest versions of the XCUItest driver that affects Appium's
ability to interact with and verify iOS system level modal dialogs.
### Which gem should I use?
* The [TestCentricity For **Apps** gem](https://rubygems.org/gems/testcentricity_apps) supports testing of MacOS desktop apps and native iOS and Android mobile apps
* The [TestCentricity For **Mobile** gem](https://rubygems.org/gems/testcentricity_mobile) supports testing of native iOS and Android mobile apps
* The [TestCentricity For **Web** gem](https://rubygems.org/gems/testcentricity_web) supports testing of web interfaces via desktop and mobile web browsers
| Tested platforms | TestCentricity For Apps | TestCentricity For Mobile | TestCentricity For Web |
|---------------------------------------------------|:-:|:-:|:-:|
| MacOS desktop apps | Yes | No | No |
| Native mobile iOS/iPadOS and/or Android apps only | Yes | Yes | No |
| Desktop/mobile web browsers only | No | No | Yes |
## Installation
TestCentricity For Apps requires Ruby 3.1.0 or later. To install the TestCentricity For Apps gem, add this line to your
automation project's `Gemfile`:
gem 'testcentricity_apps'
And then execute:
$ bundle
Or install it yourself as:
$ gem install testcentricity_apps
---
## Setup
### Using Cucumber
If you are using Cucumber, you need to require the following in your `env.rb` file:
```ruby
require 'testcentricity_apps'
```
### Using RSpec
If you are using RSpec instead, you need to require the following in your `spec_helper.rb` file:
```ruby
require 'testcentricity_apps'
```
---
## ScreenObjects
The **Screen Object Model** is a test automation pattern that aims to create an abstraction of your MacOS desktop app or
native mobile app's User Interface that can be used in tests. The **Screen** Object Model in MacOS desktop apps or native
mobile app test automation is equivalent to the **Page** Object Model in web user interface test automation.
A **Screen Object** is an object that represents a single screen in your AUT (Application Under Test). **Screen Objects**
encapsulate the implementation details of a MacOS desktop or native mobile app screen and expose an API that supports
interaction with, and validation of the UI elements on the screen.
**Screen Objects** makes it easier to maintain automated tests because changes to screen UI elements are updated in only
one location - in the `ScreenObject` class definition. By adopting a **Screen Object Model**, Cucumber feature files and
step definitions are no longer required to hold specific information about a screen's UI objects, thus minimizing maintenance
requirements. If any element on, or property of a screen changes (text field attributes, button captions, element states,
etc.), maintenance is performed in the `ScreenObject` class definition only, typically with no need to update the affected
feature files, scenarios, or step definitions.
### Defining a ScreenObject
Your `ScreenObject` class definitions should be contained within individual `.rb` files in the `features/support//screens`
folder of your test automation project, where `` is typically `mac`, `ios`, or `android`. For each screen in your app,
you will typically have to define a `ScreenObject` for each platform version of your app.
📁 my_automation_project
├── 📁 config
├── 📁 features
│ ├── 📁 step_definitions
│ ├── 📁 support
│ │ ├── 📁 android
| | | └── 📁 screens
│ │ ├── 📁 ios
| | | └── 📁 screens
│ │ ├── 📁 mac
| | | └── 📁 screens
│ │ ├── 📄 env.rb
│ │ └── 📄 hooks.rb
├── 📄 Gemfile
└── 📄 README.md
You define a new `ScreenObject` as shown below:
```ruby
class LoginScreen < TestCentricity::ScreenObject
end
class ProductsScreen < TestCentricity::ScreenObject
end
class CheckoutAddressScreen < TestCentricity::ScreenObject
end
```
### Adding Traits to your ScreenObject
Desktop and mobile app screens typically have names associated with them. Screens also typically have a unique object or
attribute that, when present, indicates that the screen's contents have fully loaded.
The `screen_name` trait is registered with the `ScreenManager` object, which includes a `find_screen` method that takes a
screen name as a parameter and returns an instance of the associated `ScreenObject`. If you intend to use the `ScreenManager`,
you must define a`screen_name` trait for each `ScreenObject` to be registered.
The `screen_name` trait is usually a `String` value that represents the name of the screen that will be matched by the
`ScreenManager.find_screen` method. `screen_name` traits are case and white-space sensitive. For screens that may be
referenced with multiple names, the `screen_name` trait may also be an `Array` of `String` values representing those
screen names.
The `screen_locator` trait specifies a locator for a unique object that exists once the screen's contents have been fully
rendered. The `screen_locator` trait is a locator strategy that uniquely identifies the object. The `ScreenObject.verify_screen_exists`
method waits for the `screen_locator` trait to exist, and raises an exception if the wait time exceeds the `default_max_wait_time`.
A `deep_link` trait should be defined if a screen can be directly loaded using a deep link. Specifying a `deep_link` trait
is optional, as not all screens can be directly accessed via a deep link.
You define your screen's **Traits** as shown below:
```ruby
class LoginScreen < TestCentricity::ScreenObject
trait(:screen_name) { 'Login' }
trait(:screen_locator) { { accessibility_id: 'login screen' } }
trait(:deep_link) { 'mydemoapprn://login' }
end
class ProductsScreen < TestCentricity::ScreenObject
trait(:screen_name) { 'Products' }
trait(:screen_locator) { { accessibility_id: 'products screen' } }
trait(:deep_link) { 'mydemoapprn://store-overview' }
end
class CheckoutAddressScreen < TestCentricity::ScreenObject
trait(:screen_name) { 'Checkout - Address' }
trait(:screen_locator) { { accessibility_id: 'checkout address screen' } }
trait(:deep_link) { 'mydemoapprn://checkout-address' }
end
```
### Adding UI Elements to your ScreenObject
Desktop and mobile app screens are made up of UI elements like text fields, check boxes, radio buttons, switches, lists,
buttons, etc. **UI Elements** are added to your `ScreenObject` class definition as shown below:
```ruby
class LoginScreen < TestCentricity::ScreenObject
trait(:screen_name) { 'Login' }
trait(:screen_locator) { { accessibility_id: 'login screen' } }
trait(:deep_link) { 'mydemoapprn://login' }
# Login screen UI elements
labels username_label: { accessibility_id: 'Username'},
password_label: { xpath: '(//XCUIElementTypeStaticText[@name="Password"])[1]'},
username_error: { accessibility_id: 'Username-error-message' },
password_error: { accessibility_id: 'Password-error-message' },
generic_error: { accessibility_id: 'generic-error-message' }
textfields username_field: { accessibility_id: 'Username input field' },
password_field: { accessibility_id: 'Password input field' }
button :login_button, { accessibility_id: 'Login button' }
end
class CheckoutAddressScreen < TestCentricity::ScreenObject
trait(:screen_name) { 'Checkout - Address' }
trait(:screen_locator) { { accessibility_id: 'checkout address screen' } }
trait(:deep_link) { 'mydemoapprn://checkout-address' }
# Checkout Address screen UI elements
textfields fullname_field: { accessibility_id: 'Full Name* input field' },
address1_field: { accessibility_id: 'Address Line 1* input field' },
address2_field: { accessibility_id: 'Address Line 2 input field' },
city_field: { accessibility_id: 'City* input field' },
state_region_field: { accessibility_id: 'State/Region input field' },
zip_code_field: { accessibility_id: 'Zip Code* input field' },
country_field: { accessibility_id: 'Country* input field' }
button :to_payment_button, { accessibility_id: 'To Payment button' }
end
```
### Adding Methods to your ScreenObject
It is good practice for your Cucumber step definitions to call high level methods in your your `ScreenObject` instead of
directly accessing and interacting with a screen object's UI elements. You can add high level methods to your `ScreenObject`
class definition for interacting with the UI to hide implementation details, as shown below:
```ruby
class LoginScreen < TestCentricity::ScreenObject
trait(:screen_name) { 'Login' }
trait(:screen_locator) { { accessibility_id: 'login screen' } }
trait(:deep_link) { 'mydemoapprn://login' }
# Login screen UI elements
labels username_label: { accessibility_id: 'Username'},
password_label: { xpath: '(//XCUIElementTypeStaticText[@name="Password"])[1]'},
username_error: { accessibility_id: 'Username-error-message' },
password_error: { accessibility_id: 'Password-error-message' },
generic_error: { accessibility_id: 'generic-error-message' }
textfields username_field: { accessibility_id: 'Username input field' },
password_field: { accessibility_id: 'Password input field' }
button :login_button, { accessibility_id: 'Login button' }
def verify_screen_ui
ui = {
header_label => { visible: true, caption: 'Login' },
username_label => { visible: true, caption: 'Username' },
username_field => { visible: true, enabled: true },
password_label => { visible: true, caption: 'Password' },
password_field => { visible: true, enabled: true },
login_button => { visible: true, enabled: true, caption: 'Login' }
}
verify_ui_states(ui)
end
def login(username, password)
fields = {
username_field => username,
password_field => password
}
populate_data_fields(fields)
login_button.tap
end
def verify_entry_error(reason)
ui = case reason.gsub(/\s+/, '_').downcase.to_sym
when :invalid_password, :invalid_user
{ generic_error => { visible: true, caption: 'Provided credentials do not match any user in this service.' } }
when :locked_account
{ generic_error => { visible: true, caption: 'Sorry, this user has been locked out.' } }
when :no_username
{ username_error => { visible: true, caption: 'Username is required' } }
when :no_password
{ password_error => { visible: true, caption: 'Password is required' } }
else
raise "#{reason} is not a valid selector"
end
verify_ui_states(ui)
end
end
```
Once your `ScreenObject` has been instantiated, you can call your methods as shown below:
```ruby
login_screen.login('snicklefritz', 'Pa55w0rd')
login_screen.verify_entry_error('invalid user')
```
### Loading your App's ScreenObjects using Deeplinks
Users typically move between an app's screens (or a web portal's pages) by interacting with various navigation metaphors,
usually by tapping on buttons or links, or making selections from menu, grid, carousel, or list items. When testing web
interfaces using automated tests, time consuming interactions with the user interface can usually be reduced by using URLs
to quickly load pages without following a strict workflow.
Being able to use a combination of public or private APIs and URLs to bypass the time consuming interactions with a user
interface that may be undergoing refactoring during ongoing development (and which could lead to test failures due to bugs
in the new UI) can result in significant reduction in test execution time. While all UI interactions should be comprehensively
tested, most of the repetitive time intensive UI workflow interactions required to establish a stable base state for testing
downstream functionality can be avoided by leveraging testability "shortcuts" provided by your app's developers.
For example, in order to verify the functionality of finalizing the purchase of products via an ecommerce app or web portal,
a typical workflow might require a user to search for products to purchase, select product specific options (color, size,
quantity, etc.), add the products to a shopping cart, and log in to their account before they can finalize the purchase.
By utilizing developer provided APIs, URLs, or deeplinks, test execution time can be greatly reduced.
The `ScreenObject.load_screen` method is used to load a screen using its defined `deep_link` trait. When testing on physical
iOS devices running iOS/iPadOS versions earlier than version 16.4, deep links can only be opened by sending the deeplink URL
to the mobile Safari web browser, and then accepting the confirmation modal that pops up. The `load_screen` method handles
invoking deeplinks on Android and iOS/iPadOS simulators and physical devices.
Refer to the [Speeding Up Tests With Deep Links](https://appiumpro.com/editions/7-speeding-up-tests-with-deep-links) post on [AppiumPro](https://appiumpro.com/) for more information about deeplinks.
---
## ScreenSections
A `ScreenSection` is a collection of **UI Elements** that may appear in multiple locations on a screen, or on multiple
screens in an app. It is a collection of **UI Elements** that represent a conceptual area of functionality, like a menu,
a navigation bar, or a search capability. **UI Elements** and functional behavior are confined to the scope of a `ScreenSection`
object. A `ScreenSection` may contain other `ScreenSection` objects.
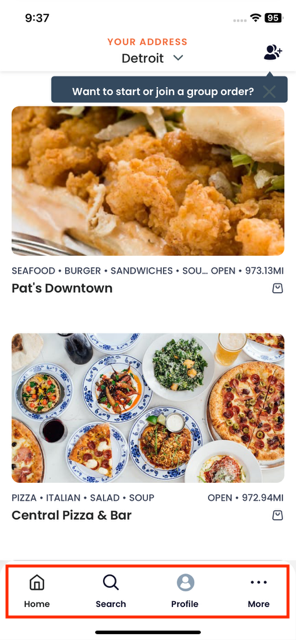
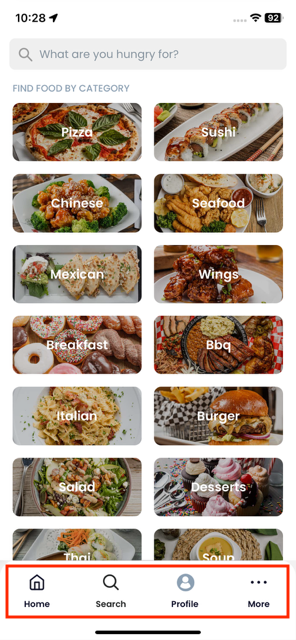
Below is an example of a footer navigation bar feature that is common to multiple screen -
### Defining a ScreenSection
Your `ScreenSection` class definitions should be contained within individual `.rb` files in the `features/support//sections`
folder of your test automation project, where `` is typically `mac`, `ios`, or `android`. For each screen section in your
app, you will typically have to define a `ScreenSection` for each platform version of your app.
📁 my_automation_project
├── 📁 config
├── 📁 features
│ ├── 📁 step_definitions
│ ├── 📁 support
│ │ ├── 📁 android
| | | ├── 📁 screens
| | | └── 📁 sections
│ │ ├── 📁 ios
| | | ├── 📁 screens
| | | └── 📁 sections
│ │ ├── mac
| | | ├── 📁 screens
| | | └── 📁 sections
│ │ ├── 📄 env.rb
│ │ └── 📄 hooks.rb
├── 📄 Gemfile
└── 📄 README.md
You define a new `ScreenSection` as shown below:
```ruby
class NavMenu < TestCentricity::ScreenSection
end
```
### Adding Traits to a ScreenSection
A `ScreenSection` typically has a root node object that encapsulates a collection of `UIElements`. The `section_locator`
trait specifies the CSS or Xpath expression that uniquely identifies that root node object.
You define your section's **Traits** as shown below:
```ruby
class NavMenu < TestCentricity::ScreenSection
trait(:section_name) { 'Nav Menu' }
trait(:section_locator) { { xpath: '//XCUIElementTypeScrollView' } }
end
```
### Adding UI Elements to your ScreenSection
A `ScreenSection` is typically made up of UI elements like text fields, check boxes, switches, lists, buttons, etc. **UI
Elements** are added to your `ScreenSection` class definition as shown below:
```ruby
class NavMenu < TestCentricity::ScreenSection
trait(:section_name) { 'Nav Menu' }
trait(:section_locator) { { xpath: '//XCUIElementTypeScrollView' } }
# Nav Menu UI elements
buttons close_button: { accessibility_id: 'close menu' },
webview_button: { accessibility_id: 'menu item webview' },
qr_code_button: { accessibility_id: 'menu item qr code scanner' },
geo_location_button: { accessibility_id: 'menu item geo location' },
drawing_button: { accessibility_id: 'menu item drawing' },
report_a_bug_button: { accessibility_id: 'menu item report a bug' },
about_button: { accessibility_id: 'menu item about' },
reset_app_button: { accessibility_id: 'menu item reset app' },
biometrics_button: { accessibility_id: 'menu item biometrics' },
log_in_button: { accessibility_id: 'menu item log in' },
log_out_button: { accessibility_id: 'menu item log out' },
api_calls_button: { accessibility_id: 'menu item api calls' },
sauce_video_button: { accessibility_id: 'menu item sauce bot video' }
end
```
### Adding Methods to your ScreenSection
You can add methods to your `ScreenSection` class definition, as shown below:
```ruby
class NavMenu < TestCentricity::ScreenSection
trait(:section_name) { 'Nav Menu' }
trait(:section_locator) { { xpath: '//XCUIElementTypeScrollView' } }
# Nav Menu UI elements
buttons close_button: { accessibility_id: 'close menu' },
webview_button: { accessibility_id: 'menu item webview' },
qr_code_button: { accessibility_id: 'menu item qr code scanner' },
geo_location_button: { accessibility_id: 'menu item geo location' },
drawing_button: { accessibility_id: 'menu item drawing' },
report_a_bug_button: { accessibility_id: 'menu item report a bug' },
about_button: { accessibility_id: 'menu item about' },
reset_app_button: { accessibility_id: 'menu item reset app' },
biometrics_button: { accessibility_id: 'menu item biometrics' },
log_in_button: { accessibility_id: 'menu item log in' },
log_out_button: { accessibility_id: 'menu item log out' },
api_calls_button: { accessibility_id: 'menu item api calls' },
sauce_video_button: { accessibility_id: 'menu item sauce bot video' }
def verify_ui
ui = {
self => { visible: true },
close_button => { visible: true, enabled: true },
webview_button => { visible: true, enabled: true, caption: 'Webview' },
qr_code_button => { visible: true, enabled: true, caption: 'QR Code Scanner' },
geo_location_button => { visible: true, enabled: true, caption: 'Geo Location' },
drawing_button => { visible: true, enabled: true, caption: 'Drawing' },
report_a_bug_button => { visible: true, enabled: true, caption: 'Report A Bug' },
about_button => { visible: true, enabled: true, caption: 'About' },
reset_app_button => { visible: true, enabled: true, caption: 'Reset App State' },
biometrics_button => { visible: true, enabled: true, caption: 'FaceID' },
log_in_button => { visible: true, enabled: true, caption: 'Log In' },
log_out_button => { visible: true, enabled: true, caption: 'Log Out' },
api_calls_button => { visible: true, enabled: true, caption: 'Api Calls' },
sauce_video_button => { visible: true, enabled: true, caption: 'Sauce Bot Video' }
}
verify_ui_states(ui)
end
def close
close_button.click
self.wait_until_hidden(3)
end
def verify_closed
ui = {
self => { visible: true },
close_button => { visible: false }
}
verify_ui_states(ui)
end
end
```
### Adding ScreenSections to your ScreenObject
You add a `ScreenSection` to its associated `ScreenObject` as shown below:
```ruby
class BaseAppScreen < TestCentricity::ScreenObject
# Base App screen UI elements
label :header_label, { accessibility_id: 'container header' }
sections nav_bar: NavBar,
nav_menu: NavMenu
end
```
Once your `ScreenObject` has been instantiated, you can call its `ScreenSection` methods as shown below:
```ruby
base_screen.nav_menu.verify_ui
```
---
## AppUIElements
Native app `ScreenObjects` and `ScreenSections` are typically made up of **UI Element** like text fields, switches, lists,
buttons, etc. **UI Elements** are declared and instantiated within the class definition of the `ScreenObject` or `ScreenSection`
in which they are contained. With TestCentricity, all native app screen UI elements are based on the `AppUIElement` class.
### Declaring and Instantiating AppUIElements
Single `AppUIElement` declarations have the following format:
elementType :elementName, { locator_strategy: locator_identifier }
* The `elementName` is the unique name that you will use to refer to the UI element and is specified as a `Symbol`.
* The `locator_strategy` specifies the selector strategy that Appium will use to find the `AppUIElement`. Valid selectors are:
- `accessibility_id:`
- `id:`
- `name:`
- `class:`
- `xpath:`
- `predicate:` (MacOS and iOS only)
- `class_chain:` (MacOS and iOS only)
- `uiautomator:` (Android only)
- `css:` (WebViews in hybrid mobile apps only).
* The `locator_identifier` is the value or attribute that uniquely and unambiguously identifies the `AppUIElement`.
Refer to [this page](https://github.com/appium/appium-mac2-driver?tab=readme-ov-file#element-location) for information on selector strategies for MacOS.
Refer to [this page](https://appium.github.io/appium-xcuitest-driver/5.12/locator-strategies/) for information on selector strategies for iOS.
Refer to [this page](https://github.com/appium/appium-uiautomator2-driver?tab=readme-ov-file#element-location) for information on selector strategies for Android.
Multiple `AppUIElement` declarations for a collection of elements of the same type can be performed by passing a hash table
containing the names and locators of each individual element.
### Example AppUIElement Declarations
Supported `AppUIElement` elementTypes and their declarations have the following format:
*Single element declarations:*
```ruby
class SampleScreen < TestCentricity::ScreenObject
button :button_name, { locator_strategy: locator_identifier }
textfield :field_name, { locator_strategy: locator_identifier }
checkbox :checkbox_name, { locator_strategy: locator_identifier }
radio :radio_name, { locator_strategy: locator_identifier }
label :label_name, { locator_strategy: locator_identifier }
list :list_name, { locator_strategy: locator_identifier }
selectlist :selectlist_name, { locator_strategy: locator_identifier }
image :image_name, { locator_strategy: locator_identifier }
switch :switch_name, { locator_strategy: locator_identifier }
element :element_name, { locator_strategy: locator_identifier }
alert :alert_name, { locator_strategy: locator_identifier }
menu :menu_name, { locator_strategy: locator_identifier }
menubar :menubar_name, { locator_strategy: locator_identifier }
table :table_name, { locator_strategy: locator_identifier }
end
```
*Multiple element declarations:*
```ruby
class SampleScreen < TestCentricity::ScreenObject
buttons button_1_name: { locator_strategy: locator_identifier },
button_2_name: { locator_strategy: locator_identifier },
button_X_name: { locator_strategy: locator_identifier }
textfields field_1_name: { locator_strategy: locator_identifier },
field_2_name: { locator_strategy: locator_identifier },
field_X_name: { locator_strategy: locator_identifier }
checkboxes check_1_name: { locator_strategy: locator_identifier },
check_2_name: { locator_strategy: locator_identifier },
check_X_name: { locator_strategy: locator_identifier }
radios radio_1_name: { locator_strategy: locator_identifier },
radio_2_name: { locator_strategy: locator_identifier }
lists list_1_name: { locator_strategy: locator_identifier },
list_X_name: { locator_strategy: locator_identifier }
selectlists menu_1_name: { locator_strategy: locator_identifier },
menu_X_name: { locator_strategy: locator_identifier }
labels label_1_name: { locator_strategy: locator_identifier },
label_X_name: { locator_strategy: locator_identifier }
images image_1_name: { locator_strategy: locator_identifier },
image_X_name: { locator_strategy: locator_identifier }
alerts alert_1_name: { locator_strategy: locator_identifier },
alert_X_name: { locator_strategy: locator_identifier }
tables table_1_name: { locator_strategy: locator_identifier },
table_X_name: { locator_strategy: locator_identifier }
end
```
Refer to the Class List documentation for the `ScreenObject` and `ScreenSection` classes for details on the class methods
used for declaring and instantiating `AppUIElements`. Examples of UI element declarations can be found in the ***Adding
UI Elements to your ScreenObject*** and ***Adding UI Elements to your ScreenSection*** sections above.
### AppUIElement Inherited Methods
With TestCentricity, all native app UI elements are based on the `AppUIElement` class, and inherit the following methods:
**Action methods:**
element.click
element.tap
element.double_tap
element.long_press
element.scroll_into_view
element.drag_by(right_offset, down_offset)
element.drag_and_drop(target)
element.swipe_gesture(direction, distance)
**Object state methods:**
element.exists?
element.visible?
element.hidden?
element.enabled?
element.disabled?
element.selected?
element.tag_name
element.width
element.height
element.x_loc
element.y_loc
element.count
element.get_attribute(attrib)
element.identifier (MacOS only)
**Waiting methods:**
element.wait_until_exists(seconds)
element.wait_until_gone(seconds)
element.wait_until_visible(seconds)
element.wait_until_hidden(seconds)
element.wait_until_enabled(seconds)
element.wait_until_value_is(value, seconds)
element.wait_until_value_changes(seconds)
### Populating your ScreenObject or ScreenSection with data
A typical automated test may be required to perform the entry of test data by interacting with various `AppUIElements` on
your `ScreenObject` or `ScreenSection`. This data entry can be performed using the various object action methods (listed
above) for each `AppUIElement` that needs to be interacted with.
The `ScreenObject.populate_data_fields` and `ScreenSection.populate_data_fields` methods support the entry of test data
into a collection of `AppUIElements`. The `populate_data_fields` method accepts a hash containing key/hash pairs of
`AppUIElements` and their associated data to be entered. Data values must be in the form of a `String` for `textfield`
controls. For `checkbox`, `radio`, and `switch` controls, data must either be a `Boolean` or a `String` that evaluates to
a `Boolean` value ('Yes', 'No', '1', '0', 'true', 'false').
The `populate_data_fields` method verifies that data attributes associated with each `AppUIElement` is not `nil` or `empty`
before attempting to enter data into the `AppUIElement`.
The optional `wait_time` parameter is used to specify the time (in seconds) to wait for each `AppUIElement` to become
viable for data entry (the `AppUIElement` must be visible and enabled) before entering the associated data value. This
option is useful in situations where entering data, or setting the state of a `AppUIElement` might cause other `AppUIElements`
to become visible or active. Specifying a wait_time value ensures that the subsequent `AppUIElements` will be ready to
be interacted with as states are changed. If the wait time is `nil`, then the default wait time will be 5 seconds.
If any of the specified UI elements are not currently visible, the `populate_data_fields` method will attempt to scroll
the UI object in view on the vertical axis (down, then up).
```ruby
def enter_data(user_data)
fields = {
first_name_field => user_data.first_name,
last_name_field => user_data.last_name,
email_field => user_data.email,
phone_number_field => user_data.phone_number
}
populate_data_fields(fields, wait_time = 2)
end
```
### Verifying AppUIElements on your ScreenObject or ScreenSection
A typical automated test executes one or more interactions with the user interface, and then performs a validation to
verify whether the expected state of the UI has been achieved. This verification can be performed using the various object
state methods(listed above) for each `AppUIElement` that requires verification. Depending on the complexity and number of
`AppUIElements` to be verified, the code required to verify the presence of `AppUIElements` and their correct states can
become cumbersome.
The `ScreenObject.verify_ui_states` and `ScreenSection.verify_ui_states` methods support the verification of multiple
properties of multiple UI elements on a `ScreenObject` or `ScreenSection`. The `verify_ui_states` method accepts a hash
containing key/hash pairs of UI elements and their properties or attributes to be verified.
```ruby
ui = {
object1 => { property: expected_state },
object2 => { property1: expected_state, property2: expected_state },
object3 => { property: expected_state }
}
verify_ui_states(ui)
```
The `verify_ui_states` method automatically scrolls UI elements that are expected to be visible into view. Auto-scrolling
only occurs on the vertical axis (down, then up). Setting the `auto_scroll` parameter to `false` prevents automatic scrolling
from occurring.
The `verify_ui_states` method queues up any exceptions that occur while verifying each object's properties until all
`AppUIElements`and their properties have been checked, and then posts any exceptions encountered upon completion. Posted
exceptions include a screenshot of the screen where expected results did not match actual results.
The `verify_ui_states` method supports the following property/state pairs:
**All Objects:**
:exists Boolean
:enabled Boolean
:disabled Boolean
:visible Boolean
:hidden Boolean
:width Integer
:height Integer
:x Integer
:y Integer
:count Integer
:value String
:caption String
:attribute Hash
:class String
**Text Fields:**
:placeholder String
:readonly Boolean (WebViews only)
:maxlength Integer (WebViews only)
**Checkboxes and Switches:**
:checked Boolean
**Radio Buttons:**
:selected Boolean
**Lists and SelectLists**
:items Array of Strings
:itemcount Integer
**Menu Bars**
:items Array of Strings
:itemcount Integer
**Menus**
:items Array of Strings
:itemcount Integer
:item_data Array of Hash
**Tables**
:rowcount Integer
:columncount Integer
:columnheaders Array of String
:cell Hash
:row Hash
:column Hash
#### Comparison States
The `verify_ui_states` method supports comparison states using property/comparison state pairs:
object => { property: { comparison_state: value } }
Comparison States:
:lt or :less_than Integer or String
:lt_eq or :less_than_or_equal Integer or String
:gt or :greater_than Integer or String
:gt_eq or :greater_than_or_equal Integer or String
:starts_with String
:ends_with String
:contains String
:not_contains or :does_not_contain Integer or String
:not_equal Integer, String, or Boolean
#### I18n Translation Validation
The `verify_ui_states` method also supports I18n string translations using property/I18n key name pairs:
object => { property: { translate_key: 'name of key in I18n compatible .yml file' } }
**I18n Translation Keys:**
:translate String
:translate_upcase String
:translate_downcase String
:translate_capitalize String
:translate_titlecase String
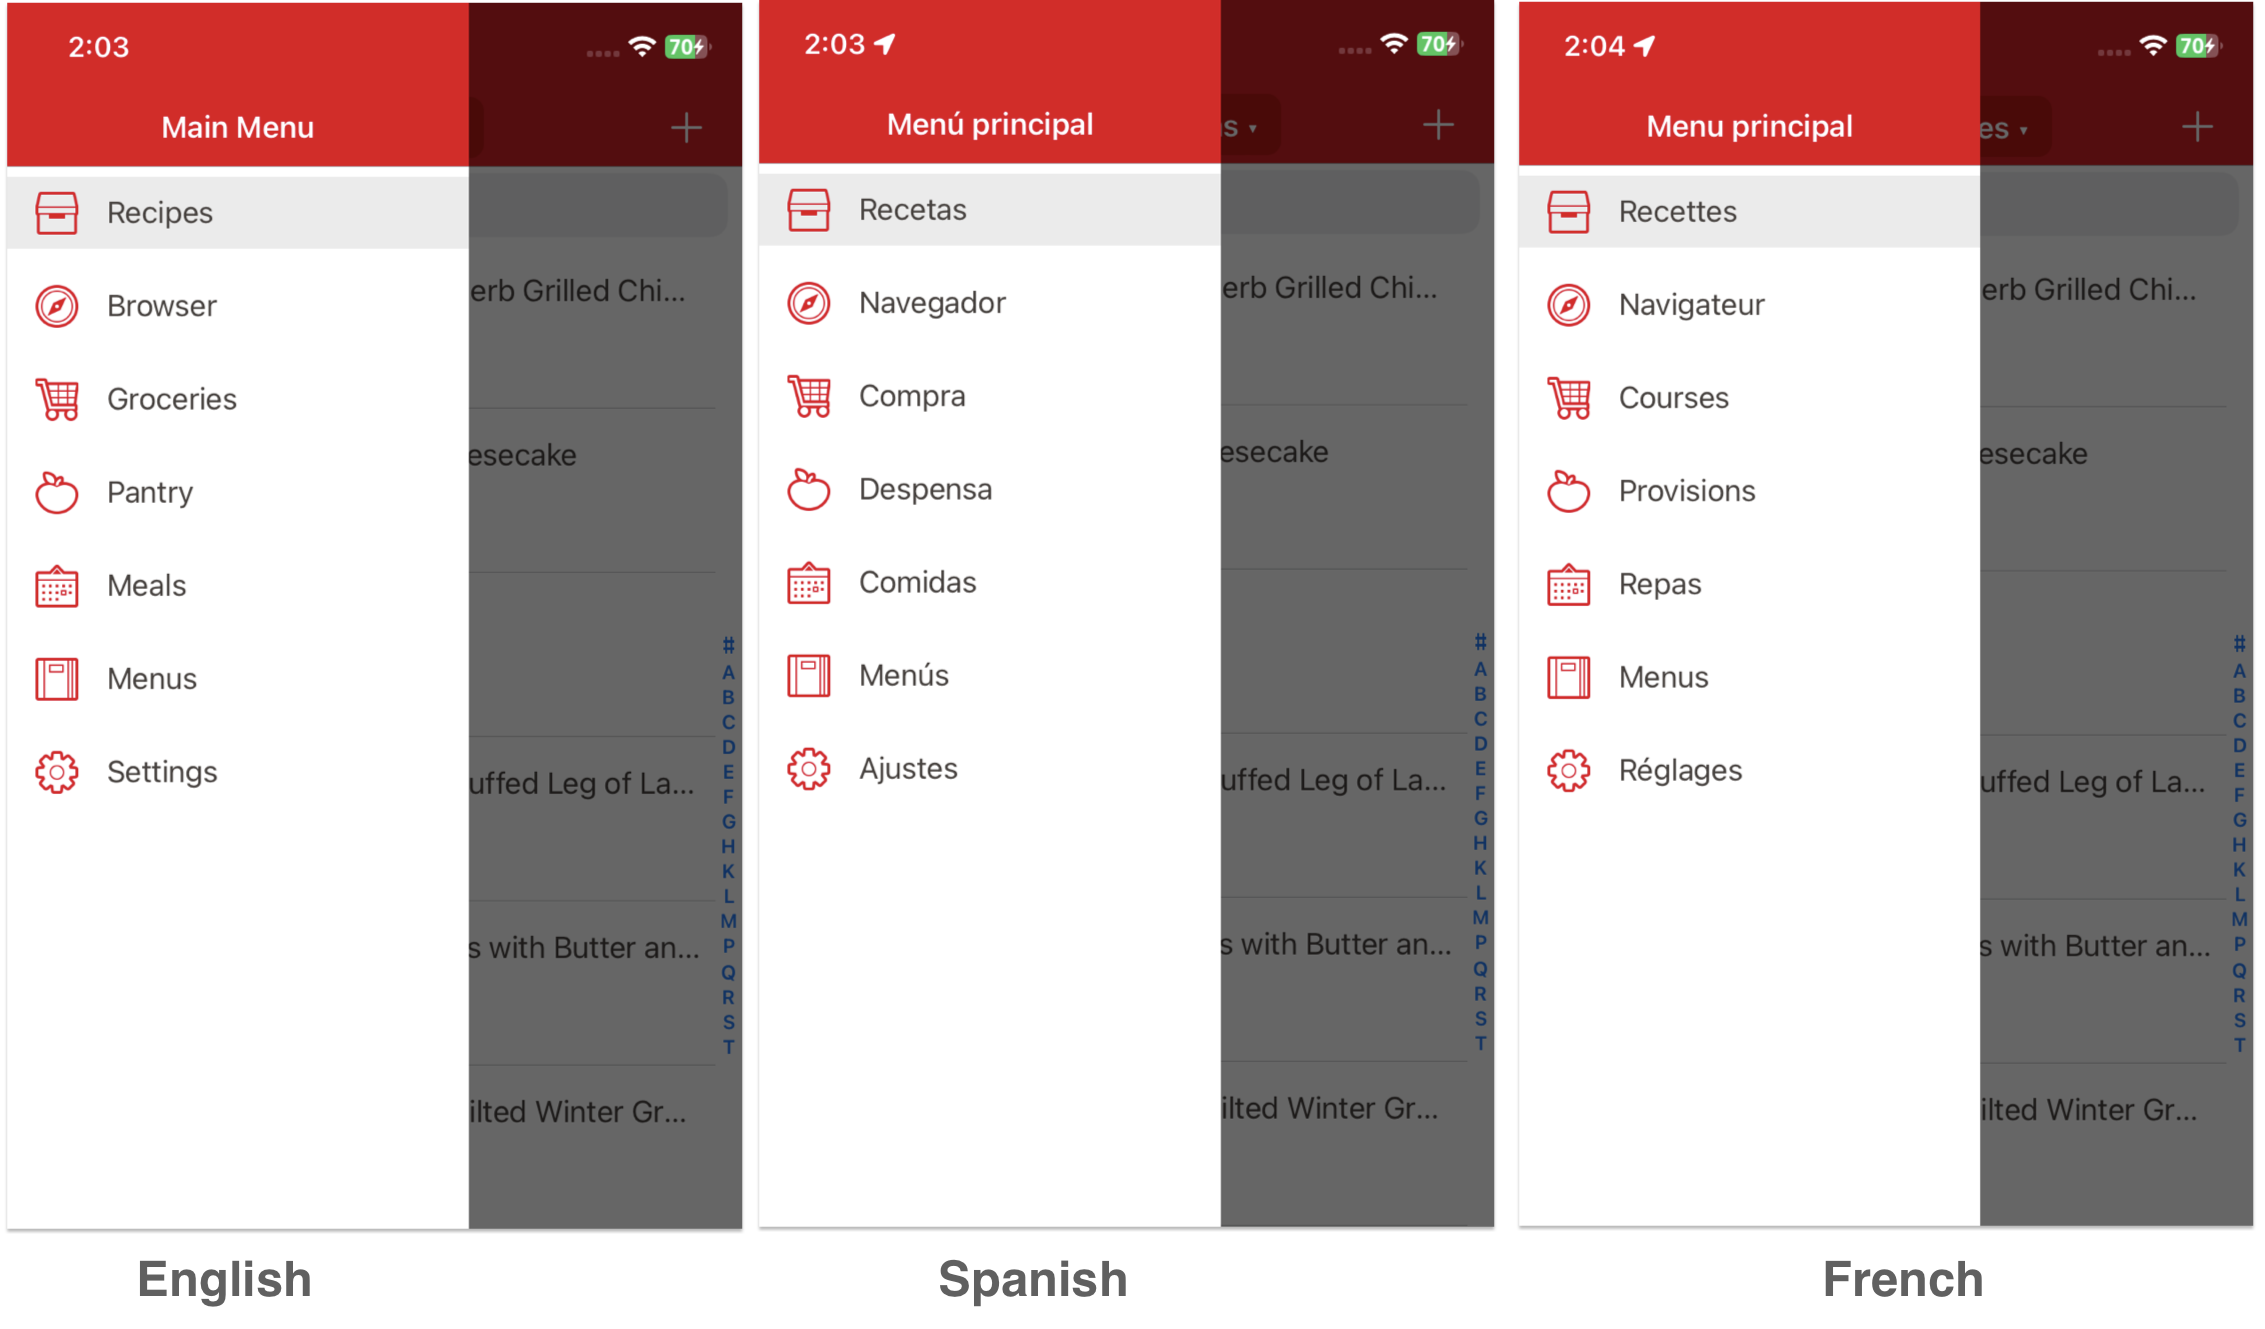
The example below depicts the usage of the `verify_ui_states` method to verify that the captions for navigation menu items
are correctly translated.
```ruby
def verify_menu
ui = {
menu_title => {
visible: true,
caption: { translate: 'NavMenu.title' }
},
recipes_item => {
visible: true,
caption: { translate: 'NavMenu.recipes' }
},
browser_item => {
visible: true,
caption: { translate: 'NavMenu.browser' }
},
groceries_item => {
visible: true,
caption: { translate: 'NavMenu.groceries' }
},
pantry_item => {
visible: true,
caption: { translate: 'NavMenu.pantry' }
},
meals_item => {
visible: true,
caption: { translate: 'NavMenu.meals' }
},
menus_item => {
visible: true,
caption: { translate: 'NavMenu.menus' }
},
settings_item => {
visible: true,
caption: { translate: 'NavMenu.settings' }
}
}
verify_ui_states(ui)
end
```
I18n `.yml` files contain key/value pairs representing the name of a translated string (key) and the string value. For the
menu example above, the translated strings for English, Spanish, and French are represented below:
**English** - `en.yml`
```yaml
en:
NavMenu:
title: 'Main Menu'
recipes: 'Recipes'
browser: 'Browser'
groceries: 'Groceries'
pantry: 'Pantry'
meals: 'Meals'
menus: 'Menus'
settings: 'Settings'
```
**Spanish** - `es.yml`
```yaml
es:
NavMenu:
title: 'Menú principal'
recipes: 'Recetas'
browser: 'Navegador'
groceries: 'Compra'
pantry: 'Despensa'
meals: 'Comidas'
menus: 'Menús'
settings: 'Ajustes'
```
**French** - `fr.yml`
```yaml
fr:
NavMenu:
title: 'Menu principal'
recipes: 'Recettes'
browser: 'Navigateur'
groceries: 'Courses'
pantry: 'Provisions'
meals: 'Repas'
menus: 'Menus'
settings: 'Réglades'
```
Each supported language/locale combination has a corresponding `.yml` file. I18n `.yml` file naming convention uses
[ISO-639 language codes and ISO-3166 country codes](https://docs.oracle.com/cd/E13214_01/wli/docs92/xref/xqisocodes.html). For example:
| Language (Country) | File name |
|-----------------------|-----------|
| English | en.yml |
| English (Australia) | en-AU.yml |
| English (Canada) | en-CA.yml |
| French | fr.yml |
| French (Canada) | fr-CA.yml |
| Spanish | es.yml |
| German | de.yml |
| Portuguese (Brazil) | pt-BR.yml |
| Portuguese (Portugal) | pt-PT.yml |
Baseline translation strings are stored in `.yml` files in the `config/locales/` folder.
📁 my_automation_project/
├── 📁 config/
│ ├── 📁 locales/
│ │ ├── 📄 en.yml
│ │ ├── 📄 en-AU.yml
│ │ ├── 📄 es.yml
│ │ ├── 📄 de.yml
│ │ ├── 📄 fr.yml
│ │ ├── 📄 fr-CA.yml
│ │ ├── 📄 pt-BR.yml
│ │ └── 📄 pt-PT.yml
│ ├── 📁 test_data/
│ └── 📄 cucumber.yml
├── 📁 downloads/
├── 📁 features/
├── 📄 Gemfile
└── 📄 README.md
### Working With Custom AppUIElements
#### Vertical Scrolling ListView
`AppUIElements` like ListViews (`AppList` class) are typically made up of multiple composite UI component types, which will
be different for iOS vs. Android mobile platforms. Below is an example of the vertical scrolling ListView implementations
for a cross-platform application implemented using React Native (iOS version on the left, Android version on the right).
Each ListView contains 30 items:
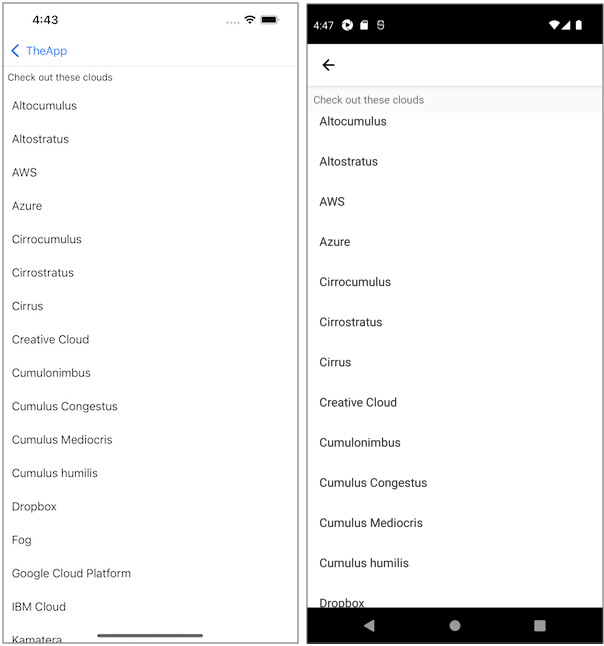
While the iOS and Android ListViews appear to be identical in the app, performing an inspection of each application's GUI
using Appium Inspector reveals differences in the object hierarchy as depicted below (iOS version on left, Android version
on the right):
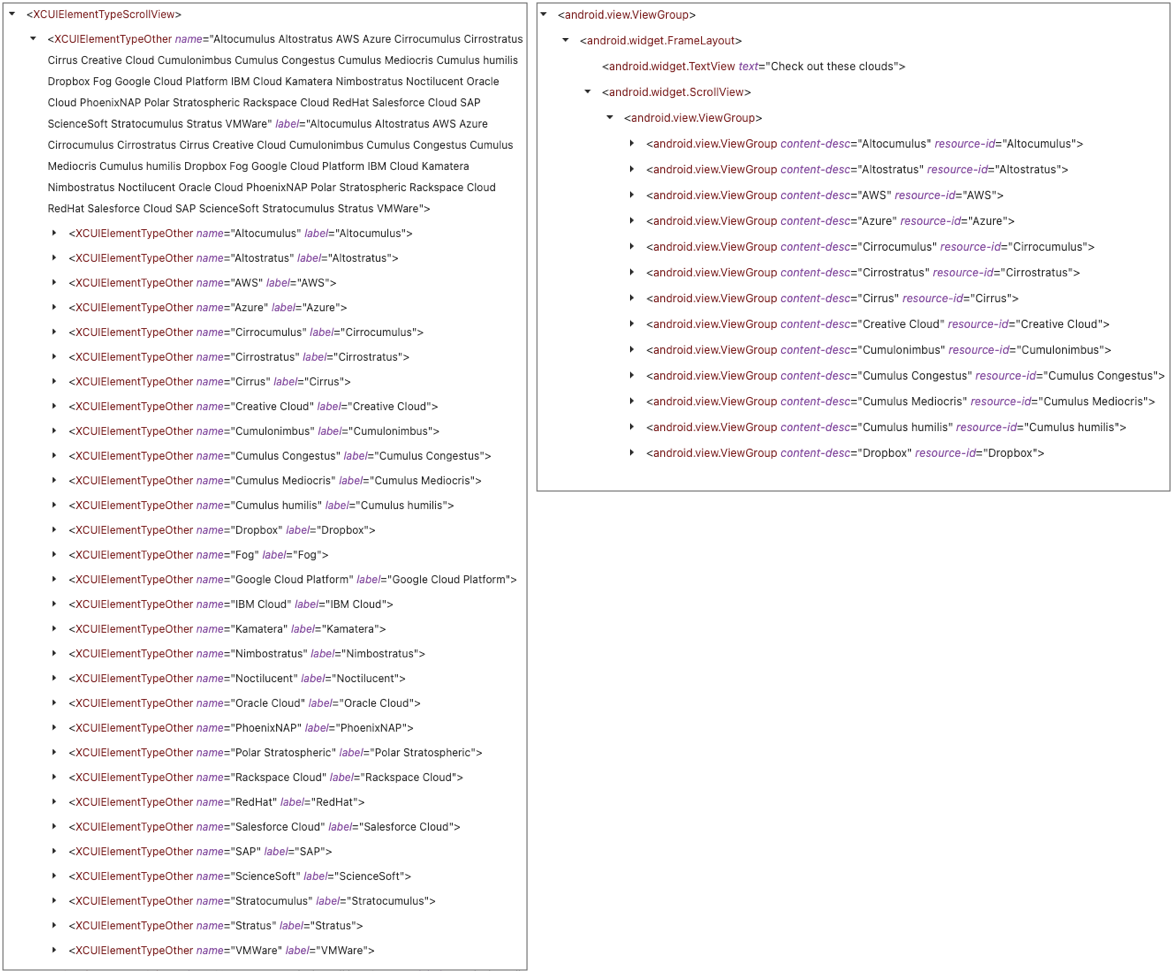
The inspection of the ListView object hierarchy reveals that for the iOS version of the app, list items are made up of
`XCUIElementTypeOther` objects, and that for the Android version of the app, list items are made up of `android.view.ViewGroup`
objects.
The other, more notable difference is that while the iOS inspection shows all 30 list items, only 13 list items are shown
in the inspection of the Android app, which corresponds to the list items that are visible on the Android device screen.
When testing Android apps using the `UiAutomator2` driver for Appium, UI objects that are not displayed on screen cannot
be detected by Appium Inspector or by Appium based frameworks until the objects are scrolled into view.
The `AppList.define_list_elements` method provides a means of specifying the objects that make up the list item components
of an `AppList` control, and the axis in which scrolling of the list items occurs. The method accepts a hash that can contain
up to two key-value pairs. Valid key designators are `:list_item`and `:scrolling`. The `AppList.define_list_elements` method
is typically called in the `initialize` method of the `ScreenObject` or `ScreenSection` that contains the associated `AppList`
control.
The code snippets below demonstrate the use of the `AppList.define_list_elements` method in the `CloudListScreen` screen
object's `initialize` method to define the list item components that make up the Clouds vertical scrolling ListView from
the above examples. It is not necessary to specify the scroll axis in the code below, as `:vertical` is the default scroll
axis that is set when instantiating an `AppList` element.
iOS Cloud List `ScreenObject`
```ruby
class CloudListScreen < TestCentricity::ScreenObject
trait(:screen_name) { 'Cloud List' }
trait(:screen_locator) { { class_chain: '**/XCUIElementTypeWindow/XCUIElementTypeOther/XCUIElementTypeOther/XCUIElementTypeOther' } }
# Cloud List screen UI elements
list :cloud_list, { class_chain: '**/XCUIElementTypeScrollView/XCUIElementTypeOther' }
def initialize
super
# define the list item element for the Cloud list object
list_spec = { list_item: { class: 'XCUIElementTypeOther' } }
cloud_list.define_list_elements(list_spec)
end
end
```
Android CloudListScreen `ScreenObject`
```ruby
class CloudListScreen < TestCentricity::ScreenObject
trait(:screen_name) { 'Cloud List' }
trait(:screen_locator) { { xpath: '//android.widget.FrameLayout[@resource-id="android:id/content"]/android.view.ViewGroup' } }
# Cloud List screen UI elements
list :cloud_list, { xpath: '//android.widget.ScrollView/android.view.ViewGroup' }
def initialize
super
# define the list item element for the Cloud list object
list_spec = { list_item: { class: 'android.view.ViewGroup' } }
cloud_list.define_list_elements(list_spec)
end
end
```
#### Horizontal Scrolling ListView
Below is an example of a horizontal scrolling "Carousel" style ListView implementations on the Swipe screen of a cross-platform
application. Each ListView contains 6 list items.
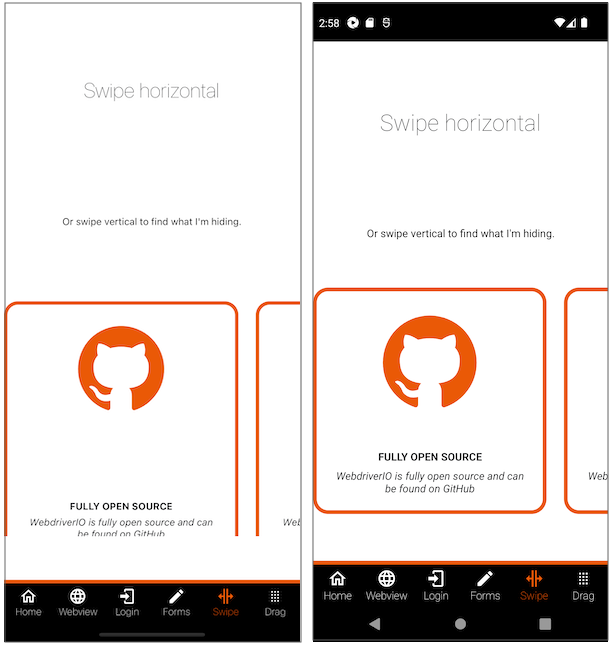
While the iOS and Android ListViews appear to be identical in the app, performing an inspection of each application's GUI
using Appium Inspector reveals differences in the object hierarchy as depicted below (iOS version on left, Android version
on the right):
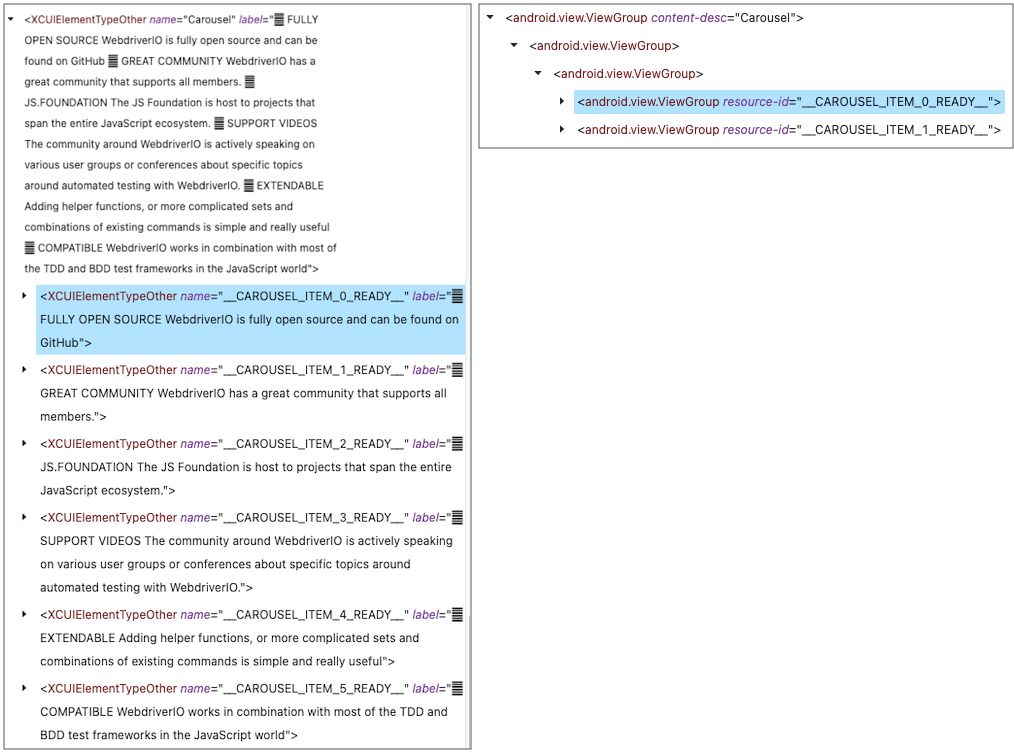
As in the previous example for the vertical scrolling ListView, the inspection of the Carousel ListView object hierarchy
reveals that for the iOS version of the app, list items are again made up of `XCUIElementTypeOther` objects, and that for
the Android version of the app, list items are again made up of `android.view.ViewGroup` objects.
As in the previous examples, the iOS inspection shows all 6 list items, while only 2 list items are shown in the inspection
of the Android app, which corresponds to the list items that are visible on the Android device screen.
The code snippets below demonstrate the use of the `AppList.define_list_elements` method in the `SwipeScreen` screen object's
`initialize` method to define the scroll axis and list item components that make up the Carousel horizontal scrolling ListView
from the above examples.
iOS Swipe `ScreenObject`
```ruby
class SwipeScreen < TestCentricity::ScreenObject
trait(:screen_name) { 'Swipe' }
trait(:screen_locator) { { accessibility_id: 'Swipe-screen' } }
# Swipe screen UI elements
list :carousel_list, { accessibility_id: 'Carousel' }
def initialize
super
# define the list item element for the Carousel list object
list_spec = {
list_item: { xpath: '//XCUIElementTypeOther[contains(@name, "__CAROUSEL_ITEM_")]' },
scrolling: :horizontal
}
carousel_list.define_list_elements(list_spec)
end
end
```
Android Swipe `ScreenObject`
```ruby
class SwipeScreen < TestCentricity::ScreenObject
trait(:screen_name) { 'Swipe' }
trait(:screen_locator) { { accessibility_id: 'Swipe-screen' } }
# Swipe screen UI elements
list :carousel_list, { accessibility_id: 'Carousel' }
def initialize
super
# define the list item element for the Carousel list object
list_spec = {
list_item: { xpath: '//android.view.ViewGroup[contains(@resource-id, "__CAROUSEL_ITEM_")]' },
scrolling: :horizontal
}
carousel_list.define_list_elements(list_spec)
end
end
```
#### Popup and PickerWheel Style ListViews
Below is an example of a PickerWheel (iOS) and Popup (Android) style ListView implementations on the Form Components screen
of a cross-platform application.
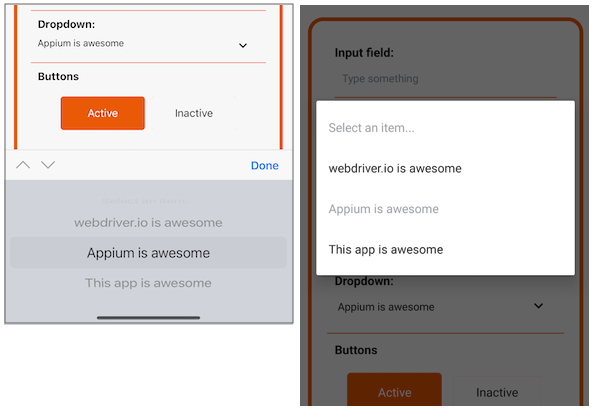
Performing an inspection of each application's GUI using Appium Inspector reveals differences in the object hierarchy as
depicted below (iOS version on left, Android version on the right):
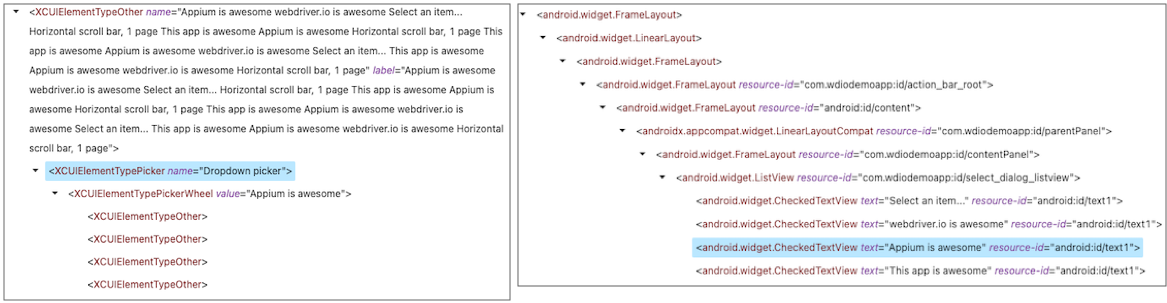
The inspection of the PickerWheel and Popup ListView object hierarchies reveals that for the iOS version of the app, list
items are again made up of `XCUIElementTypeOther` objects, and that for the Android version of the app, list items are made
up of `android.widget.CheckedTextView` objects.
However, `XCUIElementTypePickerWheel` controls present testability challenges with Appium, as the `XCUIElementTypeOther`
objects that comprise the individual list items cannot be reliably interacted with or validated. When inspecting each of
the `XCUIElementTypeOther` list items of the `XCUIElementTypePickerWheel` control, there are no `text`, `accessibility_id`,
`label`, or `value` element attributes available which could be used to determine whether the correct caption strings are
displayed for each list item. The `AppList.get_item_count` or `get_list_items` methods do not support `XCUIElementTypePickerWheel`
controls, and will raise an exception if called for such a control.
For the Android version of the app, the `android.widget.CheckedTextView` list items can be interacted with and validated,
as the `text` element attribute for each list item are visible in the inspection.
The code snippet below demonstrate the use of the `AppList.define_list_elements` method in the `FormScreen` screen object's
`initialize` method to define the list item components that make up the Android Popup style ListView from the above example.
Android FormScreen `ScreenObject`
```ruby
class FormScreen < TestCentricity::ScreenObject
trait(:screen_name) { 'Form' }
trait(:screen_locator) { { accessibility_id: 'Forms-screen' } }
# Form screen UI elements
list :drop_down_menu, { id: 'com.wdiodemoapp:id/select_dialog_listview' }
def initialize
super
# define the list item element for the drop-down list object
list_spec = { list_item: { class: 'android.widget.CheckedTextView' } }
drop_down_menu.define_list_elements(list_spec)
end
end
```
#### Table AppUIElements
The basic iOS or MacOS `AppTable` element is typically composed of the parent `XCUIElementTypeTable` object, containing
one or more rows (`XCUIElementTypeTableRow`), and containing one or more columns (`XCUIElementTypeTableColumn`). Tables
can also include an optional header (`XCUIElementTypeGroup`) containing one or more header cells (`XCUIElementTypeButton`).
Table cells are typically embedded in each parent row object, and are implemented using a parent `XCUIElementTypeCell`
with a child `XCUIElementTypeStaticText` object that provides access to the text content of the table cell.
As such, when an iOS or MacOS `AppTable` element is instantiated in a `ScreenObject` or `ScreenSection`, the table's component
objects and their locator strategies are defined as follows:
```ruby
{
table_row: { class: 'XCUIElementTypeTableRow' },
table_column: { class: 'XCUIElementTypeTableColumn' },
table_cell: { class_chain: '**/XCUIElementTypeCell/XCUIElementTypeStaticText' },
table_header: { class: 'XCUIElementTypeGroup' },
table_header_cell: { class: 'XCUIElementTypeButton' }
}
```
An example of this table implementation in the MacOS Shortcuts app, and its object hierarchy as viewed by Appium Inspector,
is depicted below:
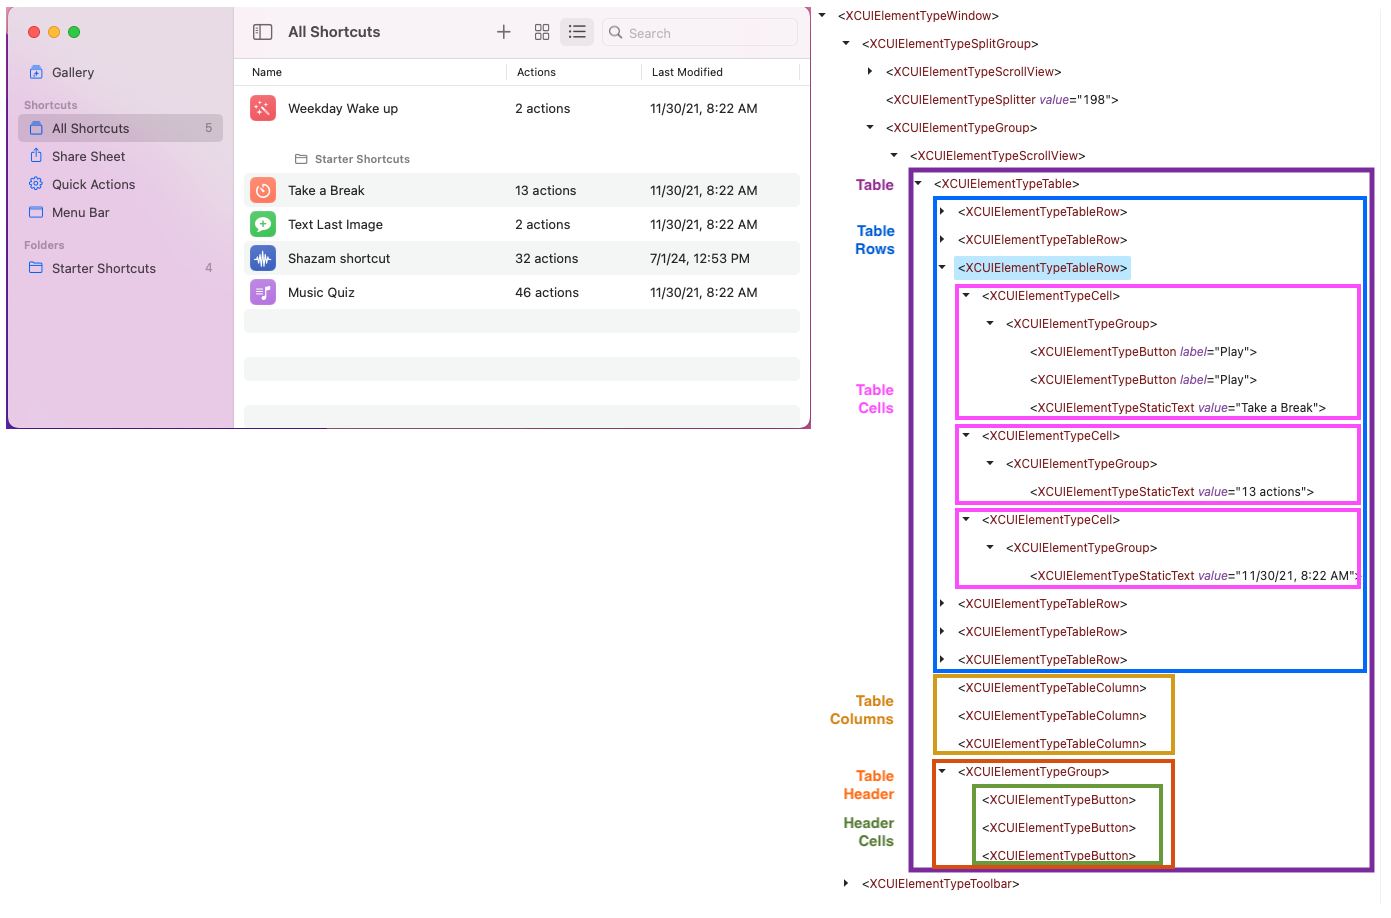
The above table object hierarchy for the Shortcuts table shows that access to the text content of the table's cells will
fail using the typical implementation of `XCUIElementTypeCell/XCUIElementTypeStaticText` cell objects. This is due to the
presence of an `XCUIElementTypeGroup` object between the `XCUIElementTypeCell` parent object and the `XCUIElementTypeStaticText`
cell text caption object.
The `AppTable.define_table_elements` method provides a means of specifying the various elements that make up the key
components of an `AppTable` object, or for overriding the default component locator strategy. The method accepts a hash
of table component designators (key) and a locator strategy (value) for identifying the component in the `AppTable` object
hierarchy.
Valid table component designators are:
* `table_row:`
* `table_column:`
* `table_cell:`
* `table_header:`
* `table_header_cell:`
Valid component `locator_strategy` are:
* `class:`
* `xpath:`
* `predicate:` (MacOS and iOS only)
* `class_chain:` (MacOS and iOS only)
If you were developing automated tests for the MacOS Shortcuts app, your `ShortcutsAppScreen` screen object's `initialize`
method would use the `AppTable.define_table_elements` method to define the locator strategy for the `table_cell` component.
```ruby
class ShortcutsAppScreen < TestCentricity::ScreenObject
trait(:screen_name) { 'Shortcuts' }
trait(:screen_locator) { { class_chain: '**/XCUIElementTypeWindow' } }
# Shortcuts screen UI elements
tables sidebar_table: { predicate: 'identifier == "library.sidebar"' },
view_table: { predicate: 'identifier == "view.library.table"' }
def initialize
super
# define the cell element for the Shortcuts table object
table_spec = { table_cell: { class_chain: '**/XCUIElementTypeCell/XCUIElementTypeGroup/XCUIElementTypeStaticText' } }
view_table.define_table_elements(table_spec)
end
end
```
Another `AppTable` implementation using elements other than the default `AppTable` components can be found in the MacOS
Activity Monitor app (see below). An inspection of the Activity Monitor's table object hierarchy for the app reveals that
it is an `XCUIElementTypeOutline` object comprised of `XCUIElementTypeOutlineRow` elements representing the table's rows.
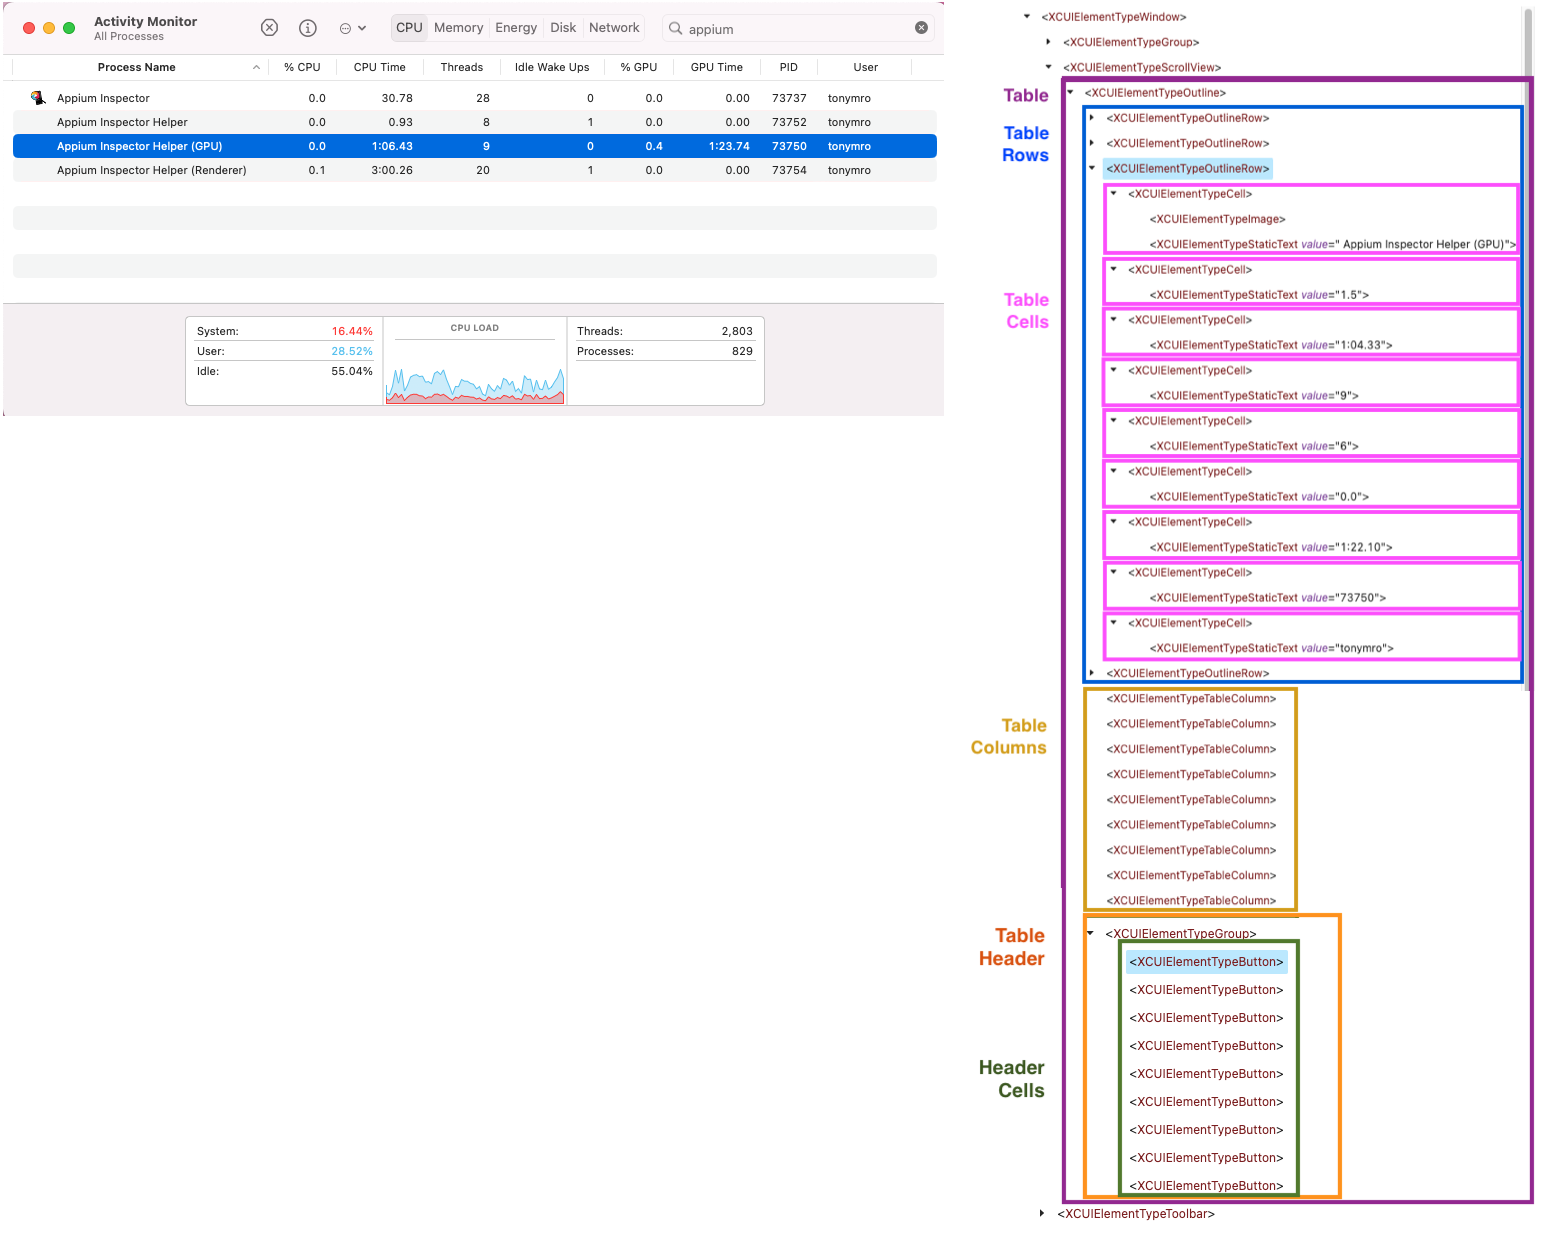
The `ActivityMonitorScreen` screen object's `initialize` method in the code snippet below demonstrates the use of the
`AppTable.define_table_elements` method to define the locator strategy for the `table_row` component.
```ruby
class ActivityMonitorScreen < TestCentricity::ScreenObject
trait(:screen_name) { 'Activity Monitor' }
trait(:screen_locator) { { class_chain: '**/XCUIElementTypeWindow' } }
# Shortcuts screen UI elements
table :process_table, { class_chain: '**/XCUIElementTypeScrollView/XCUIElementTypeOutline' }
def initialize
super
# define the row element for the Activity Monitor table object
table_spec = { table_row: { class: 'XCUIElementTypeOutlineRow' } }
process_table.define_table_elements(table_spec)
end
end
```
---
## MacOS Application Menu Bar and Menus
With MacOS desktop applications, the menu bar at the top of the screen displays the top-level menus associated with your
app, and typically includes both system-provided menus and app-specific menus. Below is the menu bar and **View** menu
associated with the MacOs Calculator application:
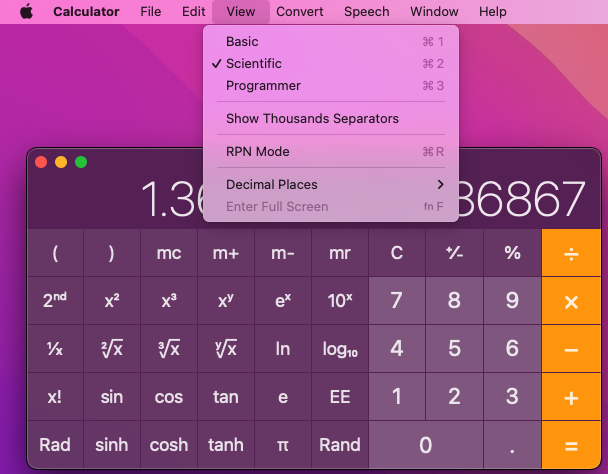
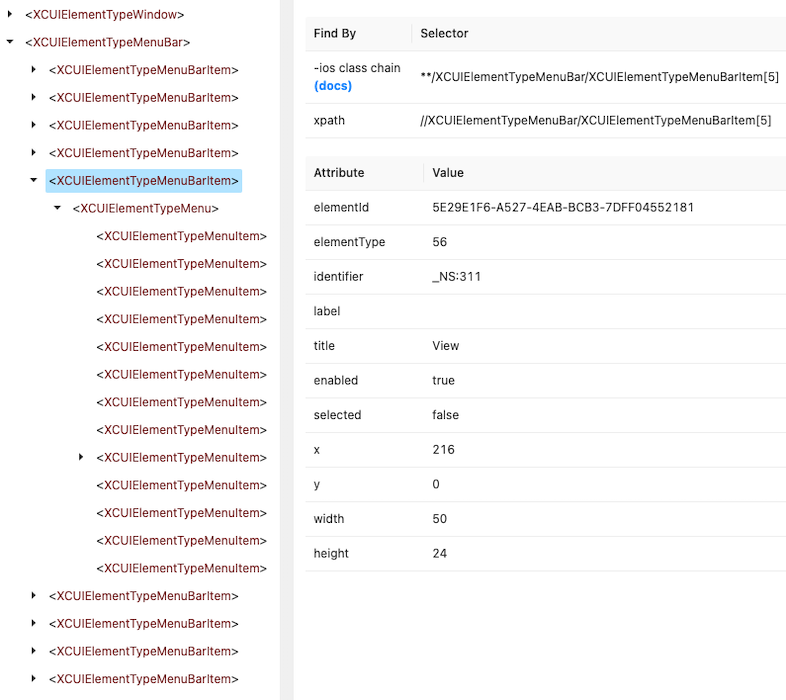
Performing an inspection of the Calculator application's GUI using Appium Inspector reveals that the `XCUIElementTypeMenuBar`
object is not a child object of the Calculator app's main `XCUIElementTypeWindow`, but resides at the top level of the
MacOS app object hierarchies, along with the app's windows.
### Defining a MenuBar
TestCentricity For Apps provides a `MenuBar` class object, that is a special subclass of the `ScreenSection` class object.
You define a new `MenuBar` as shown below:
```ruby
class CalculatorMenuBar < TestCentricity::MenuBar
end
```
### Adding a MenuBar to your App's Primary ScreenObject
You add a `MenuBar` to your app's primary `ScreenObject` as shown below:
```ruby
class CalculatorAppScreen < TestCentricity::ScreenObject
# Calculator App screen UI elements
menubar :calc_menu_bar, CalculatorMenuBar
end
```
Once your `ScreenObject` has been instantiated, you can call its `MenuBar` methods as shown below:
```ruby
num_menus = calculator_screen.calc_menu_bar.get_item_count
```
### Adding Menus to your MenuBar
A `MenuBar` is typically made up of one or more `Menu` objects, which are added to your `MenuBar` class definition as shown
below:
```ruby
class CalculatorMenuBar < TestCentricity::MenuBar
# Calculator Menu Bar UI elements
menus calc_menu: { class_chain: '**/XCUIElementTypeMenuBarItem[2]' },
file_menu: { class_chain: '**/XCUIElementTypeMenuBarItem[3]' },
edit_menu: { class_chain: '**/XCUIElementTypeMenuBarItem[4]' },
view_menu: { class_chain: '**/XCUIElementTypeMenuBarItem[5]' },
view_sub_menu: { predicate: 'identifier == "_NS:335"' },
convert_menu: { class_chain: '**/XCUIElementTypeMenuBarItem[6]' },
convert_sub_menu: { predicate: 'identifier == "_NS:352"' },
speech_menu: { class_chain: '**/XCUIElementTypeMenuBarItem[7]' },
window_menu: { class_chain: '**/XCUIElementTypeMenuBarItem[8]' },
help_menu: { class_chain: '**/XCUIElementTypeMenuBarItem[9]' }
end
```
### Adding Methods to your MenuBar
You can add methods to your `MenuBar` class definition, as shown below:
```ruby
class CalculatorMenuBar < TestCentricity::MenuBar
# Calculator Menu Bar UI elements
menus calc_menu: { class_chain: '**/XCUIElementTypeMenuBarItem[2]' },
file_menu: { class_chain: '**/XCUIElementTypeMenuBarItem[3]' },
edit_menu: { class_chain: '**/XCUIElementTypeMenuBarItem[4]' },
view_menu: { class_chain: '**/XCUIElementTypeMenuBarItem[5]' },
view_sub_menu: { predicate: 'identifier == "_NS:335"' },
convert_menu: { class_chain: '**/XCUIElementTypeMenuBarItem[6]' },
convert_sub_menu: { predicate: 'identifier == "_NS:352"' },
speech_menu: { class_chain: '**/XCUIElementTypeMenuBarItem[7]' },
window_menu: { class_chain: '**/XCUIElementTypeMenuBarItem[8]' },
help_menu: { class_chain: '**/XCUIElementTypeMenuBarItem[9]' }
def choose_menu_item(menu, item, method = :mouse)
menu_map = {
calc: calc_menu,
calculator: calc_menu,
file: file_menu,
edit: edit_menu,
view: view_menu,
view_sub_menu: view_sub_menu,
convert: convert_menu,
convert_sub_menu: convert_sub_menu,
window: window_menu
}
menu_obj = menu_map[menu]
raise "#{menu} is not a supported menu" if menu_obj.nil?
menu_obj.choose_menu_item(item, method)
end
def verify_menu_bar
ui = {
self => {
enabled: true,
items: %w[Apple Calculator File Edit View Convert Speech Window Help],
itemcount: 9
},
calc_menu => {
enabled: true,
itemcount: 8,
item_data: [
{ caption: 'About Calculator', enabled: true },
{ caption: '', enabled: false },
{ caption: 'Hide Calculator', enabled: true },
{ caption: 'Hide Others', enabled: true },
{ caption: 'Show All', enabled: false },
{ caption: '', enabled: false },
{ caption: 'Quit Calculator', enabled: true },
{ caption: 'Quit and Keep Windows', enabled: true }
]
},
speech_menu => {
enabled: true,
itemcount: 2,
items: ['Speak Button Pressed', 'Speak Result']
}
}
verify_ui_states(ui)
end
end
```
### Defining Keyboard Shortcuts for your App's Menus
The Appium Mac2 Driver does not support element attributes that could be used to verify the checked state of a menu item
or the keyboard shortcut assigned to a menu item. However, it is possible to verify that menu item keyboard shortcuts are
functional by mapping the keyboard shortcuts to a particular menu item and then calling `AppMenu.choose_menu_item` with
the `method` parameter set to `:keys` or `:keyboard` and then verifying that the expected menu-triggered action occurs.
The `AppMenu.define_menu_elements` method provides a means of specifying the objects that make up the menu item components
of an `AppMenu` control, and the keyboard shortcut map for each menu item in a menu. The method accepts a hash that can
contain up to two key-value pairs. Valid key designators are `:menu_item` and `:key_map`.
When `AppMenu` objects are instantiated, the `:menu_item` attribute is set to the `XCUIElementTypeMenuItem` class, which
is the default menu item object for MacOS applications. The `AppMenu.define_menu_elements` method is typically called in
the `initialize` method of your app's `MenuBar` control.
The code snippet below demonstrate the use of the `AppMenu.define_menu_elements` method in the `CalculatorMenuBar` object's
`initialize` method to define the keyboard shortcut mapping for 4 of the menu items in the **View** menu and 1 of the menu
items in the **Window** menu of the MacOS Calculator app. Keyboard shortcuts are assigned to the **View** menu items by
index (menu items 1, 2, 3, and 7) and to the **Window** menu by menu item caption (menu item *Show Paper Tape*).
```ruby
class CalculatorMenuBar < TestCentricity::MenuBar
def initialize(name, parent, locator, context)
super
# define key map for View menu
menu_items = {
key_map: {
1 => [key: '1', modifierFlags: XCUIKeyModifierCommand],
2 => [key: '2', modifierFlags: XCUIKeyModifierCommand],
3 => [key: '3', modifierFlags: XCUIKeyModifierCommand],
7 => [key: 'r', modifierFlags: XCUIKeyModifierCommand]
}
}
view_menu.define_menu_elements(menu_items)
# define key map for Window menu
menu_items = {
key_map: { 'Show Paper Tape' => [key: 't', modifierFlags: XCUIKeyModifierCommand] }
}
window_menu.define_menu_elements(menu_items)
end
end
```
The `modifierFlags` argument is an `unsigned long` type and defines the bitmask with depressed modifier keys for the given
key. TestCentricity and XCTest defines the following possible bitmasks for modifier keys:
```ruby
XCUIKeyModifierNone = 0
XCUIKeyModifierCapsLock = (1 << 0)
XCUIKeyModifierShift = (1 << 1)
XCUIKeyModifierControl = (1 << 2)
XCUIKeyModifierOption = (1 << 3)
XCUIKeyModifierCommand = (1 << 4)
XCUIKeyModifierFunction = (1 << 5)
```
Refer to [this page](https://github.com/appium/appium-mac2-driver?tab=readme-ov-file#macos-keys) for more information on MacOS keyboard `modifierFlags`.
### Adding Popup Menus to your ScreenObject or ScreenSection
A MocOS desktop app may have one or more popup menus that can appear on a `ScreenObject` or `ScreenSection`. Below is an
example of two different popup menus that can be invoked on the MacOS Shortcuts app - one on sidebar list items, and the
other on Shortcuts table items.
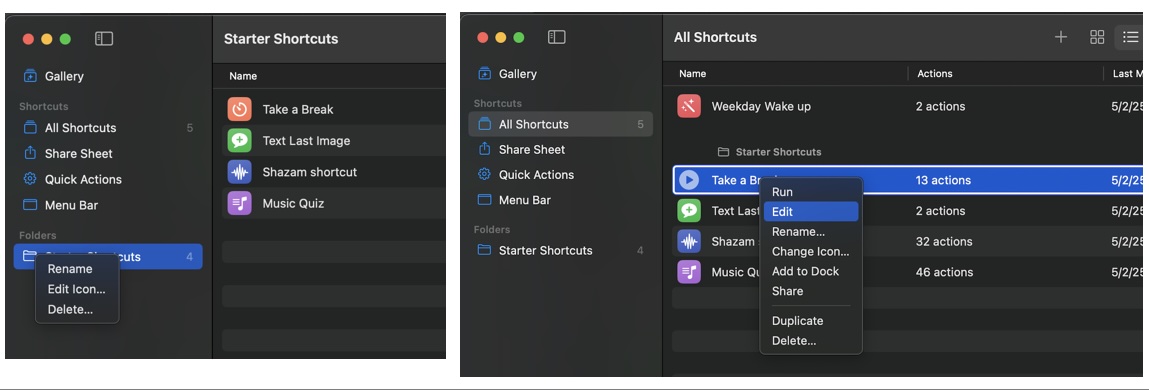
It is typically not necessary to define more than one popup menu object in your `ScreenObject` or `ScreenSection` class
definition, even if there are multiple popups that can be interacted with. Since only one popup can be visible at a time,
you only need to define a single popup menu object.
Popup menus are added to your `ScreenObject` or `ScreenSection` class definition as shown below:
```ruby
class ShortcutsAppScreen < TestCentricity::ScreenObject
# Shortcuts App screen UI elements
menu :popup_menu, { class_chain: '**/XCUIElementTypeTable/XCUIElementTypeMenu' }
menubar :shortcuts_menu_bar, ShortcutsMenuBar
end
```
---
## Instantiating ScreenObjects and Utilizing the ScreenManager
Before you can call the methods in your `ScreenObjects` and `ScreenSections`, you must instantiate the `ScreenObjects` of
your MacOS dektop app or native mobile application, as well as create instance variables which can be used when calling
`ScreenObject` methods from your step definitions or specs.
The `ScreenManager` class provides methods for supporting the instantiation and management of `ScreenObjects`. In the code
example below, the `screen_objects` method contains a hash table of your `ScreenObject` instances and their associated
`ScreenObject` classes to be instantiated by `ScreenManager`:
```ruby
module WorldScreens
def screen_objects
{
login_screen: LoginScreen,
registration_screen: RegistrationScreen,
search_results_screen: SearchResultsScreen,
products_grid_screen: ProductsCollectionScreen,
product_detail_screen: ProductDetailScreen,
shopping_basket_screen: ShoppingBasketScreen,
payment_method_screen: PaymentMethodScreen,
confirm_purchase_screen: PurchaseConfirmationScreen,
my_account_screen: MyAccountScreen,
my_order_history_screen: MyOrderHistoryScreen
}
end
end
World(WorldScreens)
```
The `WorldScreens` module above should be defined in the `world_screens.rb` file in the `features/support` folder.
Include the code below in your `env.rb` file to ensure that your `ScreenObjects` are instantiated before your Cucumber
scenarios are executed:
```ruby
include WorldScreens
WorldPages.instantiate_screen_objects
```
**NOTE:** If you intend to use the `ScreenManager`, you must define a `screen_name` trait for each of the `ScreenObjects`
to be registered.
### Leveraging the ScreenManager in your Cucumber tests
Many Cucumber based automated tests suites include scenarios that verify that mobile app screens are correctly loaded,
displayed, or can be navigated to by clicking associated menus and navigation elements. One such Cucumber navigation
scenario is displayed below:
```gherkin
Scenario Outline: Verify screen navigation features
Given I am on the Products screen
When I tap the navigation menu item
Then I expect the screen to be correctly displayed
Examples:
|screen_name |
|Registration |
|Shopping Basket |
|My Account |
|My Order History |
```
In the above example, the step definitions associated with the 3 steps can be implemented using the `ScreenManager.find_screen`
method to match the specified `screen_name` argument with the corresponding `ScreenObject` as shown below:
```ruby
include TestCentricity
When(/^I (?:load|am on) the (.*) screen$/) do |screen_name|
# find and load the specified target screen
target_screen = ScreenManager.find_screen(screen_name)
target_screen.load_screen
end
When(/^I (?:click|tap) the ([^\"]*) navigation menu item$/) do |screen_name|
# find and navigate to the specified target screen
target_screen = ScreenManager.find_screen(screen_name)
target_screen.navigate_to
end
Then(/^I expect the (.*) screen to be correctly displayed$/) do |screen_name|
# find and verify that the specified target screen is loaded
target_screen = ScreenManager.find_screen(screen_name)
target_screen.verify_screen_exists
# verify that target screen is correctly displayed
target_screen.verify_screen_ui
end
```
---
## Connecting to a MacOS Desktop Application
The `TestCentricity::AppiumConnect.initialize_appium` method configures the appropriate Appium capabilities required to
establish a connection with a locally hosted MacOS desktop application. The `initialize_appium` method accepts an `options`
hash for specifying desired capabilities (using the W3C protocol), driver type, driver name, and endpoint URL information.
The following options and capabilities must be specified in the `options` hash:
- `driver:` must be set to `:appium`
- `platformName:` must be set to `:mac` in the `capabilities:` hash
- `'appium:automationName':` must be set to `mac2` in the `capabilities:` hash
- `'appium:bundleId'`: must be set to the Bundle ID of the MacOS app to be tested
```ruby
options = {
driver: :appium,
capabilities: {
platformName: :mac,
'appium:automationName': 'mac2',
'appium:bundleId': 'com.apple.calculator'
}
}
AppiumConnect.initialize_appium(options)
```
Additional options that can be specified in an `options` hash include the following:
| Option | Purpose |
|------------------|--------------------------------------------------------------------------------|
| `driver_name:` | optional driver name |
| `endpoint:` | optional endpoint URL for local Appium server or cloud hosted service provider |
| `global_driver:` | define new driver with global scope if `true` |
Refer to [this page](https://github.com/appium/appium-mac2-driver#capabilities) for information regarding specifying Appium capabilities that are
specific to the Mac2 Driver driver.
The Appium server must be running prior to invoking Cucumber to run your features/scenarios on a locally hosted MacOS desktop
application. Refer to [**Section 10.2.3 (Starting and Stopping Appium Server)**](#starting-and-stopping-appium-server) below.
---
## Connecting to an iOS or Android Mobile Simulator or Device
The `AppiumConnect.initialize_appium` method configures the appropriate Appium capabilities required to establish a connection
with a locally or cloud hosted target iOS or Android simulator or real device.
Since its inception, TestCentricity has provided support for establishing a single connection to a target iOS or Android
simulator or real device by instantiating an Appium driver object. **Environment Variables** are used to specify the local
or remote cloud hosted target platform, and the various Appium capability parameters required to configure the driver object.
The appropriate **Environment Variables** are typically specified in the command line at runtime through the use of profiles
set in a `cucumber.yml` file (Refer to [**Section 10.4 (Using Configuration Specific Profiles in `cucumber.yml`)**](#using-configuration-specific-profiles-in-cucumber-yml) below).
However, due to the growing number of optional Appium capabilities that are being offered by cloud hosted service providers
(like BrowserStack, Sauce Labs, TestingBot, or LambdaTest), **Environment Variables** may not effectively address.
Beginning with TestCentricity version 4.0.0, the `TestCentricity::AppiumConnect.initialize_appium` method accepts an optional
`options` hash for specifying desired capabilities (using the W3C protocol), driver type, driver name, endpoint URL, and
device type information.
### Specifying Options and Capabilities in the `options` Hash
For those test scenarios where cumbersome **Environment Variables** are less than ideal, call the `AppiumConnect.initialize_appium`
method with an `options` hash that specifies the Appium desired capabilities, the driver type, and the device type, as depicted
in the example below:
```ruby
options = {
driver: :appium,
devicetype: :phone or :tablet,
capabilities: {
platformName: :ios or :android,
'appium:platformVersion': os_version,
'appium:deviceName': device_name,
'appium:automationName': 'XCUITest' or 'UiAutomator2',
'appium:app': path_to_app
}
}
AppiumConnect.initialize_appium(options)
```
Additional options that can be specified in an `options` hash include the following:
| Option | Purpose |
|------------------|--------------------------------------------------------------------------------|
| `driver_name:` | optional driver name |
| `endpoint:` | optional endpoint URL for local Appium server or cloud hosted service provider |
| `global_driver:` | define new driver with global scope if `true` |
Details on specifying desired capabilities, driver type, endpoint URL, global driver scope, and default driver names are
provided in each of the platform hosting sections below.
#### Specifying the Driver Type
The `driver:` type is a required entry in the `options` hash when instantiating an Appium driver object using the
`initialize_appium` method. Valid `driver:` type values are listed in the table below:
| `driver:` | **Driver Type** |
|-----------------|-----------------------------------------------------------------------|
| `:appium` | locally hosted native iOS/Android device simulator or physical device |
| `:browserstack` | remote hosted on BrowserStack |
| `:saucelabs` | remote hosted on Sauce Labs |
| `:testingbot` | remote hosted on TestingBot |
| `:custom` | remote hosted on unsupported cloud based hosting services |
#### Specifying a Driver Name
An optional user defined `driver_name:` can be specified in the `options` hash when instantiating an Appium driver object
using the `AppiumConnect.initialize_appium` method. If a driver name is not specified, the `initialize_appium` method will
assign a default driver name comprised of the specified driver type (`driver:`) and the device OS and device type specified
in the `capabilities:` hash. Details on default driver names are provided in each of the device/simulator hosting sections
below.
### Connecting to Locally Hosted Simulators or Physical Devices
Refer to [this page](https://appium.io/docs/en/2.6/guides/caps/) for information regarding specifying Appium capabilities. The Appium server must be running prior
to invoking Cucumber to run your features/scenarios on locally hosted iOS or Android simulators or physical devices. Refer
to [**Section 10.2.3 (Starting and Stopping Appium Server)**](#starting-and-stopping-appium-server) below.
⚠️ If you are running locally hosted mobile tests on iOS or Android simulators or devices using version 1.x of the Appium
server, the `APPIUM_SERVER_VERSION` environment variable must be set to `1` in order to ensure that the correct Appium server
endpoint is used.
#### Connecting to Locally Hosted iOS Simulators or Physical Devices
You can run your automated tests on locally hosted iOS simulators or physically connected devices using Appium and XCode
on macOS. You must install Appium, XCode, and the iOS version-specific device simulators for XCode. Information about
Appium setup and configuration requirements with the XCUITest driver for testing on physically connected iOS devices can
be found on [this page](https://github.com/appium/appium-xcuitest-driver/blob/master/docs/preparation/real-device-config.md). Refer to [this page](https://appium.github.io/appium-xcuitest-driver/latest/capabilities/) for information regarding specifying Appium capabilities that are
specific to the XCUITest driver.
##### Local iOS Simulators or Physical Devices using Environment Variables
If the `options` hash is not provided when calling the `TestCentricity::AppiumConnect.initialize_appium` method, the following
**Environment Variables** must be set as described in the table below.
| **Environment Variable** | **Description** |
|--------------------------|-----------------------------------------------------------------------------------------------------------------------------------------------------------------------|
| `DRIVER` | Must be set to `appium` |
| `APP_PLATFORM_NAME` | Must be set to `iOS` |
| `AUTOMATION_ENGINE` | Must be set to `XCUITest` |
| `APP_VERSION` | Must be set to `17.4`, `16.2`, or which ever iOS version you wish to run within the XCode Simulator |
| `APP_DEVICE` | Set to iOS device name supported by the iOS Simulator (`iPhone 13 Pro Max`, `iPad Pro (12.9-inch) (5th generation)`, etc.) or name of physically connected iOS device |
| `DEVICE_TYPE` | Must be set to `phone` or `tablet` |
| `APP` | Must be set to path where iOS app can be accessed and loaded |
| `UDID` | UDID of physically connected iOS device (not used for simulators) |
| `TEAM_ID` | unique 10-character Apple developer team identifier string (not used for simulators) |
| `TEAM_NAME` | String representing a signing certificate (not used for simulators) |
| `APP_NO_RESET` | [Optional] Don't reset app state after each test. Set to `true` or `false` |
| `APP_FULL_RESET` | [Optional] Perform a complete reset. Set to `true` or `false` |
| `WDA_LOCAL_PORT` | [Optional] Used to forward traffic from Mac host to real iOS devices over USB. Default value is same as port number used by WDA on device. |
| `LOCALE` | [Optional] Locale to set for the simulator. e.g. `fr_CA` |
| `LANGUAGE` | [Optional] Language to set for the simulator. e.g. `fr` |
| `ORIENTATION` | [Optional] Set to `portrait` or `landscape` (only for iOS simulators) |
| `NEW_COMMAND_TIMEOUT` | [Optional] Time (in Seconds) that Appium will wait for a new command from the client |
| `SHOW_SIM_KEYBOARD` | [Optional] Show the simulator keyboard during text entry. Set to `true` or `false` |
| `SHUTDOWN_OTHER_SIMS` | [Optional] Close any other running simulators. Set to `true` or `false`. See note below. |
The `SHUTDOWN_OTHER_SIMS` environment variable can only be set if you are running Appium Server with the `--relaxed-security`
or `--allow-insecure=shutdown_other_sims` arguments passed when starting it from the command line, or when running the server
from the Appium Server GUI app. A security violation error will occur without relaxed security enabled.
Refer to [**Section 10.4 (Using Configuration Specific Profiles in `cucumber.yml`)**](#using-configuration-specific-profiles-in-cucumber-yml) below.
##### Local iOS Simulators or Physical Devices using the `options` Hash
When using the `options` hash, the following options and capabilities must be specified:
- `driver:` must be set to `:appium`
- `device_type:` must be set to `:tablet` or `:phone`
- `platformName:` must be set to `ios` in the `capabilities:` hash
- `'appium:automationName':` must be set to `xcuitest` in the `capabilities:` hash
- `'appium:platformVersion':` must be set to the version of iOS on the simulator or physical device
- `'appium:deviceName':` must be set to the name of the iOS simulator or physical device
- `'appium:app'`: must be set to path where iOS app can be accessed and loaded
```ruby
options = {
driver: :appium,
device_type: phone_or_tablet,
capabilities: {
platformName: :ios,
'appium:automationName': 'xcuitest',
'appium:platformVersion': ios_version,
'appium:deviceName': device_or_simulator_name,
'appium:app': path_to_ios_app
},
endpoint: 'http://127.0.0.1:4723/wd/hub'
}
AppiumConnect.initialize_appium(options)
```
> ℹ️ If an optional user defined `driver_name:` is not specified in the `options` hash, the default driver name will be set to
`appium__` - e.g. `:appium_ios_phone` or `:appium_ios_tablet`.
>
> ℹ️ If an `endpoint:` is not specified in the `options` hash, then the default remote endpoint URL of `http://127.0.0.1:4723/wd/hub`
will be used.
>
> ℹ️ If `global_driver:` is not specified in the `options` hash, then the driver will be initialized without global scope.
Below is an example of an `options` hash for specifying a connection to a locally hosted mobile app running on an iPad Pro
simulator. The `options` hash includes options for specifying the driver name, global driver scope, and setting the simulated
device orientation to portrait mode.
```ruby
options = {
driver: :appium,
device_type: :tablet,
driver_name: :my_custom_ipad_driver,
global_driver: true,
capabilities: {
platformName: :ios,
'appium:platformVersion': '15.4',
'appium:deviceName': 'iPad Pro (12.9-inch) (5th generation)',
'appium:automationName': 'XCUITest',
'appium:orientation': 'PORTRAIT',
'appium:app': Environ.current.ios_app_path
}
}
AppiumConnect.initialize_appium(options)
```
#### Connecting to Locally Hosted Android Simulators or Physical Devices
You can run your automated tests on locally hosted Android simulators or physically connected devices using Appium and Android
Studio on macOS. You must install Android Studio, the desired Android version-specific virtual device emulators, and
Appium. Refer to [this page](https://appium.io/docs/en/2.6/quickstart/uiauto2-driver/) for information on configuring Appium to work with the Android SDK. Refer to [this page](https://github.com/appium/appium-uiautomator2-driver)
for information regarding specifying Appium capabilities that are specific to the UiAutomator2 driver.
##### Local Android Simulators or Physical Devices using Environment Variables
If the `options` hash is not provided when calling the `TestCentricity::AppiumConnect.initialize_appium` method, the following
**Environment Variables** must be set as described in the table below.
| **Environment Variable** | **Description** |
|---------------------------|--------------------------------------------------------------------------------------------------------------------------------|
| `DRIVER` | Must be set to `appium` |
| `APP_PLATFORM_NAME` | Must be set to `Android` |
| `AUTOMATION_ENGINE` | Must be set to `UiAutomator2` |
| `APP_VERSION` | Must be set to `12.0`, or which ever Android OS version you wish to run with the Android Virtual Device |
| `APP_DEVICE` | Set to Android Virtual Device ID (`Pixel_2_XL_API_26`, `Nexus_6_API_23`, etc.) found in Advanced Settings of AVD Configuration |
| `DEVICE_TYPE` | Must be set to `phone` or `tablet` |
| `APP` | Must be set to path where Android `.apk` file can be accessed and loaded || `UDID` | UDID of physically connected Android device (not used for simulators) |
| `ORIENTATION` | [Optional] Set to `portrait` or `landscape` |
| `APP_NO_RESET` | [Optional] Don't reset app state after each test. Set to `true` or `false` |
| `APP_FULL_RESET` | [Optional] Perform a complete reset. Set to `true` or `false` |
| `LOCALE` | [Optional] Locale to set for the simulator. e.g. `fr_CA` |
| `LANGUAGE` | [Optional] Language to set for the simulator. e.g. `fr` |
| `NEW_COMMAND_TIMEOUT` | [Optional] Time (in Seconds) that Appium will wait for a new command from the client |
| `CHROMEDRIVER_EXECUTABLE` | [Optional] Absolute local path to ChromeDriver executable |
Refer to [**Section 10.4 (Using Configuration Specific Profiles in `cucumber.yml`)**](#using-configuration-specific-profiles-in-cucumber-yml) below.
##### Local Android Simulators or Physical Devices using the `options` Hash
When using the `options` hash, the following options and capabilities must be specified:
- `driver:` must be set to `:appium`
- `device_type:` must be set to `:tablet` or `:phone`
- `platformName:` must be set to `Android` in the `capabilities:` hash
- `'appium:automationName':` must be set to `UiAutomator2` in the `capabilities:` hash
- `'appium:platformVersion':` must be set to the version of Android on the simulator or physical device
- `'appium:deviceName':` must be set to the Android Virtual Device ID
- `'appium:app'`: must be set to path where Android `.apk` file can be accessed and loaded
```ruby
options = {
driver: :appium,
device_type: phone_or_tablet,
capabilities: {
platformName: :android,
'appium:automationName': 'UiAutomator2',
'appium:platformVersion': android_version,
'appium:deviceName': simulator_name,
'appium:avd': simulator_name,
'appium:app': path_to_android_app
},
endpoint: 'http://localhost:4723/wd/hub'
}
AppiumConnect.initialize_appium(options)
```
> ℹ️ If an optional user defined `driver_name:` is not specified in the `options` hash, the default driver name will be set to
`appium__` - e.g. `:appium_android_phone` or `:appium_android_tablet`.
>
> ℹ️ If an `endpoint:` is not specified in the `options` hash, then the default remote endpoint URL of ``http://127.0.0.1:4723/wd/hub``
will be used.
>
> ℹ️ If `global_driver:` is not specified in the `options` hash, then the driver will be initialized without global scope.
Below is an example of an `options` hash for specifying a connection to a locally hosted mobile app running on an Android
tablet simulator. The `options` hash includes options for specifying the driver name and setting the simulated device orientation
to landscape mode.
```ruby
options = {
driver: :appium,
device_type: :tablet,
driver_name: :admin_tablet,
capabilities: {
platformName: 'Android',
'appium:platformVersion': '12.0',
'appium:deviceName': 'Pixel_C_API_31',
'appium:avd': 'Pixel_C_API_31',
'appium:automationName': 'UiAutomator2',
'appium:orientation': 'LANDSCAPE',
'appium:app': Environ.current.android_apk_path
}
}
AppiumConnect.initialize_appium(options)
```
#### Starting and Stopping Appium Server
##### Using Appium Server with Cucumber
The Appium server must be running prior to invoking Cucumber to run your features/scenarios on locally hosted mobile simulators
or physical devices. To programmatically control the starting and stopping of Appium server with the execution of your automated
tests, place the code shown below in your `hooks.rb` file.
```ruby
BeforeAll do
# start Appium Server if APPIUM_SERVER = 'run'
if ENV['APPIUM_SERVER'] == 'run'
$server = TestCentricity::AppiumServer.new
$server.start
end
end
AfterAll do
# close Appium driver
TestCentricity::AppiumConnect.quit_driver
# terminate Appium Server if command line option was specified and Appium server is running
if ENV['APPIUM_SERVER'] == 'run' && Environ.driver == :appium && $server.running?
$server.stop
end
end
```
The `APPIUM_SERVER` environment variable must be set to `run` in order to programmatically start and stop the Appium server.
This can be set by adding the following to your `cucumber.yml` file and including `-p run_appium` in your command line when
starting your Cucumber test suite(s):
run_appium: APPIUM_SERVER=run
If you are running locally hosted mobile tests on iOS or Android simulators or devices using version 1.x of the Appium server,
the `APPIUM_SERVER_VERSION` environment variable must be set to `1` in order to ensure that the correct Appium server endpoint
is used. This can be set by adding the following to your `cucumber.yml` file and including `-p appium_1x` in your command line
when starting your Cucumber test suite(s):
appium_1x: APPIUM_SERVER_VERSION=1
Refer to [**Section 10.4 (Using Configuration Specific Profiles in `cucumber.yml`)**](#using-configuration-specific-profiles-in-cucumber-yml) below.
##### Using Appium Server with RSpec
The Appium server must be running prior to executing test specs on locally hosted mobile simulators or physical device. To
control the starting and stopping of the Appium server with the execution of your specs, place the code shown below in the
body of an example group:
```ruby
before(:context) do
# start Appium server before all of the examples in this group
$server = TestCentricity::AppiumServer.new
$server.start
end
after(:context) do
# terminate Appium Server after all of the examples in this group
$server.stop if Environ.driver == :appium && $server.running?
end
```
If you are running locally hosted mobile tests on iOS or Android simulators or devices using version 1.x of the Appium server,
the `APPIUM_SERVER_VERSION` environment variable must be set to `1` in order to ensure that the correct Appium server endpoint
is used.
### Connecting to Remote Cloud Hosted iOS and Android Simulators or Physical Devices
You can run your automated tests against remote cloud hosted iOS and Android simulators and real devices using the BrowserStack,
SauceLabs, or TestingBot services.
#### Remote iOS and Android Mobile Devices on the BrowserStack service
For remotely hosted iOS and Android real devices on the BrowserStack service, refer to the [Browserstack-specific capabilities chart page](https://www.browserstack.com/app-automate/capabilities?tag=w3c)
for information regarding the options and capabilities available for the various supported mobile operating systems and
devices. BrowserStack uses only real physical devices - simulators are not available on this service.
##### Uploading your mobile app(s) to BrowserStack
Refer to the following pages for information on uploading your iOS `.ipa` or Android `.apk` app files to the BrowserStack
servers:
- [Upload apps from filesystem](https://www.browserstack.com/docs/app-automate/appium/upload-app-from-filesystem)
- [Upload apps using public URL](https://www.browserstack.com/docs/app-automate/appium/upload-app-using-public-url)
- [Define custom ID for app](https://www.browserstack.com/docs/app-automate/appium/upload-app-define-custom-id)
The preferred method of uploading an app to BrowserStack is to define a custom test ID for your apps to avoid having to
modify your test configuration data with a new `app_url` after every app upload. Use the same custom test ID every time
you upload a new build of the app.
If the `UPLOAD_APP` Environment Variable is set to `true` prior to calling the `initialize_appium` method, your iOS `.ipa`
or Android `.apk` file will automatically be uploaded to the BrowserStack servers prior to running your tests. If you have
not specified a custom test ID for your apps, your tests will most likely fail as a new `app_url` will be generated, and
you will have to update your test configuration data to use the new `app_url`. If you have specified a custom test ID for
your apps, your tests should be able to run immediately after the app file upload has completed.
##### BrowserStack Mobile Devices using Environment Variables
If the `options` hash is not provided when calling the `TestCentricity::AppiumConnect.initialize_appium` method, the following
**Environment Variables** must be set as described in the table below.
| **Environment Variable** | **Description** |
|--------------------------|-------------------------------------------------------------------------------------------------------------------------------------|
| `DRIVER` | Must be set to `browserstack` |
| `BS_USERNAME` | Must be set to your BrowserStack account user name |
| `BS_AUTHKEY` | Must be set to your BrowserStack account access key |
| `BS_OS` | Must be set to `ios` or `android` |
| `BS_DEVICE` | Refer to `deviceName` capability in chart |
| `BS_OS_VERSION` | Set to the OS version specified in the `platformVersion` capability in the chart |
| `DEVICE_TYPE` | Must be set to `phone` or `tablet` |
| `AUTOMATION_ENGINE` | Must be set to `XCUITest` for iOS or `UiAutomator2` for Android |
| `APP` | Must be set to URL or custom test ID of uploaded iOS `.ipa` or Android `.apk` file |
| `ORIENTATION` | [Optional] Set to `portrait` or `landscape` |
| `RECORD_VIDEO` | [Optional] Enable screen video recording during test execution (`true` or `false`) |
| `TIME_ZONE` | [Optional] Specify custom time zone. Refer to `browserstack.timezone` capability in chart |
| `IP_GEOLOCATION` | [Optional] Specify IP Geolocation. Refer to [IP Geolocation](https://www.browserstack.com/ip-geolocation) to select a country code. |
| `SCREENSHOTS` | [Optional] Generate screenshots for debugging (`true` or `false`) |
| `NETWORK_LOGS` | [Optional] Capture network logs (`true` or `false`) |
| `APPIUM_LOGS` | [Optional] Generate Appium logs (`true` or `false`) |
| `UPLOAD_APP` | [Optional] Automatically upload the app to BrowserStack servers if true (`true` or `false`) |
Refer to [**Section 10.4 (Using Configuration Specific Profiles in `cucumber.yml`)**](#using-configuration-specific-profiles-in-cucumber-yml) below.
##### BrowserStack Mobile Devices using the `options` Hash
When using the `options` hash, the following options and capabilities must be specified:
- `driver:` must be set to `:browserstack`
- `device_type:` must be set to `:tablet` or `:phone`
- `platformName:` must be set to `ios` or `android` in the `capabilities:` hash
- `'appium:automationName':` must be set to to `XCUITest` for iOS or `UiAutomator2` for Android in the `capabilities:` hash
- `'appium:platformVersion':` must be set to the version of iOS on the simulator or physical device
- `'appium:deviceName':` must be set to the name of the iOS simulator or physical device
- `'appium:app'`: must be set to URL or custom test ID of uploaded iOS `.ipa` or Android `.apk` file
```ruby
options = {
driver: :browserstack,
device_type: phone_or_tablet,
capabilities: {
platformName: platform,
'appium:automationName': automation_name,
'appium:platformVersion'