https://github.com/themiu/2d-sprite-creator
Make 2D Sprites Using 3D Models
https://github.com/themiu/2d-sprite-creator
3d-to-2d game-assets gameart godot sprite-animation
Last synced: about 1 month ago
JSON representation
Make 2D Sprites Using 3D Models
- Host: GitHub
- URL: https://github.com/themiu/2d-sprite-creator
- Owner: TheMIU
- License: mit
- Created: 2025-04-05T14:11:20.000Z (6 months ago)
- Default Branch: main
- Last Pushed: 2025-04-06T16:32:34.000Z (6 months ago)
- Last Synced: 2025-09-04T01:39:55.328Z (about 1 month ago)
- Topics: 3d-to-2d, game-assets, gameart, godot, sprite-animation
- Language: GDScript
- Homepage:
- Size: 3.35 MB
- Stars: 1
- Watchers: 1
- Forks: 0
- Open Issues: 0
-
Metadata Files:
- Readme: README.md
- License: LICENSE
Awesome Lists containing this project
README
# 2D Sprite Generator from 3D Models
This is a simple Godot 4.4 project that lets you convert animated 3D characters into 2D sprites by automatically capturing each frame of an animation and saving it as PNG images.
[](https://www.youtube.com/watch?v=sTrDrFgCJCw)
---
## ✨ Features
- Easy setup for 3D to 2D sprite conversion
- Automatically captures animation frames and exports PNGs
- Customizable frame rate, animation length, and naming
---
## 🚀 Getting Started
### 1. Setup the Project
- Place your **animated 3D character** in the scene.
- Setup **lights** for your scene.
- Optionally, use the included **outline shader** (you can disable or adjust it via the Inspector).
- In the **AnimationPlayer**, set your desired animation to **"Run on Start"** (click the `A` icon).

- Copy the **animation duration** (you’ll need it later).
---
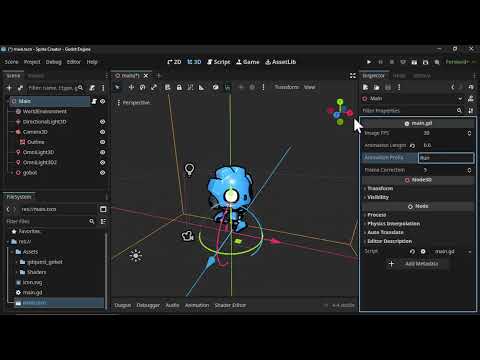
### 2. Adjust Parameters
Click the main node in the scene and modify the following in the **Inspector**:

- **Image FPS** – Frames captured per second (keep this consistent with your animation FPS).
- **Animation Length** – Set this to your animation duration (in seconds).
- **Animation Prefix** – Adds a prefix to each PNG filename to help identify animations.
- **Frame Correction** – Adds extra frames at the end (default is 5). Useful for better looping. *(This may be removed in the future)*
---
### 3. Run the Project
- Hit **Play** in the editor.
- The animation will play, and once it's finished, the capture will stop.
- A folder will automatically open with all the captured **PNG sprites**.
- Use them in your 2D games or animations!

---
## 📝 Notes & Tips
- You can improve PNG quality by increasing the **window size** in **Project Settings** and scaling your scene accordingly.
- For large movement animations (e.g., jumping), animate the **camera** to follow or fit the motion.
- If your sprite loop doesn't look right, try adjusting the **Frame Correction** value.
- As a known bug, the first frame (`000.png`) is empty — just delete it.
---
## 📦 Credits
For demonstration purposes, this project uses some awesome third-party assets:
- **Outline Shader**
[Thick 3D Screen-Space Outline Shader](https://godotshaders.com/shader/thick-3d-screen-space-depth-normal-based-outline-shader/)
- **Gobot Character**
[Gobot from GDQuest Demos](https://github.com/gdquest-demos/godot-4-3D-Characters/tree/main?tab=readme-ov-file)