https://github.com/themrleon/rpi-experiments
Set of experiments with Raspberry Pi 1 Model B 512MB
https://github.com/themrleon/rpi-experiments
console dispmanx doom dosbox emulation framebuffer games gpu h264 opengl quake raspberry-pi retropie sdl sdl2 sound spi videocore vnc webcam
Last synced: 2 months ago
JSON representation
Set of experiments with Raspberry Pi 1 Model B 512MB
- Host: GitHub
- URL: https://github.com/themrleon/rpi-experiments
- Owner: themrleon
- Created: 2025-08-30T16:16:23.000Z (10 months ago)
- Default Branch: main
- Last Pushed: 2025-11-12T04:42:04.000Z (8 months ago)
- Last Synced: 2025-11-12T06:16:39.438Z (8 months ago)
- Topics: console, dispmanx, doom, dosbox, emulation, framebuffer, games, gpu, h264, opengl, quake, raspberry-pi, retropie, sdl, sdl2, sound, spi, videocore, vnc, webcam
- Homepage:
- Size: 7.37 MB
- Stars: 2
- Watchers: 2
- Forks: 0
- Open Issues: 0
-
Metadata Files:
- Readme: README.md
Awesome Lists containing this project
README
# What is this?
A set of experiments revisiting the **Raspberry Pi Model B 512MB** in 2025 to see what it is capable. Since desktop environment is too heavy for it, my focus will be on a thing called **framebuffer**, in headless/console mode, which still allow us to use the GPU and graphics.
# Raspberry Pi Model B rev 2 512MB

```
* SoC: Broadcom BCM2835
* CPU: Single-core ARM1176JZF-S 32-bit CPU running at 700 MHz, which is part of the ARMv6 architecture
* GPU: VideoCore IV GPU capable of hardware-accelerated 1080p H.264 video decoding and OpenGL ES 2.0 graphics
* Memory: 512MB RAM
* Storage: SD card (full-size) for booting the operating system and storing data
* Video: HDMI port and composite video (via RCA jack)
* Audio: 3.5mm analog audio jack and audio over HDMI
* Networking: 10/100 Ethernet RJ45 port
* GPIO: 26-pin GPIO header providing access to interfaces like UART, I2C, and SPI
* CSI (camera) port: standard 15-pin, 1.0mm pitch, 16mm width
* DSI (display) port: standard 15-pin, 1.0mm pitch, 16mm width
* USB: 2 × USB 2.0
```
Powered via a 5V microUSB connector. Power consumption ranges 300mA (1.5W) - 700mA (3.5W) (depending on connected peripherals and workload)
# What OS to use?
It all comes down to the GPU support, if you don't care about GPU and performance, you can use any 32 bit version:
https://www.raspberrypi.com/software/operating-systems/
For the experiments I will stick with the last Raspbian 10 Buster, because it seems to be the last OS that supported the GPU drivers of this model:
http://downloads.raspberrypi.com/raspios_oldstable_armhf/images/raspios_oldstable_armhf-2023-05-03/
# Raspberry Pi GPU
I couldn't put in better words than AI, so here it goes:
🖥️ GPU Basics
> VideoCore IV GPU: This handles graphics and video playback. It supports hardware-accelerated 1080p video decoding (like H.264) and basic 3D graphics.
Proprietary Components: The GPU requires closed-source firmware (a "binary blob") to function. This firmware is loaded during boot-up and is essential for the GPU to operate, as it contains the low-level code that controls the hardware.
While some parts of the driver stack are open-source, the core GPU firmware and certain userland components remain proprietary. This is common in many embedded systems to protect intellectual property.
🎮 OpenGL ES Support
> The GPU supports OpenGL ES 2.0 (and possibly limited ES 3.0 features in some contexts, though primarily ES 2.0 is the standard for this model).
OpenGL ES (OpenGL for Embedded Systems) is a streamlined version of OpenGL designed for devices like the Pi. It allows developers to create 3D graphics applications.
On the Pi 1, OpenGL ES performance is functional but limited due to the hardware's age and single-core CPU.
🔧 Drivers and Mesa
> Drivers: The Raspberry Pi uses a mix of open and closed drivers. The closed-source components include the GPU firmware and some userland libraries.
Mesa: This is an open-source implementation of OpenGL and other graphics APIs. On the Pi 1, Mesa can be used to provide OpenGL support, but it may rely on software rendering (which is slower) or interface with the proprietary GPU firmware for hardware acceleration.
For the Pi 1, using Mesa with hardware acceleration typically requires enabling experimental drivers and adjusting memory settings (like cma-128 in config.txt), but performance may still be slower than on newer Pi models.
🖼️ Dispmanx
> Dispmanx is a low-level display manager API specific to Raspberry Pi. It handles graphics layers and composition directly, often used for applications that need precise control over the display (e.g., video players or embedded systems).
It allows elements like video overlays or GUI elements to be layered efficiently. However, it is a proprietary API and not widely used outside the Pi ecosystem.
Dispmanx can be complex to use directly, as it involves managing resources and memory carefully to avoid performance issues (e.g., slow buffer writes).
🖼️ OpenMAX
> OpenMAX is a standardized, but proprietary, API that provides direct access to the GPU's hardware acceleration for demanding multimedia tasks like decoding 1080p video. It is implemented as a closed-source "binary blob" provided by Broadcom, meaning developers can only use the pre-built components (like video decoders) and cannot create their own. While powerful, programming with OpenMAX directly is complex and low-level, so it's often easier to use it indirectly through simpler frameworks like GStreamer, which handle the complicated details while still benefiting from the GPU's speed.
⚖️ Open vs. Closed Source
> The GPU's proprietary nature means that some advanced features or bug fixes rely on Broadcom or Raspberry Pi-provided updates.
While this closed approach has drawbacks (e.g., less community control), it also ensured the Pi could launch at a low cost with capable multimedia features.
💎 Performance Notes
> The Pi 1's GPU is capable for its time (released in 2012) but struggles with modern graphics workloads. Simple 3D applications and video playback work, but complex tasks may be slow.
Techniques like overclocking or adjusting gpu_mem in config.txt can help allocate more RAM to the GPU, potentially improving graphics performance.
In short, the Raspberry Pi 1 Model B's GPU is a capable but aging piece of hardware that relies on a mix of open and closed software components to deliver its graphics functionality. While it supports standards like OpenGL ES 2.0, its performance is limited by its hardware design and proprietary drivers.
# What is framebuffer?
The Linux framebuffer is a simple interface that provides direct access to the display. It is represented by the device file /dev/fb0.
Its core function is to act as a memory buffer (a RAM-based array of pixels) that holds the exact image being sent to the screen. The graphics hardware reads from this buffer continuously to refresh the display:
* `/dev/fb0`: This is the device file. Writing pixel data to this file changes the image on the screen immediately.
* `Console Only / Headless`: On systems without a graphical desktop (like a text-only terminal or a headless device with a display attached), the framebuffer is what renders the text console and allows basic graphics to be drawn.
* `Raspberry Pi & Embedded Systems`: It is essential here because it is lightweight and doesn't require a complex graphical environment. It is the standard way to output graphics or video efficiently on low-power devices, making it ideal for kiosks, embedded displays, or media players.
# Performance tips
## Hardware & System Tweaks
* Use a lower screen resolution to reduce GPU/RAM usage
* Safely overclock the CPU (with heatsink for cooling)
* Use a high-quality power supply and fast SD card
* Prefer hardware with built-in kernel drivers to save RAM
## Software Optimization
* Reduce GPU memory allocation in config.txt
* Disable unused background services
* Use ZRAM for compressed swap instead of SD card swap
* Choose efficient compiled languages (C) over interpreted ones (Python) for demanding tasks
# My setup
Overclocked pi with two heatsinks and a hub USB with: keyboard, AX900 wifi dongle and Logitech C920 1080p webcam. For the settings at `/boot/config.txt`:
```
framebuffer_width=640
framebuffer_height=480
framebuffer_depth=16
arm_freq=1000
sdram_freq=600
core_freq=500
over_voltage=6
gpu_mem=128
```
These will impact the result of the experiments and syntax you will see further down. All the tools used are either part of the OS already or installed with `apt install `, unless stated otherwise. The compiled from source things will be compiled directly in the rpi
# Experiments
## Images
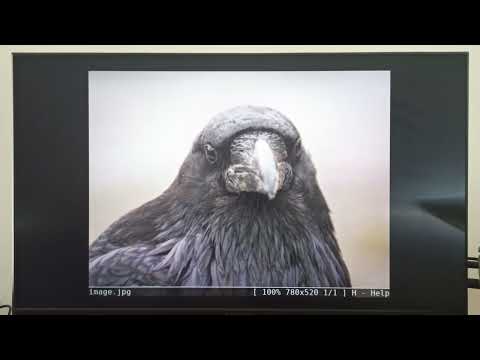
Linux framebuffer imageviewer supports PhotoCD, jpeg, ppm, gif, tiff, xpm, xwd, bmp, png and webp, ex:
```bash
$ fbi image.jpeg
```
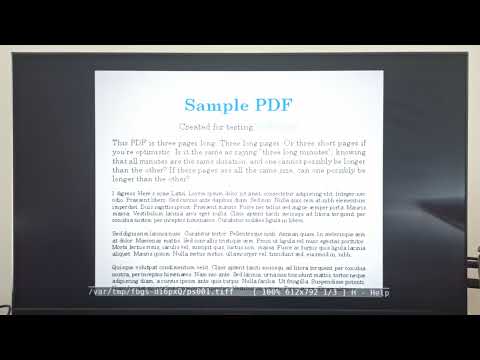
For PDF use:
```bash
$ fbgs file.pdf
```
Watch both tools in action:
[](https://www.youtube.com/watch?v=yyO0KxJruYs)
[](https://www.youtube.com/watch?v=isw05usOtlc)
## Videos
### CPU / software renderer (very slow)
* mplayer `mplayer video.mp4 -vo fbdev2 -vf scale=640:480`
* mpv `mpv video.mp4`
* ffplay `ffplay video.mp4`
> [!WARNING]
> Some of these tools have flags/options to use GPU/h.264 codecs, but none of them worked for me
### GPU / hardware h.264 decoder (fast)
* omxplayer: `omxplayer video.mp4 `
* ffmpeg: `ffmpeg -c:v h264_mmal -i video.mp4 -pix_fmt rgb565le -f fbdev /dev/fb0`
> [!WARNING]
> Omxplayer is no longer available after Raspbian Buster and has been deprecated since 2020
> https://github.com/popcornmix/omxplayer
> But it still available for the last Raspbian Buster OS via `sudo apt install omxplayer`
> They claim VLC replaces it, but I couldn't use VLC with GPU decoding and console mode
Watch the difference between mplayer(CPU) and omxplayer(GPU) playing the same video (h.264 / 480p):
[](https://www.youtube.com/watch?v=3zUy5Sg55xg)
## Userland GPU demos
Userland contains code/examples of how to leverage the dispmanx API to use the GPU, so let's run the demos and see what it is capable:
```bash
$ git clone https://github.com/raspberrypi/userland
$ cd userland
$ ./buildme
$ cd host_applications/linux/apps/hello_pi/
$ ./rebuild.sh
```
In the `hello_pi` folder you will find demos, run any `.bin` file from any of them, ex:
```bash
$ cd hello_triangle
$ ./hello_triangle.bin
```
Watch them in action:
[](https://www.youtube.com/watch?v=jPbkeuRi7ZE)
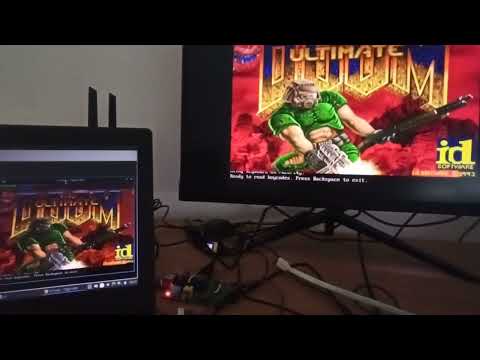
# DOOM
To run DOOM use this framebuffer ready version:
```bash
$ git clone https://github.com/maximevince/fbDOOM
$ cd fbDOOM
$ wget https://github.com/Akbar30Bill/DOOM_wads/raw/refs/heads/master/doom1.wad
$ make NOSDL=1
$ ./fbdoom -iwad doom1.wad
```
See it in action:
[](https://www.youtube.com/watch?v=T6gzGYftMPc)
> [!TIP]
> Get fbDOOM already compiled binary from [here](https://github.com/themrleon/fbDOOM/releases/tag/1.0)
These other versions are also available:
```bash
sudo apt install prboom-plus
sudo apt install chocolate-doom
```
## VNC
You can use VNC with console only! a desktop environment is not needed. So "Why not just use a simple SSH connection?" the key difference is:
* SSH connection provides a text-only terminal. It's perfect for command-line control but cannot display any graphics or applications that render to the screen
* VNC server like x11vnc mirrors the entire visual display. This means you can remotely see everything that would appear on the physical monitor
Start the server on the raspberry:
```bash
sudo x11vnc -rawfb console -auth /dev/null -noxdamage -forever -shared -repeat -defer 0 -wait 0 -noxinerama -nowf -nowcr -speeds modem -tightfilexfer
```
Now on any another device run the client, ex with TigerVNC:
```bash
vncviewer -SecurityTypes None :0 -CompressLevel 0 -QualityLevel 0 -FullColor 0 -PreferredEncoding raw -AutoSelect=0
```
All VNC devices will be mirroring each other (server and clients). I tested a couple VNC clients, some of them will allow more options than the others. Aiming reduced lag I chose `TigerVNC Viewer v1.13.1` as the winner.
> [!IMPORTANT]
> Using `-rawfb` sends the screen uncompressed to save CPU power (which reduces lag), but it requires a fast internet connection because it's sending the entire screen image all at once. Lower screen resolutions work better because they send less data, making it faster and more responsive
Here's a video keeping the 640x480 resolution:
[](https://www.youtube.com/watch?v=rV3fqgPKwvI)
Here the CPU usage for both DOOM and X11VNC:

> [!NOTE]
> When only DOOM is running the CPU usage is ~93% , but when X11VNC is running too, DOOM takes only half of the CPU time due to the kernel scheduler, otherwise it would run twice as fast
Now same test but matching DOOM's native 320x200 resolution in the `/boot/config.txt` file:
[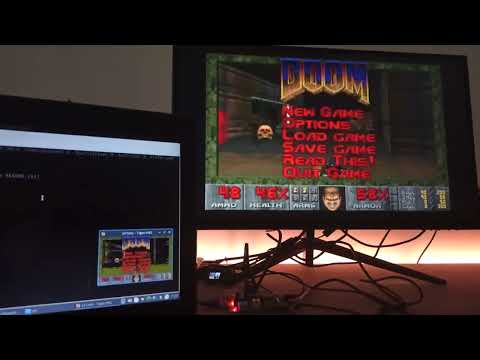](https://www.youtube.com/watch?v=SxlLdJJS1mI)
As we can see, now it's much better, making it possible to play DOOM remotely from anywhere in the world directly from the rpi!
> [!IMPORTANT]
> Doom over the VNC is to demonstrate the graphics capabilities, results may vary depending of your connection quality/speed. If you want less lag, use an ethernet cable connection instead
# USB camera
It's possible but not recommended since will eat CPU and USB bandwidth (shared across all connected USB devices). Here are the tools I tested with the webcam:
| Syntax | CPU Usage % | Delay(s) |
| :------------: |:---------------:| :-----:|
| `ffplay /dev/video0` | 21-40 | 0.5 |
| `mpv /dev/video0` | ~30 | 1-2 |
## Network streaming
To stream the video you can use ffmpeg with GPU encoding:
```bash
ffmpeg -f v4l2 -video_size 640x480 -input_format yuyv422 -i /dev/video0 -c:v h264_omx -b:v 1000k -g 50 -profile:v baseline -an -preset ultrafast -tune zerolatency -f mpegts "udp://:1234?pkt_size=1316"
```
Now on another machine run VLC player:

Here is the ffmpeg CPU usage and FPS based on different resolutions tested:
| Resolution | CPU Usage % | FPS |
| :------------: |:---------------:|:---------------:|
| 1280x720 | 40-50 | 9.7 |
| 640x480 | 22-30 | 15 |
| 320x240 | ~15 | 15 |
> [!WARNING]
> Always run VLC **before** ffmpeg, otherwise VLC won't work! I noticed this on both PC and Phone versions. Also it has a one second caching delay, set it to zero here:
> 
Despite setting to zero, there still 1-2s video delay (since I am on wifi) and it doesn't seem to transmit audio
# CSI camera and OV5647 sensor

> Raspivid is a command-line tool specifically designed for Raspberry Pi devices to capture video using the official camera modules (connected via the CSI interface). It is part of the legacy camera software stack (deprecated in newer Raspberry Pi OS versions like "Bullseye" and later) and leverages the VideoCore IV GPU for hardware-accelerated H.264 encoding, ensuring efficient video processing with minimal CPU load
This is much better than trying an USB camera, also there are two dedicated tools, one for picture and another for video.
> [!WARNING]
> Altought OV5647 is a 5MP sensor (2592x1944 pixels), rpi H.264 hardware encoder only supports up to 1920x1080 30 FPS video
## Camera connection steps
1. Locate the CSI Port on your Pi 1 Model B - it's between the Ethernet and HDMI ports
2. Lift the plastic clip on the CSI connector
3. Insert the ribbon cable with the blue side facing the Ethernet port
4. Push the clip back down to secure the cable
5. Enable in the `sudo raspi-config`, Interface Options → Camera → Yes
6. Reboot
7. Run `vcgencmd get_camera` and check for `supported=1 detected=1`
If there is no other camera connected then it will likely be at `/dev/video0`:
```bash
$ dmesg | grep video0
[ 19.385771] bcm2835-v4l2-0: V4L2 device registered as video0 - stills mode > 1280x720
```
The tools:
* raspistill: Used to take pictures, supports up to 5MP
* raspivid: Used to record videos, supports up to 1080p 30 FPS
Handy commands:
* Take 5MP picture waiting 5s: `raspistill -o image.jpg -w 2592 -h 1944`
* Take 5MP picture without wait: `raspistill -o image.jpg -w 2592 -h 1944 -t 1`
* Record raw h264 10s video: `raspivid -o video.h264 -w 1920 -h 1080 -t 10000 -fps 30`
* Convert raw h264 to mp4: `ffmpeg -r 30 -i video.h264 -c copy video.mp4`
* Stream video: `raspivid -t 0 -w 1920 -h 1080 -fps 30 -b 2000000 -o - | cvlc -vvv stream:///dev/stdin --sout '#standard{access=http,mux=ts,dst=:8080}' :demux=h264` (watch from VLC with `http://:8080`)
> [!IMPORTANT]
> By default `raspistill` waits 5s before taking the picture, but if you don't wait, depending on the light conditions, the image may be very dark!
> [!IMPORTANT]
> Videos recorded with `raspivid` are raw h264 and need to be converted to mp4 before playing, that can be done with tools like `ffmpeg` and `handbrake`
> [!TIP]
> Explore `raspivid --help`, it supports lots of features like camera parameters, filters, rotation and so on
> [!TIP]
> It's possible to watch the camera feed in the framebuffer console too, with `raspivid -f` or `ffplay /dev/video0`
# Audio
You can use `alsamixer` to control the volume of each device (press F6 for more):

To have sound on the 3.5mm audio jack instead of HDMI, use `sudo raspi-config` and go to 'System Options' -> 'Audio':

The same tools from videos can play music too, here is how each performed with the same MP3 file (which had an album cover too):
| Syntax | CPU Usage % | Show Album Cover |
| :------------: |:---------------:| :-----:|
| `mpv file.mp3` | ~23 | Yes |
| `ffplay file.mp3` | 25-40 | Yes |
| `mplayer file.mp3` | ~10 | No |
| `omxplayer file.mp3` | ~10 | No |
| `mpg123 file.mp3` | 7-9 | No |
`mpg123` was the winner since it's only for audio files.
Check [this](https://github.com/themrleon/tui-mp3-player) personal project for an UI for `mpg123`:

> [!WARNING]
> Unfortunatelly using the 3.5mm audio jack you'll be able to hear noises, specially when CPU is doing something, but even when idle the audio signal is noisy, that seems to be a known issue and the only solution I found was to **power pi from an USB power bank** or battery, powering from wall adaptor creates the noise, also tried putting different capacitors, and recommendations like adding `disable_audio_dither=1` and `audio_pwm_mode=2` to `/boot/config.txt`, but that didn't help either.
> So for wall adapter consider using via **HDMI** or **bluetooth**, or try a very high quality adapter and cable, I also tried via **USB sound card** but then couldn't get to work in **stereo** mode, only in **mono**, at least the noise was like 95% gone. Despite the noise with the built-in 3.5mm audio jack, at least it works in stereo mode:
> | Audio source | Noise | Channels | Pi powered from
> | :------------: |:---------------:| :-----:| :-----:|
> | Built-in 3.5mm | a lot! | 2ch / stereo | AC/DC 5v adaptor |
> | Built-in 3.5mm | zero | 2ch / stereo | USB power bank |
> | HDMI out | zero | 2ch / stereo | AC/DC 5v adaptor |
> | HDMI out | zero | 2ch / stereo | USB power bank |
> | USB sound card | minimal | 1ch / mono | AC/DC 5v adaptor |
> | USB sound card | zero | 1ch / mono | USB power bank |
> | Bluetooth | zero | 2ch / stereo | AC/DC 5v adaptor |
> | Bluetooth | zero | 2ch / stereo | USB power bank |
# Emulation and Retropie
The best choice for emulation is using Retropie, it contains everything pre-compiled already (on their servers) and you download just what you want. Retropie is not only for Raspberry Pi, check their website for more details. It contains some tools, game ports and emulators of video game and computers:
https://github.com/RetroPie/RetroPie-Setup?tab=readme-ov-file#retropie-setup
> [!NOTE]
> I noticed latest Retropie which is 4.8 is using the same OS I chose (Raspbian 10 Buster)
After you are done installing, you can start it with `emulation-station`. The interface and controls are confusing, you have to set up keys using a wizard first, and when you want new things have to install via the `sudo retropie_setup.sh` tool, from there you can install multiple versions of things too, ex: multiple SNES emulators, but they won't show up as an option on the UI until you put at least one game in the proper directoty, ex: `/home/rpi/RetroPie/roms/snes`, the same idea and pattern apply for the rest of the systems. When you have multiple SNES emulators for example, you will be able to choose one to run, this will all make sense once you watch the DOSbox video
Here is an example running Stunts on DOS where I have 3 different DOSbox versions installed: **original**, **SDL2** and **Libretro**, from my tests Libretro was the fastest:
[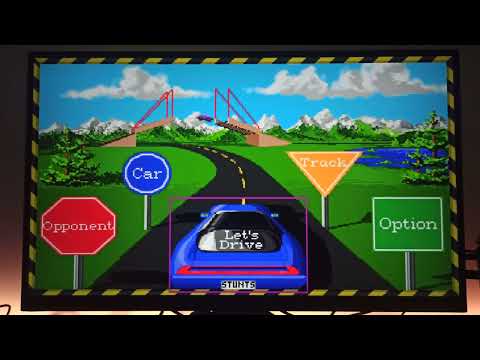](https://www.youtube.com/watch?v=RjdRhNTcLUU)
Fastest DOSbox version + overclock isn't enough to run things properly like we can see with Stunts, so for DOS better stick only with applications and 2D games. Libretro has also its own UI inside Dosbox (hold A + D), I changed the default video driver from `GL` to `dispmanx` but didn't notice any difference. To actually have the keyboard working inside libretro Dosbox you have to press scroll lock, everything can be done with keyboard only, there is no need for gamepad or mouse.
Quake port using the GPU:
[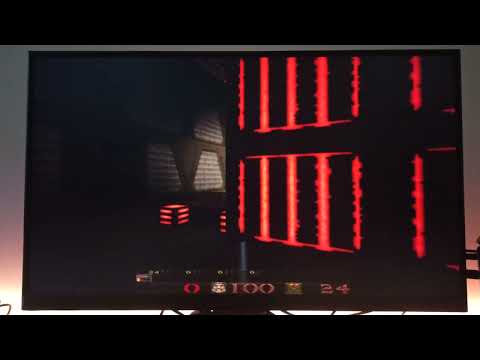](https://www.youtube.com/watch?v=yRFswHnjL9s)
With Retropie you'll have many options and configurations available, but will have to test which combo works best for your scenario
> [!IMPORTANT]
> Retropie also install some patched SDL libs on the rpi:
> 
# SDL, SDL2, OpenGL and OpenGL ES
It's possible to run SDL, SDL2 and **OpenGL ES** (but not **OpenGL**!) games and applications too, like this simple SDL2 game:
https://github.com/yujqiao/DungeonRush
[](https://www.youtube.com/watch?v=xloVZXOWGos)
The Retropie Quake we just saw above is a SDL 2 and **OpenGL ES** port, from its binary we can see both linked libs:
```bash
$ ldd /opt/retropie/ports/darkplaces-quake/darkplaces-sdl
libSDL2-2.0.so.0 => /lib/arm-linux-gnueabihf/libSDL2-2.0.so.0 (0xb6ced000)
libbrcmGLESv2.so => /opt/vc/lib/libbrcmGLESv2.so (0xb6cc7000)
```
## What is libbrcmGLESv2.so?
It's the proprietary OpenGL ES 2.0 driver for Raspberry Pi's Broadcom GPU. It was deprecated in 2021 with the release of Raspberry Pi OS Bullseye (In this experiments we are on the latest Buster, the one before Bullseye started), which replaced it with the open-source Mesa driver (libGLESv2.so). This change improved maintenance, added 64-bit support, and standardized graphics APIs. The old library was 32-bit only, causing compatibility issues on 64-bit systems
The Raspberry Pi 1 cannot run desktop OpenGL games because its VideoCore IV GPU only supports OpenGL ES, not full OpenGL. Key reasons include:
* No Native Driver: The GPU's driver only understands OpenGL ES commands, not desktop OpenGL
* Hardware Limits: The GPU physically lacks the features required for desktop OpenGL
* Software Rendering is Too Slow: Using the CPU to emulate a GPU results in unplayable performance (~1 frame per second)
* Translation is Inefficient: Compatibility layers exist but perform poorly and only work for simple 2D games like [glshim](https://github.com/lunixbochs/glshim)
* Solution: The only practical way to run games is to use those specifically ported to OpenGL ES, like [Quake 3](https://github.com/cdev-tux/q3lite)
But [GL4S](https://github.com/ptitSeb/gl4es) may allow OpenGL games on the pi:
> GL4ES is a powerful tool for enabling desktop OpenGL games on Raspberry Pi hardware that only supports OpenGL ES. While it has limitations and may not work perfectly for every game, it significantly expands the range of software that can run on the Pi. For better performance on Pi 4 or newer, consider native Vulkan or OpenGL ES development
> [!WARNING]
> To compile gl4s on the rpi you need to leave a lot of RAM available, otherwise the compiler will keep crashing due to low memory (only worked when I had max ~80MB of RAM used, by unloading drivers with rmmod and setting GPU memory to 16MB). However I couldn't get it to work with a simple OpenGL hello world application, also tried `glxgears` and `glxinfo` without success (probably needs an x11 environment instead of console/framebuffer), the gl4s compilation took around 30 minutes (full overclocked pi)
> [!TIP]
> To see an OpenGL ES 2.0 benchmark using Raylib check [this](https://github.com/themrleon/raylib-cubenchmark) personal project!
# Framebuffer Streaming vs VNC
You can stream the framebuffer using `ffmpeg` with h.264 encoding:
```bash
$ ffmpeg -f fbdev -i /dev/fb0 -video_size 640x480 -framerate 10 -c:v h264_omx -b:v 1000k -g 50 -profile:v baseline -an -preset ultrafast -tune zerolatency -f mpegts "udp://:1234?pkt_size=1316"
```
Or without (defaults to `mpeg2video`):
```bash
$ ffmpeg -f fbdev -i /dev/fb0 -preset ultrafast -tune zerolatency -f mpegts "udp://:1234?pkt_size=1316"
```
| FFMPEG encoder | CPU Usage % | FPS | Bitrate (kbits/s) |
| :------------: | :---------------: | :-----: | :-----: |
| mpeg2video | ~93 | ~6 | ~300 |
| h264_omx | ~93 | ~7.5 | ~80 |
But from my tests streaming is not worth it, X11VNC does a better job since it supports user input and have much less lag
# Wifi and Bluetooth
Unlike the latest pi models, this one haven't any, so you have to use one of those USB bluetooth/wifi dongles, ideally with an old chipset, so that the kernel will have the driver already. Otherwise, like in my case you will have to compile yourself:
https://github.com/themrleon/realtek-8851bu-driver
# SPI interface
To interact with the SPI first you have to enable it via the `sudo raspi-config` tool, then you can use any Python for quick test, or C libs for more performant tasks
## SPI displays
It's possible to use SPI displays instead of RCA/HDMI/DSI ones, however SPI will require CPU usage, given the already limited pi single-core CPU, that can be a heavy toll on performance. Hopefully there is this tool which from my tests seems to be the best option as long as you have an **ILI9341** based display:
https://github.com/juj/fbcp-ili9341
### ST7789 controller

The **fbcp-ili9341** tool seems to support other display controllers like the ST7789, but from my tests that didn't work out of the box, only after patching the lib (but still an issue when it clears the screen due to the 35px offset that my ST7789 model has), and given the high CPU usage and complexity to get it working wasn't worth it, so I made my own ST7789 display solution:
https://github.com/themrleon/rpi-st7789-console-display
> [!IMPORTANT]
> Note that both tools used similar amount of CPU when running DOOM, however when idle **fbcp-ili9341** uses less
> [!IMPORTANT]
> I am providing the patch file in case you wanna try a ST7789 display with **fbcp-ili9341** yourself (`git apply st7789_fbcp-ili9341.patch`)
> Compile with (no DMA since that doesn't seem to work with ST7789): `cmake .. -DST7789=ON -DGPIO_TFT_DATA_CONTROL=24 -DGPIO_TFT_RESET_PIN=25 -DSPI_BUS_CLOCK_DIVISOR=16 -DSTATISTICS=0 -DUSE_DMA_TRANSFERS=OFF -DDISPLAY_ROTATE_180_DEGREES=ON`
### ILI9341 controller

This is by far the best model choice, the CPU usage is low compared to any other solutions found:
| Tool CPU Usage % | Doing What ? | Notes |
| :------------: | :---------------: | :---------------: |
| 4-7 | Idle | console idle
| 14-18 | DOOM | fbdoom
| 10-16 | video playback | omxplayer (GPU h.264 decode)
The process to compile the tool is, from the `fbcp-ili9341` folder:
1. `mkdir build`
2. `cd build`
3. `cmake .. -DILI9341=ON -DGPIO_TFT_DATA_CONTROL=24 -DGPIO_TFT_RESET_PIN=25 -DSPI_BUS_CLOCK_DIVISOR=16 -DSTATISTICS=0 -DUSE_DMA_TRANSFERS=ON -DDMA_TX_CHANNEL=5 -DDMA_RX_CHANNEL=4`
4. Run with sudo: `sudo ./fbcp-ili9341`
> [!WARNING]
> Make sure to adapt the PIN numbers to your wiring, the example above is following [this](https://github.com/themrleon/rpi-st7789-console-display?tab=readme-ov-file#wiring)
> [!IMPORTANT]
> The default DMA channels used by the tool caused problems to me, so I changed to 4 and 5 and that solved
> [!TIP]
> To run the tool whenever pi boots, add an entry to `/etc/rc.local`, ex: `/fbcp-ili9341/build/fbcp-ili9341 &`
# Cyberdeck
Putting everything into making a small portable computer with it, I present you the Raspberry Pi Cyberdeck:
[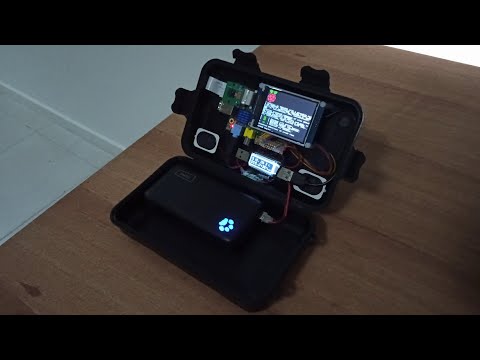](https://www.youtube.com/watch?v=GxkUKVQvG-8)
**Features**
* Overclocked @ 1 Ghz
* Real-time power consumption
* 3W stereo speakers (PAM8403 amplifier)
* 2.8" TFT SPI ILI9341 320x240 screen
* Can record, play and stream FHD 1920x1080 30 FPS h264 videos
* Can control and be controlled remotelly via wifi
* Can be used as IP webcam and video source for IA applications
* Use USB connection for power
* 2.4 Ghz wireless keyboard with touchpad
* 5.8 Ghz Wifi
* GPU with OpenGL ES 2.0
* HDMI and RCA video out
* 3.5mm audio jack