https://github.com/thevindu-w/clip_share_client
Clip Share Android client. Share clipboard between devices. Share files and screenshots securely.
https://github.com/thevindu-w/clip_share_client
android clipboard files lan screenshots secure share
Last synced: 2 months ago
JSON representation
Clip Share Android client. Share clipboard between devices. Share files and screenshots securely.
- Host: GitHub
- URL: https://github.com/thevindu-w/clip_share_client
- Owner: thevindu-w
- License: mit
- Created: 2022-07-22T21:47:27.000Z (almost 4 years ago)
- Default Branch: master
- Last Pushed: 2026-04-27T18:06:53.000Z (2 months ago)
- Last Synced: 2026-04-27T20:10:38.509Z (2 months ago)
- Topics: android, clipboard, files, lan, screenshots, secure, share
- Language: Java
- Homepage:
- Size: 1.29 MB
- Stars: 112
- Watchers: 1
- Forks: 10
- Open Issues: 1
-
Metadata Files:
- Readme: README.md
- License: LICENSE
- Codeowners: .github/CODEOWNERS
Awesome Lists containing this project
README
# ClipShare - Android Client
### Share Clipboard and Files. Copy on one device. Paste on another device.


[](https://github.com/thevindu-w/clip_share_client/releases)
[](https://github.com/thevindu-w/clip_share_client/stargazers)
ClipShare is a lightweight and cross-platform tool for clipboard sharing. ClipShare enables copying text, files, and images on one device and pasting on another. ClipShare is simple and easy to use while being highly configurable.
The ClipShare Android client can connect to the server running on your desktop/laptop and share copied text, files, and images.
## 🚀 Quick-start
1. Download and install the ClipShare server: [https://github.com/thevindu-w/clip_share_server/releases](https://github.com/thevindu-w/clip_share_server/releases/latest) (Other installation methods are available in the [Installation section of the server](https://github.com/thevindu-w/clip_share_server#installation).)
1. Download and install the ClipShare client.
- Mobile client (Android): [https://github.com/thevindu-w/clip_share_client/releases](https://github.com/thevindu-w/clip_share_client/releases/latest) or [apt.izzysoft.de/fdroid/index/apk/com.tw.clipshare](https://apt.izzysoft.de/fdroid/index/apk/com.tw.clipshare)
- Desktop client: [https://github.com/thevindu-w/clip_share_desktop/releases](https://github.com/thevindu-w/clip_share_desktop/releases/latest) (Other installation methods are available in the [Installation section of the desktop client](https://github.com/thevindu-w/clip_share_desktop#installation).)
1. Start sharing clipboard contents across devices.
Copy some text on one device and use the ClipShare client to share it from/to the device running the server.
More customization options and detailed instructions on each step are described below in the [How to Use](#how-to-use) section.
## Download
### Server
Desktop

Download the server from GitHub Releases.
### Client
Android
Desktop

Download the Android client app
from IzzyOnDroid
or from GitHub Releases.
Download the desktop client from GitHub Releases.
This is the Android client of ClipShare. You will need the server on your desktop to connect with it.
ClipShare is lightweight and easy to use. Run the server on your Windows, macOS, or Linux machine to use the ClipShare
app. You can find more information on running the server on Windows, macOS, or Linux at
[github.com/thevindu-w/clip_share_server](https://github.com/thevindu-w/clip_share_server#how-to-use).
## Table of Contents
- [📖 How to Use](#how-to-use)
- [📱 Main screen](#main-screen)
- [Get and Send operations](#get-and-send-operations)
- [Other operations](#other-operations)
- [⚙️ Settings](#settings)
- [Auto send](#auto-send)
- [Saved addresses](#saved-addresses)
- [Secure mode](#secure-mode)
- [Other settings](#other-settings)
- [Ports](#ports)
- [Run in background](#run-in-background)
- [Server mode (beta)](#server-mode-beta)
- [Import/Export settings](#importexport-settings)
## How to use
### Main screen
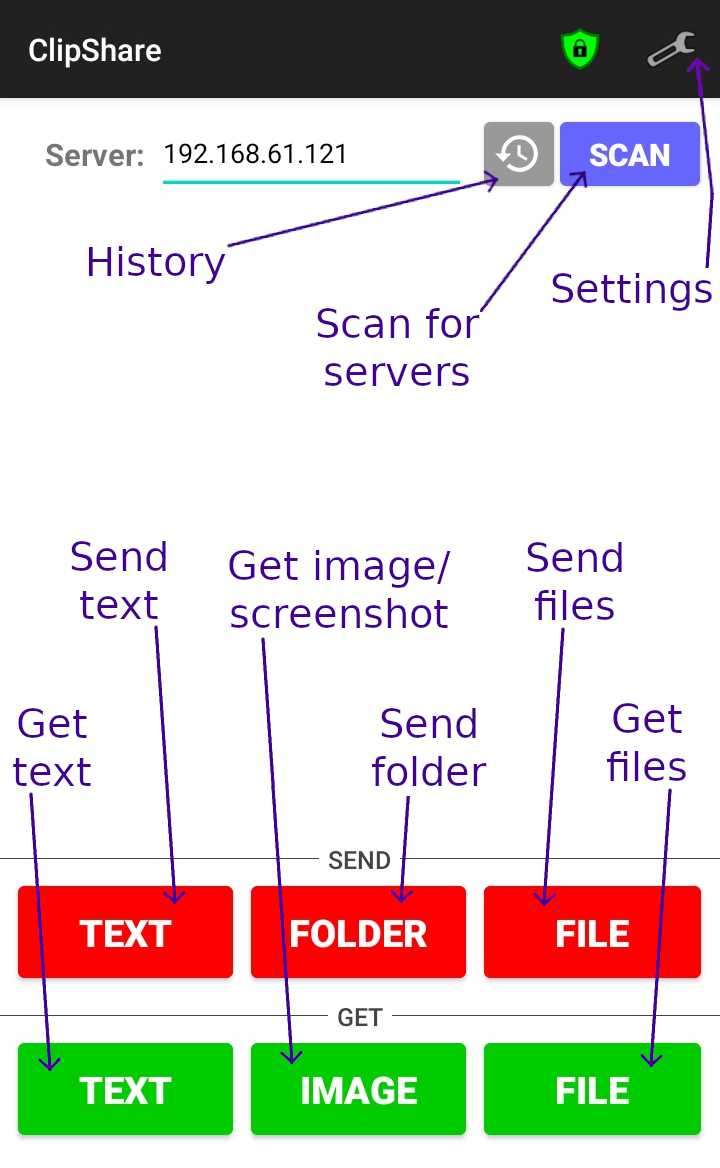
#### Get and Send operations
- **Get text**: To get copied text from the server (ex: laptop) to the phone.
_Steps_:
- Copy any text on the laptop.
- Press the green colored _GET_ button.
- Now, the copied text is received and copied to the phone. Paste it anywhere on the phone (possibly in a different
app).
- **Send text**: To send copied text from the phone to the server (ex: laptop).
_Steps_:
- Copy any text on the phone (possibly in a different app).
- Press the red colored _SEND_ button.
- Now, the copied text is sent and copied to the laptop. Paste it anywhere on the laptop.
- **Get files**: To get copied files from the server (ex: laptop) to the phone.
_Steps_:
- Copy any file(s) and/or folder(s) on the laptop.
- Press the green colored _FILE_ button.
- The copied files and folders are now received and saved on the phone.
- **Send files**: To send files from the phone to the server (ex: laptop).
_Method 1 Steps_:
- Press the red colored _FILE_ button.
- Select the file(s) to send.
- The files are now sent to the laptop.
_Method 2 Steps_:
- Share any file(s) with ClipShare from any other app.
- Press the red colored _FILE_ button.
- The files are now sent to the laptop.
- **Send folder**: To send a folder from the phone to the server (ex: laptop).
_Steps_:
- Press the red colored _FOLDER_ button.
- Select the folder to send.
- The folder is now sent to the laptop.
Note: Sending folders requires a server version 2.x or later.
- **Get image/screenshot**: To get a copied image or screenshot from the server (ex: laptop) to the phone.
_Steps_:
- Optional: Copy an image (not an image file) to the clipboard on the laptop.
- Press the green colored _IMAGE_ button.
- If there is an image copied on the laptop, it will be received and saved on the phone.
Otherwise, a screenshot of the laptop will be received and saved on the phone.
Long pressing the _IMAGE_ button gives more options.
- Get only a copied image without a screenshot.
- Get only a screenshot, even when there is an image, copied to the clipboard of the laptop.
- Select the display to get the screenshot.
Note: These options require a server version 3.x or later to work.
#### Other operations
- **Scan**: To scan the network to find available servers in the network.
If there is any server in the network, scanning will find that. If the scan finds only one server, its address will be
placed in the _Server_ address input area. If the scan finds many servers, a popup will appear to select any server
out of them, and the selected address will be placed in the _Server_ address input area.
- **History**: To select a previously saved server address.
The _History_ option will display the server addresses, which were saved previously, to select one as the server
address. If there are any saved server addresses available, a popup will appear to select any address out of them, and
the selected address will be placed in the _Server_ address input area.
### Settings
#### Auto send
- **Auto send text:** When this setting is enabled, ClipShare will automatically send the text shared with it from other
apps (ex: when sharing a link from the web browser) without requiring to tap the _Send_ button.
- **Auto send files:** When this setting is enabled, ClipShare will automatically send the files shared with it
(ex: sharing documents or photos from the file manager or gallery) without requiring to tap the _Send File_ button.
- **Auto send to:** This is the list of trusted servers to auto-send. Add the IP address of each server using the `+`
button. Setting the address to `*` will allow auto-sending to any server. Tap on the address to edit it, and tap on
the `X` button to remove the entry from the list.
#### Saved addresses
- **Save addresses:** When this setting is enabled, ClipShare will save the server addresses used by the app.
- **Saved servers:** This is the list of automatically saved server addresses. You can manually add an IP address to
the list using the `+` button. Tap on any address to edit it, and tap on the `X` button to remove it from the list.
#### Secure mode
- **CA Certificate:** This is the self-signed TLS certificate of the certification authority that signed the client and
server's TLS certificates. Select the certificate file using the _Browse_ button.
- **Client Certificate:** This is the TLS key and certificate _p12_ or _pfx_ file of the client. Before selecting the
file using the _Browse_ button, you must enter the password for the _pfx_ file.
The password should have less than 256 characters.
- **Trusted servers:** This is the list of trusted servers to which the client is allowed to connect. Add the _Common
Name_ of each server using the `+` button. Tap on the name to edit it, and tap on the `X` button to remove the entry
from the list. The client app will refuse to connect to servers not having TLS certificates with their _Common Name_
listed under this list when secure mode is enabled.
- **Secure mode:** When this setting is enabled, the connections with the server (ex: your laptop) are secured with TLS
encryption. Enabling this setting prevents others on the same network from spying on or modifying the data you share
with your laptop. To enable this setting, you need to select the CA certificate and client TLS certificate and add at
least one trusted server. Additionally, you need to configure the server to create and use a server certificate.
Refer to the
[TLS certificates](https://github.com/thevindu-w/clip_share_server#create-ssltls-certificate-and-key-files) and
[Configuration](https://github.com/thevindu-w/clip_share_server#configuration) sections of the
[ClipShare server](https://github.com/thevindu-w/clip_share_server) for more information.
#### Other settings
- **Close app if idle:** When this setting is enabled, the ClipShare app will automatically close if it is kept idle
without interacting with it for some time. This time duration can be changed from the _Auto-close delay_ setting
described below.
- **Auto-close delay:** This is the time duration, in seconds, for which the app is kept idle before automatically
closing. This setting is visible only when the _Close app if idle_ setting is enabled.
- **Vibration alerts:** When this setting is enabled, the phone will give a short vibration pulse after each successful
operation (ex: _Get Files_) as feedback to the user.
- **IPv6 Scan:** When this setting is enabled, the [scan operation](#other-operations) will scan the network for IPv6
addresses of servers in addition to IPv4 addresses.
- **TCP Scan:** When this setting is enabled, the [scan operation](#other-operations) will scan using TCP connections in
addition to UDP broadcast (or multicast for IPv6) scanning. It is recommended to keep this turned off, as TCP scanning
is slower and more resource-intensive than UDP scanning. Enable this only if there is any issue with the UDP scanning.
- **Auto-scan at start:** When this setting is enabled, [scan operation](#other-operations) will scan the network for
available servers when the app starts.
##### Ports
- **Port:** This is the port on which the server on your laptop listens for plaintext TCP connections. The default value
for this port is `4337`. If a different port is assigned for the server according to the
[server configuration](https://github.com/thevindu-w/clip_share_server#configuration), enter the same port here.
- **Secure Port:** This is the port on which the server on your laptop listens for TLS-encrypted connections. The
default value for this port is `4338`. If a different port is assigned for the server according to the
[server configuration](https://github.com/thevindu-w/clip_share_server#configuration), enter the same port here.
- **UDP Port:** This is the port on which the server on your laptop listens for UDP scanning requests. The default value
for this port is `4337`. If a different port is assigned for the server according to the
[server configuration](https://github.com/thevindu-w/clip_share_server#configuration), enter the same port here.
#### Run in background
- **Run in background:** This will make the app run in the background with a notification. The notification has buttons
to get and send copied text without opening the app.
#### Server mode (beta)
- **UDP Scan:** When this setting is enabled, the server mode becomes discoverable to other devices using the scan
operation. It is useful when using the auto-send in the desktop client.
##### Ports
- **Port:** This is the port on which the server mode listens for plaintext TCP connections. The default value of this
port is `4337`. If a different port is assigned, configure the other clients to use the same port.
- **Secure Port:** This is the port on which the server mode listens for TLS-encrypted connections. The default value of
this port is `4338`. If a different port is assigned, configure the other clients to use the same port.
- **UDP Port:** This is the port on which the server mode listens for UDP scanning requests. The default value of this
port is `4337`. If a different port is assigned, configure the other clients to use the same port.
#### Start server mode
- **Start server mode:** This will start the server mode in the background with a notification. Other ClipShare clients
on the network can send text to this device. The notification has a button to stop the server mode.
#### Import/Export settings
- **Import settings:** Use this to import settings from a _JSON_ file exported before. Note that the current settings
will be discarded when importing settings from a file.
- **Export settings:** Use this to export settings to a _JSON_ file that can be imported later. Settings can be exported
to preserve settings after reinstalling the app or moving app settings to another device.