https://github.com/tomaae/homeassistant-portainer
Portainer integration for Home Assistant
https://github.com/tomaae/homeassistant-portainer
docker hacs homeassistant homeassistant-components homeassistant-custom-component homeassistant-integration portainer
Last synced: 4 months ago
JSON representation
Portainer integration for Home Assistant
- Host: GitHub
- URL: https://github.com/tomaae/homeassistant-portainer
- Owner: tomaae
- License: apache-2.0
- Created: 2023-05-06T03:28:40.000Z (about 3 years ago)
- Default Branch: master
- Last Pushed: 2025-09-06T00:15:51.000Z (10 months ago)
- Last Synced: 2025-10-09T09:46:27.747Z (9 months ago)
- Topics: docker, hacs, homeassistant, homeassistant-components, homeassistant-custom-component, homeassistant-integration, portainer
- Language: Python
- Homepage:
- Size: 594 KB
- Stars: 134
- Watchers: 6
- Forks: 15
- Open Issues: 12
-
Metadata Files:
- Readme: README.md
- Funding: .github/FUNDING.yml
- License: LICENSE
Awesome Lists containing this project
README
# Portainer integration for Home Assistant

[](https://github.com/hacs/integration)


[](https://app.lokalise.com/public/892665226456f113e0a814.16864793/)


Monitor and control Portainer from Home Assistant.
Features:
- List Endpoints
- List Containers
- Check registry, for container updates
- Public repos on docker and github are currently supported
# Features
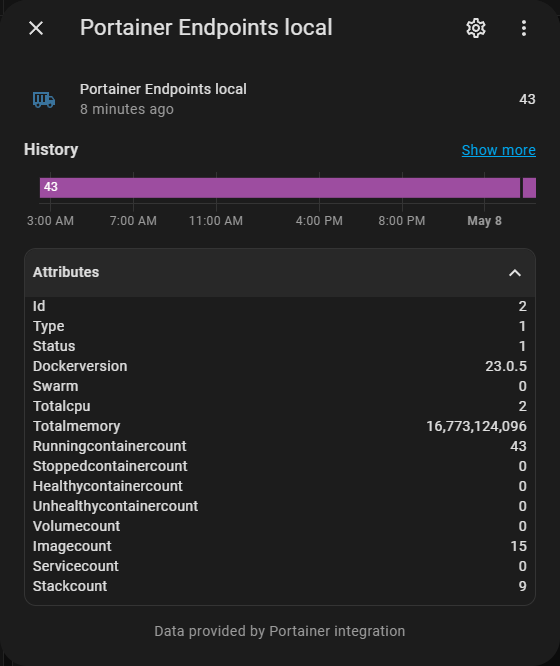
## Endpoints
List of Portainer endpoints.
## Containers
List of containers.

## Update Check Feature
The integration supports checking for available updates for your containers via Docker Hub and GitHub registries.
- **Check update**: This option is **disabled by default**. To use update checks, you must enable the option in the integration settings (`Configuration -> Integrations -> Portainer -> Configure`).
- **Update check time**: You can set the hour of day when the automatic update check should run. The update cycle is every 24 hours at the configured time.
- **Update check button and sensor**: Both the update check button ("Force update check") and the update check sensor are **disabled by default** in the Home Assistant entity registry. You must enable them manually under `Settings -> Devices & Services -> Entities` to use them.
- **Force update**: The update check button allows you to trigger an immediate update check outside the regular schedule. **Note:** Most registries (Docker Hub, GitHub) have rate limits. Excessive use of the force update button may result in temporary blocks or errors from the registry.
- **Supported registries**: Currently, Docker Hub and GitHub Container Registry are supported for update checks.
You can view the update status and details in the sensor attributes. The button entity can be used to trigger a manual check, but please use it responsibly to avoid hitting registry rate limits.
### Status Codes
The update check sensor and button use the following status codes in their state and attributes:
| Status Code | Meaning |
| ----------- | ------------------------------------------------------- |
| 0 | No update available (up to date) |
| 1 | Update available |
| 2 | Update status not yet checked |
| 401 | Unauthorized (registry credentials required or invalid) |
| 404 | Image not found on registry |
| 429 | Registry rate limit reached |
| 500 | Registry/internal error |
The sensor attributes also include a human-readable `update_status_description` for each code. For details on errors or rate limits, see the sensor attributes.
# Install integration
This integration is distributed using [HACS](https://hacs.xyz/).
You can find it under "Integrations", named "Portainer".
## Get portainer access token
1. Login into your portainer instance
2. Click your username at the top right and select "My Account"
3. Under "Access tokens", click "Add access token"
4. Enter name for your access token (can be anything, for example "homeassistant")
5. Copy displayed access token for use in integration setup
## Setup integration
Setup this integration for your Portainer in Home Assistant via `Configuration -> Integrations -> Add -> Portainer`.
You can add this integration several times for different portainer instances.
- "Name of the integration" - Friendly name for this Portainer instance
- "Host" - Use hostname or IP and port (example: portainer.domain.tld or 192.168.0.2:9000)
- "Access token" - Use access token from previous step
- "Use SSL" - Connect to portainer using SSL
- "Verify SSL certificate" - Validate SSL certificate (must be trusted certificate)
## Configuration
After setup, you can configure custom attributes and options for each Portainer entry via `Configuration -> Integrations -> Portainer -> Configure`.
### Supported options:
- **Health check**: Checks if the container is running correctly by executing a defined command.
- **Restart policy**: Defines how and when the container restarts after stopping.
- **Check update**: Enable or disable the update check feature (see above for details).
- **Update check time**: Set the hour of day for the daily update check.

# Development
## SonarCloud Automation
To enable SonarCloud analysis via GitHub Actions, you must create the following secrets in your GitHub repository:
- `SONAR_PROJECT_KEY`
- `SONAR_ORGANIZATION`
- `SONAR_TOKEN`
Go to your repository's **Settings > Secrets and variables > Actions** and add these secrets. This allows the SonarCloud workflow to run automatically for code analysis.
## Visual Studio Code Setup
A `.vscode-template` directory is provided in the repository to help you set up your development environment in Visual Studio Code. Copy the contents of `.vscode-template` to your `.vscode` directory to use recommended settings and launch configurations for Python development and testing.
## Software Development
### Prerequisites
- Python 3.11 or higher
- Git
- Visual Studio Code (recommended)
### Setting up the Development Environment
#### 1. Clone the Repository
```bash
git clone https://github.com/tomaae/homeassistant-portainer.git
cd homeassistant-portainer
```
#### 2. Create a Virtual Environment
It's highly recommended to use a virtual environment to isolate dependencies:
```bash
# Create virtual environment
python -m venv .venv
# Activate virtual environment
# On Linux/macOS:
source .venv/bin/activate
# On Windows:
.venv\Scripts\activate
```
#### 3. Install Dependencies
```bash
# Install runtime dependencies
pip install -r requirements.txt
# Install development and testing dependencies
pip install -r requirements_test.txt
```
#### 4. Install Development Tools (Optional)
```bash
# Install pre-commit hooks for code quality
pre-commit install
```
### Code Formatting
This project uses Black for code formatting. All code must be Black-formatted before committing. VS Code is configured to auto-format on save if you use the provided settings.
```bash
# Format all Python files
black custom_components/ tests/
# Check formatting without making changes
black --check custom_components/ tests/
```
### Running Tests
#### Command Line
```bash
# Run all tests
python -m pytest
# Run tests with verbose output
python -m pytest -v
# Run tests with coverage report
python -m pytest --cov=custom_components.portainer --cov-report=html
# Run specific test file
python -m pytest tests/test_tag_parsing.py
# Run specific test
python -m pytest tests/test_tag_parsing.py::TestDockerImageTagParsing::test_parse_image_name
```
#### Visual Studio Code Integration
##### 1. Install Extensions
Install the following VS Code extensions:
- **Python** (ms-python.python)
- **Python Test Explorer** (or use built-in testing)
##### 2. Configure VS Code Settings
Create or update `.vscode/settings.json`:
```json
{
"python.defaultInterpreterPath": "./.venv/bin/python",
"python.testing.pytestEnabled": true,
"python.testing.unittestEnabled": false,
"python.testing.pytestArgs": ["tests"],
"python.testing.autoTestDiscoverOnSaveEnabled": true,
"python.terminal.activateEnvironment": true,
"editor.formatOnSave": true,
"python.formatting.provider": "black"
}
```
##### 3. Activate Tests in VS Code
1. Open the Command Palette (`Ctrl+Shift+P` / `Cmd+Shift+P`)
2. Run `Python: Select Interpreter`
3. Choose `./.venv/bin/python`
4. Run `Test: Refresh Tests` to discover tests
5. Open the Test Explorer (`Ctrl+Shift+T` / `Cmd+Shift+T`)
You should now see all 110 tests organized by file and class in the Test Explorer.
##### 4. Running Tests in VS Code
- **Run all tests**: Click the play button at the top of Test Explorer
- **Run specific test**: Click the play button next to any test
- **Debug test**: Right-click on a test and select "Debug Test"
- **View test output**: Click on any test to see results and output
### Test Structure
```
tests/
├── test_availability_fix.py # Entity availability management (enabled/disabled states)
├── test_dynamic_ui_reactive.py # Dynamic UI behavior
├── test_pure_logic.py # Core config flow logic and validation
├── test_tag_parsing.py # Docker image name parsing
├── test_ui_field_visibility.py # Conditional field display
├── test_unique_id_fix.py # Entity unique ID generation
└── test_update_checks.py # Container update logic and caching
```
### Development Workflow
1. **Create a feature branch**: `git checkout -b feature/your-feature`
2. **Make changes** to the code
3. **Format code**: Use Black to ensure consistent code style
4. **Run tests**: `python -m pytest` to ensure nothing breaks
5. **Commit changes**: `git commit -m "Description of changes"`
6. **Push and create PR**: `git push origin feature/your-feature`
#### Code Formatting with Black
This project uses [Black](https://black.readthedocs.io/) for consistent code formatting.
```bash
# Format all Python files
black custom_components/ tests/
# Check if files need formatting (without applying changes)
black --check custom_components/ tests/
# Format specific file
black custom_components/portainer/coordinator.py
```
**Important**: All code must be Black-formatted before committing. VS Code is configured to auto-format on save if you use the provided settings.
### Debugging
Add breakpoints in VS Code and use the debug configuration for pytest:
```json
// .vscode/launch.json
{
"version": "0.2.0",
"configurations": [
{
"name": "Python: pytest",
"type": "debugpy",
"request": "launch",
"module": "pytest",
"args": ["tests/", "-v"],
"console": "integratedTerminal",
"python": "./.venv/bin/python",
"cwd": "${workspaceFolder}"
}
]
}
```
### Current Test Coverage
- **Total Tests**: 121
- **Entity Availability Tests**: Entity enabled/disabled states
- **Static UI Tests**: Static UI behavior
- **Pure Logic Tests**: Config flow logic and validation
- **Tag Parsing Tests**: Docker image name parsing
- **UI Field Visibility Tests**: Conditional field display
- **Unique ID Tests**: Entity unique ID generation
- **Update Check Tests**: Container update logic and caching
- **Success Rate**: 100% ✅
## Translation
To help out with the translation you need an account on Lokalise, the easiest way to get one is to [click here](https://lokalise.com/login/) then select "Log in with GitHub".
After you have created your account [click here to join Portainer project on Lokalise](https://app.lokalise.com/public/892665226456f113e0a814.16864793/).
If you want to add translations for a language that is not listed please [open a Feature request](https://github.com/tomaae/homeassistant-portainer/issues/new?labels=enhancement&title=%5BLokalise%5D%20Add%20new%20translations%20language).
## Enabling debug
To enable debug for Portainer integration, add the following to your configuration.yaml:
```
logger:
default: info
logs:
custom_components.portainer: debug
```