https://github.com/tomasf/airtag-holder
Designing an AirTag holder
https://github.com/tomasf/airtag-holder
Last synced: 9 months ago
JSON representation
Designing an AirTag holder
- Host: GitHub
- URL: https://github.com/tomasf/airtag-holder
- Owner: tomasf
- Created: 2022-03-21T09:23:54.000Z (about 4 years ago)
- Default Branch: main
- Last Pushed: 2025-07-15T15:38:00.000Z (11 months ago)
- Last Synced: 2025-07-16T10:35:46.387Z (11 months ago)
- Language: Swift
- Size: 60.5 KB
- Stars: 4
- Watchers: 2
- Forks: 0
- Open Issues: 0
-
Metadata Files:
- Readme: README.md
Awesome Lists containing this project
README

# Designing an AirTag holder
I want to use an [AirTag](https://www.apple.com/airtag/) to find my keys by attaching it to my [key organiser](https://www.orbitkey.eu/collections/key-organiser/products/orbitkey-2-0-active?variant=8149748056165). There are certainly lots of accessories available that would work for this, but I see it as a perfect excuse to design my own 3D-printed solution.
This article takes you through different iterations in the process of designing this simple 3D model. I've included code snippets, but often shortened for brevity. Make sure to view the code in this repo for a more complete understanding.
## OpenSCAD
There are many tools for designing in 3D. A popular choice is Autodesk Fusion 3D. Fusion is fine, but I prefer code-based solutions like OpenSCAD. Partly because I’m a programmer, but proibably also because I’m used to it.
Transitional GUI-based CAD tools make it easy to throw something together without thinking much about exact measurements. While this can be an advantage, it’s also easier to keep cheating and end up with an unorganized mess. In code, you have to be very literal about what you’re doing and making models parametric comes more naturally.
[OpenSCAD](https://openscad.org) is a program and language designed for 3D modelling, using boolean operations to combine shapes. It’s made specifically for building shapes, so it doesn’t let you apply textures, for example. Colors are available, but they're only meant to improve contrast and tell things apart during development; the exported mesh isn't colored. The language is simple but somewhat limited. Arrays exist, but there are no dictionaries or structures. This is why I created [SwiftSCAD](https://github.com/tomasf/SwiftSCAD), a Swift DSL that outputs OpenSCAD code. It gives you the power of a better language and a more convenient syntax.

```scad
// OpenSCAD
difference() {
cube([20, 15, 10]);
translate([16, 0, 10]) {
sphere(d = 15);
}
}
```
```swift
// SwiftSCAD
Box([20, 15, 10])
.subtracting {
Sphere(diameter: 15)
.translated(x: 16, z: 10)
}
```
This example creates a box (`cube`), and subtracts a sphere from it using `difference`. These kinds of basic shapes, transformations and boolean operations, combined with 2D-to-3D extrusion can be used to create complex models.
Even if you choose to use the OpenSCAD language, I don’t recommend using the built-in text editor in the OpenSCAD app. It’s a better idea to write code in your favorite text editor and use OpenSCAD to view and render the model. Enable *Design ▸ Automatic Reload and Preview* to automatically update the model preview in OpenSCAD when you save the code in an external editor.
If you use SwiftSCAD, running your code writes the resulting OpenSCAD code to a file. You use the OpenSCAD app to preview and render your model, so you can have it reload automatically in the same way.
## Basic Shape
The holder needs two parts; a simple ring to hook onto the key organiser and one part that holds the AirTag. The biggest challenge is to design the attachment for the AirTag. It has a non-trivial shape which would be tricky to measure and model accurately.

Luckily, Apple publishes [a document](https://developer.apple.com/accessories/Accessory-Design-Guidelines.pdf) for accessory manufacturers with guidelines for design as well as technical drawings for most contemporary Apple products. This includes a description of the profile of AirTag, which we can use in code to build a shape.
After some tedious typing (the numbers in the PDF aren’t text, so you can’t just copy them), I built an array of coordinates that we can use to make a polygon of the profile.
The `extrude(angles:)` method ([`rotate_extrude`](https://en.wikibooks.org/wiki/OpenSCAD_User_Manual/2D_to_3D_Extrusion#Rotate_Extrude) in OpenSCAD) accepts a 2D shape and rotates it around the Z axis to produce a 3D shape, which is exactly what we need.
```swift
let shapePoints: [Vector2D] = [[15.935, 7.98], [15.93, 7.97], [15.10, 7.96], [14.27, 7.95], [13.44, 7.95], [12.61, 7.92], [11.78, 7.89], [10.96, 7.85], [10.13, 7.81], [9.30, 7.75], [8.48, 7.69], [7.65, 7.62], [6.83, 7.54], [6.00, 7.44], [5.18, 7.33], [4.36, 7.20], [3.55, 7.03], [2.75, 6.82], [1.97, 6.55], [1.23, 6.18], [0.58, 5.67], [0.13, 4.98], [0.00, 4.17], [0.24, 3.38], [0.77, 2.75], [1.46, 2.29], [3.21, 2.29], [3.21, 0.88], [4.18, 0.75], [5.16, 0.63], [6.13, 0.52], [7.11, 0.42], [8.09, 0.33], [9.07, 0.26], [10.04, 0.19], [11.02, 0.13], [12.00, 0.08], [12.98, 0.05], [13.97, 0.02], [14.95, 0.01], [15.93, 0.00]]
let airTagRadius = 15.935
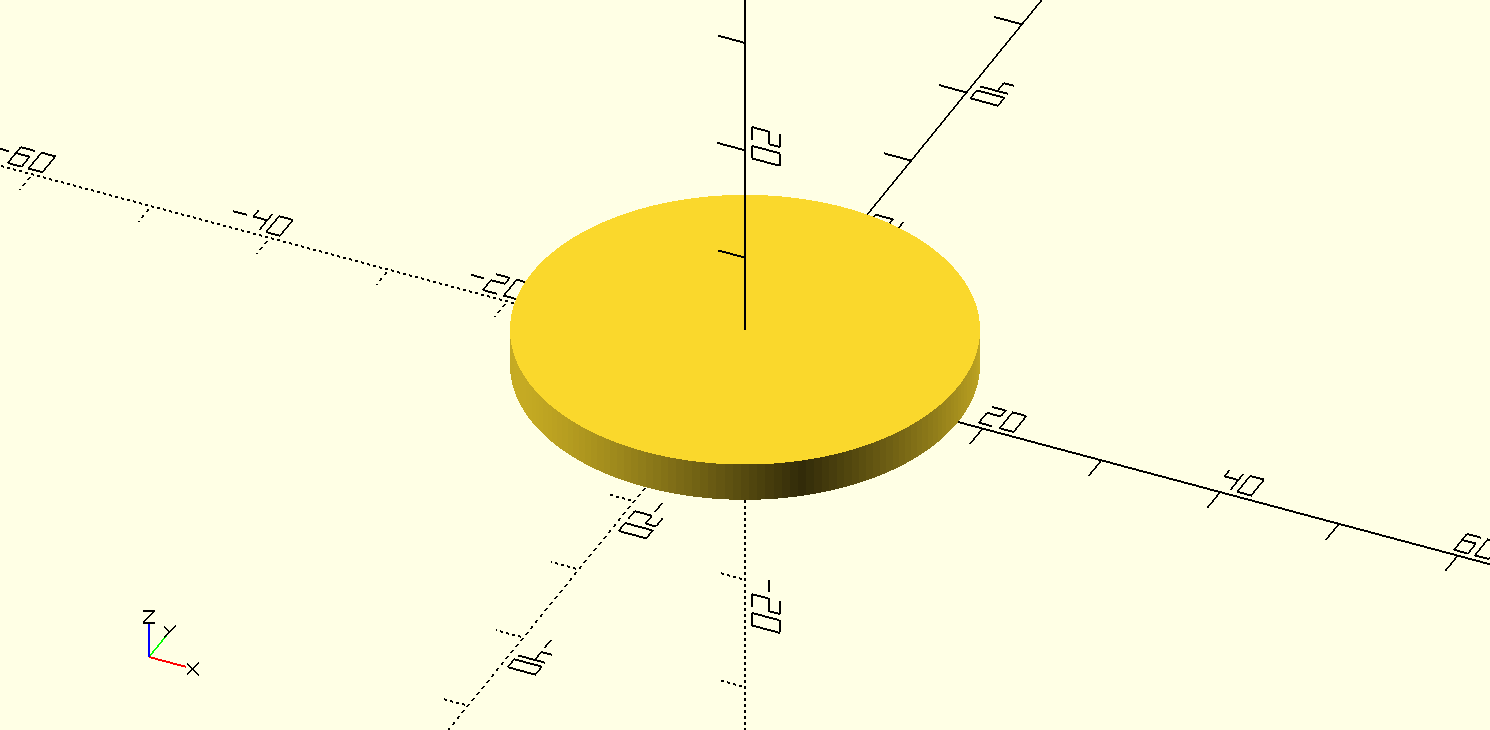
Polygon(shapePoints)
.translated(x: -airTagRadius)
.extruded(angles: 0°..<360°)
.save(to: "~/Desktop/AirTag Holder.scad")
```

Nice. It definitely looks like an AirTag! We have the shape of the tag itself, but what we want is some kind of holder to attach to a tag.
## Shape test
A wonderful advantage of 3D printing is that it lets us iterate quickly. Even if what you have is far from finished, print it anyway. Even rough prototypes teach you something, and while you wait for the print to finish, you can work on the next step.
Let’s print a sanity check of our shape. The most basic test should be to print two halves with the AirTag shape subtracted, so we can check that an AirTag fits snugly sandwiched between them.
There are different kinds of 3D printing. The most common kind, and the one I use, is called FDM, fused deposition modeling. The basic concept is simple: A continuous strand of plastic, the filament, is fed through a heated nozzle to melt it. The print head moves along a two-dimensional path, depositing the plastic in the desired shape. After one layer is done, the print head moves up vertically and the next layer is laid out on top of the previous one. If you've ever used a glue gun, imagine a machine that automatically moves such a glue gun in a pre-determined pattern while extruding.
Like most methods of manufacturing, FDM isn’t super-precise. While stepper motors position the nozzle with high precision, extruded plastic can vary slightly in diameter, causing variations in extrusion width. This, combined with other mechanical quirks means we need to design slightly larger negative spaces than we actually want in the end. 0,3 mm is usually a good starting point.
For this print, we’ll use PLA. It’s the most basic and least expensive filament material. It prints easily and we don’t need anything special. Rule of thumb: When in doubt, keep it simple and just use PLA. It will probably do just fine.
```swift
let shapePoints: [Vector2D] = [[15.935, 7.98], [15.93, 7.97], [15.10, 7.96], [14.27, 7.95], [13.44, 7.95], [12.61, 7.92], [11.78, 7.89], [10.96, 7.85], [10.13, 7.81], [9.30, 7.75], [8.48, 7.69], [7.65, 7.62], [6.83, 7.54], [6.00, 7.44], [5.18, 7.33], [4.36, 7.20], [3.55, 7.03], [2.75, 6.82], [1.97, 6.55], [1.23, 6.18], [0.58, 5.67], [0.13, 4.98], [0.00, 4.17], [0.24, 3.38], [0.77, 2.75], [1.46, 2.29], [3.21, 2.29], [3.21, 0.88], [4.18, 0.75], [5.16, 0.63], [6.13, 0.52], [7.11, 0.42], [8.09, 0.33], [9.07, 0.26], [10.04, 0.19], [11.02, 0.13], [12.00, 0.08], [12.98, 0.05], [13.97, 0.02], [14.95, 0.01], [15.93, 0.00]]
let airTagThickness = 7.98
let airTagRadius = 15.935
let airTagWidestPointZ = 4.17
let boxTagMargin = 2.0
let boxSize: Vector3D = [
(airTagRadius + boxTagMargin) * 2,
(airTagRadius + boxTagMargin) * 2,
airTagWidestPointZ + 0.8
]
let boxTagTolerance = 0.15
func airTagShape(tolerance: Double) -> Geometry3D {
Polygon(shapePoints)
.translated(x: -airTagRadius - tolerance)
.adding {
// Offsetting the shape leaves a hole in the middle – fill it
Rectangle([tolerance + 0.01, airTagThickness])
.translated(x: -tolerance - 0.01)
}
.extruded(angles: 0°..<360°)
}
func bottomHalf() -> Geometry3D {
Box(boxSize, center: .xy)
.subtracting {
airTagShape(tolerance: boxTagTolerance)
.translated(z: boxSize.z - airTagWidestPointZ)
}
}
func topHalf() -> Geometry3D {
Box(boxSize, center: .xy)
.subtracting {
airTagShape(tolerance: boxTagTolerance)
.rotated(x: 180°)
.translated(z: boxSize.z + airTagWidestPointZ)
}
}
bottomHalf()
.adding {
topHalf()
.translated(x: 40)
}
.save(to: "~/Desktop/AirTag sandwich.scad")
```


## Joining the two halves
The test print fits the tag well. If we add a way to join together the two parts and a loop to hang it off the key organizer, we should have a functioning, if a bit basic, AirTag holder.
We could glue the two pieces together, but that would be a pain to pry apart when it’s time to replace the battery. There are plenty of ways to join parts, but a reliable solution is a simple nut and bolt. One side of the sandwich would have a countersunk hole and the other a nut trap.

M3 should be small enough and I don’t have a wide enough assortment of hardware for smaller sizes. I tend to use square nuts when possible, especially for smaller sizes. 3D-printable plastic is relatively soft, and there’s not a lot of material that keeps a traditional hexagonal nut from rotating freely. A hexagon is simply too similar to a circle at M3 sizes, but a square nut has more plastic to grab onto.
Let’s start with three bolts equally spaced around the tag. We’ll let a convex hull of circles at these three points define the outer shape.
```swift
let shapeCornerSize = 11.0
let holeOffset = airTagRadius + shapeCornerSize / 2 + 1.5
private func half() -> Geometry3D {
Circle(diameter: shapeCornerSize)
.translated(x: holeOffset)
.repeated(in: 0°..<360°, count: 3)
.convexHull()
.extruded(height: thickness)
}
```
Different methods of manufacturing has different constraints, and this also goes for FDM 3D printing. One limitation is overhang. Because layers are printed on top of one another, a layer can’t be much larger than the one below it. If it is, the strands are laid out in mid-air and will obviously fall down. As a rule of thumb, angles should be kept below 45° for good surface quality.

Because of this, one should try to orient models so that depressions in the shape face upwards. A special case is that gaps can be bridged horizontally. The filament will start to droop down from longer bridges, so you need to keep the gap small enough that it’s not noticeable.

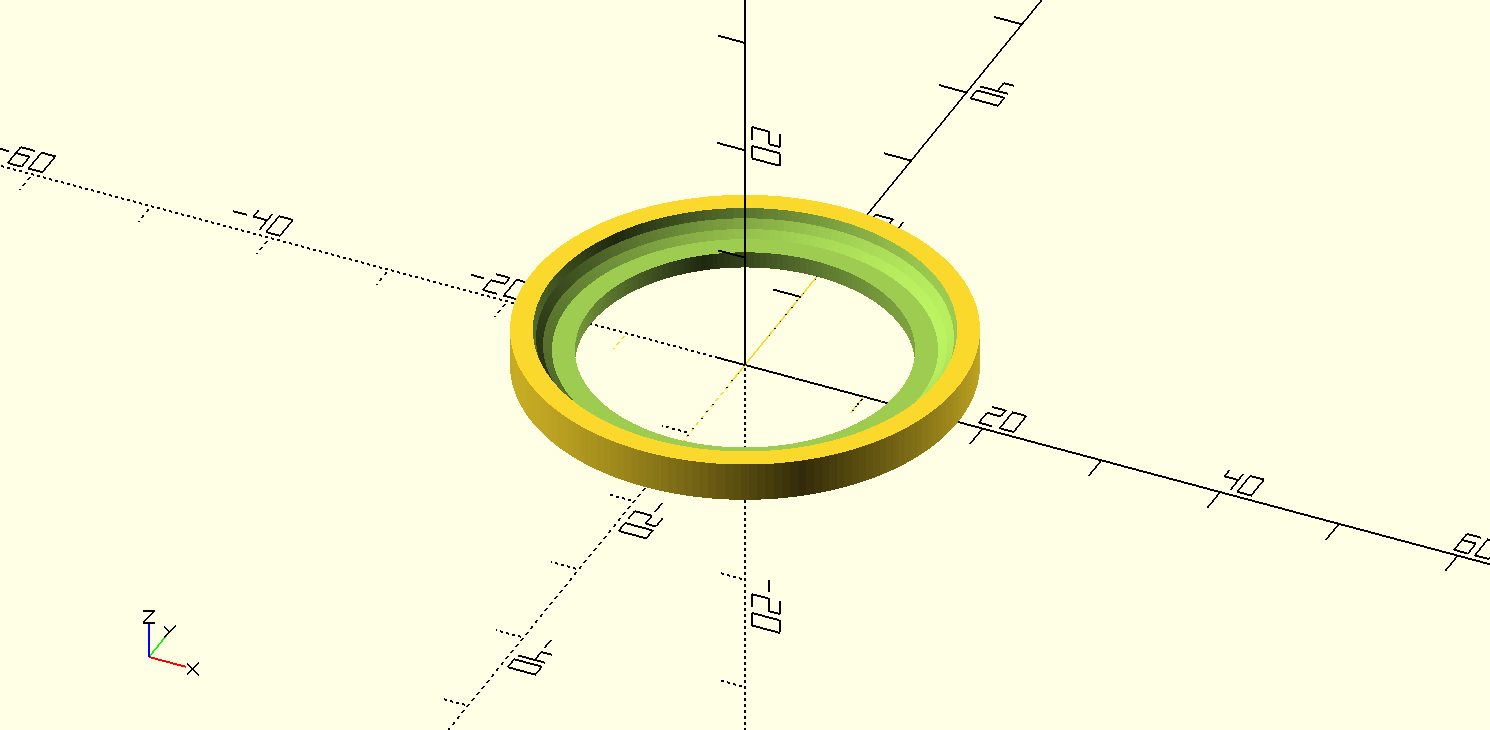
Our nut traps present an overhang problem. The AirTag shape must be printed facing up, which makes nut traps face downwards. A pure box shape can be bridged, but one with a hole in the middle can't be. Here's a cross section of our model:
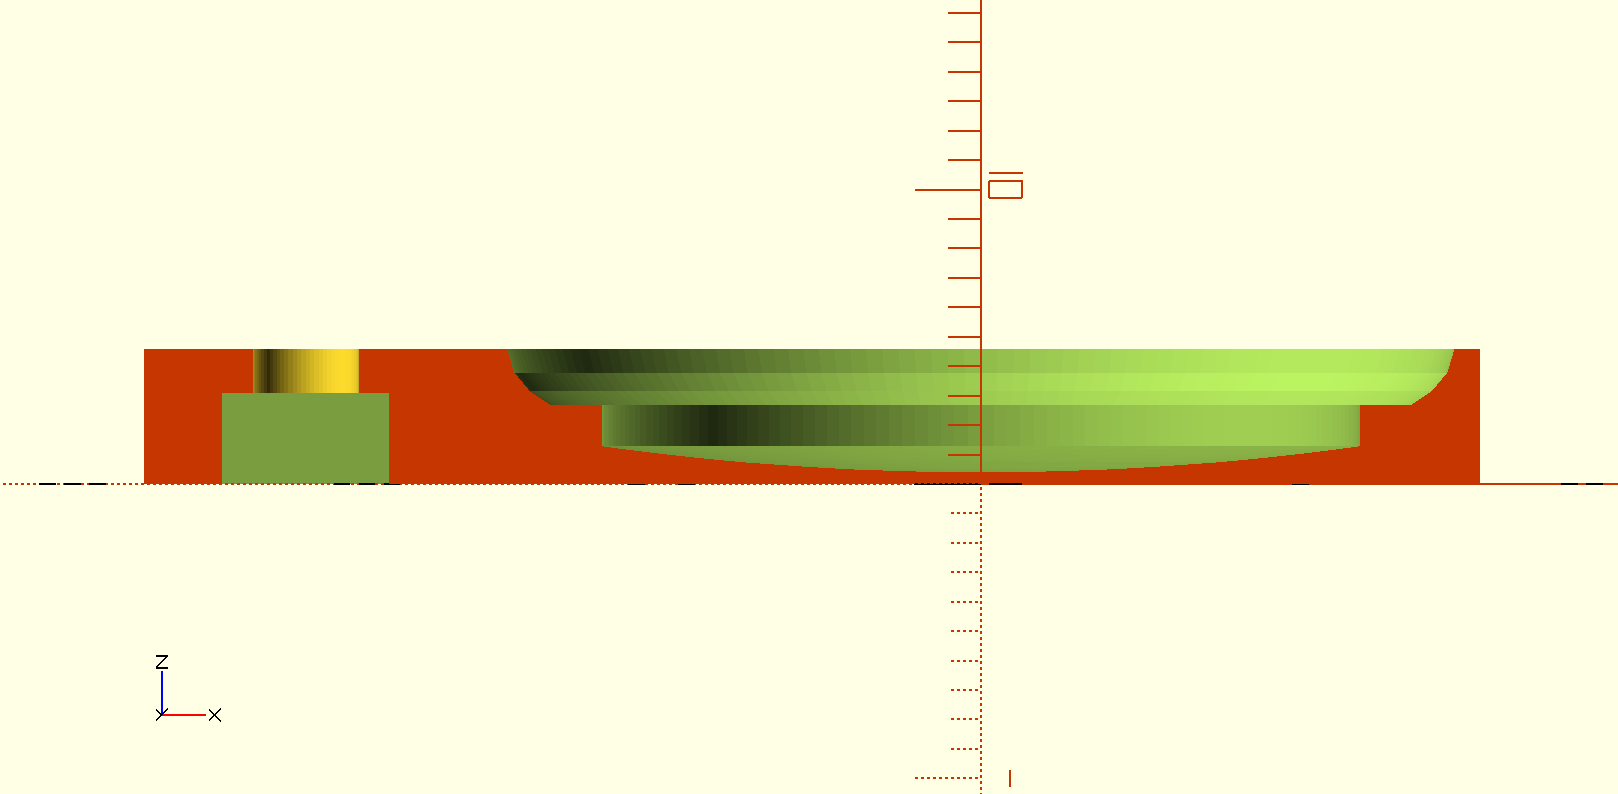
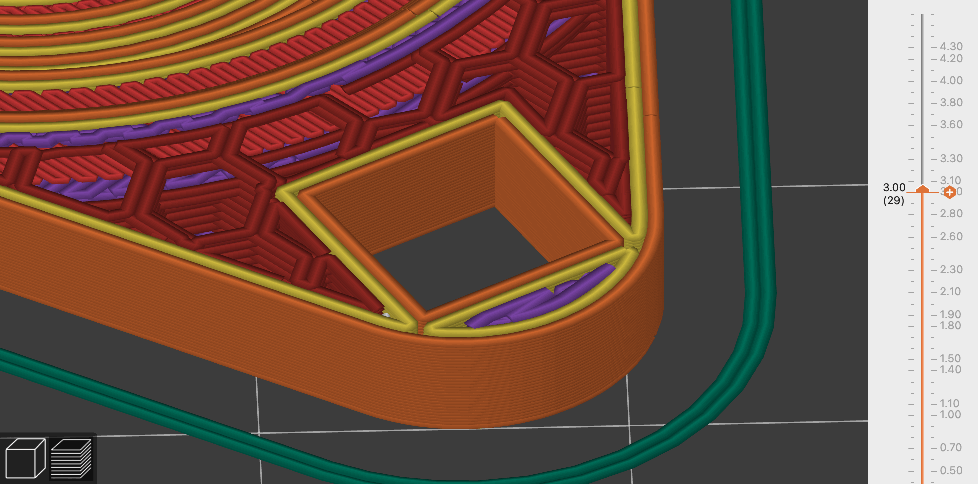
We can work around this by creating an intermediate bridging layer. This layer takes care of bridging one direction around the hole, and the final layer can do it in the other direction. The hole won't be perfectly circular at this layer, but that doesn't matter at such a small size. If we wanted to do this with a larger hole, we could add more intermediary layers, each one making the hole rounder.
Here's an animation showing the relevant layers in [PrusaSlicer](https://www.prusa3d.com/page/prusaslicer_424/):
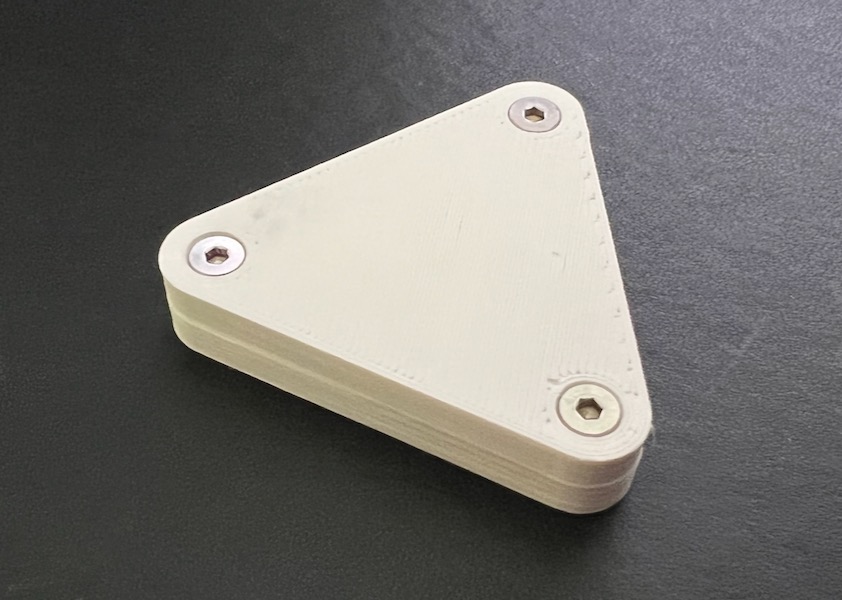
The triangular holder seemed a bit large and unwieldy as a model, and it’s even more apparent when you hold it in your hands. One possible option to make it a bit smaller is to use self-tapping screws made for plastic. They’re smaller and don’t need nuts, but they’re also less secure and we don’t want the AirTag to fall out.
What if instead we could make it snap into place?
A snap-in approach has some advantages. It’s a single piece that doesn’t require any additional hardware. We can make it small, which would look and feel more elegant. We can get rid of a lot of complexity and attaching and detaching the AirTag is effortless. It also presents some challenges; we need to get the size just right, especially the small lips that would hold the AirTag in place. We also need to print in a material that can flex slightly without breaking, but that is stiff enough to hold the tag securely.
## Snap-in
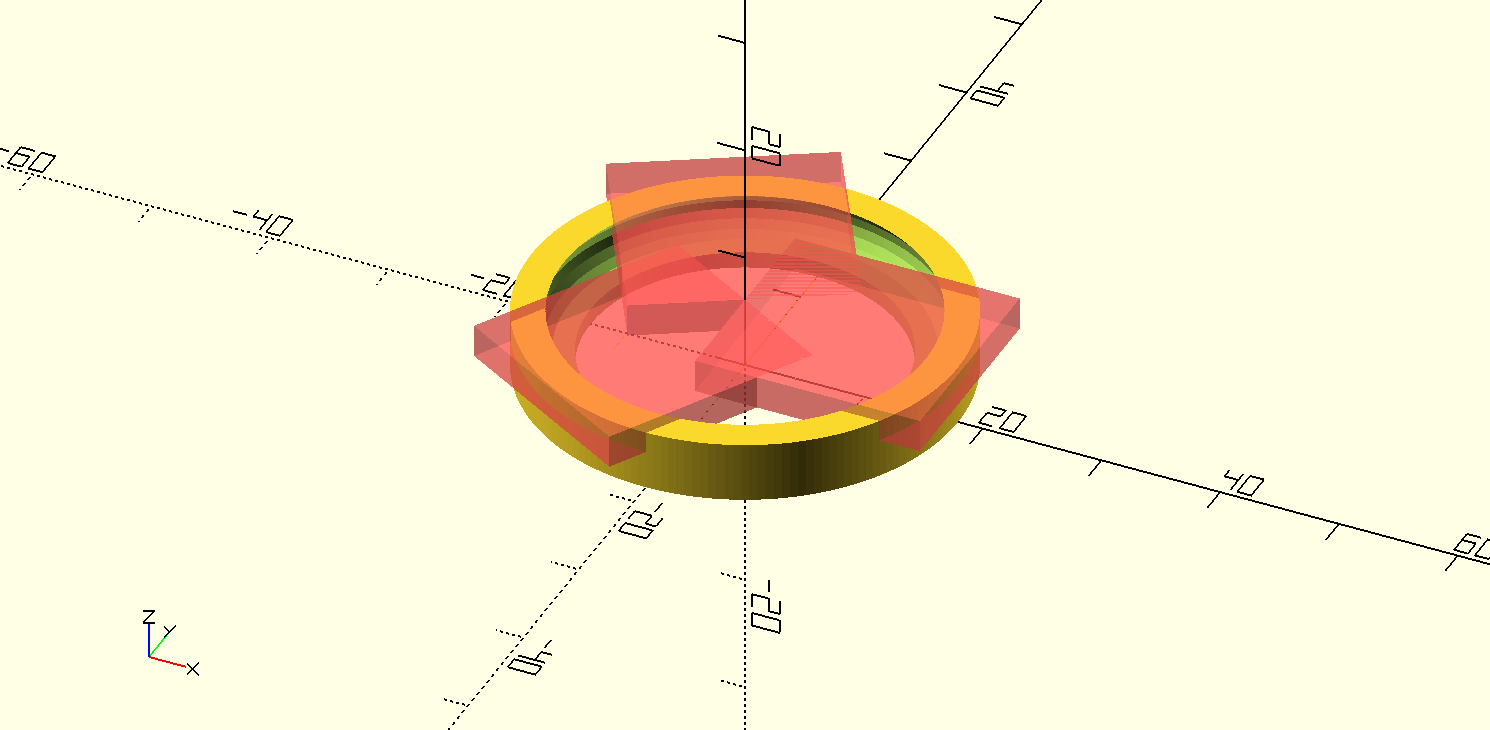
Let's start over. First, we make a simple cylinder that defines the outer shape of our snap-in holder. We want it to be a bit wider than the AirTag, but it doesn't have to be as thick – it doesn't need to cover the aluminium bottom. An open bottom that exposes the tag actually makes it easier to detach.
```swift
let airTagRadius = 15.935
let airTagWidestPointZ = 4.17
let airTagZeroZ = 0.88 // The Z level of the AirTag shape that corresponds to the holder's zero
let holderWallThickness = 2.0
let fullHeight = airTagWidestPointZ - airTagZeroZ
let outerDiameter = airTagRadius * 2 + holderWallThickness * 2
Cylinder(diameter: outerDiameter, height: fullHeight)
```
Next, we subtract the AirTag shape.
```swift
Cylinder(diameter: outerDiameter, height: fullHeight)
.subtracting {
airTagShape(tolerance: tolerance)
.translated(z: -airTagZeroZ)
}
```
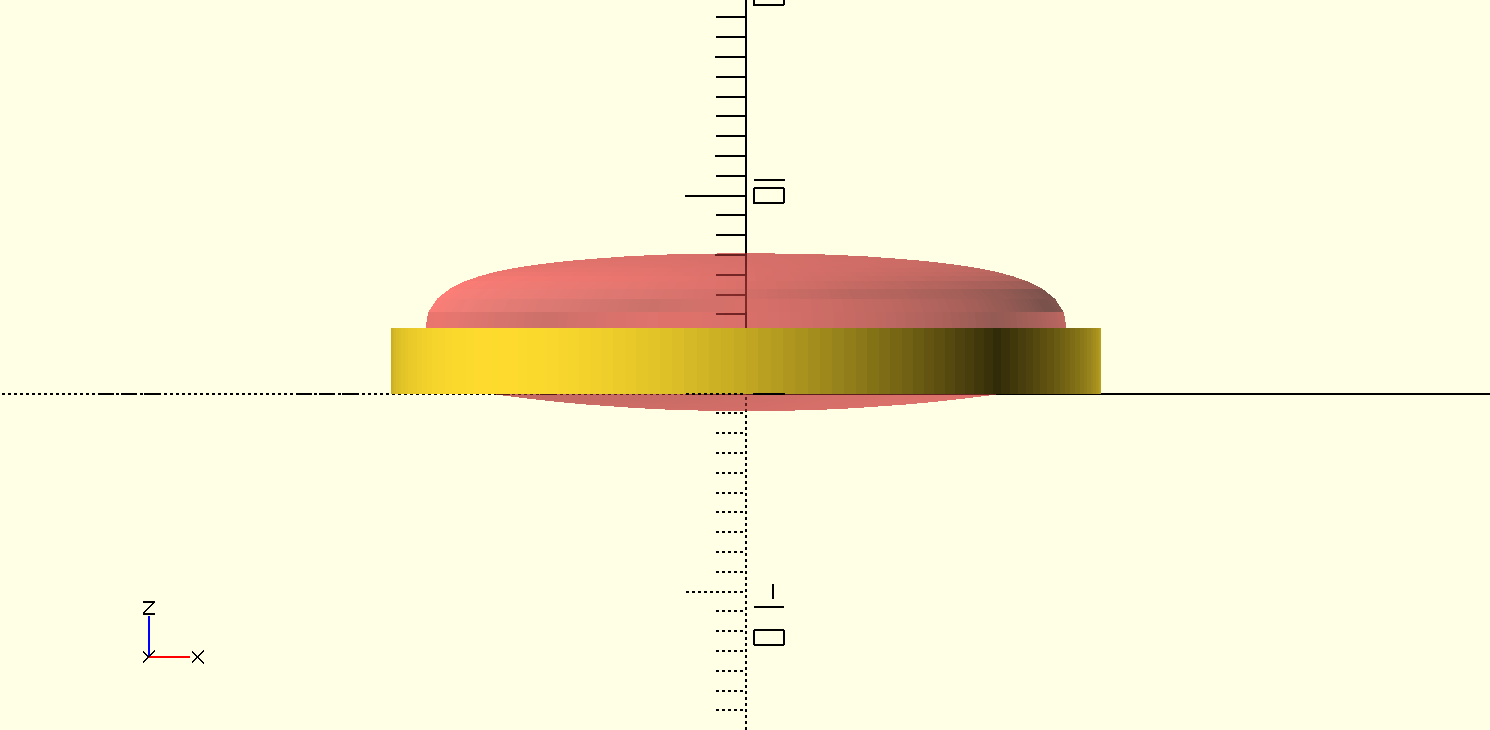
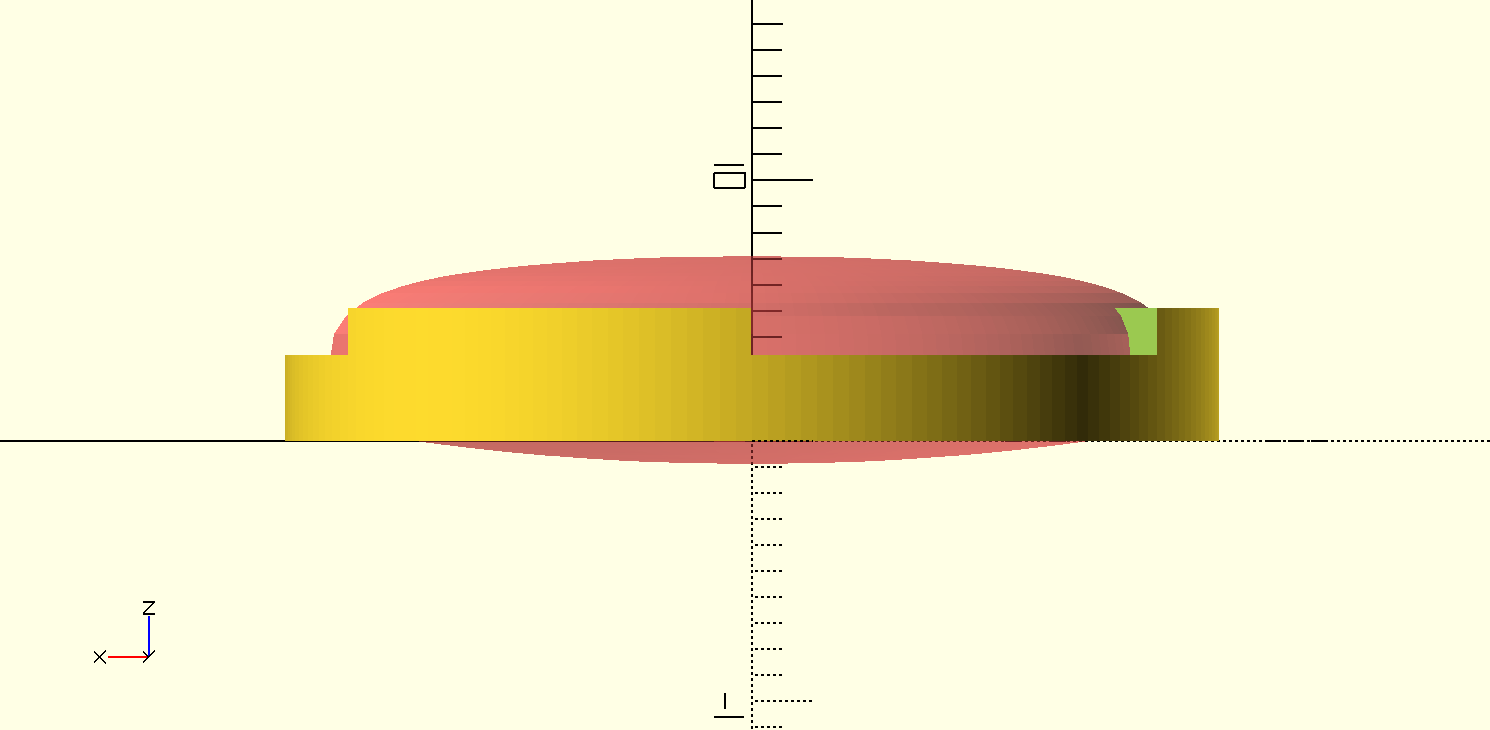
Here's a side view with the AirTag shape highlighted:
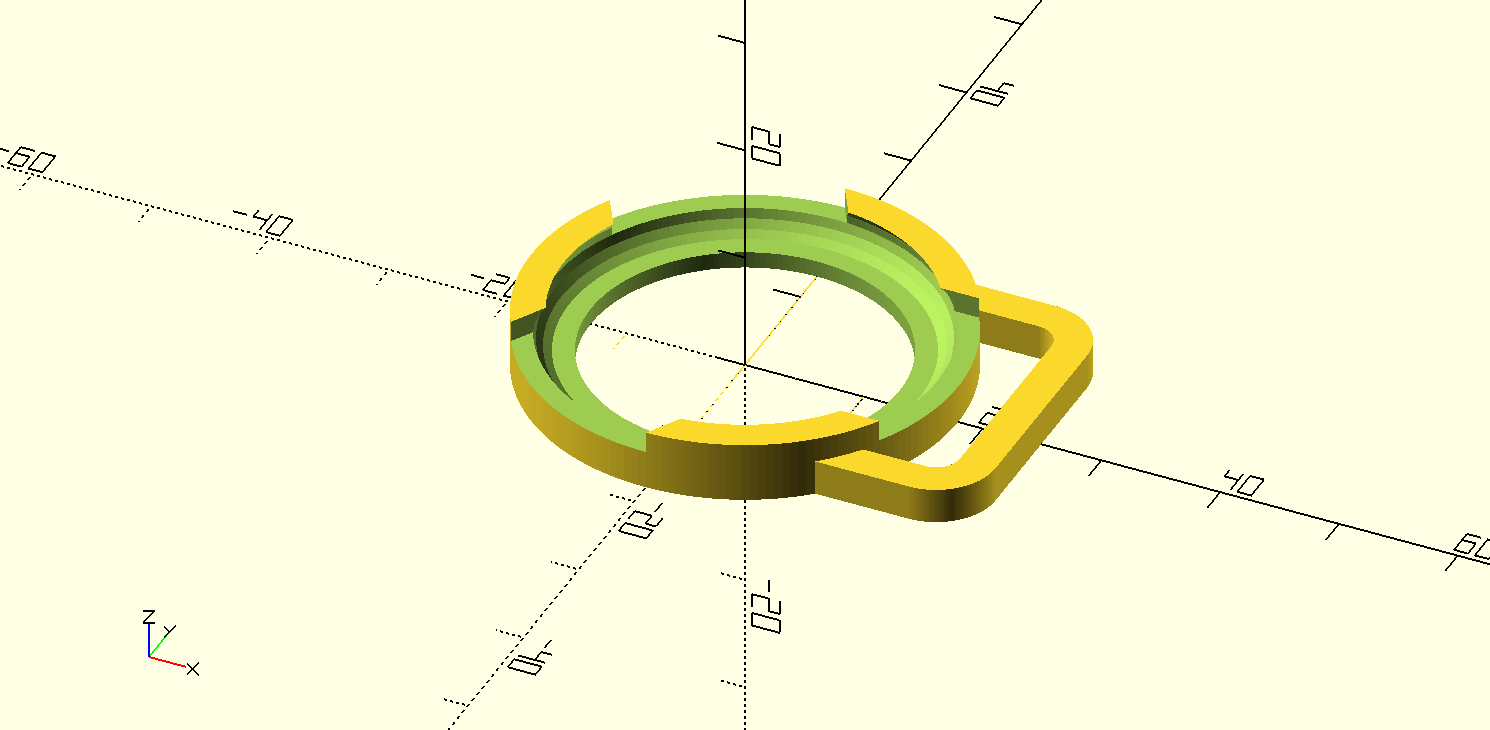
We need something that keeps the AirTag in place. We can make the holder a bit thicker, but splitting it into sections, leaving little lips that hopefully flex enough to allow the tag to slip in.
```swift
let topExtension = 1.8
let fullHeight = airTagWidestPointZ - airTagZeroZ + topExtension
let splitWidth = 18.0
let splitCount = 3
Cylinder(diameter: outerDiameter, height: fullHeight)
.subtracting {
airTagShape(tolerance: tolerance)
.translated(z: -airTagZeroZ)
Box([outerDiameter / 2, splitWidth, topExtension + 1], center: .y)
.repeated(around: .z, in: 0°..<360°, count: splitCount)
.translated(z: fullHeight - topExtension)
}
```
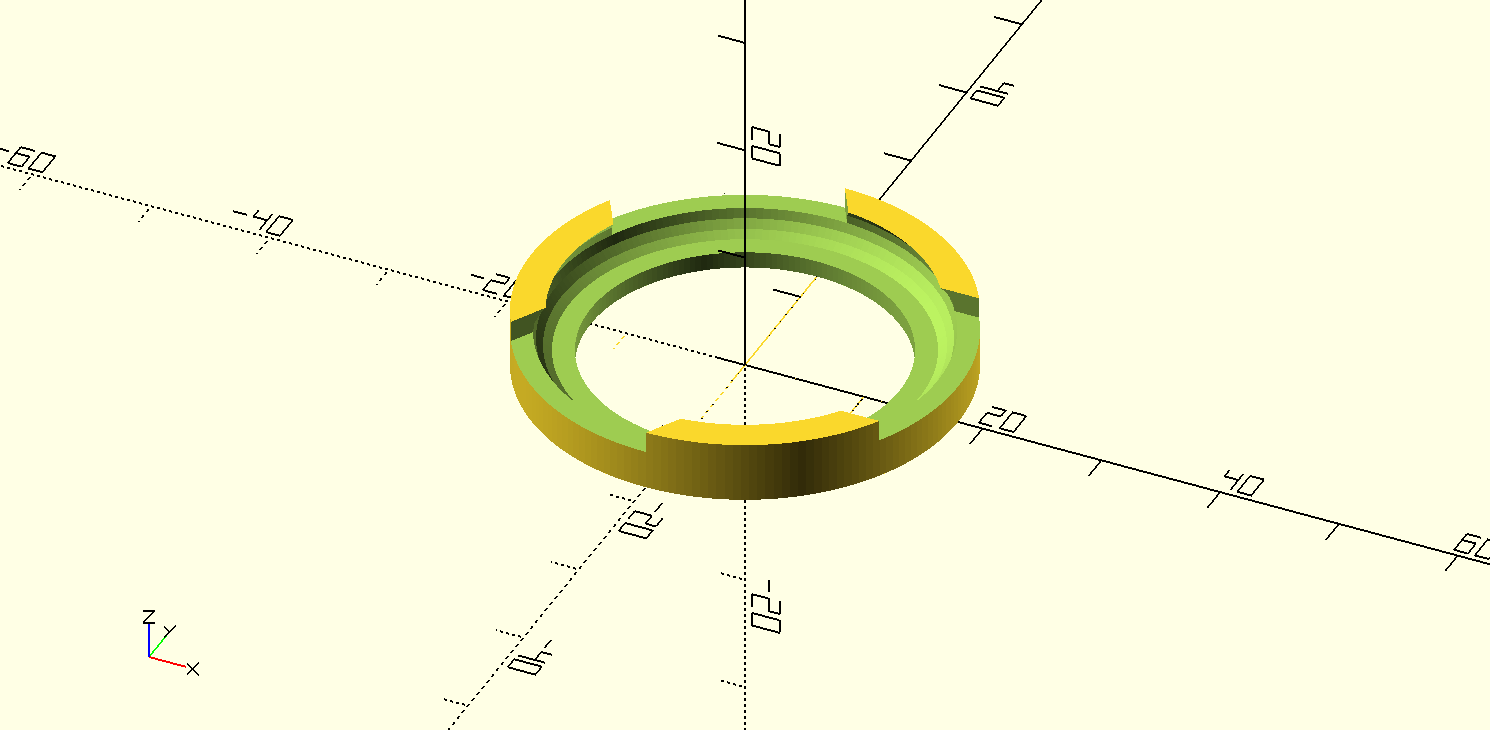
We do it by subtracting a box from the shape and repeating it around the Z axis. Here are the boxes highlighted:
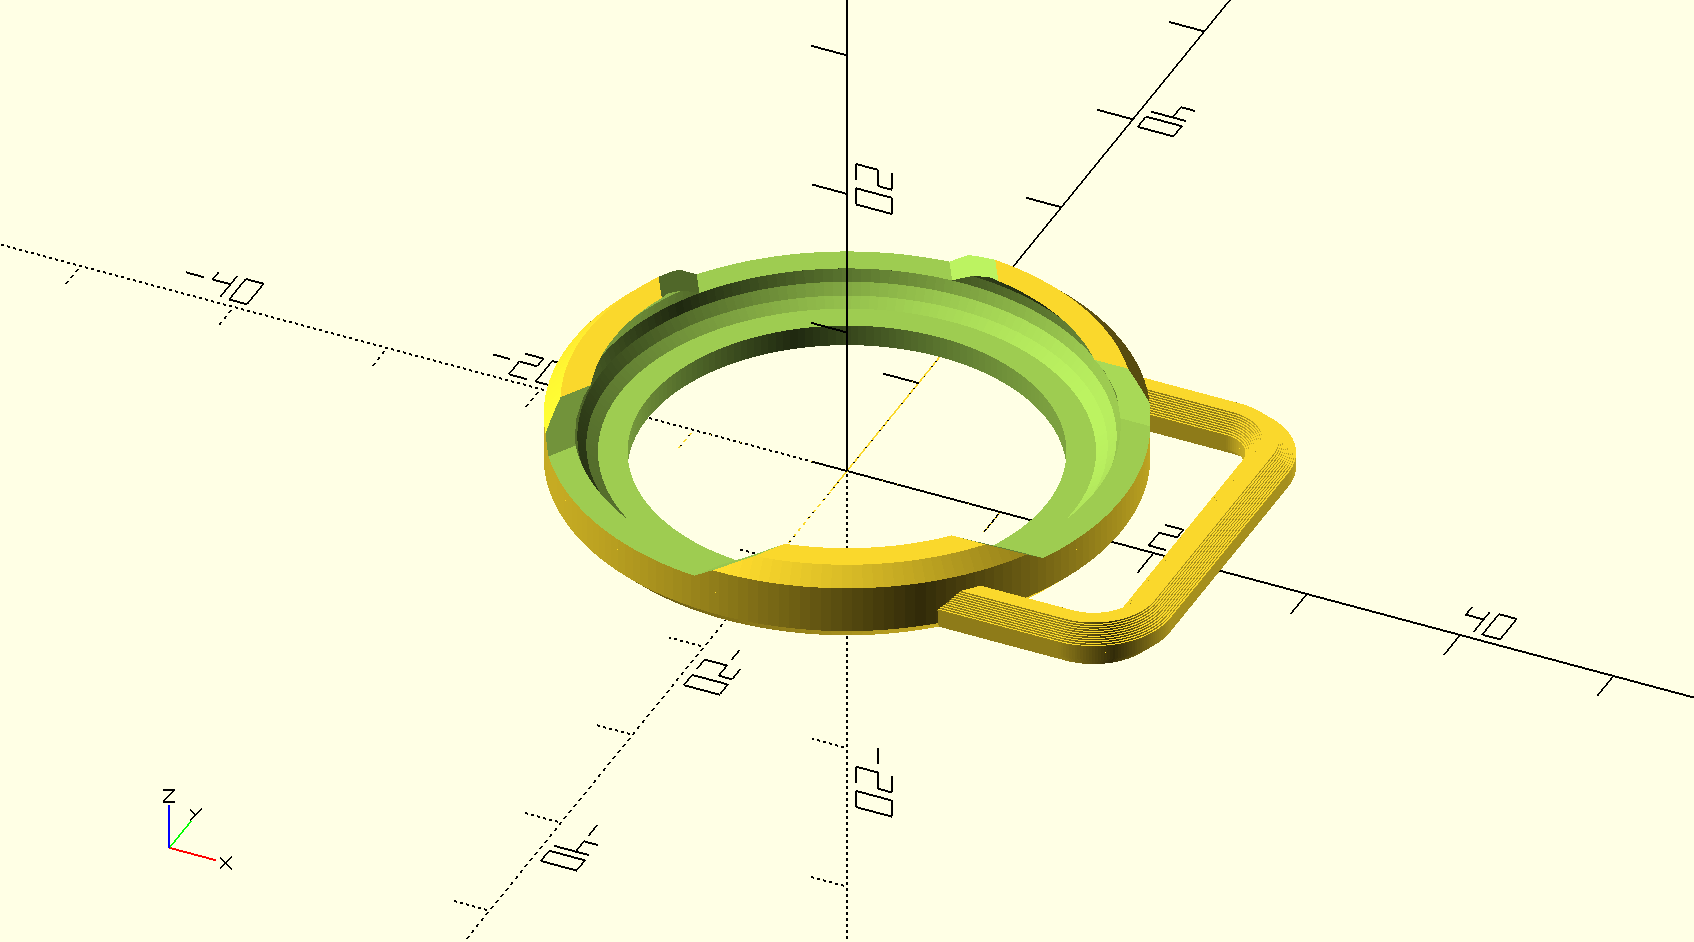
And again with the AirTag highlighted:
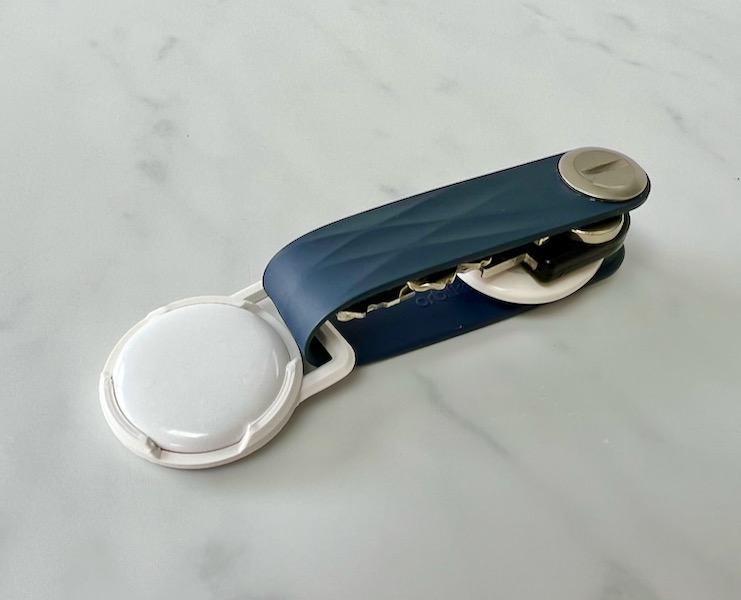
Looks good. Let's print it. No more than five minutes later, I got this:


It already fits the AirTag surprisingly well and it weighs almost nothing.
It's time to add the loop that attaches to my key organizer. We do this by subtracting an inner rounded rectangle from an outer one and extruding this 2D shape to 3D with the desired thickness.
```swift
.adding {
let offset = Vector2D(outerDiameter/2, 0)
RoundedRectangle(loopOuterSize + offset, cornerRadius: loopCornerRadius, center: .y)
.subtracting {
RoundedRectangle(loopInnerSize + offset, cornerRadius: loopCornerRadius - loopWidth, center: .y)
}
.extruded(height: loopThickness)
}
```
The holder has a few sharp edges and we can chamfer them which will also improve the appearance. 45 degree chamfers are ideal for FDM 3D printing because the angle works as overhang. Rounded edges have too low angles to be printable.
SwiftSCAD provides convenient special extrusion modes for both chamfers and rounding. Due to limits in OpenSCAD, chamfered extrusion works in one of two modes. The `.convexHull` extrusion method combines the [`convexHull`](https://en.wikibooks.org/wiki/OpenSCAD_User_Manual/Transformations#hull) modifier with [`offset`](https://en.wikibooks.org/wiki/OpenSCAD_User_Manual/Transformations#offset) to create the chamfered shape. This looks nice, but only works correctly with convex shapes.
The `.layered` extrusion method "cheats" by creating the chamfered edge as a series of slices. This works with any shape, but doesn't look as good. FDM ultimately prints in layers anyway, so the end result looks fine.
Extrusion turns 2D shapes into 3D, so we change the cylinder to a circle and extrude it. The loop is already extruded from 2D, but it isn't convex, so we use the layered method:
```swift
let chamferSize = 1.0
let layerThickness = 0.1
Circle(diameter: outerDiameter)
.extruded(height: fullHeight, chamferSize: chamferSize, method: .convexHull, sides: .both)
.adding {
let offset = Vector2D(outerDiameter/2, 0)
RoundedRectangle(loopOuterSize + offset, cornerRadius: loopCornerRadius, center: .y)
.subtracting {
RoundedRectangle(loopInnerSize + offset, cornerRadius: loopCornerRadius - loopWidth, center: .y)
}
.extruded(height: loopThickness, chamferSize: chamferSize, method: .layered(height: layerThickness), sides: .both)
}
```


The attachment lips also have sharp corners, so let's put a sort of chamfer on those as well. Instead of the simple box we use to split the upper part, let's give it a slope on the sides by using a `extrudeHull` between two rectangles, the top being longer than the bottom.
```swift
Rectangle([outerDiameter / 2 + 1, splitWidth], center: .y)
.extrudedHull(height: topExtension + 0.001) {
Rectangle([outerDiameter / 2 + 1, splitWidth + 2 * splitSlopeLength], center: .y)
}
.repeated(around: .z, in: 0°..<360°, count: splitCount)
.translated(z: fullHeight - topExtension)
```
After experimenting with some of the parameters (split count and width), I decided this is the final version. I printed it in [add:north X-PLA](https://addnorth.com/shop/Filaments%20by%20material/PLA/X-PLA), which is less brittle than regular PLA, to give it a bit more flex. It's a quick print, very lightweight and looks nice: