https://github.com/turingschool-projects/code-of-arms
An Exercism-like application designed for the Turing School.
https://github.com/turingschool-projects/code-of-arms
education learning rails react ruby webhooks
Last synced: 2 months ago
JSON representation
An Exercism-like application designed for the Turing School.
- Host: GitHub
- URL: https://github.com/turingschool-projects/code-of-arms
- Owner: turingschool-projects
- License: mit
- Created: 2017-01-30T21:03:47.000Z (over 9 years ago)
- Default Branch: master
- Last Pushed: 2017-02-28T23:51:21.000Z (over 9 years ago)
- Last Synced: 2025-06-24T18:53:14.521Z (about 1 year ago)
- Topics: education, learning, rails, react, ruby, webhooks
- Language: Ruby
- Homepage: https://code-of-arms.herokuapp.com
- Size: 5.5 MB
- Stars: 0
- Watchers: 7
- Forks: 3
- Open Issues: 0
-
Metadata Files:
- Readme: README.md
- License: LICENSE.txt
Awesome Lists containing this project
README
# Code of Arms
---

An Exercism-like application designed for the [Turing School of Software and Design](https://www.turing.io).
[](https://travis-ci.org/turingschool-projects/ripped)
## Table of Contents
* [Using the app](#using-the-app)
- [Students](#students)
- [Instructors](#instructors)
* [Developing for Code of Arms](#developing-for-code-of-arms)
* [Contribution Guidelines](#contribution-guidelines)
* [Requirements](#requirements)
* [Environment Variables](#environment-variables)
* [Installation](#installation)
* [Using HTTPS on localhost](#getting-set-up-with-https)
* [Post-Install Options](#now-its-up-and-running---what-next)
* [API Documentation](#api-endpoints)
- [GET user](#to-receive-a-user-by-id)
- [GET exercises](#to-receive-all-exercises)
- [GET exercise](#to-receive-an-exercise-by-id)
- [GET solutions for a user with unread feedbacl](#to-retrieve-all-of-a-users-solutions-and-only-the-unread-feedback-for-those-solutions)
- [GET all solutions with no feedback](#to-retrieve-all-solutions-with-no-feedback)
- [GET solution](#to-receive-a-solution-for-an-exercise-by-id)
- [GET feedback](#to-receive-a-feedback-item-for-a-solution-by-id)
- [PATCH feedback](#to-update-a-feedback-items-status)
* [Setting up the webhook](#setting-up-the-webhook)
- [The file tree](#the-file-tree)
- [The webhook](#the-webhook)
- [GitHelper](#githelper)
- [Additional Functionality](#additional-functionality)
* [License](#license)
* [Contributors](#contributors)
## Using the app
Code of Arms is an Exercism-like application for the Turing School of Software and Design to help students practice coding and instructors give feedback in a streamlined manner.
To use Code of Arms, visit https://code-of-arms.herokuapp.com and log in with your [Census](https://turing-census.herokuapp.com) account. Upon login, you will see an index of all the available exercises. You can filter the exercise options using the buttons at the top of the page.
### Students
Click on an exercise name to see the full instructions and test suite that can be copied into your editor of choice. Once you pass all the tests, click on the "Submit your solution" button and copy/paste your answer into the form. After submitting your answer, your instructors and peers can leave feedback. Instructors will also be able to mark your answer as "Solved" or "Incorrect".
To see a summary of your feedback and exercises that have been marked "Solved" click on the "Dashboard" button in the navigation bar.
To leave feedback on your peers' solutions, click the "See all submissions" button from any Exercise detail page. If new feedback has been left on any of your submissions, the notifications button in the navigation will alert you.
### Instructors
Click on an exercise name to see the full instructions and test suite that can be copied into your editor of choice. Once a student passes the tests and has a solution, they can submit it via the "Submit" button on this page, and instructors will receive a notification in the navigation bar to alert that there is a new submission to review.
Instructors can access submissions directly from this notification, or by visiting the Dashboard. On the Dashboard, instructors will see a list of all submissions awaiting feedback and review. These can be filtered using the cohort buttons at the top of the page. Instructors can also see exercises that have already been marked as "Solved" or "Incorrect".
To review an exercise, choose a submission to review and leave feedback directly on the submission. There are also two buttons- one to mark the solutions as "Solved" and a second for "Incorrect."
# Developing for Code of Arms
## Contribution Guidelines
We're very welcoming of pull requests and issue/bug reports. We'd appreciate it if your submissions are fully tested - we're using RSpec/Capybara for our test framework, with Factory Girl for generating assorted objects. You can find a pretty decent intro to the above [here](https://robots.thoughtbot.com/how-we-test-rails-applications). We also use webmock and VCR for external API call testing. If you're seeing lots of failures, take it from us: delete your VCR Cassettes and try again.
As far as Turing students, staff, and alumni are concerned: The Turing School Code of Conduct most likely covers everything here, but you can check out our contributor guidelines by clicking [here](https://github.com/turingschool-projects/code-of-arms/blob/master/GUIDELINES.md) for some basic rules to contributing to the project (and to open source in general) - this document is also helpful if you're not a current Turing student.
The best way to get in touch with us (because there's a rotating group of people maintaining the project) is probably by filing an issue report. Enjoy, and happy hacking! :)
## Requirements
```
Ruby on Rails
- Rails version 5.0.1
- Ruby version 2.3.0 (2.3.1 should also work)
- Bundled with 1.13.6
PostgreSQL
Access to a Census account
```
If you don't have rails (or ruby) installed, this [tutorial](http://docs.railsbridge.org/intro-to-rails/) is a good place to start.
## Environment Variables
Code of Arms will require the following environment variables. We'll go through how to add them to the project later, but for now, know that you'll need (at _least_) the following:
A [Census](https://turing-census.herokuapp.com) `id` and `secret`. Assuming you have a Census account, you'll login, click on Registered Applications, then click on New Application. From there you'll enter a name and a callback URL. At the time of writing there is an occasional hiccup with the callback URI - it sometimes defaults to HTTP instead of the required HTTPS - the hope is that this patched out in a future version of Census. Anyway. Give your app a name and add your callback URI/s. You will need:
` https://localhost:3001/auth/census/callback ` (local development)
and when you have the app on staging or production:
` https://your-app-url.herokuapp.com/auth/census/callback `
(Heroku is used there as an example. Play around with other deployment systems and see what you can do!)
Cool. Leave the "scope" section blank and hit submit. On the next page you'll be given an Application Id and Secret. You'll also be able to edit your callback URI/s if necessary. We'll go over what to do with the Id and Secret in the next section.
## Installation
- First: clone down this repo:
`git clone https://github.com/turingschool-projects/code-of-arms`
or
`git clone git@github.com:turingschool-projects/code-of-arms.git` for SSH.
- run `bundle install` to make sure all your gems are properly added.
- run `rake db:create db:migrate db:seed db:test:prepare` (you can run those all as one command but I like to have them separated out)
- once the database is set up, run `figaro install` (`bundle exec figaro install` if you run into trouble). This will create an `application.yml` file in your `config/` directory and add that same file to your `.gitignore`.
- EXTRA IMPORTANT: Before committing, run `git status` and be EXTRA CERTAIN that your gitignore is working properly and it's not about to commit all your precious secrets to Github.
- Now go into your `application.yml` folder and add the following lines:
```
CENSUS_ID: here's where you put the census application id
CENSUS_SECRET: here's where you put the census secret
```
- Cool. Almost there. Now, just to make sure you've got things configured properly go ahead and run `rspec` to make sure the tests are passing. You may have a few skipped tests - these primarily deal with the Github Webhook and if you continually run them, you will hit your Github API rate limit extremely quickly. The cost of being thorough! More on the webhook in a moment.
Here's where things get interesting (not that they weren't already) and I'll hand you over to this primer for setting up HTTPS access on localhost from @NZenitram. You'll need to be able to run your server following these instructions, otherwise the Census OAuth authentication system won't work.
## Getting set up with HTTPS
_(The following has been borrowed with permission from [this](https://github.com/NZenitram/census_staging_oauth/blob/master/README.md) readme. You may need to follow the staging environment directions found at that link, depending on the circumstances under which you're working.)_
Please note that in order to use the Census OmniAuth strategy, your application must be configured to handle secured HTTPS requests. This is not the default setting on typical Rails applications run locally. For instructions on configuring SSL on a development version of your application. The following steps will supply your application with and SSL cert and allow you to use HTTPS from your local host.
Add this line to your application's Gemfile:
```ruby
# Gemfile
gem 'thin'
```
The execute:
```
$ bundle install
```
Now work through the following steps:
```
## 1) Create your private key (any password will do, we remove it below)
$ cd ~/.ssh
$ openssl genrsa -des3 -out server.orig.key 2048
## 2) Remove the password
$ openssl rsa -in server.orig.key -out server.key
## 3) Generate the csr (Certificate signing request) (Details are important!)
$ openssl req -new -key server.key -out server.csr
## IMPORTANT
## MUST have localhost.ssl as the common name to keep browsers happy
## (has to do with non internal domain names ... which sadly can be
## avoided with a domain name with a "." in the middle of it somewhere)
Country Name (2 letter code) [AU]:
#### Just press enter to get past prompts until you reach:
...
Common Name: localhost.ssl
...
#### Fill out the Common Name field and skip the rest.
## 4) Generate self signed ssl certificate
$ openssl x509 -req -days 365 -in server.csr -signkey server.key -out server.crt
## 5) Finally Add localhost.ssl to your hosts file
$ echo "127.0.0.1 localhost.ssl" | sudo tee -a /private/etc/hosts
# 6) To start the SSL webserver open another terminal window and run
thin start -p 3001 --ssl --ssl-key-file ~/.ssh/server.key --ssl-cert-file ~/.ssh/server.crt
```
'Thin start -p 3001' will start your local host on port 3001. You will need to run the command in step 6.) in your application's directory. After it has started open your browser and visit 'localhost:3001'.
You will also need to visit your Census application profile and add "https://localhost:3001/auth/census/callback" to the list of redirect URLs.

## Now it's up and running - what next?
You've got a couple of options here. You can experiment with the API:
## API Endpoints:
* [GET user](#to-receive-a-user-by-id)
* [GET exercises](#to-receive-all-exercises)
* [GET exercise](#to-receive-an-exercise-by-id)
* [GET solutions for a user that have unread feedback](#to-retrieve-all-of-a-users-solutions-and-only-the-unread-feedback-for-those-solutions)
* [GET all solutions with no feedback](#to-retrieve-all-solutions-with-no-feedback)
* [GET solution](#to-receive-a-solution-for-an-exercise-by-id)
* [GET feedback](#to-receive-a-feedback-item-for-a-solution-by-id)
* [PATCH feedback](#to-update-a-feedback-items-status)
You can set also up the webhook (which will allow you to add new exercises by pushing to a Github repo) by following the instructions below:
* [Setting up the webhook](#setting-up-the-webhook)
- [The file tree](#the-file-tree)
- [The webhook](#the-webhook)
- [GitHelper](#githelper)
- [Additional Functionality](#additional-functionality)
---
## API Documentation:
###To receive a user by ID:
```
GET '/api/v1/users/:id'
```
**Path parameters:**
* id: The unique id for the user
**Success Response:**
Code: 200
Content:
```
{
"id": 2,
"census_id": 55,
}
```
**Error Response:**
Code: 400
---
###To receive all exercises:
```
GET '/api/v1/exercises'
```
**Success Response:**
Code: 200
Content:
```
[
{
"id": 1,
"name": "Hello World",
"content": "class HelloWorldTest < Minitest::Test\n def test_no_name\n assert_equal 'Hello, World!', HelloWorld.hello\n end\n\n def test_sample_name\n assert_equal 'Hello, Alice!', HelloWorld.hello('Alice')\n end\n\n def test_other_sample_name\n assert_equal 'Hello, Bob!', HelloWorld.hello('Bob')\n end\nend",
"description": "First exercise!",
"solutions": [
{
"id": 1,
"content": "solution",
"exercise_id": 1,
},
{
"id": 2,
"content": "puts \"Hello World\"",
"exercise_id": 1,
}
]
}
]
```
**Error Response:**
Code: 400
---
###To receive an exercise by ID:
```
GET '/api/v1/exercises/:id'
```
**Path parameters:**
* id: The unique id for the exercise
**Success Response:**
Code: 200
Content:
```
{
"id": 1,
"name": "Hello World",
"content": "class HelloWorldTest < Minitest::Test\n def test_no_name\n assert_equal 'Hello, World!', HelloWorld.hello\n end\n\n def test_sample_name\n assert_equal 'Hello, Alice!', HelloWorld.hello('Alice')\n end\n\n def test_other_sample_name\n assert_equal 'Hello, Bob!', HelloWorld.hello('Bob')\n end\nend",
"description": "First exercise!",
"solutions": [
{
"id": 1,
"content": "solution",
"exercise_id": 1,
},
{
"id": 2,
"content": "puts \"Hello World\"",
"exercise_id": 1,
}
]
}
```
**Error Response:**
Code: 400
---
###To retrieve all of a users solutions and only the unread feedback for those solutions
Note: this provides content for the student dropdown component. Though it returns solutions (and their feedback) the code for the action "lives" in the feedbacks controller as its purpose is to return feedback.
```
GET '/api/v1/users/:user_id/solutions'
```
**Path parameters:**
* user_id: The unique id for a user
**Success Response:**
Code: 200
Content:
```
{
{
"id": 1,
"content": "Here's where the solution would go",
"exercise_id": 2,
"feedbacks": [
{
"id": 1,
"user_id": 2,
"solution_id": 1,
"comment": "And it's a great solution",
"created_at": "2017-02-22T00:04:17.058Z",
"updated_at": "2017-02-23T16:28:33.947Z",
"status": "unread"
},
{
"id": 3,
"user_id": 2,
"solution_id": 1,
"comment": "The code is so beautiful I could cry",
"created_at": "2017-02-22T20:42:23.947Z",
"updated_at": "2017-02-23T16:28:33.958Z",
"status": "unread"
}
]}
```
**Error Response:**
Code: 400
###To retrieve all solutions with no feedback
Note: this provides content for the instructor dropdown component.
```
GET '/api/v1/solutions'
```
**Success Response:**
Code: 200
Content:
```
[
{
"id": 3,
"content": "Here is a test solution",
"exercise_id": 2,
"feedbacks": [],
"exercise": exercise text and data will be here
},
{
"id": 4,
"content": "and here is another test solution",
"exercise_id": 3,
"feedbacks": [],
"exercise": exercise text and data will be here
}
}
]
```
**Error Response:**
Code: 400
---
###To receive a solution for an exercise by ID:
```
GET '/api/v1/exercises/:exercise_id/solutions/:id'
```
**Path parameters:**
* exercise_id: The unique id for the exercise
* id: The unique id for a solution belonging to the exercise
**Success Response:**
Code: 200
Content:
```
{
"id": 1,
"content": "puts 'Hello World'",
"exercise_id": 1,
"feedbacks": [
{
"id": 1,
"user_id": 1,
"solution_id": 1,
"comment": "Comment",
"created_at": "2017-02-08T23:57:47.836Z",
"updated_at": "2017-02-08T23:57:47.836Z",
"status": "unread"
},
{
"id": 3,
"user_id": 2,
"solution_id": 1,
"comment": "Another comment",
"created_at": "2017-02-08T23:58:40.247Z",
"updated_at": "2017-02-08T23:58:40.247Z",
"status": "unread"
}
]
}
```
**Error Response:**
Code: 400
---
###To receive a feedback item for a solution by ID:
```
GET '/api/v1/solutions/:solution_id/feedbacks/:id'
```
**Path parameters:**
* solution_id: The unique id for the solution
* id: The unique id for a feedback item belonging to the solution
**Success Response:**
Code: 200
Content:
```
{
"id": 1,
"user_id": 1,
"solution_id": 1,
"comment": "Comment",
"created_at": "2017-02-08T23:57:47.836Z",
"updated_at": "2017-02-08T23:57:47.836Z",
"status": "unread"
}
```
**Error Response:**
Code: 400
---
###To update a feedback item's status:
```
PATCH '/api/v1/solutions/:solution_id/feedbacks/:id'
```
**Path parameters:**
* solution_id: The unique id for the solution
* id: The unique id for a feedback item belonging to the solution
**Request body parameters:**
* feedback
* status: read or unread
**Request body example:**
```
{ "feedback":
{ "status": "read" }
}
```
**Success Response:**
Code: 200
Content:
```
{
"id": 1,
"user_id": 1,
"solution_id": 1,
"comment": "Comment",
"created_at": "2017-02-08T23:57:47.836Z",
"updated_at": "2017-02-08T23:57:47.836Z",
"status": "read"
}
```
**Error Response:**
Code: 400
## Adding Exercises
This application has been set up so that you can host and maintain exercises is a GitHub repo. The instructions that follow will describe how that repo should be set up and how the application interacts with the GitHub API to populate the application's database.
## Directory Structure
Create the repo for the exercises you wish to upload. The file tree for the repo should be set up as shown below:
```
https://github.com/#{user_name}/#{repo_name}
-- #{user_name}
|
-- #{repo_name}
|
|
-- ruby
|
|
-- javascript
|
|
-- bash
```
Each branch of the file tree shown above is a folder. Within each of these folders will exist folders or sub-directories that include the challenge and a description of that challenge.
```
-- #{user_name}
|
-- #{repo_name}
|
|
-- ruby
| |
| -- hello_world
| |
| -- hello_world.rb
| |
| -- README.md
|
-- javascript
```
Each language folder should contain another collection of folders with the name of the exercise that folder will contain. In the example above, the name of the folder containing the 'hello_world.rb' test file and its README is named hello_world.
## The Webhook
To set up the webhook on GitHub visit your profile's setting page and click the 'Personal Access Tokens' link at the bottom of the left hand panel. At the top of the console page that loads next, click 'Generate New Token'. Provide the token a description and select the admin:repo_hook checkboxes. Click on the generate token button at the bottom and copy the new token to your clipboard when it is revealed on the next page.

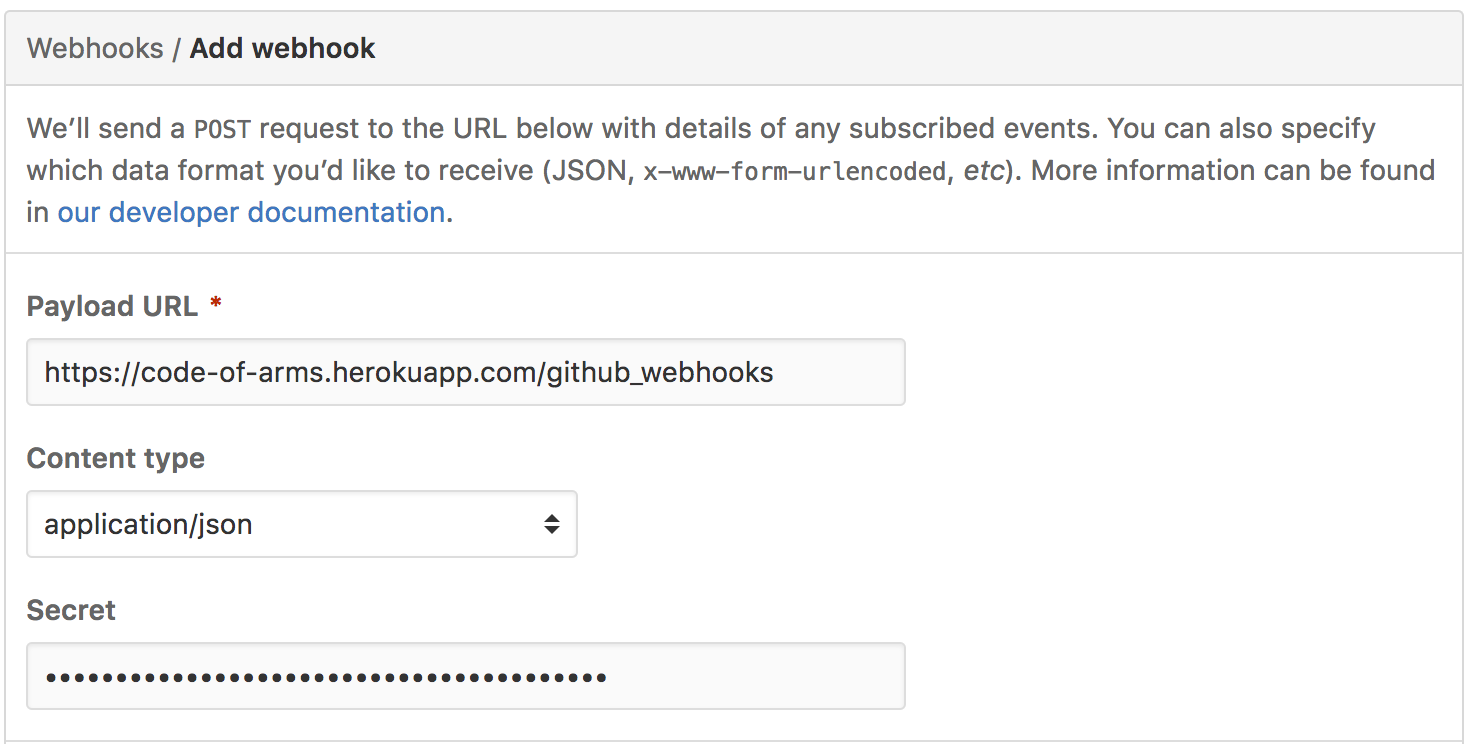
Next, visit the repository for your exercises and click on the settings tab. Click on the 'Webhooks' link in the table on the left. The webhooks console will appear; click on the 'Add Webhook' button on the right hand side. Fill out the URL field with your hostname and append it with '/github_webhooks. Change the content type to 'application/json' and paste the key you copied from the previous step into the field provided.
When the repo is pushed after being updated on your local machine, the webhook that is set to the repo will trigger a POST event to the github_webhooks_controller.rb file on your application. This route will hit the github_create action on that controller, which will set off a series of API calls to GitHub that require the setup of ENV variables for the application. Those environment variables are currently being set in the application.yml and will need to be manually updated in the environment on your server.
```ruby
class GithubWebhooksController < ActionController::Base
include GithubWebhook::Processor
def github_create
uri = URI("https://api.github.com/repos/#{ENV['GITHUB_USER']}/#{ENV['GITHUB_USER']}/contents/")
GitHelper.get_directory_object(uri)
end
```
The URI in the controller is set to an API endpoint that returns the contents of the GitHub #{repo_name} as JSON.
```json
{
"name": "javascript",
"path": "javascript",
"sha": "5b6d28e46a0ece24bfbb2889359a53bf5e6d422b",
"size": 0,
"url": "https://api.github.com/repos/#{user_name}/#{repo_name}/contents/javascript?ref=master",
"html_url": "https://github.com/#{user_name}/#{repo_name}/tree/master/javascript",
"git_url": "https://api.github.com/repos/#{user_name}/#{repo_name}/git/trees/5b6d28e46a0ece24bfbb2889359a53bf5e6d422b",
"download_url": null,
"type": "dir",
"_links": {
"self": "https://api.github.com/repos/#{user_name}/#{repo_name}/contents/javascript?ref=master",
"git": "https://api.github.com/repos/#{user_name}/#{repo_name}/git/trees/5b6d28e46a0ece24bfbb2889359a53bf5e6d422b",
"html": "https://github.com/#{user_name}/#{repo_name}/tree/master/javascript"
}
}
```
This response is sent to the GitHelper where it is sent through a series of API calls that dig into the repo to retrieve the folders and files that will be parsed and saved to the database.
### GitHelper
The first method, get_directory_object uses the URI from the controller and pulls down an object that contains the language folders (the snippet above is an example of that return, however it only includes one language folder). The next method, get_language_folder iterates over that object of language folders. That folder name is sent to the get_and_save_exercise method with the exercise_object that is parsed from the folder request (we are going to carry the folder name with us through the methods to use in our update and create methods at the bottom of the script).
Each method sends its child to the next, digging one level deeper into the repo each time. The retrieve_lesson_content method iterates over the last folder in the file tree and selects the exercise file and the README file within it. The exercise_items hash is then created with keys that point to each attribute the exercise object in your database requires.
```ruby
create_table "exercises", force: :cascade do |t|
t.text "name"
t.text "content"
t.datetime "created_at", null: false
t.datetime "updated_at", null: false
t.text "description"
t.integer "status", default: 0
end
```
The name for the exercise is corrected from the file name that is pulled out of the repo. The content of the exercise is pulled from the text of the exercise file within the repo using the URI in the retrieve_lesson_content method. This URI differs from the URIs used to make the initial API calls to the GitHub repo. Finally, the description text comes from the README file that is pushed up with the exercise. This file should contain instructions for the student on how to complete the exercise.
```ruby
exercise_item = {name: "Hello World",
content: "This is where the code goes",
description: "This explains what the exercise is for"})
```
This is where the folder object we have passed through each method is now used. If you recall, the folder variable was set to the name of the folder in the block in the get_language_folder method. We pass this through the module because the name of that folder is the same as the language the exercise is written in. We use that string, in this case "javascript", to build the tag for the exercise that is going to be created and generate a collection of the exercises that already exist in your database for that language.
```ruby
def self.find_tags_and_save(exercise_items, folder)
corrected_name = exercise_items[:name].split('.')[0].titleize
match = Exercise.joins(:tags).where({ tags: {name: folder} })
exercise = Exercise.find_by(name: corrected_name)
if match.include?(exercise)
...
end
```
In the `find_tags_and_save` method we use an ActiveRecord join clause to create an object that searches our database for all records that use the "javascript" or folder tag. This object is called 'match'. We then search the database for the exercise by name and match that return against the collection of exercises of the same type. If the exercise exists, the method updates the exercise in the database, otherwise the object is created in the database.
### Additional Functionality
The goal for the Webhook functionality needs to be expanded to include updating the tags of the exercises and deleting or un-publishing exercises through the push. In its current state, if an instructor pushes the exercises repo, the module is unable to update the published and unpublished status of the exercise (in our exercise table, we don't delete exercises through the application, we have provided functionality to only publish or un-publish exercises, this determines if they appear on the show and index pages.) Adding dynamic tag update and creating for the difficulty levels could be done through formatting the READMEs of the exercises so they include metadata that is parsed out the description and carried into the update/create methods.
## License
Code of Arms is released under the MIT license, which is available [here](https://github.com/turingschool-projects/code-of-arms/blob/master/LICENSE.txt).
## Contributors
The original four, in alphabetical order:
- [Anna Dolan](https://github.com/annadolan)
- [Erin Pintozzi](https://github.com/epintozzi)
- [Nicholas Martinez](https://github.com/NZenitram)
- [Noah Berman](https://github.com/bermannoah)
1608BE Turing School of Software and Design