https://github.com/tusharnankani/Aankh
Aankh - A real time proctoring solution 🦄
https://github.com/tusharnankani/Aankh
aankh detection-model extension proctoring reactjs tensorflow
Last synced: over 1 year ago
JSON representation
Aankh - A real time proctoring solution 🦄
- Host: GitHub
- URL: https://github.com/tusharnankani/Aankh
- Owner: tusharnankani
- License: gpl-3.0
- Created: 2022-01-17T11:07:00.000Z (over 4 years ago)
- Default Branch: main
- Last Pushed: 2024-12-18T18:21:19.000Z (over 1 year ago)
- Last Synced: 2025-04-07T11:01:35.748Z (over 1 year ago)
- Topics: aankh, detection-model, extension, proctoring, reactjs, tensorflow
- Language: JavaScript
- Homepage: https://tusharnankani.github.io/Aankh
- Size: 43.2 MB
- Stars: 76
- Watchers: 3
- Forks: 29
- Open Issues: 3
-
Metadata Files:
- Readme: README.md
- License: LICENSE
Awesome Lists containing this project
README

A straightforward framework built for automatic proctoring to create online tests, effortlessly.
Explore the docs »
Architecture
·
Features
·
Local Setup

### Table Of Content
- [Architecture](#architecture-and-design)
- [Design](#design)
- [Demonstration & Features](#demonstration)
- [Technologies Used](#technologies-used)
- [Local Setup & Contributing](#contributing)
- [License](#license-)
- [Authors](#authors)
### Problem we are trying to solve?
Due to Covid 19, remote learning has been a constant and so have been online examinations.
But proctoring has always been a task and cheating and unfair practices have always been a problem.
**Problems with the exisiting sytem?**
The current solutions assumes to have 2 platforms
- One for testing purposes like Google Form for writing exams
- And another, video conferencing platforms like meet or zoom for manual proctoring.
Our PS poses to develop an application that can automatically proctor and monitor students, without the need of manual proctoring - ie without a teacher's aid.
### Market & User Research
- On market research, the products available found, are paid.
- On user research and feedback from students, UX of such platforms isn't upto the mark.
- UX from the client's end isn't frictionless, it was expected by the client to upload questions on their platforms.
- The existing product doesn't seem to have an accessible Admin Dashboard.
That's where we come into picture.
## Architecture and Design
The tradeoff in a Hackathon: `Speed over quality`
But something that we are proud of is, we tried to follow ideal software development practices.
- Architecture
- Design
- Code
The presentation for Aankh can be found [here](https://docs.google.com/presentation/d/1h3WqCwEhf5xG7TsZ-yNuDoE9ybbFiaAMEsltQ3KrLEc/edit?usp=sharing).
### Architecture
- The architecture and workflow was built using [excalidraw](https://excalidraw.com) and it is freaking [brilliant](https://github.com/excalidraw/excalidraw).

### Design
- The designs were built using [Figma](figma.com) and were brought to life with [React](https://beta.reactjs.org).
- [Design Link](https://www.figma.com/file/pbuXQGcgFpsi2lgEbtllXf/aankh)

## Demonstration
**Landing Page**


**Register & Login**


User Registration - Face Verifacation to be done when exam starts.
User Login to start the exam.
**Creating a Test and Dashbaord**


Creating a test and expecting a Google/Microsoft Form Link
Admin Dashboard: Tests arranged chronologically.
**Start Exam**
- After logging in and entering the unique test code.
- Live Snapshots will be captured, periodically and will be analysed for the following :
- Face Verification
- Face Cover/Visibility
- Multiple People Detection

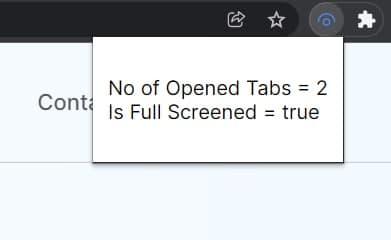
**Building a chrome extension for track of tabs**
**Checks for cheating**
- Face Verification
- Voice Detection
- Multiple People Detection
- Dev Tools Check
- Multiple Tabs Check
- Full Screen Check


Also, **ideas rejected**: These were rejcted due to false positives and unsurity of cheating.
- Eye Tracking
- Object detection
- Mouse Tracking
**Test Admin Dashboard**
- The following warning logs, data and statistics will be emailed to the Admin after the test.


Test Dashboard: Admin can see statistics - no. of students with warnings and above the threshold.
Admin Dashboard: Admin can Terminate or Continue a students exam based on warnings.
## Technologies Used
- Workflow and Architecture Design
- Excalidraw
- Prototyping and Frontend Design
- Figma
- Frontend
- React.js
- CSS
- Backend
- Node.js (Express.js)
- MongoDB
- Machine Learning
- OpenCV
- Tensorflow_hub
- Flask
**Dependencies**
A freaking huge shoutout to:
- [react-webcam](https://www.npmjs.com/package/react-webcam)
- [devtools-detect](https://www.npmjs.com/package/devtools-detect)
- [react-chartjs-2](https://www.npmjs.com/package/react-chartjs-2)
- [chartjs](https://www.npmjs.com/package/chartjs)
## Contributing
**Local Setup || Project Structure**
NOTE: Individual instructions can be found in respective directories.
- The project contains 4 broad directories.
```
*
├───client
├───extension
├───model
└───server
```
- `client`: The frontend for the application.
- `extension`: Chrome/Edge extension to keep a track of browser tabs.
- `model`: Model APIs for Machine Learning.
- `server`: The backend for the application.
**Client**
For local setup of frontend:
- `cd client`
- `npm i`
- `npm start`
- Go to `localhost:3000`
Structure
```
src
├───assets
├───components
├───containers
└───index.js
```
Individual Component & Container Structure
```
component
├───component.jsx
└───component.css
```
**Extension**
Read [this](https://github.com/tusharnankani/LeadsTracker#using-this-extension) or [this](https://github.com/dheerajdlalwani/back-to-work/#how-to-install) for a brief description for installing extensions.
- Open new tab & type: `chrome://extensions` or `edge://extensions`.
- Look for the Developer mode toggle & turn it on if it's not already.
- After cloning the repository, click on `Load Unpacked` and select the `extension` directory.
**Model**
The complete setup can be found in the [`model` directory](./model).
NOTE:
- Apart from this `tensorflow` and `tensorflow_hub` should be installed .
- The face-pose-estimation model is not final it is just a placeholder for now(will improve it as we get time).
- How to convert javascript array for image into image tensor that part is remaining.
**Server**
For local setup of backend:
- `cd server`
- `npm i`
- `npm start`
```
server
├───controllers
├───middlewares
├───models
├───routes
└───package.json
```
### License 📜
[GNU General Public License v3.0](/LICENSE)
### Authors
- Vivek Namaye
- [LinkedIn](https://www.linkedin.com/in/viveknamaye/)
- Akshay Kanade
- [LinkedIn](https://www.linkedin.com/in/akshaykanade/)
- Tushar Nankani
- [Twitter](https://twitter.com/tusharnankanii)
We are Team VAT, not Value Added Tax, but Vivek, Akshay and myself, Tushar.