Ecosyste.ms: Awesome
An open API service indexing awesome lists of open source software.
https://github.com/uraimo/HD44780CharacterLCD.swift
A Swift library for 16x2/20x4 Character LCDs with the HD44780(or clones) controller
https://github.com/uraimo/HD44780CharacterLCD.swift
1602a 2004a gpio hd44780 iot lcd
Last synced: 3 months ago
JSON representation
A Swift library for 16x2/20x4 Character LCDs with the HD44780(or clones) controller
- Host: GitHub
- URL: https://github.com/uraimo/HD44780CharacterLCD.swift
- Owner: uraimo
- License: other
- Created: 2016-02-19T16:24:28.000Z (over 8 years ago)
- Default Branch: master
- Last Pushed: 2019-09-26T16:35:57.000Z (about 5 years ago)
- Last Synced: 2024-07-28T14:34:14.007Z (3 months ago)
- Topics: 1602a, 2004a, gpio, hd44780, iot, lcd
- Language: Swift
- Size: 265 KB
- Stars: 13
- Watchers: 4
- Forks: 8
- Open Issues: 2
-
Metadata Files:
- Readme: README.md
- License: LICENSE
Awesome Lists containing this project
- awesome-embedded-swift - HD44780CharacterLCD.swift - A Swift library for 16x2/20x4 Character LCDs with the HD44780(or clones) controller (Displays / Networking, IoT, Bus Protocols, …)
README
#HD44780CharacterLCD.swift
*A Swift library for 16x2(aka 1602A), 20x4(aka 2004A) or bigger Character LCDs with an Hitachi HD44780 controller or one of its clones(KS0066, SPLC780D, ST7066U, NT8331D, etc...).*

#Summary
A Swift library for 16x2(aka 1602A), 20x4(aka 2004A) or bigger Character LCDs with an Hitachi HD44780 controller or one of its clones(KS0066, SPLC780D, ST7066U, NT8331D, etc... 99% of the controllers on the market).
This library will not work with LCDs connected to an additional I2C/SPI driver board (boards with just 5 pins instead of 16 or so).
Also, the RGB backlight is not supported, it could be added in the future if someone is interested.
## Supported Boards
Every board supported by [SwiftyGPIO](https://github.com/uraimo/SwiftyGPIO): Raspberries, BeagleBones, C.H.I.P., etc...
To use this library, you'll need a Linux ARM board with Swift 3.x/4.x, the old Swift 2.x version of this library is available [on a specific branch](https://github.com/uraimo/HD44780CharacterLCD.swift/tree/swift2).
The example below will use a RaspberryPi2 board but you can easily modify the example to use one the the other supported boards.
## Installation
Please refer to the [SwiftyGPIO](https://github.com/uraimo/SwiftyGPIO) readme for Swift installation instructions.
Once your board runs Swift, if your version support the Swift Package Manager, you can simply add this library as a dependency of your project and compile with `swift build`:
let package = Package(
name: "MyProject",
dependencies: [
.package(url: "https://github.com/uraimo/HD44780CharacterLCD.swift.git", from: "3.0.0"),
...
]
...
)
The directory `Examples/RaspberryPi` contains a sample project that uses SPM, compile it and run the sample with `sudo ./.build/debug/TestLCD`.
If SPM is not supported, you'll need to manually download the library and its dependencies:
wget https://raw.githubusercontent.com/uraimo/HD44780CharacterLCD.swift/master/Sources/HD44780CharacterLCD.swift https://raw.githubusercontent.com/uraimo/SwiftyGPIO/master/Sources/SwiftyGPIO.swift https://raw.githubusercontent.com/uraimo/SwiftyGPIO/master/Sources/Presets.swift https://raw.githubusercontent.com/uraimo/SwiftyGPIO/master/Sources/SunXi.swift
And once all the files have been downloaded, create an additional file that will contain the code of your application (e.g. main.swift). When your code is ready, compile it with:
swiftc *.swift
The compiler will create a **main** executable.
As everything interacting with GPIOs, if you are not already root, you will need to run that binary with `sudo ./main`.
## Usage
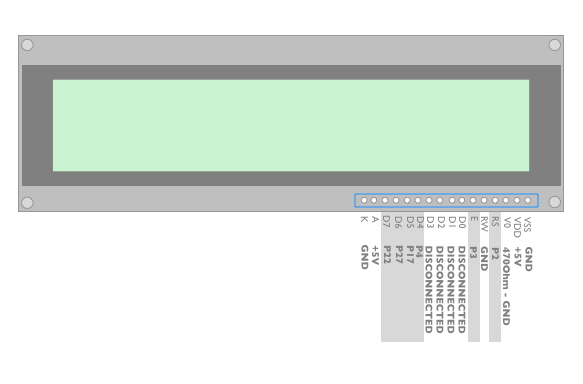
In the following usage example i'll use a 20x4 LCD connected to a RaspberryPi 2 as shown below:

Before using this as a reference, verify that the pins are the same (A and K could have a different name).
Since the library supports only writes, the *R/W* pin is connected to *GND* and since we use a 4bit data mode, the lower 4 data pins are not connected to anything.
The *A* and *K* pins are used for the backlight, if you have and RGB backlight LCD, you'll have three pins instead of two. Usually you will just connect *K* to *GND* and *A* to *VDD(5V)*. The V0 pins regulates the display contrast, you could connect it to *GND* for maximum contrast or you could search the value you prefer with a 20K variable resistor, here i suggest you to use a 470 Ohm resistor connected to *GND* that will give you a good value of contrast (see pitcure above), if you don't like it feel free to experiment.
And that's all for the LCD connections, just connect the remaining pins to the Raspberry GPIOs as shown in the diagram.
The library needs 6 GPIO Objects created with SwiftyGPIO to initialize the HD44780 class, let's see how to do it on a RaspberryPi 2, we'll use the first 6 gpios on the left side of the header:
```swift
import SwiftyGPIO
import HD44780LCD
let gpios = SwiftyGPIO.GPIOs(for: .RaspberryPi2)
var rs = gpios[.P2]!
var e = gpios[.P3]!
var d4 = gpios[.P4]!
var d5 = gpios[.P17]!
var d6 = gpios[.P27]!
var d7 = gpios[.P22]!
let lcd = HD44780LCD(rs:rs,e:e,d7:d7,d6:d6,d5:d5,d4:d4,width:20,height:4)
```
The screen can be cleared using the `clearScreen` method:
```swift
lcd.clearScreen()
```
The cursor, a functionality provided by the HD44780 LCD, points to the position where the next character should be drawn, the cursor can be moved to home (0,0) or to a specific position:
```swift
lcd.cursorHome()
lcd.cursorTo(x:0,y:0)
```
At the moment, cursor related methods do not have a real use case since it's not possible to print a character or a string at the current position (trivial to implement).
To print a string at a given position, use the `printString` method, the last parameter specifies if the US charset should be used. If the boolean is false, a japanese charset with katakana symbols will be used instead.
```swift
lcd.printString(x:0,y:0,what:"Hello From Swift!",usCharSet:true)
```
## Examples
Examples are available in the *Examples* directory.
## Projects using this library:
* [Portable Wifi Monitor in Swift](http://saygoodnight.com/2016/04/05/portable-wifimon-raspberrypi.html) - A battery powered wifi signal monitor to map you wifi coverage.
* [Temperature & Humidity Monitor in Swift](http://saygoodnight.com/2016/04/13/swift-temperature-raspberrypi.html) - A temperature monitor with a Raspberry Pi and an AM2302.
## TODO
A few missing features:
- [ ] User defined characters not supported (see [here](http://www.quinapalus.com/hd44780udg.html))
- [ ] This library only write to the display, reading is not supported
- [ ] RGB backlit LCD variant not supported (can be easily implemented with 3 gpios)


