https://github.com/useflyyer/flyyer-js
SaaS to manage, optimize and generate your og:image og-image
https://github.com/useflyyer/flyyer-js
expressjs flyyer image-generator javascript nextjs node og-image og-images open-graph social-preview twitter-cards typescript
Last synced: 8 months ago
JSON representation
SaaS to manage, optimize and generate your og:image og-image
- Host: GitHub
- URL: https://github.com/useflyyer/flyyer-js
- Owner: useflyyer
- License: mit
- Created: 2020-08-08T23:01:13.000Z (almost 6 years ago)
- Default Branch: master
- Last Pushed: 2023-03-05T10:08:00.000Z (over 3 years ago)
- Last Synced: 2025-08-08T16:42:07.024Z (11 months ago)
- Topics: expressjs, flyyer, image-generator, javascript, nextjs, node, og-image, og-images, open-graph, social-preview, twitter-cards, typescript
- Language: TypeScript
- Homepage: https://flyyer.io
- Size: 2.48 MB
- Stars: 17
- Watchers: 2
- Forks: 0
- Open Issues: 12
-
Metadata Files:
- Readme: README.md
- License: LICENSE
Awesome Lists containing this project
README
# flyyer-js
   
Format URLs to generate social media images using Flyyer.io.
**To create templates with React.js or Vue.js use [create-flyyer-app](https://github.com/useflyyer/create-flyyer-app) 👈**

**This module is agnostic to any JS framework and has only one dependency: [qs](https://github.com/ljharb/qs).**
## Index
- [Get started (5 minutes)](#get-started-5-minutes)
- [Advanced usage](#advanced-usage)
- [Flyyer Render](#flyyer-render)
- [Development](#development)
- [Test](#test)
- [FAQ](#faq)
## Get started (5 minutes)
### 1. Install module
This module supports Node.js, Browser and can be bundled with any tool such as Rollup, Webpack, etc and includes Typescript definitions.
```sh
yarn add @flyyer/flyyer
# or with npm:
npm install --save @flyyer/flyyer
```
### 2. Flyyer.io smart image link
> Haven't registered your website yet? Go to [Flyyer.io](https://flyyer.io/get-started?ref=flyyer-js) and import your website to create a project (e.g. `website-com`).
For each of your routes, create an instance.
```tsx
import { Flyyer } from "@flyyer/flyyer";
const flyyer = new Flyyer({
// Your project slug
project: "website-com",
// Relative path
path: `/path/to/product`,
// Optional: preserve and re-use your default or current image.
// default: "/images/default-image.png",
});
console.log(flyyer.href());
// > https://cdn.flyyer.io/v2/website-com/_/__v=1618281823/path/to/product
```
#### 2.1 Next.js
Remember to dynamically get the current path for each page. If you are using [Next.js](https://nextjs.org/) you should probably do this:
```tsx
import { useRouter } from 'next/router'
function SEO() {
const router = useRouter();
const flyyer = new Flyyer({
project: "my-project",
path: router.asPath,
// default: product["image"],
});
// ...
}
```
Check our official Next.js documentation [here](https://docs.flyyer.io/guides/javascript/nextjs?ref=flyyer-js);
### 3. Setup `` meta tags
You'll get the best results doing this:
```tsx
```
### 4. Manage rules
[Login at Flyyer.io](https://flyyer.io/dashboard/_/projects/_/manage?ref=flyyer-js), select your project and go to Manage rules. Then create a rule like the following:
[](https://flyyer.io/dashboard/)
Voilà! **To create templates with React.js or Vue.js use [create-flyyer-app](https://github.com/useflyyer/create-flyyer-app) 👈**
## Advanced usage
Advanced features include:
- Custom variables: additional information for your preview that is not present in your website. [Note: if you need customization you should take a look at [Flyyer Render](#flyyer-render)]
- Custom metadata: set custom width, height, resolution, and more (see example).
- Signed URLs.
Here you have a detailed full example for project `website-com` and path `/path/to/product`.
```tsx
import { Flyyer } from "@flyyer/flyyer";
const flyyer = new Flyyer({
// Project slug, find it in your dashboard https://flyyer.io/dashboard/.
project: "website-com",
// The current path of your website (by default it's `/`).
path: "/path/to/product",
// [Optional] Keep and re-use your current image.
default: product["image"],
// [Optional] In case you want to provide information that is not present in your page set it here.
variables: {
title: "Product name",
img: "https://flyyer.io/img/marketplace/flyyer-banner.png",
},
// [Optional] Additional variables.
meta: {
id: "jeans-123", // stats identifier (e.g. product SKU), defaults to `path`.
width: 1080, // force width (pixels).
height: 1080, // force height (pixels).
v: null, // cache-burst, to circumvent platforms' cache, default to a timestamp, null to disable.
},
});
```
> Read more about integration guides here: https://docs.flyyer.io/guides
## Flyyer Lite
If you are not using Signed URLs you can opt-in for `@flyyer/flyyer-lite` which is a lightweight version because it doesn't include crypto functions.
```sh
yarn add @flyyer/flyyer-lite
```
Usage is the same:
```tsx
import { Flyyer } from "@flyyer/flyyer-lite";
// ...
```
## FlyyerRender
* Flyyer uses the [rules defined on your dashboard](https://flyyer.io/dashboard/_/projects) to decide how to handle every image. It analyse your website to render a content-rich image. Let's say _"Flyyer renders images based on the content of this route"_.
* FlyyerRender instead requires you to explicitly declare template and variables for the images to render, **giving you more control for customization**. Let's say _"FlyyerRender renders an image using this template and these explicit variables"_.
```tsx
import { FlyyerRender } from "@flyyer/flyyer";
const flyyer = new FlyyerRender({
tenant: "flyyer",
deck: "default",
template: "main",
variables: { title: "try changing this" },
});
const url = flyyer.href()
// https://cdn.flyyer.io/r/v2/flyyer/default/main.jpeg?title=try+changing+this
```
[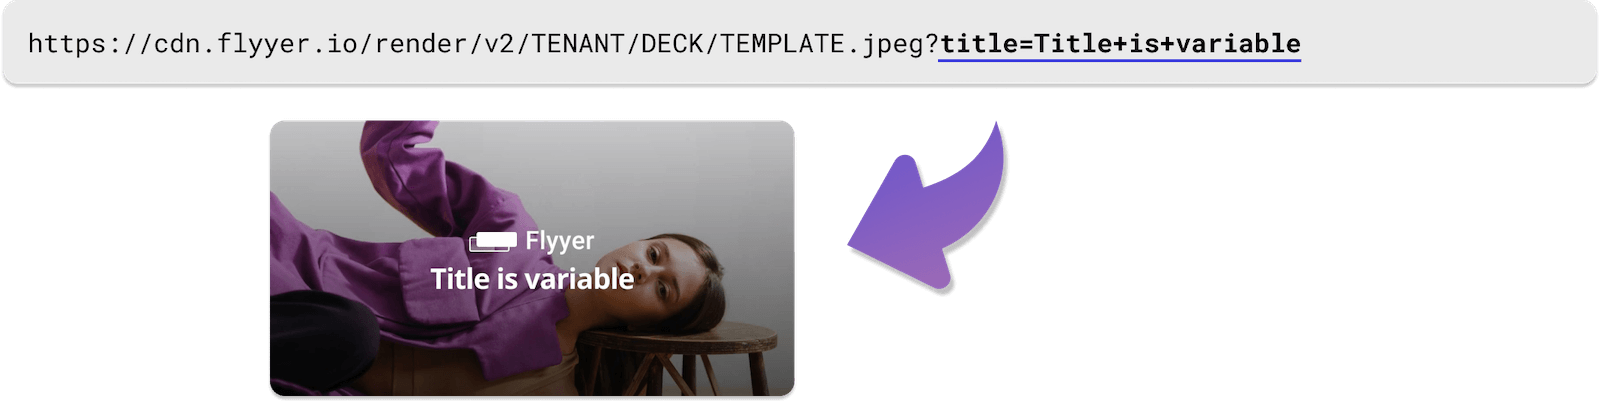](https://cdn.flyyer.io/r/v2/flyyer/default/main.jpeg?title=try+changing+this)
After installing this module you can format URLs. Here is an example with React.js, but note this can be used with any framework:
```tsx
import React from "react";
import { FlyyerRender } from "@flyyer/flyyer";
function Head() {
const flyyer = new FlyyerRender({
tenant: "tenant",
deck: "deck",
template: "template",
variables: {
title: "Hello world!",
image: "https://yoursite.com/image/products/1.png",
},
});
const url = flyyer.href();
return (
);
}
```
Variables can be complex arrays and objects.
```js
const flyyer = new FlyyerRender({
// ...
variables: {
items: [
{ text: "Oranges", count: 12 },
{ text: "Apples", count: 14 },
],
},
meta {
id: "slug-or-id", // To identify the resource in our analytics report
}
});
```
**IMPORTANT: variables must be serializable.**
You can **set image dimensions**, note if your are planing to use this as `}) ` you should disable cache-bursting.
` you should disable cache-bursting.
```tsx
const flyyer = new FlyyerRender({
tenant: "tenant",
deck: "default",
template: "main",
variables: {
title: "Awesome 😃",
description: "Optional description",
},
meta: {
v: null, // prevent cache-bursting in browsers
width: 1080, // in pixels
height: 1920, // in pixels
}
});
```
[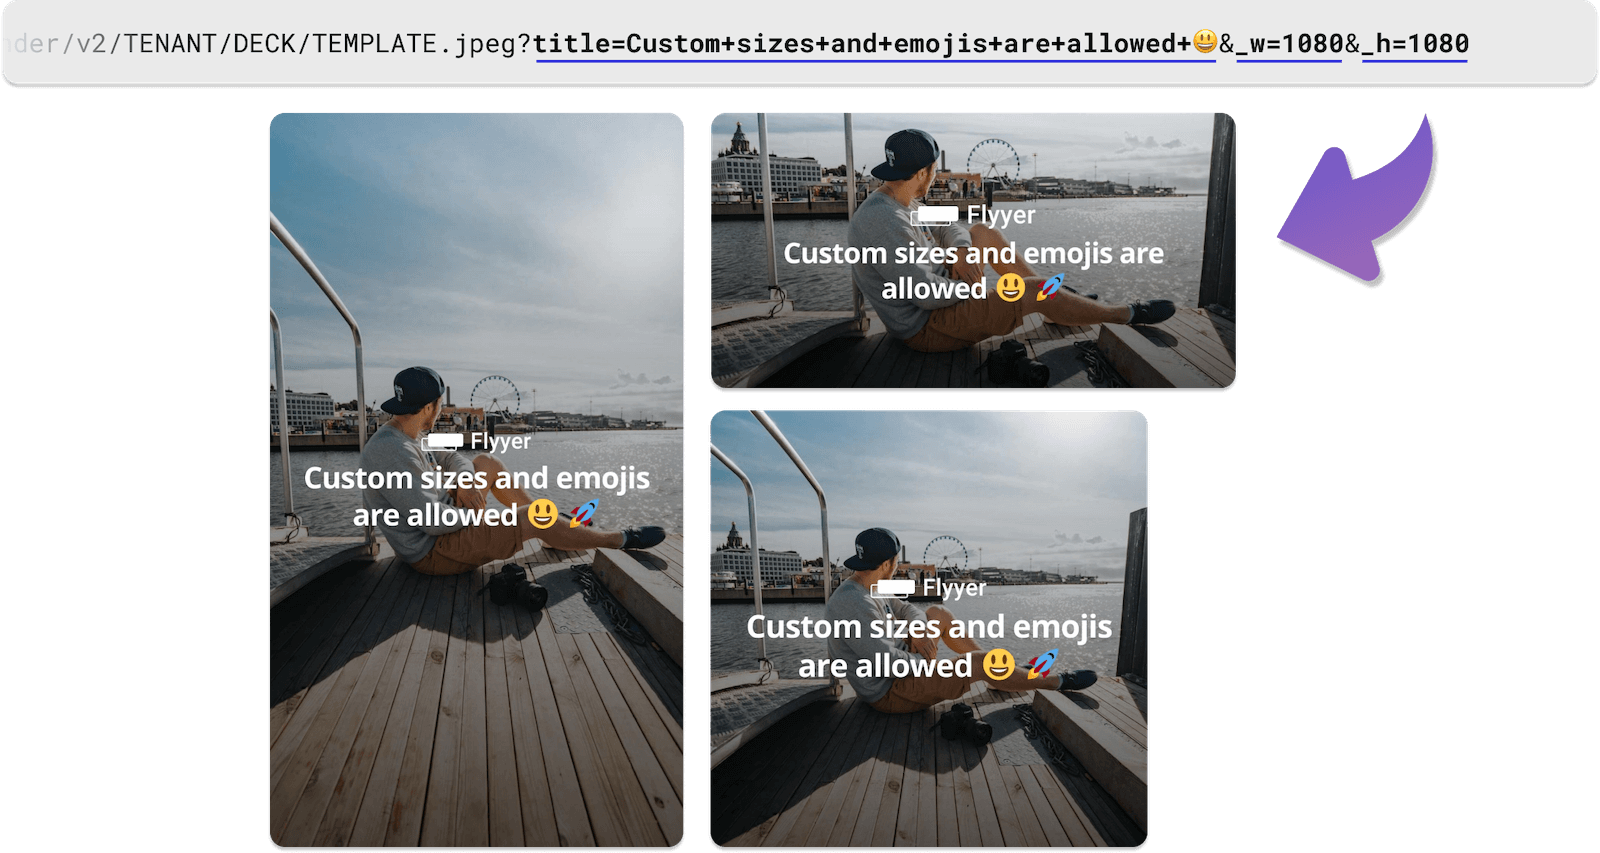](https://cdn.flyyer.io/r/v2/flyyer/default/main.jpeg?title=awesome!+%F0%9F%98%83&description=Optional+description&_w=1080&_h=1920)
**To create templates with React.js or Vue.js use [create-flyyer-app](https://github.com/useflyyer/create-flyyer-app) 👈**
---
## Development
Prepare the local environment:
```sh
yarn install
```
To decode an URL for debugging purposes:
```js
console.log(decodeURI(url));
// > https://cdn.flyyer.io/r/v2/tenant/deck/template.jpeg?title=Hello+world!&__v=123
```
Helpers to compare instances (ignores `__v` param and performs a shallow compare of `variables`).
```tsx
import {
isEqualFlyyer,
isEqualFlyyerRender,
isEqualFlyyerMeta,
} from "@flyyer/flyyer";
import { dequal } from "dequal/lite";
const boolean = isEqualFlyyer(fio1, fio2, dequal);
```
## Test
To run tests:
```sh
yarn test
```
## FAQ
### What is the difference between Flyyer and FlyyerRender?
* Flyyer uses the [rules defined on your dashboard](https://flyyer.io/dashboard/_/projects) to decide how to handle every image. It analyse your website to render a content-rich image. Let's say _"Flyyer renders images based on the content of this route"_.
* FlyyerRender instead requires you to explicitly declare template and variables for the images to render, **giving you more control for customization**. Let's say _"FlyyerRender renders an image using this template and these explicit variables"_.
### Is it compatible with Nextjs, React, Vue, Express and other frameworks?
This is framework-agnostic, you can use this library on any framework on any platform.
### How to configure Flyyer rules?
Visit your [project rules and settings](https://flyyer.io/dashboard/_/projects) on the Flyyer Dashboard.
### What is the `__v=` thing?
Most social networks caches images, we use this variable to invalidate their caches but we ignore it on our system to prevent unnecessary renders. **We strongly recommend it and its generated by default.**
Pass `meta: { v: null }` to disabled it (not recommended).