https://github.com/utensor/utensor-mnist-demo
https://github.com/utensor/utensor-mnist-demo
Last synced: over 1 year ago
JSON representation
- Host: GitHub
- URL: https://github.com/utensor/utensor-mnist-demo
- Owner: uTensor
- License: apache-2.0
- Created: 2018-01-22T16:58:15.000Z (over 8 years ago)
- Default Branch: develop
- Last Pushed: 2020-05-06T04:09:28.000Z (about 6 years ago)
- Last Synced: 2025-04-19T15:21:44.639Z (over 1 year ago)
- Language: C++
- Size: 2.3 MB
- Stars: 21
- Watchers: 6
- Forks: 25
- Open Issues: 6
-
Metadata Files:
- Readme: README.md
- License: LICENSE
Awesome Lists containing this project
README
# Basic MNIST handwriting recognition with uTensor
uTensor reduces AI-inference cost significantly, bringing AI to Cortex M devices.
This tutorial discusses at a high level what TensorFlow graphs are and how to start using uTensor to build a handwriting recognition application. This involves training a fully-connected neural network on the MNIST dataset on a host machine, generating embedded code, and building an mbed application that classifies handwritten digits based on user input.
## Introduction
TensorFlow is an open-source software library for numerical computation using data flow graphs. Nodes in the graph represent mathematical operations, and the graph edges represent tensors, a type of multidimensional data array.
uTensor translates these TensorFlow graphs into C++ code, which you can run on embedded devices.
Running artificial intelligence on embedded systems involves 3 main steps.
1. construct a machine learning model either offline on your local machine or in the cloud.
1. feed this model into code generation tools. These tools output uTensor kernels, which you can run on your devices. These kernels are functions that output predictions based on their inputs.
1. build embedded applications that call these functions to make informed decisions.
## Requirements
- [DISCO_F413ZH](https://os.mbed.com/platforms/ST-Discovery-F413H/)
- [mbed-cli](https://os.mbed.com/docs/v5.7/tools/installation-and-setup.html)
- [uTensor-cli](https://github.com/uTensor/utensor_cgen) `pip install utensor-cgen`
- [Tensorflow 1.6+](https://www.tensorflow.org/install)
- [Jupyter Notebook](http://jupyter.org/) `pip install jupyter` *(Optional)*
### Note for Windows users
*NOTE*: Windows is not currently supported; here are two workarounds:
1. If you are running Windows then you must have both Python2 and Python3 installed. Tensorflow 1.2+ does not support Python 2.7 on Windows, and only officially supports Python 3.5 and 3.6. Meanwhile, mbed officially supports Python2 and has limited support for Python3. You can get the demo working by running the Ipython notebook with the Python3 kernel, and the mbed project build with Python2.
1. Use the [Cloud9 Environment](https://github.com/uTensor/cloud9-installer)
## Build Instruction
1. Import the project:
```
$ mbed import https://github.com/uTensor/utensor-mnist-demo
```
### Train the model
**Note**
- The repository contains reference model files. You may choose to skip to the [**Prepare the mbed project**](#prepare-the-mbed-project) section.
- If you prefer traditional Python scripts rather than notebooks, check out `tensorflow-models/deep_mlp.py`. This script contains all the same code as the notebook.
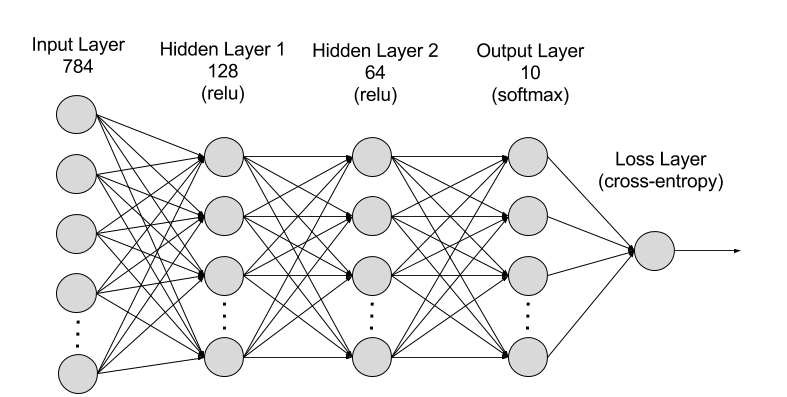
The process of training and validating the model is exactly the same as in traditional machine learning workflows. This example trains a fully connected neural net with two hidden layers to recognize handwritten digits from the MNIST dataset, but you can apply the concepts to an application of your choice.
### Jupyter Notebook *(Optional)*
In preparation for code generation, you must freeze the TensorFlow model. Freezing a model stores learned graph parameters in a protobuf file.
1. Train the Tensorflow model
1. Launch IPython `jupyter notebook` 
1. Open the `tensorflow-models/deep_mlp.ipynb`
1. Select `Kernel/Restart & Run All`. This will build a 2 layer NN then train, quantize, and save the model in `tensorflow-models/mnist_model/deep_mlp.pb`.

1. Go back to project root directory
### Generate embedded C++ code
You can get the output node names from the IPython notebook. This will create a `models` directory. The `models` contains the embedded code interface for making inferences in your applications and relevant C++ source code associated with the *learned* weights and architecture of the neural net. Please refer to the [uTensor-cli](https://github.com/uTensor/utensor_cgen) for installation and usage instructions.
```
# from project root, run:
$ utensor-cli convert tensorflow-models/mnist_model/deep_mlp.pb --output-nodes=y_pred
```
### Prepare the mbed project
This example builds a handwriting recognition application using Mbed and the generated model, but you can apply these concepts to your own projects and platforms. This example uses the **ST-Discovery-F413H** because it has a touch screen and SD card built in, but you could just as easily build the application using plug-in components.
1. Run `mbed deploy`, this fetches the necessary libraries like uTensor
1. Build the mbed project:
```
$ mbed compile -m DISCO_F413ZH -t GCC_ARM
```
1. Finally flash your device by dragging and dropping the binary from `BUILD/DISCO_F413ZH/GCC_ARM/utensor-mnist-demo.bin` to your device.
# Playing with the application
After drawing a number on the screen press the blue button to run inference, uTensor should output its prediction in the middle of the screen. Then press the reset button.
[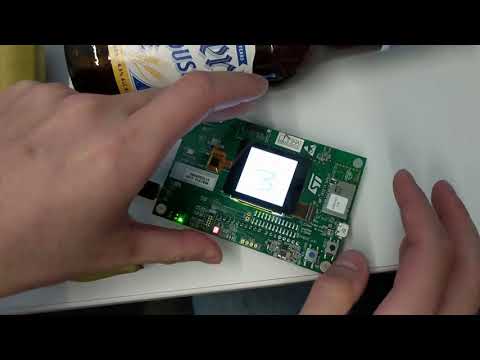](https://www.youtube.com/watch?v=FhbCAd0sO1c)
**Note**: The model used in training is very simple and has suboptimal accuracy in practice.