https://github.com/wagiminator/ch32x033-usb-knob
Rotary Encoder with NeoPixels and USB Interface
https://github.com/wagiminator/ch32x033-usb-knob
ch32x033 ch32x035 neopixels risc-v rotary-encoder usb-hid volume-control
Last synced: about 1 year ago
JSON representation
Rotary Encoder with NeoPixels and USB Interface
- Host: GitHub
- URL: https://github.com/wagiminator/ch32x033-usb-knob
- Owner: wagiminator
- License: other
- Created: 2024-03-10T14:46:16.000Z (over 2 years ago)
- Default Branch: main
- Last Pushed: 2024-11-24T11:15:27.000Z (over 1 year ago)
- Last Synced: 2025-03-26T06:19:27.227Z (about 1 year ago)
- Topics: ch32x033, ch32x035, neopixels, risc-v, rotary-encoder, usb-hid, volume-control
- Language: C
- Homepage: https://oshwlab.com/wagiminator/ch32x033-tinyknob
- Size: 1 MB
- Stars: 16
- Watchers: 1
- Forks: 2
- Open Issues: 0
-
Metadata Files:
- Readme: README.md
- License: LICENSE
Awesome Lists containing this project
README
# CH32X033 USB Knob - Rotary Encoder with USB Interface
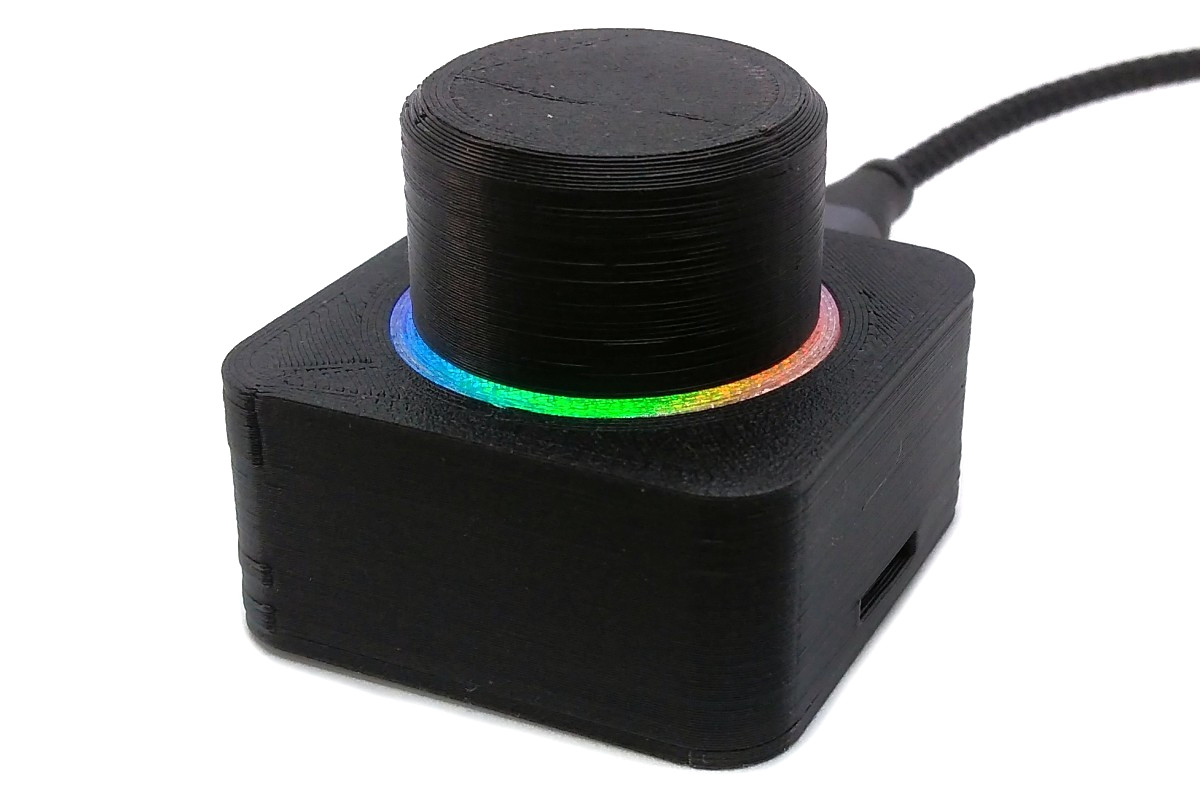
The USB Knob is a versatile device that combines the functionality of a rotary encoder with the convenience of a USB interface. It is based on the CH32X033 microcontroller and is equipped with addressable LEDs, commonly known as NeoPixels. The unique combination of these components makes the USB Knob an ideal choice for a wide range of applications, including volume control for PCs.
One of the standout features of the USB Knob is that it requires no driver installation, making it incredibly easy to use. The device acts as a USB human interface device (HID), meaning that it can be recognized and utilized by most computers without the need for additional software.
# Hardware
## Schematic

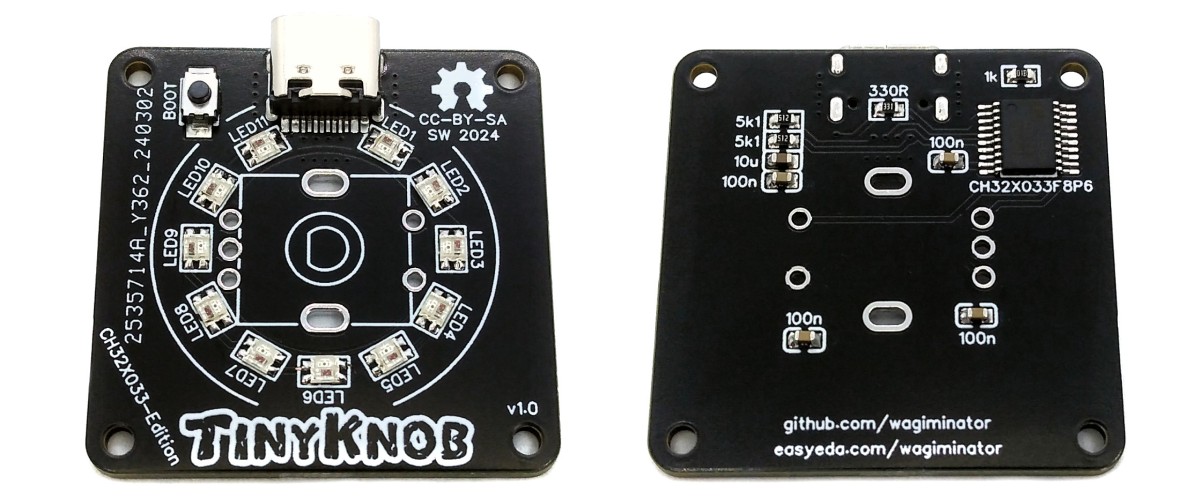
## CH32X033 32-bit RISC-V USB Microcontroller
CH32X033 is a low-cost microcontroller that utilizes the QingKe 32-bit RISC-V4C core, supporting the RV32IMAC instruction set along with self-extending instructions. This microcontroller comes with a built-in USB PHY and supports USB2.0 full-speed device functions. It features a programmable protocol I/O controller (PIOC), 2 groups of operational amplifiers (OPA) with programmable gain (PGA), 2 groups of analog comparators (CMP), a 12-bit analog-to-digital converter (ADC), a 10-channel touch-key controller, 4 groups of USART, I2C, SPI, multiple timers, and various other peripheral resources. The device can operate at clock frequencies of up to 48MHz and is compatible with a supply voltage range of 2.0V to 5.5V. The CH32X033 includes 62KB of flash, 20KB of SRAM, and an embedded USB bootloader.
## Building Instructions
1. Take the Gerber files (the *zip* file inside the *hardware* folder) and upload them to a PCB (printed circuit board) manufacturer of your choice (e.g., [JLCPCB](https://jlcpcb.com/)). They will use these files to create the circuit board for your device and send it to you.
2. Once you have the PCB, you can start soldering the components onto it. Use the BOM (bill of materials) and schematic as a guide to make sure everything is connected correctly. You can find the corresponding files in the *hardware* folder.
3. Upload the firmware by following the instructions in the next section (see below).
4. To create the case for your device, use the *stl* files in the *3dprint* folder with your 3D printer. Make sure to use transparent filament for the ring.
5. After printing, secure the PCB to the bottom of the case using four self-tapping M2x5mm screws.
6. Next, glue the ring from the bottom into the circular recess in the top of the case.
7. Finally, assemble the case. Place the knob onto the rotary encoder. Your device is now ready to use!
# Software
## Firmware Versions
### Volume Knob
This firmware enables the USB Knob to control the volume of your computer. By turning the knob, you can increase or decrease the volume, while pressing the knob will mute or unmute the sound. The device is recognized as a USB HID consumer multimedia keyboard and should work immediately without the need for any driver installation.
### Mouse Wheel Knob
This firmware is designed to transform the USB Knob into a mouse wheel. By rotating the knob, it emulates the movement of a mouse wheel, allowing users to scroll up and down web pages, among other things. Pressing the knob is equivalent to clicking on the mouse wheel or the middle mouse button. The device registers as a USB HID mouse on the computer and should work immediately without the need for driver installation.
### Custom Knob
This firmware is perfect for customizing it according to your own preferences. It allows for the free mapping of USB HID actions to USB Knob events. The firmware is structured and commented in such a way that it should be possible to make adjustments even with basic programming skills. It is designed as a USB HID composite device that combines a keyboard, a mouse, and a game controller.
## USB Bootloader
### Installing Drivers for the Bootloader
On Linux you do not need to install a driver. However, by default Linux will not expose enough permission to upload your code with the USB bootloader. In order to fix this, open a terminal and run the following commands:
```
echo 'SUBSYSTEM=="usb", ATTR{idVendor}=="4348", ATTR{idProduct}=="55e0", MODE="666"' | sudo tee /etc/udev/rules.d/99-ch55x.rules
echo 'SUBSYSTEM=="usb", ATTR{idVendor}=="1a86", ATTR{idProduct}=="55e0", MODE="666"' | sudo tee -a /etc/udev/rules.d/99-ch55x.rules
sudo udevadm
```
For Windows you can use the [Zadig](https://zadig.akeo.ie/) tool to install the correct driver. Here, click "Options" -> "List All Devices" and select the USB module. Then install the libusb-win32 driver. To do this, the board must be connected and the microcontroller must be in bootloader mode.
### Entering Bootloader Mode
The bootloader must be started manually for new uploads. To do this, the board must first be disconnected from the USB port. Now press the BOOT button and keep it pressed while reconnecting the board to the USB port of your PC. The chip now starts in bootloader mode, the BOOT button can be released and new firmware can be uploaded via USB within the next couple of seconds.
## Compiling and Uploading Firmware using the Makefile
### Linux
Install the toolchain (GCC compiler, Python3, and chprog):
```
sudo apt install build-essential libnewlib-dev gcc-riscv64-unknown-elf
sudo apt install python3 python3-pip
pip install chprog
```
Open a terminal and navigate to the folder with the *makefile*. Press the BOOT button and keep it pressed while connecting the board to the USB port of your PC. Run the following command to compile and upload:
```
make flash
```
### Other Operating Systems
Follow the instructions on [CNLohr's ch32v003fun page](https://github.com/cnlohr/ch32v003fun/wiki/Installation) to set up the toolchain on your respective operating system (for Windows, use WSL). Also, install [Python3](https://www.pythontutorial.net/getting-started/install-python/) and [chprog](https://pypi.org/project/chprog/). Compile and upload with "make flash". Note that I only have Debian-based Linux and have not tested it on other operating systems.
## Compiling and Uploading Firmware using PlatformIO
- Install [PlatformIO](https://platformio.org) and [platform-ch32v](https://github.com/Community-PIO-CH32V/platform-ch32v). Follow [these instructions](https://pio-ch32v.readthedocs.io/en/latest/installation.html) to do so. Linux/Mac users may also need to install [pyenv](https://realpython.com/intro-to-pyenv).
- Click on "Open Project" and select the firmware folder with the *platformio.ini* file.
- Press the BOOT button and keep it pressed while connecting the board to the USB port of your PC. Then click "Upload".
## Uploading pre-compiled Firmware Binary
WCH offers the free but closed-source software [WCHISPTool](https://www.wch.cn/downloads/WCHISPTool_Setup_exe.html) to upload firmware with Windows via the USB bootloader. Press the BOOT button and keep it pressed while connecting the board to the USB port of your PC. Release the BOOT button, open the *.hex* file in the *bin* folder with WCHISPTool and upload it to the microcontroller.
If [Python3](https://www.pythontutorial.net/getting-started/install-python/) is installed, you can also use the platform-independent open-source command-line tool [chprog](https://pypi.org/project/chprog/) for uploading:
```
chprog bin/.bin
```
# References, Links and Notes
- [EasyEDA Design Files](https://oshwlab.com/wagiminator)
- [MCU Templates](https://github.com/wagiminator/MCU-Templates)
- [MCU Flash Tools](https://github.com/wagiminator/MCU-Flash-Tools)
- [CH32X033 Datasheets](http://www.wch-ic.com/products/CH32X035.html)
- [ATtiny85 TinyKnob](https://github.com/wagiminator/ATtiny85-TinyKnob)
- [CH552E USB Knob](https://github.com/wagiminator/CH552-USB-Knob)
- [CH552E MacroPad mini](https://github.com/wagiminator/CH552-Macropad-mini)
- [CH552G MacroPad plus](https://github.com/wagiminator/CH552-MacroPad-plus)

# License

This work is licensed under Creative Commons Attribution-ShareAlike 3.0 Unported License.
(http://creativecommons.org/licenses/by-sa/3.0/)