https://github.com/waterbang/object-deteation-train
Object Detection Model Training
https://github.com/waterbang/object-deteation-train
object-detection tensorflow
Last synced: over 1 year ago
JSON representation
Object Detection Model Training
- Host: GitHub
- URL: https://github.com/waterbang/object-deteation-train
- Owner: waterbang
- Created: 2020-09-13T11:15:23.000Z (almost 6 years ago)
- Default Branch: master
- Last Pushed: 2022-04-25T15:49:48.000Z (about 4 years ago)
- Last Synced: 2025-04-12T19:53:17.570Z (over 1 year ago)
- Topics: object-detection, tensorflow
- Homepage:
- Size: 30.2 MB
- Stars: 5
- Watchers: 1
- Forks: 1
- Open Issues: 0
-
Metadata Files:
- Readme: README.md
Awesome Lists containing this project
README
# object-deteation-train
对象检测模型训练,此仓库已经集成了cocoAPI,Object deteationAPI等环境,让您开箱即用。
> 建议在本地使用此镜像,因为模型训练将耗费大量内存,会出现资源耗尽。(It is recommended to use this mirror on the server, because the model training will consume a lot of time.)
## dircetory
- .
- ├── Python ---> 存放xml转csv,csv转TFRcords 的python脚本
- ├── annotations --->存放转换的TFRcords
- ├── cocoapi ---> cocoapi
- ├── exported-models ---> 导出的模型准备放这里
- ├── images ---> 标记的图片train and test
|—— train
|—— test
- ├── model ---> 训练模型的目录
- ├── models ---> tensorflow Object deteation API
- └── pre-trained-models ---> tensorflow Object deteation model
## 开始 (start)
前置条件: labelImg 和 docker。
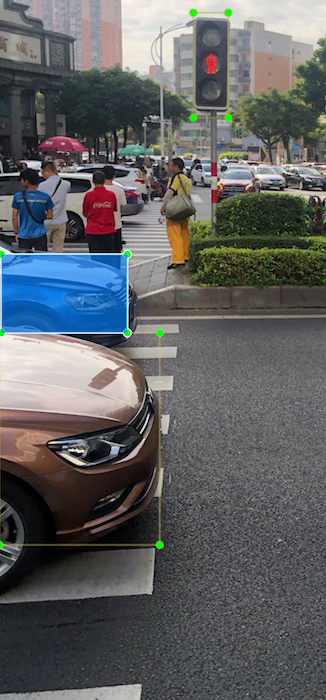
### 标记对象 (Tag object)
使用[labelImg](https://github.com/tzutalin/labelImg), 标注对象,并保存xml.类似于:
### 准备映射训练集 (Prepare the mapping training set)
收集完,将其放在任意目录下,训练集和测试集都放。比例自己决定。此项目提供了两种构建方法,推荐docker hub,因为它可以让您在服务器上训练,解放您的本地资源。
> K折交叉验证法,留出法, 留一法
## pull images
### docker hub pull
拉镜像
```
docker pull waterbang/object-deteation
```
> ⚠️ 整个训练镜像为6G
## 运行容器 (Run the container)
使用本地目录映射替到容器内images目录,以便于对数据集进行操作。
>注意:以下目录对应您的训练集和测试集目录,请修改成您的数据存放地址。
>/Users/waterbang/Desktop/tensorflow/dog/data/images
```
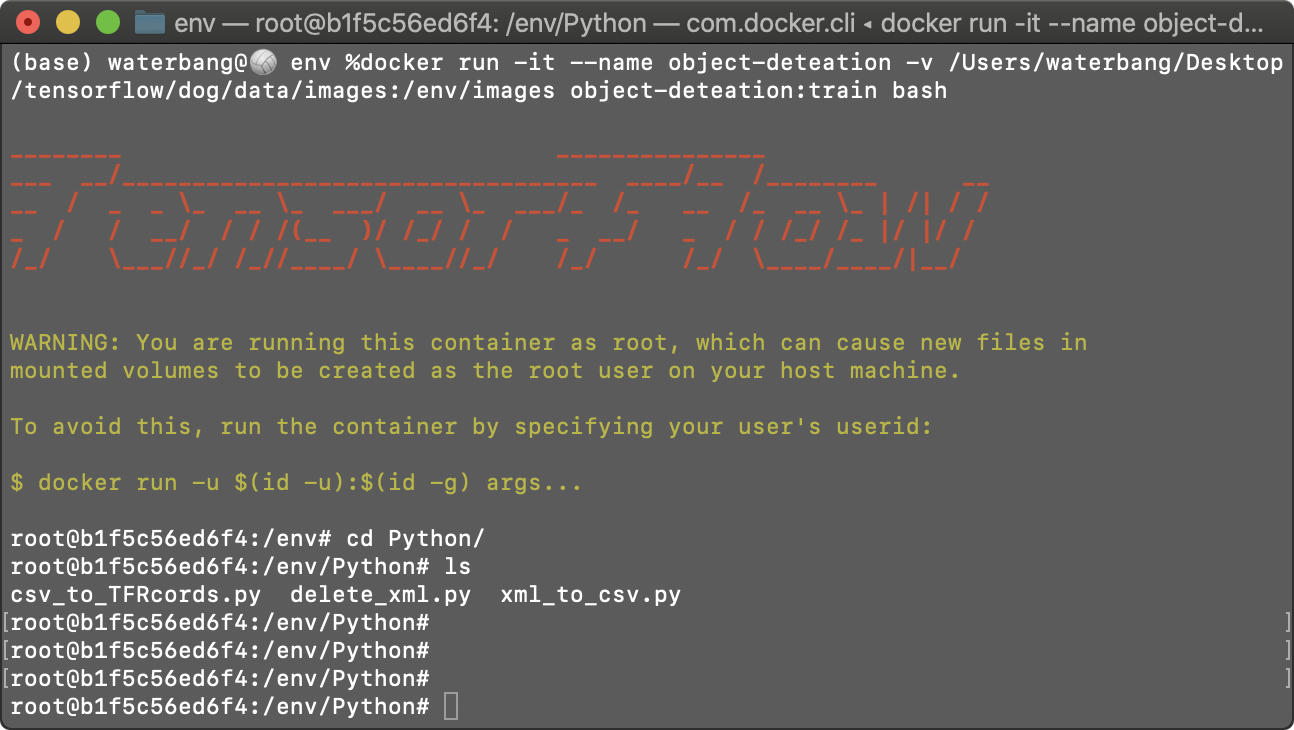
docker run -it --name object-deteation -v /root/tensorflow/images:/env/images waterbang/object-deteation:latest bash
```
显示如下:
> 如果您第二次进入运行:
>docker exec -it object-deteation bash
## 构建 TFRcords (如果您已经有TFRcords跳过此步)
> 您可以运行以下命令来安装vim工具
> apt-get update
> apt-get install vim
进入 /Python 目录
### xml transform csv
先打开,`xml_to_csv.py`,修改 xml文件夹地址 和 生成csv文件地址。
记得训练集和测试集都需要转换。
在 Python 目录下运行。
``` shell
python ./xml_to_csv.py
```
如果成功会输出如下内容:
```shell
..............
value: ('0288001.png', 60, 160, 'person', 1, 1, 60, 160)
value: ('0875004.png', 60, 160, 'person', 1, 1, 60, 160)
value: ('0388001.png', 60, 160, 'person', 1, 1, 60, 160)
Successfully converted xml to csv.
```
### csv transform TFRcords
#### 进入 `csv_to_TFRcords.py`文件,修改以下两点:
1. 修改标签对应的种类数字
2. 修改文件第110行,填入数据集地址
```shell
vim /env/Python/csv_to_TFRcords.py
```
#### 在 Python 目录下运行.(使用绝对路径)
``` shell
python csv_to_TFRcords.py --csv_input=/env/images/train/train.csv --output_path=/env/annotations/train.record
python csv_to_TFRcords.py --csv_input=/env/images/test/test.csv --output_path=/env/annotations/test.record
```
显示如下内容为成功:
```
2020-11-06 03:40:26.553550: I tensorflow/stream_executor/platform/default/dso_loader.cc:48] Successfully opened dynamic library libcudart.so.10.1
Successfully created the TFRecords: /env/annotations/train.record
```
## Training model
### 先修改您的对象种类 (Edit the target first)
```
vim /env/annotations/label_map.pbtxt
```
### 修改`/env/pipeline.config`
修改以下行:
#### 1. 第3行,当前种类数量
```
num_classes: 4
```
#### 2. 第131行,根据您第内存,增加货减少该值
```
batch_size: 8
```
#### 3. 第161行,预训练模型地址
```
fine_tune_checkpoint: "pre-trained-models/ssd_resnet50_v1_fpn/checkpoint/ckpt-0"
```
#### 4. 第168行,如果您没有在TPU上进行培训,则将此设置为false。
```
use_bfloat16: false
```
#### 5. 测试集和训练集地址
```
.....
train_input_reader {
label_map_path: "annotations/label_map.pbtxt" # Path to label map file
tf_record_input_reader {
input_path: "annotations/train.record" # Path to training TFRecord file
}
}
eval_config {
metrics_set: "coco_detection_metrics"
use_moving_averages: false
}
eval_input_reader {
label_map_path: "annotations/label_map.pbtxt" # Path to label map file
shuffle: false
num_epochs: 1
tf_record_input_reader {
input_path: "annotations/test.record" # Path to testing TFRecord
}
}
```
### Training model
在 `model_main_tf2.py`同级目录下运行(/env):
```
python model_main_tf2.py --model_dir=./pre-trained-models/ssd_resnet50_v1_fpn --pipeline_config_path=./model/my_ssd_resnet50_v1_fpn/pipeline.config
```
## 辅助脚本 (Auxiliary script)
帮您将相同大小的数据转换成xml:
`/env/node/png_to_xml.js`
批量移动文件,方便分割测试集和训练集:
`/env/node/more_test.sh`
删除一个文件夹下所有的xml文件
`/env/Python/delete_xml.py`
## 如果遇到了错误
1. 请检查脚本文件路径。
### 2.如果出现 Illegal instruction (core dumped)
那么可能您的cpu较老,不支持AVX指令。您可以运行以下命令确认,是否有输出` -mavx -mavx2` ,如果缺少则可以确认缺少AVX支持。
```
grep flags -m1 /proc/cpuinfo | cut -d ":" -f 2 | tr '[:upper:]' '[:lower:]' | { read FLAGS; OPT="-march=native"; for flag in $FLAGS; do case "$flag" in "sse4_1" | "sse4_2" | "ssse3" | "fma" | "cx16" | "popcnt" | "avx" | "avx2") OPT+=" -m$flag";; esac; done; MODOPT=${OPT//_/\.}; echo "$MODOPT"; }
```
3. 使用python3。
### express heartfelt thanks
1. https://tensorflow-object-detection-api-tutorial.readthedocs.io/en/latest/install.html#try-out-the-examples
2. https://github.com/tzutalin/labelImg
3. https://www.tensorflow.org/
4. https://gist.github.com/olivoil/a2e0e4f3427db8b6ef4a6374f9c4cb32