https://github.com/webstackdev/button-box
:checkered_flag: :traffic_light: Code to use an Arduino Uno micro-controller with rotary encoders for DIY virtual sim button boxes. Happy Simming!
https://github.com/webstackdev/button-box
arduino-uno buttons rotary-encoders simulator
Last synced: 12 months ago
JSON representation
:checkered_flag: :traffic_light: Code to use an Arduino Uno micro-controller with rotary encoders for DIY virtual sim button boxes. Happy Simming!
- Host: GitHub
- URL: https://github.com/webstackdev/button-box
- Owner: webstackdev
- Created: 2022-03-10T16:00:53.000Z (over 4 years ago)
- Default Branch: main
- Last Pushed: 2022-03-10T21:57:32.000Z (over 4 years ago)
- Last Synced: 2025-04-09T14:34:53.103Z (about 1 year ago)
- Topics: arduino-uno, buttons, rotary-encoders, simulator
- Language: C++
- Homepage:
- Size: 92.8 KB
- Stars: 2
- Watchers: 1
- Forks: 0
- Open Issues: 0
-
Metadata Files:
- Readme: README.md
Awesome Lists containing this project
README
# Arduino Rotary Encoder Code for Button Boxes
This project is to use an [Arduino Uno R3](http://store.arduino.cc/products/arduino-uno-rev3) board to support rotary encoders in DIY button boxes.
These boxes are popular in the racing :blue_car:, flight :airplane: :helicopter:, trucking :articulated_lorry:,
farming :tractor:, train :station:, and space :rocket: sim communities because you can tailor
the box exactly to your needs and commercial variants are pricey. They're usually built using
a stock electronics box (available on Amazon or AliExpress) with a laser-cut graphite carbon top
(those can be ordered from a variety of suppliers) and custom-printed labels.
If you're just using buttons and toggle switches, you can build a simpler box using an arcade-
style USB button board (also available on Amazon or AliExpress).
Rotary encoders have two outputs: `outputA` and `outputB`. By detecting the phase shift as the
knob is rotated, you can tell both where the knob is at on the dial and which way it is being
turned. That's what this project sets up your micro-controller to do. By default it maps `outputA`
and `outputB` to Arduino pins `6` and `7` respectively.
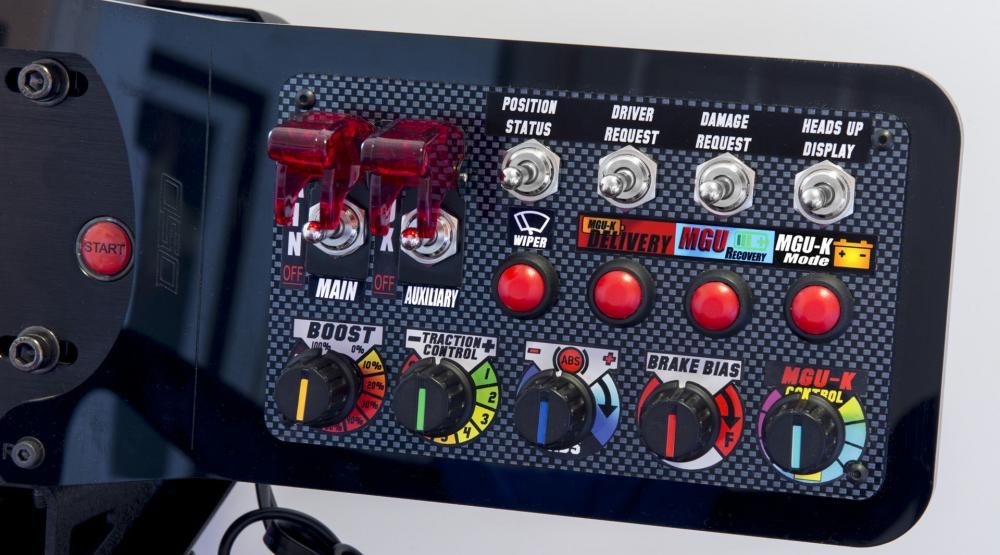
The Uno has a total of fourteen I/O pins. If you have more rotary encoders (as in the above image),
simply adjust the code accordingly. You can either use an arcade board or add code to handle buttons /
toggle switches.
There are several software packages that allow you to map the controls in your button box to
whatever sim game you're interested in. Searching the sim forums on Reddit will give you an idea
of the strengths and weaknesses of different mappers, and what works with what game.
Happy simming!
## Overview
This has been tested using Arduino Uno R3 board and Arduino IDE v1.6.
## How to
To use this code with your Arduino Uno micro-controller:
1. Fetch the official Arduino IDE:
2. Untar the file to somewhere suitable e.g. `/home/user/arduino_ide`
3. Install the following dependencies:
`avr-libc avrdude binutils-avr gcc-avr`
You can also re-use the binaries shipped with the Arduino IDE. To do so, set your PATH environment variable accordingly.
3. Checkout this repository:
`git clone git://github.com/webstackdev/button-box.git`
4. Edit the `Makefile` file to suit your environment. There are two variables that you will need to edit:
- `ARDUINO_HOME`: the path where you untarred the IDE in step number one.
- `SERIAL`: the path where your arduino listens on. If you don't know which one, try plugging and unplugging the board and see what pseudofile in `/dev/` is added.
5. Edit `main.cpp` file if are adding rotary encoders, buttons, switches, or changing the input pin mappings.
6. `make` then `make push`.
## Notes
The Makefile supports three commands:
- `all`: build and link the main binary
- `push`: push the binary to the board
- `clean`: remove the intermediary files