https://github.com/whiteshadow1234/petcam
A real-time pet camera application that allows users to remotely monitor and interact with their pets using a web browser, with video streamed from a designated client device to a central server and displayed on a dedicated viewing page.
https://github.com/whiteshadow1234/petcam
browser-based esp32 iot monitor monitoring-tool pet-project real-time-communication webrtc websockets
Last synced: about 1 year ago
JSON representation
A real-time pet camera application that allows users to remotely monitor and interact with their pets using a web browser, with video streamed from a designated client device to a central server and displayed on a dedicated viewing page.
- Host: GitHub
- URL: https://github.com/whiteshadow1234/petcam
- Owner: whiteSHADOW1234
- Created: 2024-12-18T12:04:18.000Z (over 1 year ago)
- Default Branch: main
- Last Pushed: 2025-02-10T17:06:15.000Z (over 1 year ago)
- Last Synced: 2025-03-29T19:23:03.822Z (over 1 year ago)
- Topics: browser-based, esp32, iot, monitor, monitoring-tool, pet-project, real-time-communication, webrtc, websockets
- Language: C++
- Homepage:
- Size: 128 KB
- Stars: 12
- Watchers: 1
- Forks: 1
- Open Issues: 0
-
Metadata Files:
- Readme: README.md
Awesome Lists containing this project
README
# PetCam: Your Remote Real-time Pet Monitoring Solution
中文 README |
ESP32-S3 Firmware Guide |
ESP32-S3 設定指南
This project implements a real-time pet camera application with the following features:
* **Webcam Streaming:** Captures and streams live video from a designated webcam-equipped device using WebRTC.
* **Remote Viewing:** Allows you to view the live stream from any device on your local network through a web browser.
* **Remote Pan Control:** Enables remote control of a pan mechanism (using an ESP32-S3, stepper motor, and joystick) to change the camera's viewing direction.
* **Talk to Pet:** Functionality to enable the viewer to transmit their voice to the pet through the webcam device.
* **HTTPS:** Uses HTTPS to ensure secure communication.
* **Repurpose Unused Smartphones:** With the increasing number of unused smartphones in many households, this project provides a practical way to repurpose these devices as remote webcams, reducing electronic waste and providing added value.
## Project Structure
```
pet-camera-project/
├── client/ # Client-side code (web applications)
│ └── open-cam/ # Web application for the camera device
│ ├── index.html # HTML for the open-cam page
│ ├── script.js # JS for camera access, WebRTC, and streaming
│ └── style.css # CSS for open-cam page styling
│ └── server-view/
│ └── script.js # JS for WebRTC receiving logic and motor control
├── esp_idf_esp32s3/ # ESP32-S3 firmware (motor control)
│ ├── .devcontainer/ # Dev container configuration (for development)
│ ├── test/ # Test files for individual components
│ └── main/ # Main source code for ESP32-S3
│ ├── CMakeLists.txt # CMake build configuration
│ ├── http.cpp/http.h # HTTP server logic
│ ├── joystick.cpp/joystick.h # Joystick input handling
│ ├── main.cpp # Main program entry point
│ ├── wifi.cpp/wifi.h # Wi-Fi connection management
│ ├── wifi_config.h # Wi-Fi credentials (configure this!)
│ └── ULN2003.cpp/ULN2003.h # 28BYJ-48 stepper motor control
└── server/ # Server-side code (Node.js)
├── server.js # Node.js server with WebRTC signaling
├── key.pem # SSL private key (self-signed for testing)
└── cert.pem # SSL certificate (self-signed for testing)
└── templates/
├── index.html # Server landing page
└── server-view.html # Web page to view stream and control camera
```
## Hardware
* **Webcam Device:** A laptop or computer with a built-in or connected webcam.
* **Server:** A computer (can be the same as the webcam device for testing) to run the Node.js server.
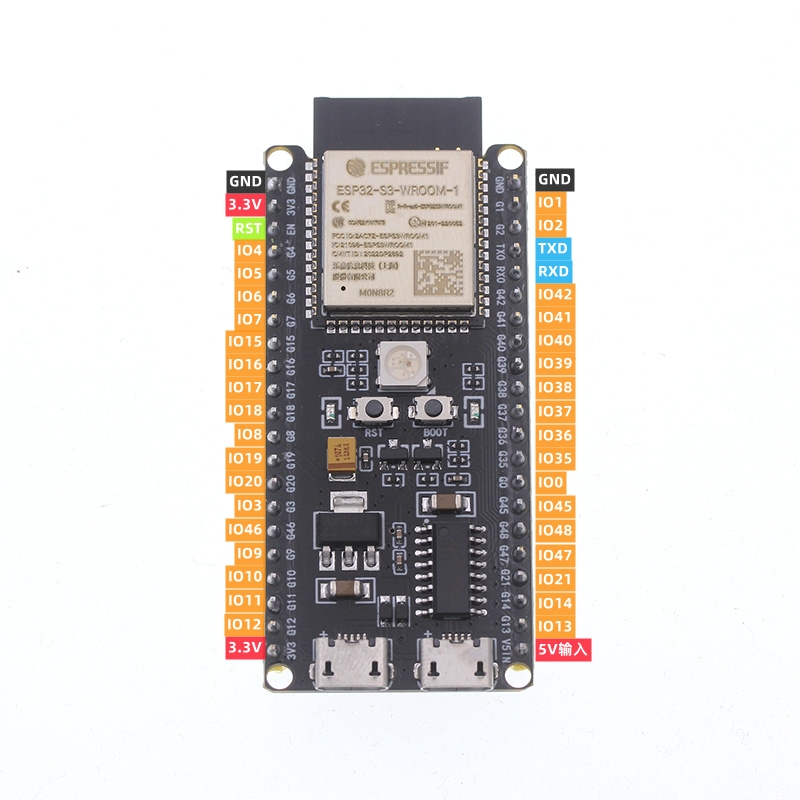
* **ESP32-S3 Development Board:**
* Model: **Goouuu ESP32-S3 N16R8** (16MB flash/8MB PSRAM, dual Type-C USB, W2812 RGB).
* Used for controlling the stepper motor and handling HTTP requests for motor control.
* **28BYJ-48 Stepper Motor with ULN2003 Driver Board:**
* Used for panning the camera.

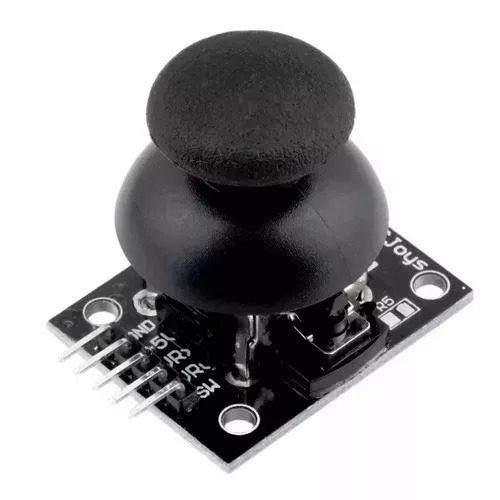
* **Joystick Module:**
* Used to control the direction of the stepper motor.
* **Power Supply Module:**
* Dedicated power supply for the stepper motor (requires 7-12V DC).

## Software Prerequisites
* **Node.js and npm:** Install Node.js and npm from [link](https://nodejs.org/).
* **OpenSSL:** Used to generate a self-signed certificate. Usually pre-installed on Linux/macOS. For Windows, it can be installed with Git for Windows or separately. Verify with `openssl version`.
* **VS Code with ESP-IDF Extension:** Follow the instructions here to install the ESP-IDF extension for VS Code: [link](https://marketplace.visualstudio.com/items?itemName=espressif.esp-idf-extension)
* **Git:** Install Git for version control: [link](https://git-scm.com/)
* **Web Browser:** A modern web browser with WebRTC support (e.g., Brave, Firefox, or Edge, **but not Chrome**).
## Installation and Setup
**1. Clone the Repository:**
```bash
git clone https://github.com/whiteSHADOW1234/PetCam.git
cd PetCam
```
**2. Server Setup:**
* **Install Node.js Dependencies:**
```bash
npm install # Execute this command in the `PetCam` directory
```
* **Generate Self-Signed Certificate:**
* Run this command in the `server` directory, **replacing `192.168.1.10` with your server's actual LAN IP address**:
```bash
openssl req -x509 -newkey rsa:4096 -keyout key.pem -out cert.pem -sha256 -days 365 -nodes -subj "/C=US/ST=CA/L=San Francisco/O=MyOrg/CN=192.168.1.10" -addext "subjectAltName=IP:192.168.1.10,DNS:localhost,IP:127.0.0.1" -addext "extendedKeyUsage=serverAuth"
```
**3. ESP32-S3 Setup (Motor Control):**
* **Configure Wi-Fi:**
* **Option 1: `wifi_config.h`:**
* Create a file named `wifi_config.h` inside the `esp_idf_esp32s3/main` directory.
* Add the following content, replacing placeholders with your actual Wi-Fi credentials:
```c
#ifndef WIFI_CONFIG_H
#define WIFI_CONFIG_H
#define EXAMPLE_ESP_WIFI_SSID "YOUR_WIFI_SSID"
#define EXAMPLE_ESP_WIFI_PASS "YOUR_WIFI_PASSWORD"
#endif
```
* **Option 2: Modify `wifi.cpp`:**
* Directly edit the `esp_idf_esp32s3/main/wifi.cpp` file.
* Comment out or remove the line `#include "wifi_config.h"`.
* Set the `EXAMPLE_ESP_WIFI_SSID` and `EXAMPLE_ESP_WIFI_PASS` defines within `wifi.cpp` to your Wi-Fi credentials.
* **Build and Flash the Firmware:**
1. **Set Espressif Device Target:**
* In VS Code, press `Ctrl+Shift+P` (or `Cmd+Shift+P` on macOS).
* Type `ESP-IDF: Set Espressif Device Target` and press Enter.
* Select `esp32s3` and choose the first option: `ESP32-S3 chip (via builtin USB-JTAG)`.
2. **Set Serial Port:**
* Press `Ctrl+Shift+P` (or `Cmd+Shift+P`).
* Type `ESP-IDF: Select Port to Use` and press Enter.
* Select the serial port corresponding to your ESP32-S3 board.
3. **Build, Flash, and Monitor:**
* Press `Ctrl+Shift+P` (or `Cmd+Shift+P`).
* Type `ESP-IDF: Build, Flash and Start a Monitor on your Device` and press Enter.
* This will build the firmware, flash it to the ESP32-S3, and open the serial monitor to view output.
**4. Wiring:**
* **28BYJ-48 Stepper Motor (using ULN2003 driver):**
| 28BYJ-48 | ULN2003 | ESP32-S3/Power Module |
| -------- | ------- | ---------------------- |
| Red | + | 5V (Power Module) |
| Orange | IN1 | GPIO15 |
| Yellow | IN2 | GPIO16 |
| Pink | IN3 | GPIO17 |
| Blue | IN4 | GPIO18 |
| Black | - | GND (Power Module) |
* **Joystick Module:**
| Joystick | ESP32-S3 |
| -------- | -------- |
| VCC | 3.3V |
| GND | GND |
| VRx | GPIO1 |
| VRy | GPIO2 |
| SW | GPIO4 |
**Note:**
* The specific GPIO numbers for the ESP32-S3 might vary depending on the development board you are using. Refer to your board's pinout diagram.
* Make sure the VRx and VRy pins of the joystick are connected to GPIO pins that support ADC (Analog-to-Digital Conversion).
## Running the Application
1. **Start the Server:**
```bash
npm start # execute this command in the `PetCam` directory
```
The server console will output the accessible URLs, including the LAN IP addresses for `open-cam` and `server-view`.
2. **Access Open-Cam (Webcam Client):**
* Open a web browser on the device with the webcam.
* Go to `https://:5000/client/open-cam`, replacing `` with one of the server's LAN IP addresses listed in the console output.
* Grant the website permission to access your camera and microphone when prompted.
3. **Access Server-View:**
* Open a web browser on any device on your LAN.
* Go to `https://:5000/server-view`, replacing `` with the server's LAN IP address.
* You should see the video stream from the `open-cam` device.
4. **Controlling the Motor:**
* Use the joystick connected to the ESP32-S3 to control the direction of the stepper motor.
* Click the "Talk to Pet" button on the `server-view` page to enable audio from the viewer to the `open-cam` device.
## Troubleshooting
* **Camera Not Starting on Open-Cam:**
* Check browser and OS permissions for camera and microphone access.
* Verify that the `serverAddress` in `client/open-cam/script.js` is correct.
* Look for errors in the browser's developer console (F12).
* Ensure no other applications are using the camera.
* Try a different browser or device.
* **No Video on Server-View:**
* Examine the console logs on the server, `open-cam`, and `server-view` for errors.
* Check the "Network" tab in the `server-view` browser's developer tools to see if the offer, answer, and ICE candidates are being exchanged.
* Verify that the `RTCPeerConnection` on `server-view` is established and the `ontrack` event is firing.
* **Motor Not Responding:**
* Check the wiring between the ESP32-S3, motor driver, and joystick.
* Verify that the ESP32-S3 is connected to your Wi-Fi network.
* Use the serial monitor in VS Code to see if the ESP32-S3 is receiving commands.
* **Server Not Accessible:**
* Double-check your server's LAN IP address.
* Make sure the server is running and listening on port 5000.
* Check your firewall settings (allow port 5000).
* **SSL Errors:**
* If you see SSL errors, it's because you're using a self-signed certificate. You'll need to add a temporary exception in your browser to proceed during development. **For production, use a valid certificate from a trusted Certificate Authority.**
* **Refresh:** If you make changes to the code, restart the server and hard refresh (Ctrl+Shift+R or Cmd+Shift+R) the web pages.
## `esp_idf_esp32s3/test` Folder Usage
The `test` folder contains code for testing individual components:
* **`joystick_motor.cpp`:** Tests joystick control of the stepper motor.
**To use a test file:**
1. Copy the contents of the `.cpp` file from the `test` folder into `esp_idf_esp32s3/main/main.cpp`.
2. Build, flash, and monitor the ESP32-S3 using the ESP-IDF extension in VS Code.
## Important Notes
* **Repurposing Smartphones:** This project provides a great way to utilize old or unused smartphones as webcams, reducing electronic waste and giving them a new purpose.
* **HTTPS:** HTTPS is required for accessing `getUserMedia` in most browsers. The self-signed certificate is for development only.
* **Performance:** This project uses a simple WebRTC implementation for testing. Performance might be limited, especially with multiple clients. Consider using a dedicated media server for production.
* **Audio:** The audio in this project is unidirectional from the `server-view` to the `open-cam`. Implementing bi-directional audio requires further development.
* **Scalability:** For a large number of clients, you'll need a more scalable solution, potentially involving a media server.