https://github.com/whokilleddb/boosterdriver
A step-by-step walkthrough of how to write a Client and a Driver to communicate with each other and boost the priority of a thread.
https://github.com/whokilleddb/boosterdriver
blog thread wdk windows-driver windows-drivers
Last synced: 4 months ago
JSON representation
A step-by-step walkthrough of how to write a Client and a Driver to communicate with each other and boost the priority of a thread.
- Host: GitHub
- URL: https://github.com/whokilleddb/boosterdriver
- Owner: whokilleddb
- Created: 2023-12-11T13:07:13.000Z (over 1 year ago)
- Default Branch: main
- Last Pushed: 2023-12-12T22:36:14.000Z (over 1 year ago)
- Last Synced: 2024-11-08T14:51:24.924Z (6 months ago)
- Topics: blog, thread, wdk, windows-driver, windows-drivers
- Language: C
- Homepage:
- Size: 8.96 MB
- Stars: 13
- Watchers: 1
- Forks: 0
- Open Issues: 0
-
Metadata Files:
- Readme: README.md
Awesome Lists containing this project
README
# Booster
A Proof-of-Code and code walkthrough to demonstrate how to facilitate communication between userland applications and Windows kernel driver. This is a follow-up to [my last Windows Kernel development repository](https://github.com/whokilleddb/HelloWorldDriver) where I document my journey into Windows Kernel land - while giving extensive code walkthroughs.
In this repository, we write a Client and a Driver which work together to boost a thread's Base Priority.
# Usage
To send a signal to the Driver to increase the base priority of a thread, use the following command:
```
BoosterClient.exe
```
# Walkthrough
This part of the guide walks you through the Driver and Client code to explain the underlying concepts. First, we take a look into the driver itself which explores concepts like Handling Dispatch routines, Major Functions, etc, while the Client covers topics like how to use `CreateFile()` and `WriteFile()` to communicate with a driver.
Also, we briefly touch upon IRQs but more upon that in future articles.
# References
This article is directly influenced by [@zodicon's Windows Internal training](https://training.trainsec.net/view/courses/windows-kernel-programming-1) and I recommend everyone to check it out.
# The Driver
We will be breaking down this section by the different functions which constitute our driver, namely:
- [`DriverEntry()`](#driverentry) - This serves as an entry point when the driver is loaded by the system
- [`BoosterCreateClose()`](#boostercreateclose) - This function handles Create/Close dispatch routines issued by the Client
- [`BoosterWrite()`](#boosterwrite) - This function handles the Write dispatch routine
- [`BoosterUnload()`](#boosterunload) - This function is called when the system unloads our driver
## DriverEntry
Looking at the `DriverEntry()` function, it has the following code:
```c
NTSTATUS DriverEntry(PDRIVER_OBJECT DriverObject, PUNICODE_STRING _RegistryPath) {
// Set major functions to indicate supported functions
DriverObject->DriverUnload = BoosterUnload;
DriverObject->MajorFunction[IRP_MJ_WRITE] = BoosterWrite;
DriverObject->MajorFunction[IRP_MJ_CREATE] = DriverObject->MajorFunction[IRP_MJ_CLOSE] = BoosterCreateClose;
// Create a device object for the client to talk to
PDEVICE_OBJECT device_obj = NULL;
UNICODE_STRING device_name = RTL_CONSTANT_STRING(L"\\Device\\Booster");
NTSTATUS status = IoCreateDevice(DriverObject, 0, &device_name, FILE_DEVICE_UNKNOWN, 0, FALSE, &device_obj);
if (!NT_STATUS(status)) return status;
device_obj->Flags |= DO_BUFFERED_IO;
// Create symbolic link
UNICODE_STRING symlink_name = RTL_CONSTANT_STRING(L"\\??\\Booster");
status = IoCreateSymbolicLink(&symlink_name, &device_name);
if (!NT_SUCCESS(status)) {
IoDeleteDevice(device_obj);
return status;
}
return status;
}
```
There are three major parts to the function - Setting the major functions to indicate the functions our driver supports, creating a device object for the client to interact with, and finally creating a symbolic link for the client to call `CreateFile()` on.
The first part of the code sets the necessary function pointers:
- First, set the `DriverUnload` member of the `DriverObject` which points to the unload routine.
- Then we set the `MajorFunction` members. The `MajorFunction` array contains a list of function pointers that serve as entry points for the Driver's dispatch routines. These indicate the functionalities supported by the driver. In our case, we support three routines:
- `IRP_MJ_CREATE`: A routine to deal with requests sent by the client when it tries to open a handle to the Device object
- `IRP_MJ_CLOSE`: A routine to deal with requests sent by the client when it tries to close the handle to the Device object
- `IRP_MJ_WRITE`: A routine to deal with requests sent by the client when it tries to transfer data to the driver using operations like `WriteFile()` or `NtWriteFile()`
For the sake of simplicity, we will point the major functions indicated by `IRP_MJ_CREATE` and `IRP_MJ_WRITE` to the same dispatch routine. But, why do we need to specify these functions in the first place? [Microsoft Documentation](https://learn.microsoft.com/en-us/windows-hardware/drivers/kernel/irp-mj-create) specifies that we need to specify these functions to handle the Create/Close Dispatch routines so that the clients can have a handle for it, and, in turn, uses functions like `WriteFile()` which need a handle to be passed in as one of the parameters.
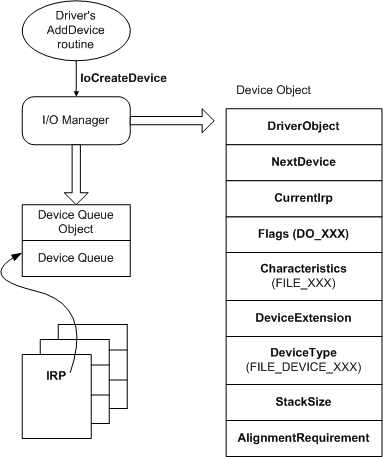
Next up, we create a Device for the Client to interact with. We use the `RTL_CONSTANT_STRING` macro to initialize a `UNICODE_STRING` with the full path name of the device. We create a device called `Booster` in the `\Device` [object directory](https://en.wikipedia.org/wiki/Object_Manager_(Windows)), which is where devices are usually created.
Following that, we use the `IoCreateDevice()` to go ahead and actually create the device. The parameters passed to this function are as follows:
| Parameter | Value | Description |
| --|--|---|
|`PDRIVER_OBJECT DriverObject` | `DriverObject` | Pointer to the driver object for the caller. In our case, we get the pointer as a parameter for the `DriverEntry()` function.|
|`ULONG DeviceExtensionSize` | 0 | Specifies the driver-determined number of bytes to be allocated for the [device extension](https://learn.microsoft.com/en-us/windows-hardware/drivers/kernel/device-extensions) of the device object. This allows us to attach extra information to the devices, in case we need to. In our case, we dont have any such special requirements.|
|`PUNICODE_STRING DeviceName` | `&device_name` |Pointer to the null-terminated device name Unicode string.|
|`DEVICE_TYPE DeviceType`|`FILE_DEVICE_UNKNOWN`| Indicates the type of device - since we do not confront to the usual predefined driver types, we specify `FILE_DEVICE_UNKNOWN`.|
|`ULONG DeviceCharacteristics`| 0| Specifies additional information about the driver's device - since we have no special permissions, we set it to 0. |
|`BOOLEAN Exclusive` |`FALSE`| Specifies if the device object represents an [exclusive device](https://learn.microsoft.com/en-us/windows-hardware/drivers/). Most drivers set this value to **FALSE**. |
|`PDEVICE_OBJECT *DeviceObject` |`&device_obj`| Pointer to a variable that receives a pointer to the newly created [DEVICE_OBJECT](https://learn.microsoft.com/en-us/windows-hardware/drivers/ddi/wdm/ns-wdm-_device_object) structure. |
If the function runs successfully - we should have a valid Device object. This address to this device can also be found at the first index of the linked list pointed by the `DeviceObject` field of `DriverObject`.
Next up, we also create a symbolic link for the device so that the client can easily access it. We use the `IoCreateSymbolicLink()` function to create a symbolic link to our device called `\??\Booster` where `\??` is a "fake" prefix that refers to per-user Dos devices.
However, if the `IoCreateSymbolicLink()` fails, we need to delete the previously created device object as if the `DriverEntry``()`` function returns something other than `STATUS_SUCCESS`, the unload routine is never called - so we don't have any opportunities to clean up after ourselves. If we do not delete the device object - we will leak the device object.
Finally, we return the valid `NTSTATUS` from the function signifying that the `DriverEntry` routine was complete.
----
## BoosterCreateClose
This function is responsible for handling Create/Close dispatch routines - and has the following code:
```c
NTSTATUS BoosterCreateClose(PDEVICE_OBJECT _DriverObject, PIRP Irp) {
...
...
Irp->IoStatus.Status = STATUS_SUCCESS;
Irp->IoStatus.Information = 0;
IoCompleteRequest(Irp, 0);
return STATUS_SUCCESS;
}
```
The function takes in two parameters - the pointer to the `DriverObject`, and a pointer to an [`IRP`](https://learn.microsoft.com/en-us/windows-hardware/drivers/ddi/wdm/ns-wdm-_irp) structure that represents an I/O request packet. For our driver, we won't need anything fancy - so we would just let the operation complete successfully. To do it, we need to do a couple of things:
- First, we set the final status of the request as `STATUS_SUCCESS` by assigning that value to the `Status` component of the [`IO_STATUS_BLOCK`](https://learn.microsoft.com/en-us/windows-hardware/drivers/ddi/wdm/ns-wdm-_io_status_block). The `IO_STATUS_BLOCK` structure stores status and information before calling `IoCompleteRequest()`[more on that in a moment].
- Next up, we set the `Information` field of `IoStatus` to indicate that we do not pass any additional information to the Client. For example, for Write/Read, this field can define the number of bytes that were written/read and return that information to the caller. Since for Create/Close we don't have any such requirements, we set it to 0.
- Finally, we complete the request with [`IoCompleteRequest()`](https://learn.microsoft.com/en-us/windows-hardware/drivers/ddi/wdm/nf-wdm-iocompleterequest) indicating that we have completed the I/O request and returned the IRP to the I/O manager. We pass two parameters to the function - the `Irp` structure pointer as well as the value for the priority boost for the original thread that requested the operation. Since we complete the IRP synchronously, we set it to 0.
- Finally, we return the same status as the one we put in `Irp->IoStatus.Status`. However, we cannot just something like `return Irp->IoStatus.Status` because after the `IoCompleteRequest()` function is called - the value stored in the address might change.
With this, we complete the function allowing us to open and close handles to the driver. Onto the next 🚀
---
## BoosterWrite
The code we have written so far can more or less be considered a boiler template - something which we would find unchanged across a lot of future work, but this function is the crux of the whole driver.
```c
NTSTATUS BoosterWrite(PDEVICE_OBJECT _DriverObject, PIRP Irp) {
UNREFERENCED_PARAMETER(_DriverObject);
ULONG info = 0;
PETHREAD thread = NULL;
NTSTATUS status = STATUS_SUCCESS;
PIO_STACK_LOCATION irp_sp = IoGetCurrentIrpStackLocation(Irp);
if (irp_sp->Parameters.Write.Length != sizeof(ThreadData)) {
status = STATUS_BUFFER_TOO_SMALL;
goto io;
}
ThreadData * p_data = (ThreadData*)(Irp->UserBuffer);
if (p_data == NULL || p_data->TargetPriority < 1 || p_data->TargetPriority > 31) {
status = STATUS_INVALID_PARAMETER;
goto io;
}
HANDLE h_tid = ULongToHandle(p_data->ThreadId);
status = PsLookupThreadByThreadId(h_tid, &thread);
if (!NT_SUCCESS(status)) goto io;
KPRIORITY _old_priority = KeSetPriorityThread(thread, p_data->TargetPriority);
KdPrint((DRIVER_PREFIX "Changed priority from %ld to %d", _old_priority, p_data->TargetPriority));
ObDereferenceObject(thread);
info = sizeof(ThreadData);
io:
Irp->IoStatus.Status = status;
Irp->IoStatus.Information = info;
IoCompleteRequest(Irp, 0);
return status;
}
```
The first thing we do is get a pointer to the IRP's stack with [`IoGetCurrentIrpStackLocation()`](https://learn.microsoft.com/en-us/windows-hardware/drivers/ddi/wdm/nf-wdm-iogetcurrentirpstacklocation) - essentially returning a pointer to an [`IO_STACK_LOCATION`](https://learn.microsoft.com/en-us/windows-hardware/drivers/ddi/wdm/ns-wdm-_io_stack_location) structure which contains information associated with each IRP (more about these in some future article). Another important point to note before we proceed is to look into the `BoosterCommon.h` header file which defines the `ThreadData` structure as follows:
```c
typedef struct _ThreadData {
_In_ ULONG ThreadId;
_In_ int TargetPriority;
} ThreadData, *PThreadData;
```
This structure will be shared by the Driver and the Client to pass information back and forth.
One important thing to do is to make sure that we got the right data from the Client and enforce the necessary checks on the Driver side of the code regardless of the restrictions imposed by the client code, just to make sure we don't get a BSOD.
The first thing we do is check the length of the buffer received from the Client - to ensure that we have received the complete structure. For this, we check the `Length` parameter of the `Write` struct in the `Parameter` union (_phew_ - that was long). The `Parameter` union is an important component of `IO_STACK_LOCATION` which contains many different structures corresponding to different IRPs, which, in our case, is the `Write` structure. Coming back, we check the `Length` value of `Write` and in case we find that it is not equal to the size of the `ThreadData` structure, we set the appropriate `NTSTATUS` and jump to complete the I/O Request.
Next, we need a pointer to the data sent through by the client and we get it from the `UserBuffer` component of the `IRP` structure. This is the user-mode address provided by the client but since we are operating from Kernel Land, we have access to it without any trouble. This isn't the best way(or the safest) way to go about things but this is what we are working with for now. Note that we can do this because the thread that makes the Write dispatch call, is the same one that jumps into the Kernel via `NtWriteFile` syscall - hence we have the correct process context.
We map the buffer to a pointer of the type `ThreadData` and then proceed to check it the pointer is valid, followed by checks to ensure that the requested thread priority lies in the valid range of 1 to 31 (we cannot have a thread priority of 0 as [only the zero-page thread can have a priority of zero](https://learn.microsoft.com/en-us/windows/win32/procthread/scheduling-priorities)). If these checks fail, we again set the appropriate `NTSTATUS` and skip to completing the I/O Request.
Here comes the part where we actually change the thread's priority. I will work my way in the reverse order for the following pseudo-codeL
```c
HANDLE h_tid = ULongToHandle(p_data->ThreadId);
status = PsLookupThreadByThreadId(h_tid, &thread);
if (!NT_SUCCESS(status))
// return bad status
KeSetPriorityThread(thread, p_data->TargetPriority);
```
The [`KeSetPriorityThread()`](https://learn.microsoft.com/en-us/windows-hardware/drivers/ddi/wdm/nf-wdm-kesetprioritythread) function is responsible for setting the run-time priority of the thread. It takes in two parameters - a thread object and the target priority. We get the latter from the `ThreadData` structure passed to us by the client. However, we do not have a thread object - we only have a Thread ID which the Client passes to us. To get the corresponding Thread object, we need the [`PsLookupThreadByThreadId()`](https://learn.microsoft.com/en-us/windows-hardware/drivers/ddi/ntifs/nf-ntifs-pslookupthreadbythreadid) function which again, takes in two parameters - a Thread ID in the form of a `HANDLE`, and a pointer `PETHREAD` variable which receives the pointer to the Thread object. If this function fails, we again do the same old drill of completing the IRP with the error status. We are almost there - just one minor issue remains and it's the fact that the `PsLookupThreadByThreadId()` takes in a `HANDLE` as the first parameter, so we need to convert the `ThreadId` member of the `ThreadData` structure into the right format. Luckily, we have a macro for that called `ULongToHandle()` which does just that. Note that we cannot simply cast a `ULONG` into a `HANDLE`
as they differ in sizes, but a lazier workaround can be something like:
```c
PsLookupThreadByThreadId((HANDLE)(ULONG_PTR)p_data->ThreadId, &thread);
```
One more thing to remember is that the `PsLookupThreadByThreadId()` function increases the thread's reference count - so the thread object won't be destroyed even after the thread dies, because it would still have an outstanding reference - at least one. So, `KeSetPriorityThread()` would never fail - because the thread object still has a valid reference count, and even though it might not make sense to change the priority of a thread that has died - it is still not an error.
However, once `KeSetPriorityThread()` runs, we need to decrease the reference count or else the thread object lives forever till the system restarts. To do this, we use the `ObDereferenceObject()` macro on the thread object to decrease the reference count. Finally, we set the `info` variable to the size of the `ThreadData` structure and pass it to `Irp->IoStatus.Information` to indicate to the Client that the structure was processed(this is the value you get back in the `lpNumberOfBytesWritten` variable of `WriteFile()` on the client's end).
We set the final bit of the `IO_STATUS_BLOCK` and complete the IRP request, as well as return the corresponding status from the dispatch routine.
----
That concludes everything on the driver's end for this project - time to write our client.
----
# The Client
With the driver done, we can take a look at the client which we would use to send messages to the driver itself. The pseudo-code for the client looks as such:
```c
#include
#include
#include
#include "..\BoosterDriver\BoosterCommon.h"
int main(int argc, char* argv[]) {
if (argc != 3) {
usage();
return -1;
}
ULONG thread_id = (ULONG)atoi(argv[1]);
int t_priority = atoi(argv[2]);
// Check for thread id
...
// Check for thread priority
...
// Try to print current base thread priority
...
// Make a call to driver
ThreadData t_data = {0};
t_data.ThreadId = thread_id;
t_data.TargetPriority = t_priority;
HANDLE hDevice = CreateFile(L"\\\\.\\Booster", GENERIC_WRITE, 0, NULL, OPEN_EXISTING, 0, NULL);
BOOL bRes = WriteFile(hDevice, &t_data, sizeof(t_data), &ret, NULL);
printf("[i] Priority changed to:\t\t%d", t_data.TargetPriority);
CloseHandle(hDevice);
return 0;
}
```
Before we begin diving into `main()`, notice we include the `BoosterCommon.h` header which we had previously used in the Driver. We include this header file so we can have access to the `ThreadData` structure used to pass information to the Driver.
Looking into `main()`, we take in the target Thread ID and the priority we want to set it to from the command line. Then, after performing some checks to make sure the inputs are reasonable, we print the current thread's base priority.
We initialize a `ThreadData` with the provided Thread ID and the target priority - we will use this to tell the driver what we want. Next up, we open a handle to the `Booster` Device with:
```
HANDLE hDevice = CreateFile(L"\\\\.\\Booster", GENERIC_WRITE, 0, NULL, OPEN_EXISTING, 0, NULL);
```
Dissecting the parameters passed to `CreateFile()` we have as follows:
| Parameter | Value | Description |
|---|---|---|
|`LPCSTR lpFileName` | `L"\\\\.\\Booster"` | The device path which points to the Booster device in the [Device Namespace](https://learn.microsoft.com/en-us/windows/win32/fileio/naming-a-file)|
| `DWORD dwDesiredAccess` | `GENERIC_WRITE` | Request `Write` access |
| `DWORD dwShareMode` | 0 | Do not share Device|
| `LPSECURITY_ATTRIBUTES lpSecurityAttributes` | `NULL` | No specific security attributes are required |
| `DWORD dwCreationDisposition` | `OPEN_EXISTING` | This is the only acceptable value for Devices as we can only open a handle to a device which already exists |
| `DWORD dwFlagsAndAttributes` | 0 | No special flags and attributes are necessary |
| `HANDLE hTemplateFile` | `NULL` | No template file is necessary |
This should get us a handle to the Device. We can then use `WriteFile()` to communicate with the Device and send the previously filled `ThreadData` structure. If the `WriteFile()` succeeds, we should see that the Dynamic priority for the thread should be set to target priority.
Finally, we close the open handle to the device and exit out of the client program.
---
With that, we have completed the Driver and the Client programs. Once compiled, it is time to see them in action.
----
# Driver-Client in Action
First, we [create a kernel-mode service using the `Service Controller` and use it to launch our driver while capturing events using `DebugView`](https://github.com/whokilleddb/HelloWorldDriver?tab=readme-ov-file#installing-driver). As soon as we start the service, we should get an output in `DebugView` as such:

Along with this, we should also see two more things:
- A `Booster` device was created under the `Device Object Namespace`.

- A symbolic link to the `Booster` Device in the `GLOBAL??` namespace.

Okay, so our device and the symbolic link were created - so far so good. Time to see the client and driver in action. First, we pick a thread from a process to boost. We are going with this one from `msedge.exe` with the Thread ID being `8116`:

We would try to set the **Dynamic Priority** of this thread to, let's say, 20 using our client as:
```
BoosterClient.exe 8116 20
```
As soon as we do it, we should see more output on `DebugView` where it indicates that the priority change happened:

We see that the Client issued the `Create` dispatch call to open a handle to the device, a `Write` dispatch call to request a change in Thread Priority, and a `Close` dispatch call the close the previously acquired handle.
Further confirming that the priority was successfully boosted, we have,

Finally, we stop the Kernel service, which should cause the driver to be unloaded and the unload routine to be called - thereby deleting our device and symbolic link:

Therefore, our Client-Driver system seems to work as intended! Hurrah!

---
# Conclusion
This concludes the code walkthrough of this project. This blog post is a part of my efforts to document my journey into Windows Kernel Land while going through [@zodicon's Windows Internal training](https://training.trainsec.net/view/courses/windows-kernel-programming-1). Feel free to reach out to me with any and all feedback - and follow my [Github](https://github.com/whokilleddb/)/[LinkedIn](https://www.linkedin.com/in/whokilleddb?originalSubdomain=in) for more updates in the future. Till next time - Happy Hacking 🎉
