https://github.com/whosydd/hugo-even-template
博客模板
https://github.com/whosydd/hugo-even-template
even hugo hugo-blog hugo-boilerplate hugo-site hugo-template
Last synced: about 2 months ago
JSON representation
博客模板
- Host: GitHub
- URL: https://github.com/whosydd/hugo-even-template
- Owner: whosydd
- License: mit
- Created: 2021-08-15T10:01:39.000Z (almost 5 years ago)
- Default Branch: main
- Last Pushed: 2021-08-17T01:38:45.000Z (almost 5 years ago)
- Last Synced: 2025-03-22T22:43:51.918Z (about 1 year ago)
- Topics: even, hugo, hugo-blog, hugo-boilerplate, hugo-site, hugo-template
- Language: SCSS
- Homepage: https://hugo-even-template.vercel.app
- Size: 945 KB
- Stars: 1
- Watchers: 1
- Forks: 0
- Open Issues: 0
-
Metadata Files:
- Readme: README.md
- License: LICENSE
Awesome Lists containing this project
README
# Hugo + Vercel 轻松搭建个人博客
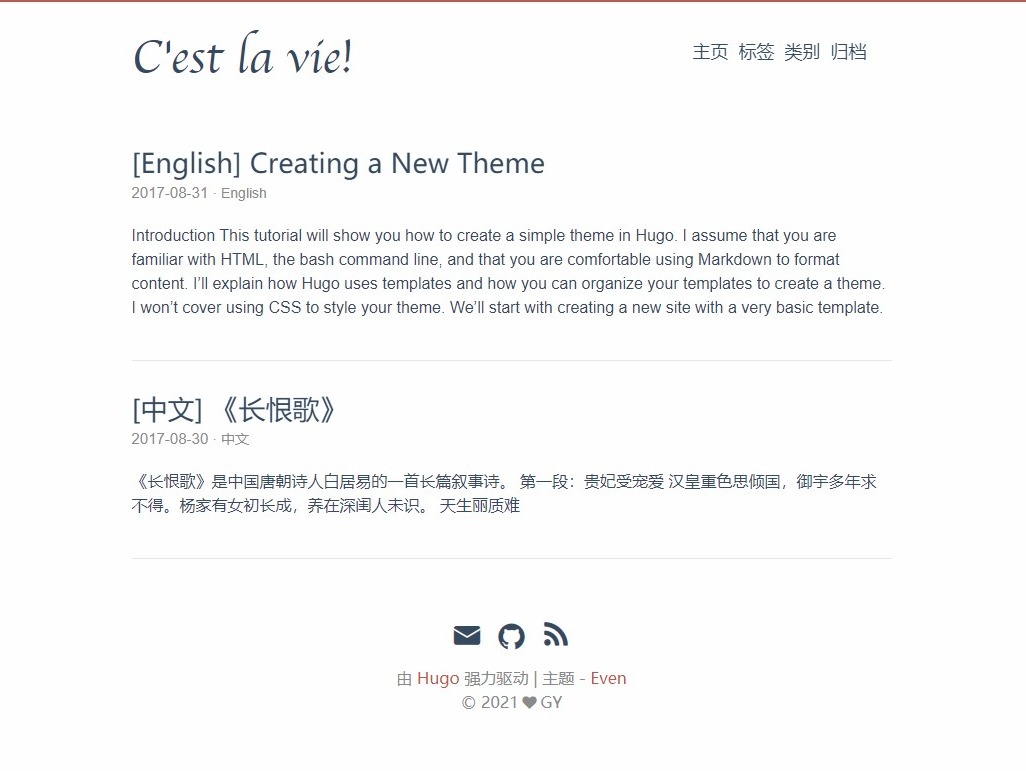
## 预览
## 参考
Hugo 中文文档 https://www.gohugo.org/
Even 主题中文文档 https://github.com/olOwOlo/hugo-theme-even/blob/master/README-zh.md
## 搭建 Hugo 环境
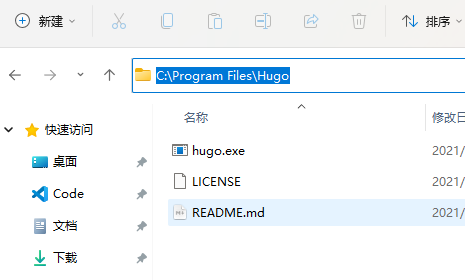
### 安装 Hugo
github 下载地址:https://github.com/gohugoio/hugo/releases
> 如果你想要修改`themes/even/assets/`下的文件,请安装`extended`版本
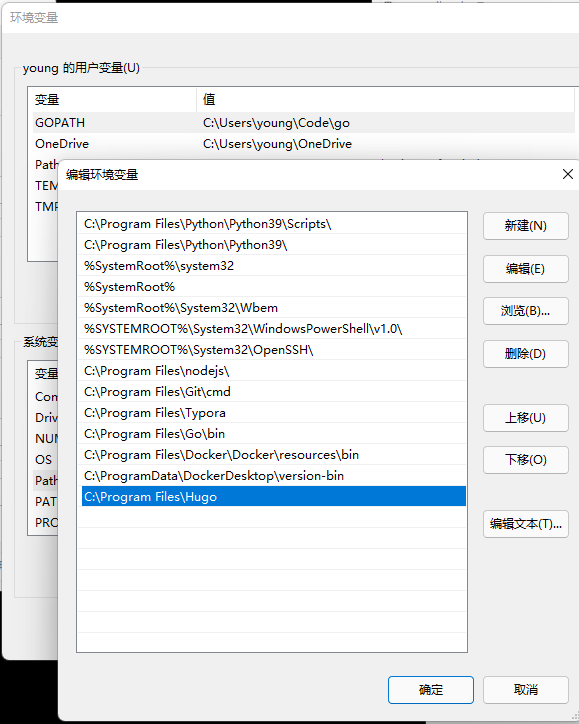
### 设置环境变量
将解压后的文件夹添加到`环境变量`中的`系统变量`中的`Path`中
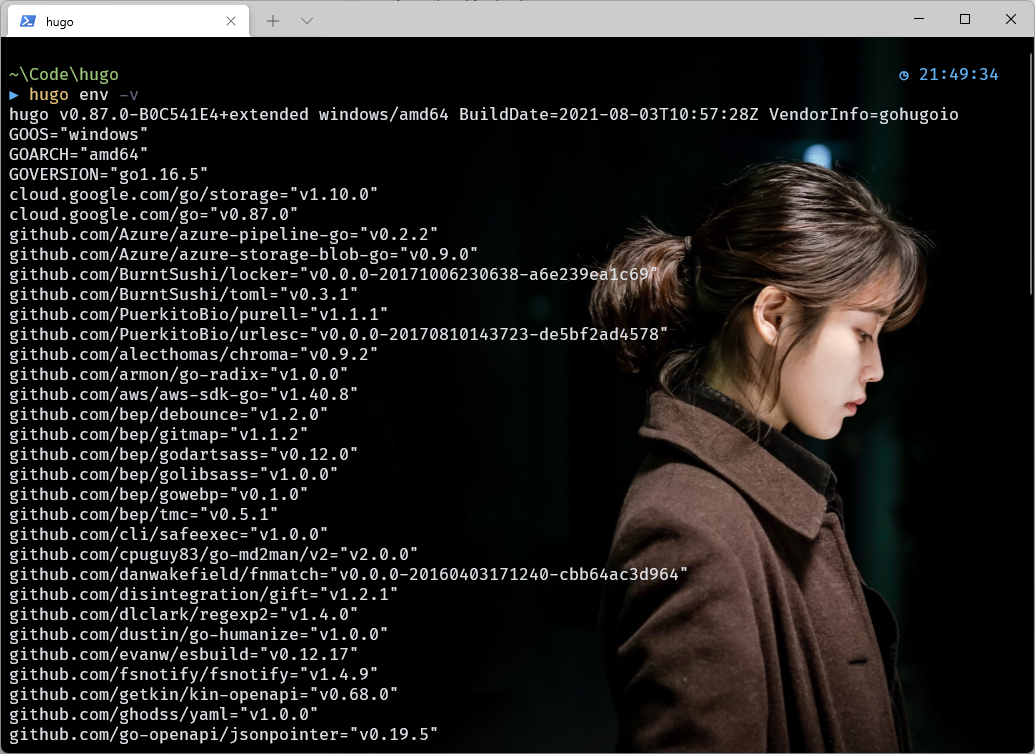
### 测试
```bash
hugo env -v
```
打开终端,输入`hugo env -v`,输出如下图表示安装成功!
## 构建项目
### 项目结构
| 名称 | 说明 |
| ----------- | ---------------------------------------------- |
| archetypes/ | 放置内容模板,在创建新内容时会根据模板创建文章 |
| content/ | 博客内容,全部使用 markdown 格式 |
| layouts/ | 博客模板文件,决定内容如何呈现 |
| static/ | 图片、css、js 等静态资源 |
| themes/ | 存放主题 |
| config.toml | 项目的主配置文件(有的主题也会使用`config.yml`) |
### 使用模板构建项目
只需要在[本仓库](https://github.com/whosydd/hugo-even-template)中点击`Use this template`,设置好仓库名称,就可以根据模板创建自己的项目仓库了
## 配置选项
### config.toml
这里仅仅是我**修改过的**配置项,请在项目根目录的`config.toml`中查看详细配置
```toml
# 这里设置成你博客的域名
baseURL = "http://www.whosydd.ml/"
# 设置默认显示语言,可选语言可以在themes/even/i18n/中查看
defaultContentLanguage = "zh-cn"
# 设置网站标签页显示的信息
title = "Blog - C'est la vie!"
# 设置作者
[author]
name = "GY"
# 配置目录 (使用weight进行排序)
[[menu.main]]
name = "主页"
weight = 10
identifier = "home"
url = "/"
[[menu.main]]
name = "标签"
weight = 20
identifier = "tags"
url = "/tags/"
[[menu.main]]
name = "类别"
weight = 30
identifier = "categories"
url = "/categories/"
[[menu.main]]
name = "归档"
weight = 40
identifier = "archives"
url = "/post/"
# 设置站点建立时间
[params]
since = "2021"
# 是否在归档页显示文章的总数
# 如果设置为false,则不会在主页显示文章的内容预览
showArchiveCount = true
# 这是我新添加的选项,设置为true时,会在主页中的每篇文章中显示阅读更多
# show 'read more' link ?
readMore = false
# 是否显示文章中的页脚信息(包含作者,上次修改时间,markdown链接,许可信息)
postMetaInFooter = false
# 设置页脚中社交链接图标,你可以选择你想要显示的社交链接
[params.social]
a-email = "mailto:dev.youngkwok718@gmail.com"
#b-stack-overflow = "http://localhost:1313"
#c-twitter = "http://localhost:1313"
#d-facebook = "http://localhost:1313"
#e-linkedin = "http://localhost:1313"
#f-google = "http://localhost:1313"
g-github = "http://github.com/whosydd"
#h-weibo = "http://localhost:1313"
#i-zhihu = "http://localhost:1313"
#j-douban = "http://localhost:1313"
#k-pocket = "http://localhost:1313"
#l-tumblr = "http://localhost:1313"
#m-instagram = "http://localhost:1313"
#n-gitlab = "http://localhost:1313"
#o-bilibili = "http://localhost:1313"
```
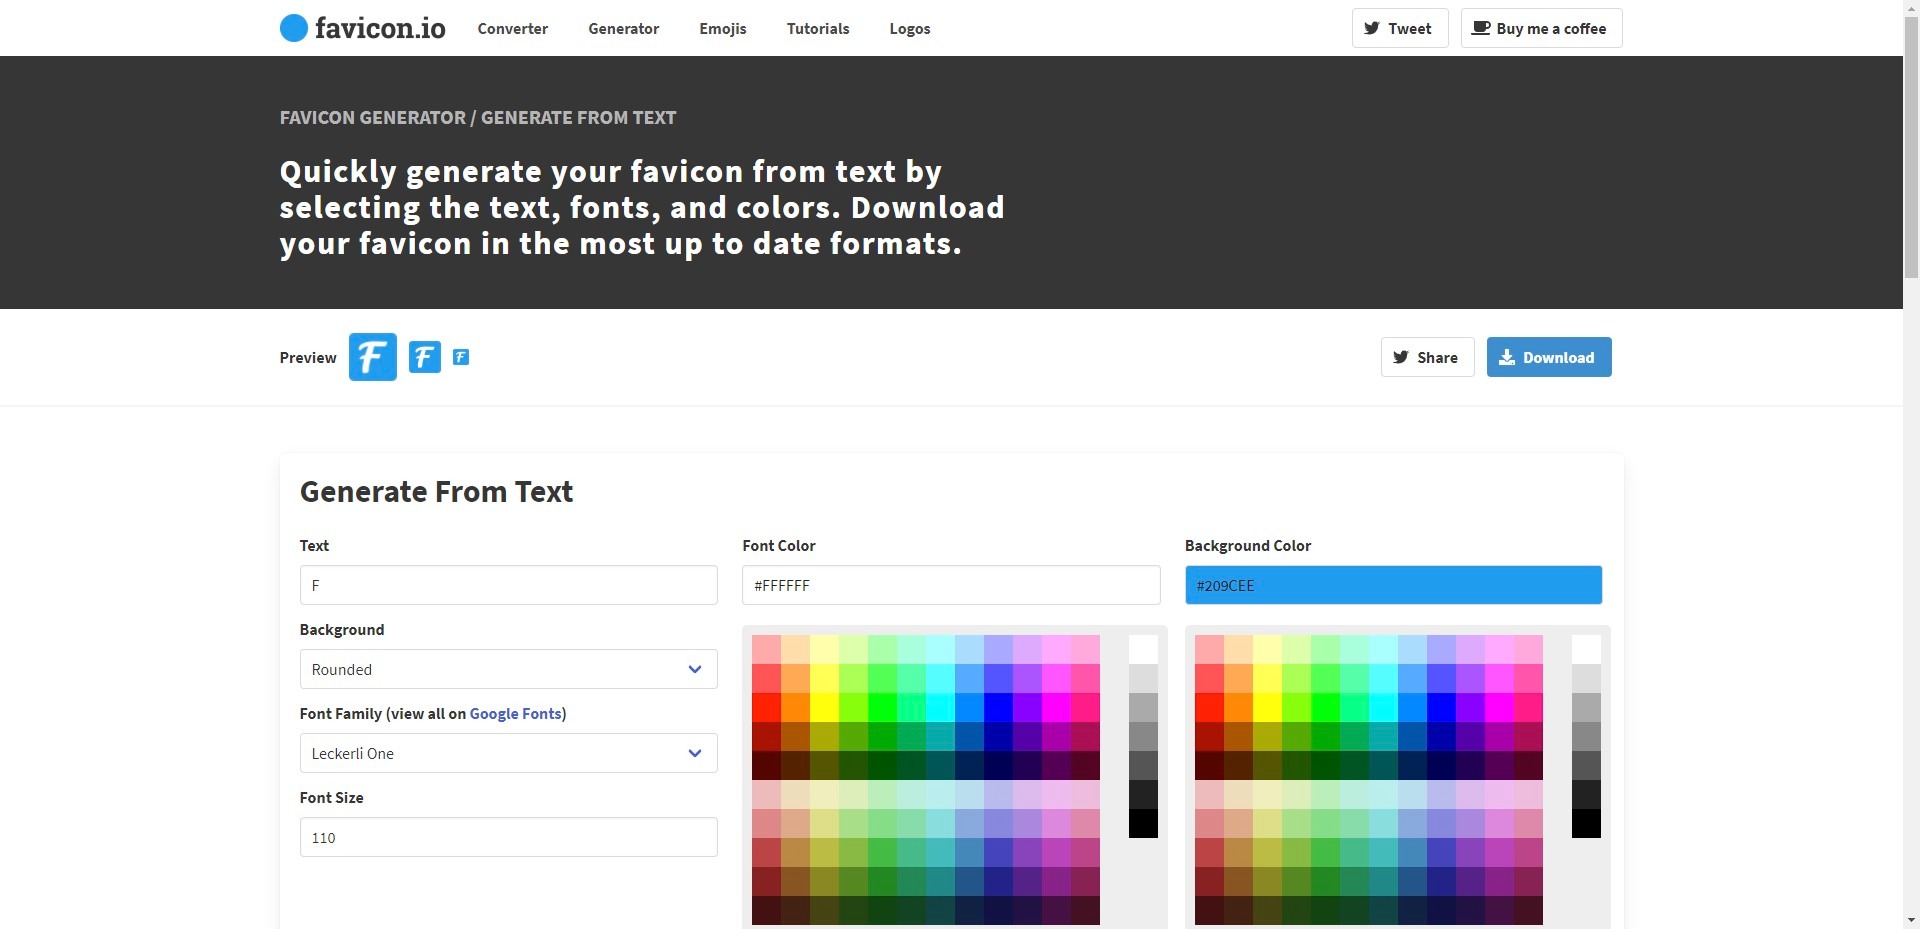
### favicon 图标
你可以在[**这里**](https://favicon.io/favicon-generator/)创建 favicon 图标,然后将解压之后的**所有图标文件**放到项目根目录的`static/`中即可
### 文章模板
- 可以在`themes/even/archetypes/`中找到文章模板,只需要将该文件复制一份,放到项目根目录中的`archetypes/`中即可。
- 建议只保留一些常用的配置项即可
- 其中的`Draft`配置项默认为`true`,表示该文章为草稿,发布时记得改为`false`
- 你可以在根目录的`content/post/`中查看所有的文章
## 本地调试
### 运行hugo
```bash
hugo server -D
```
> 不加`-D`时,不会显示`Draft`配置项设置为`true`的文章
### 新建文章
```bash
hugo new post/<文件名>.md
```
> 你可以在`content/post/`下查看新建的文章
### 推送到github
```bash
# 添加所有文件到暂存区
git add .
# 提交commit
git commit -m 'updated'
# push到github
git push
```
## vercel 部署
### 注册
vercel 注册地址:https://vercel.com/signup
一般情况下,建议使用 github 账号注册
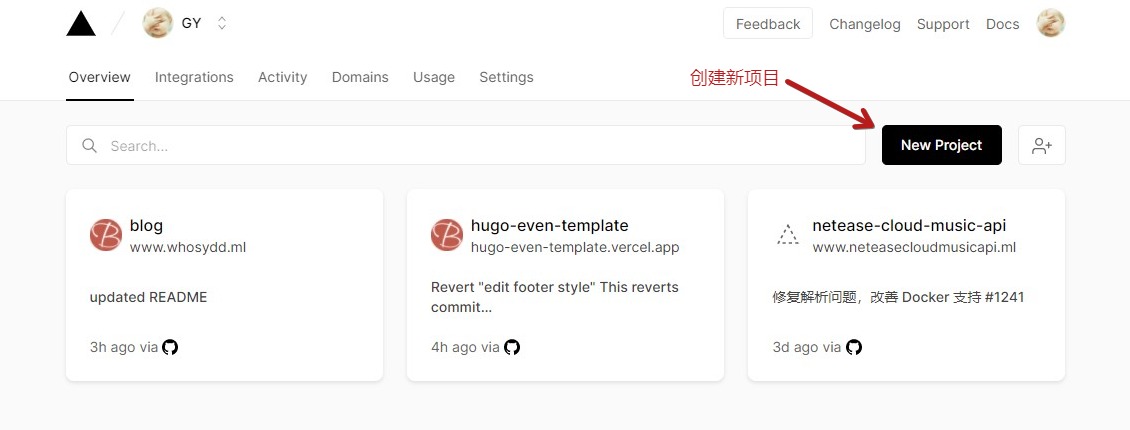
### 新建项目
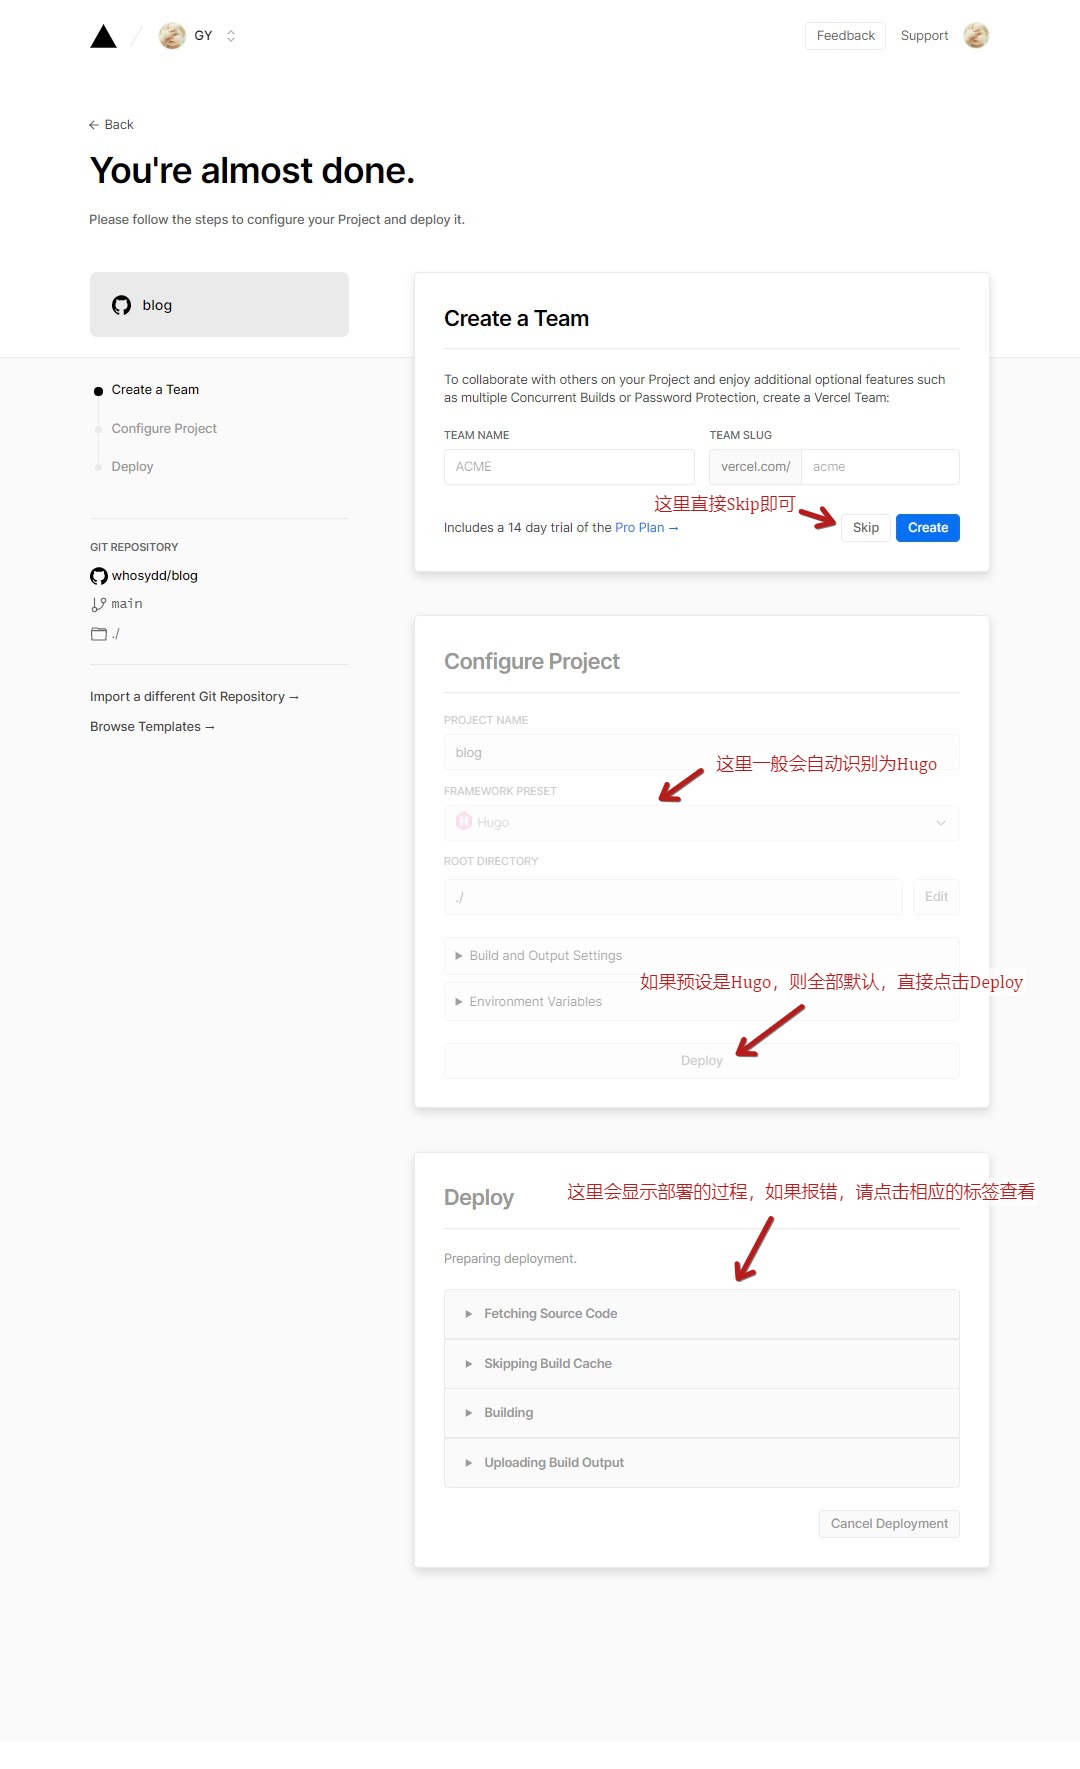
1. 点击`New Project`创建新项目
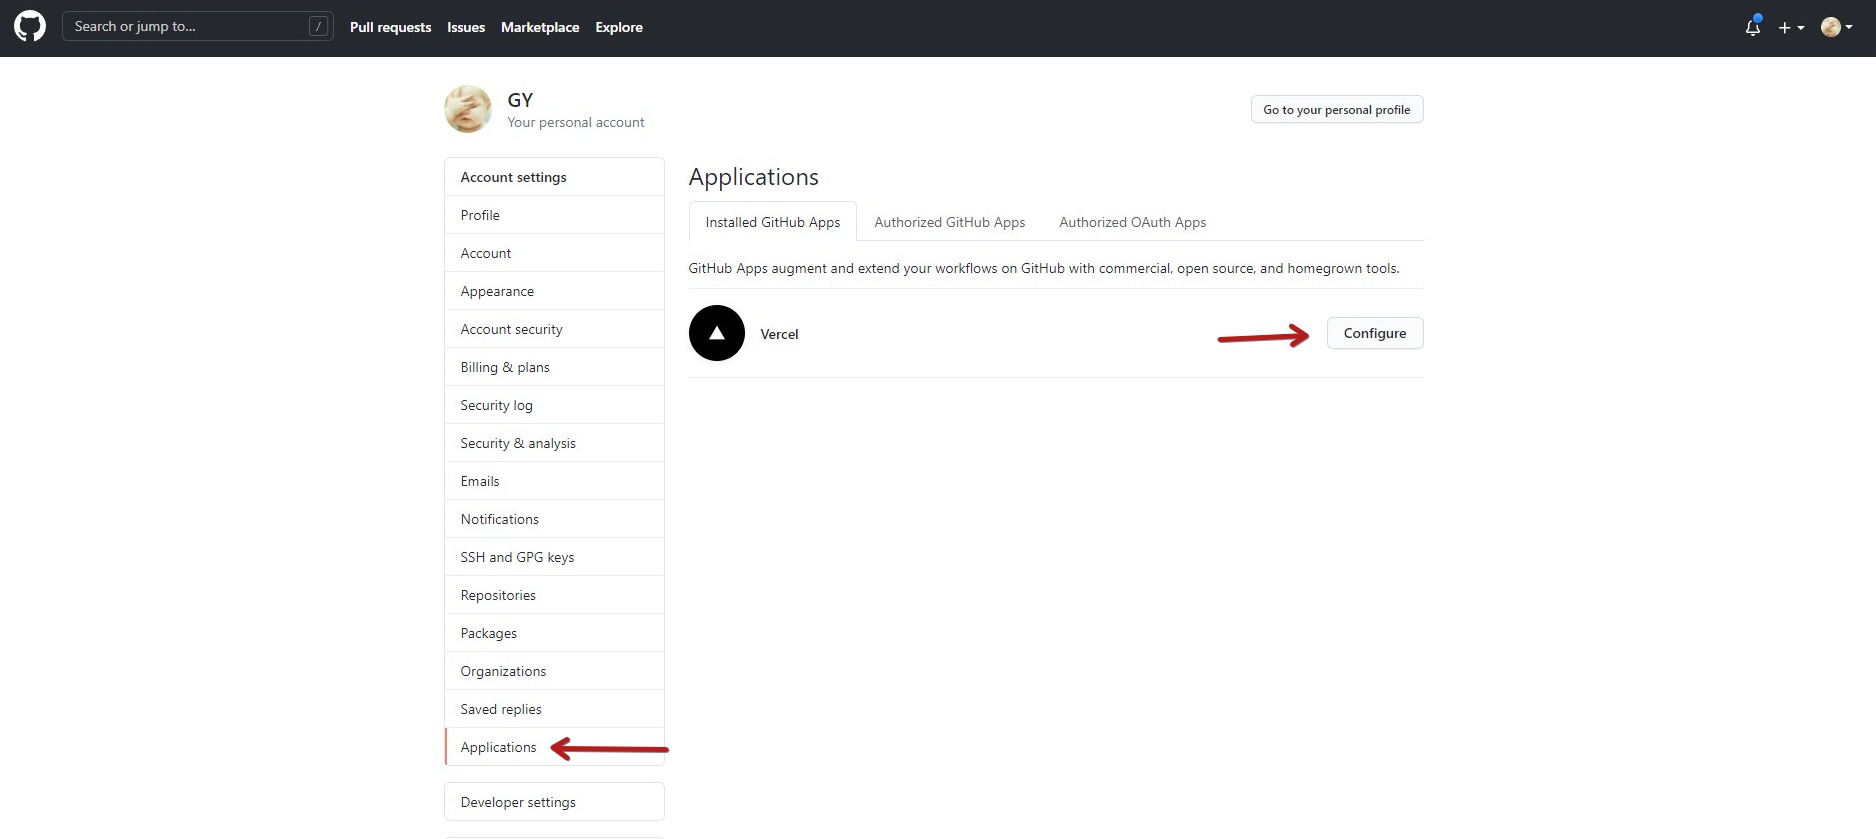
2. 初次使用,这里应该会出现`install Vercel for Github`,按照流程安装即可
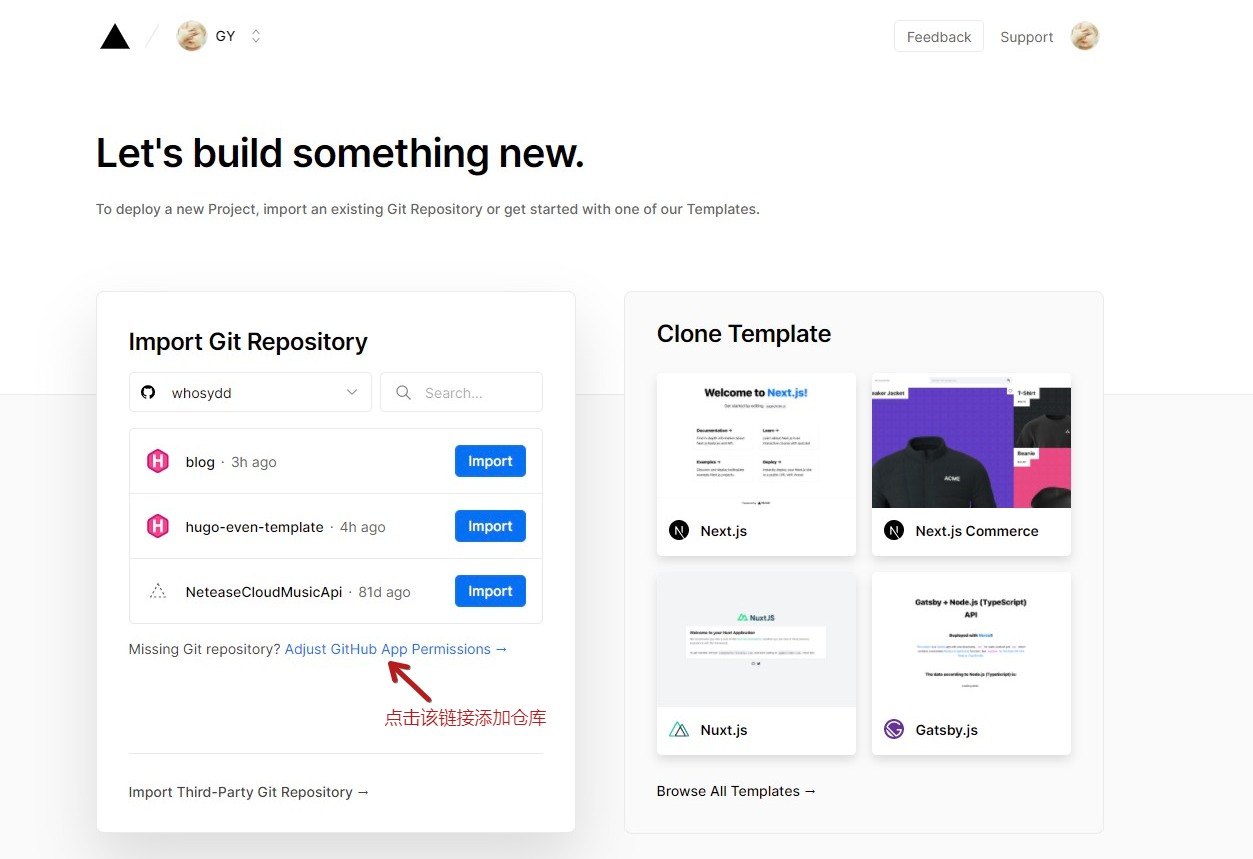
3. 点击上图中的链接会跳转到https://github.com/settings/installations页面,点击`Configur`进行配置
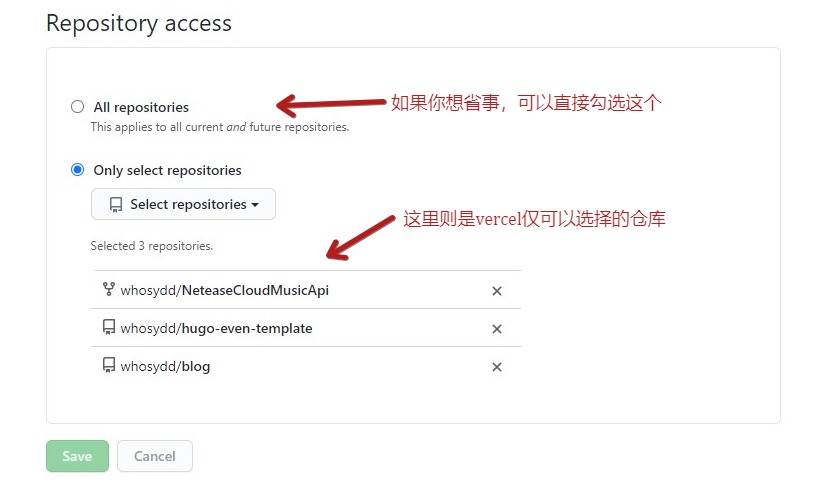
4. 配置好后则可以选择相应的仓库,点击`Import`导入
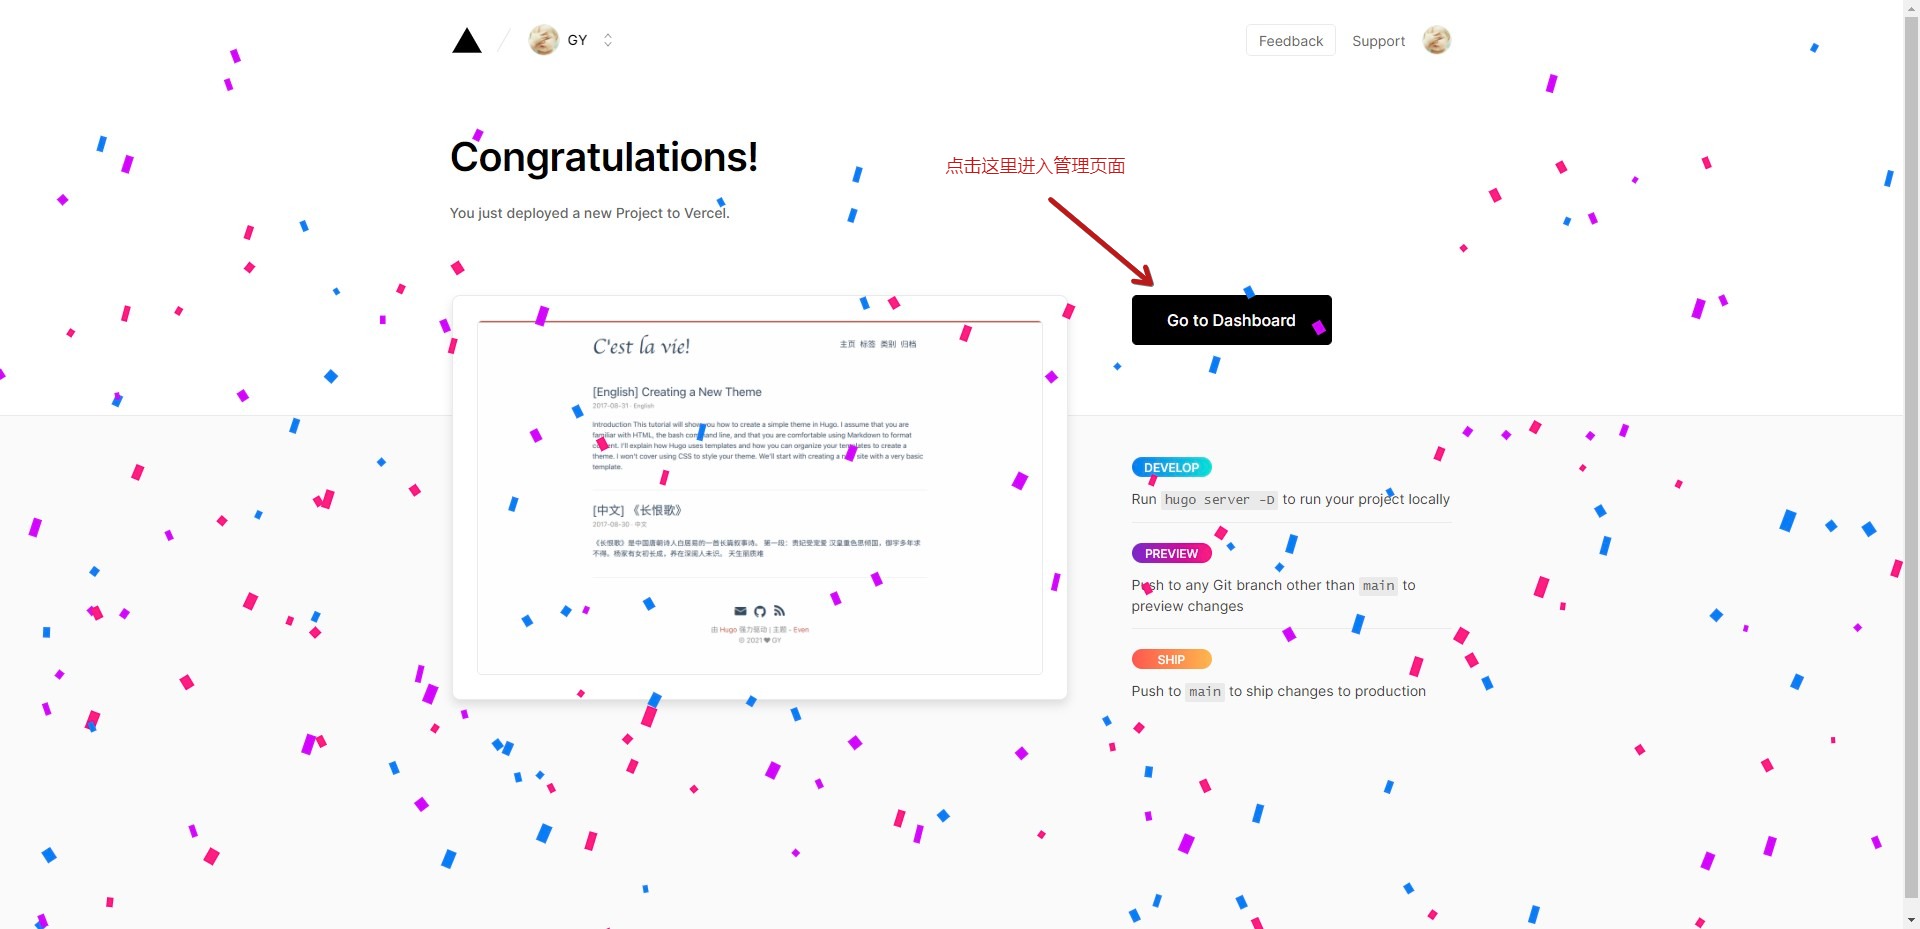
5. 出现以下页面就表示部署成功了,点击`Go to Dashboard`进入管理页面
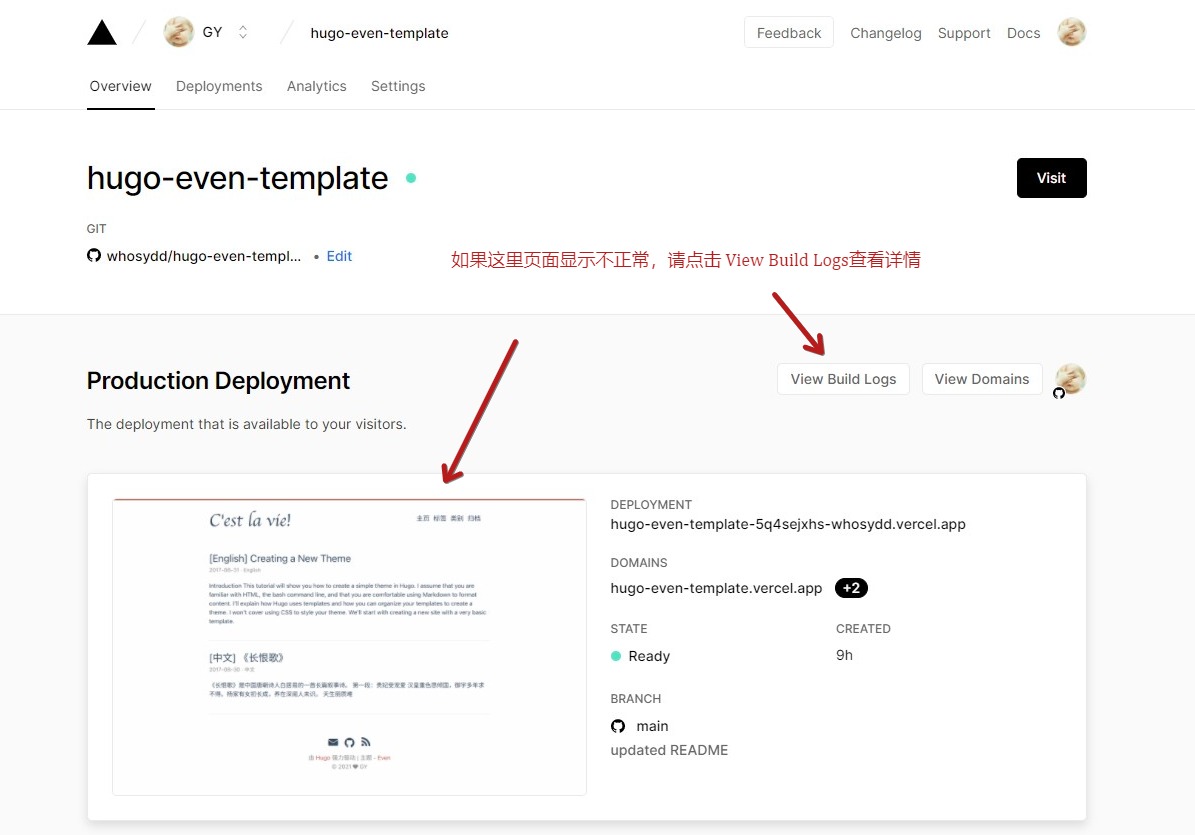
6. 如果页面不显示,请点击`View Build Logs`查看`Build Logs`了解详情
### 配置项目
#### 添加自定义域名
##### 注册域名
你可以在https://my.freenom.com/注册一个长达12个月的免费域名,不过这个网站大陆访问有点慢
> 请注意:这里使用免费域名仅为了演示,如果有需求,建议直接[阿里云](https://wanwang.aliyun.com/?spm=5176.19720258.J_8058803260.153.e9392c4anmPBf1)购买域名
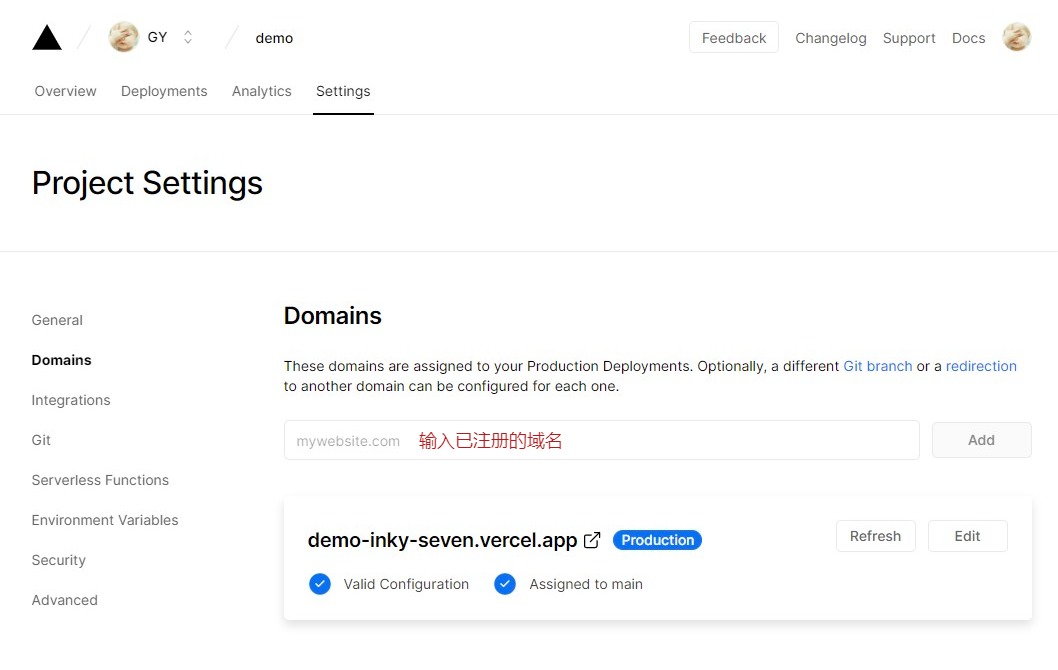
##### 添加域名
1. 在此页面输入已注册的域名,会弹窗让你选择重定向,选择`Recommended`的即可
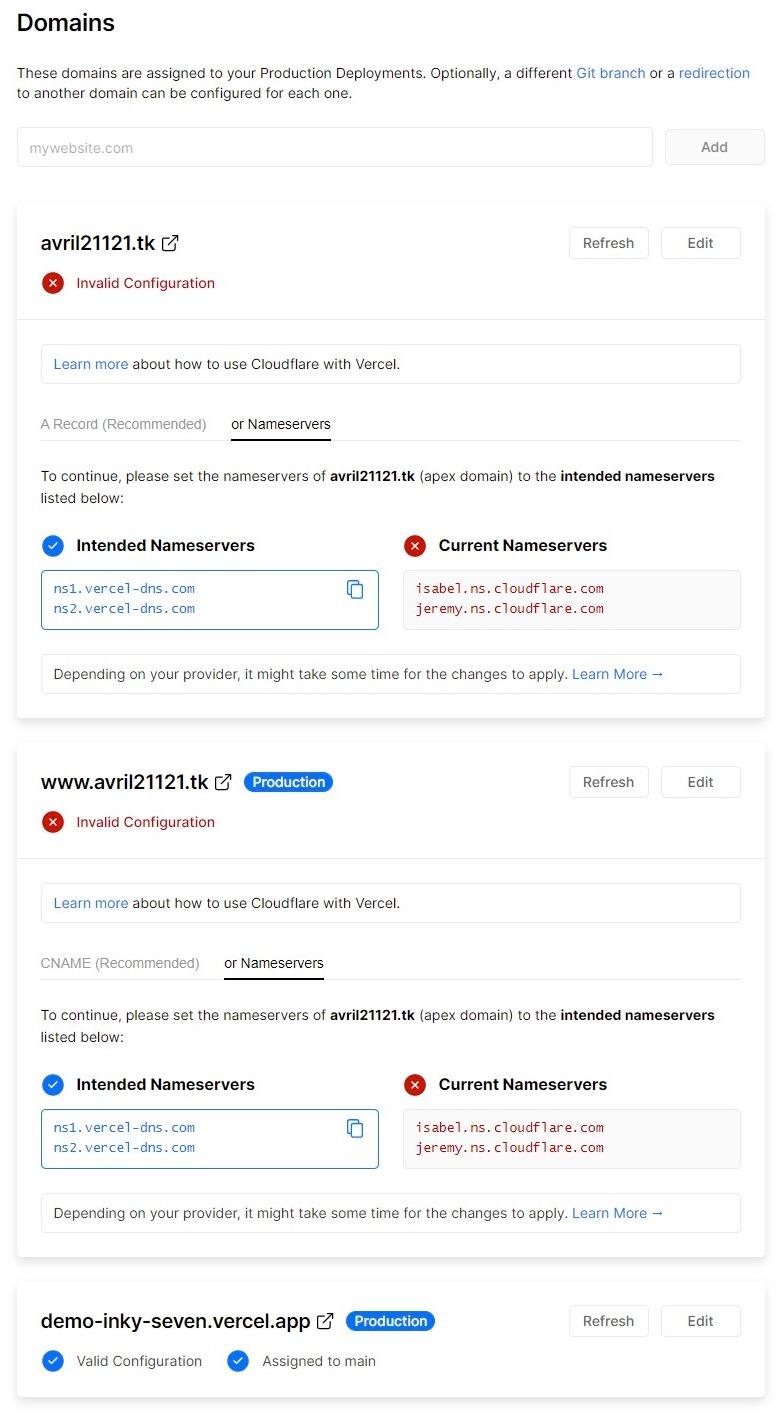
##### 域名解析
这里建议直接选择 Nameservers,然后根据提示将`ns1.vercel-dns.com`和`ns2.vercel-dns.com`添加到注册域名网站的相关配置中,然后点击`Refresh`刷新状态,如果都打钩了就可以了,此时就可以通过你填写的域名访问博客了
> 以https://my.freenom.com/注册的域名为例:注册成功后,需要在主页依次点击`Services -> My Domains -> Manage Domain -> Management Tools -> Nameservers`,选择`Use custom nameservers`,添加`ns1.vercel-dns.com`和`ns2.vercel-dns.com`即可
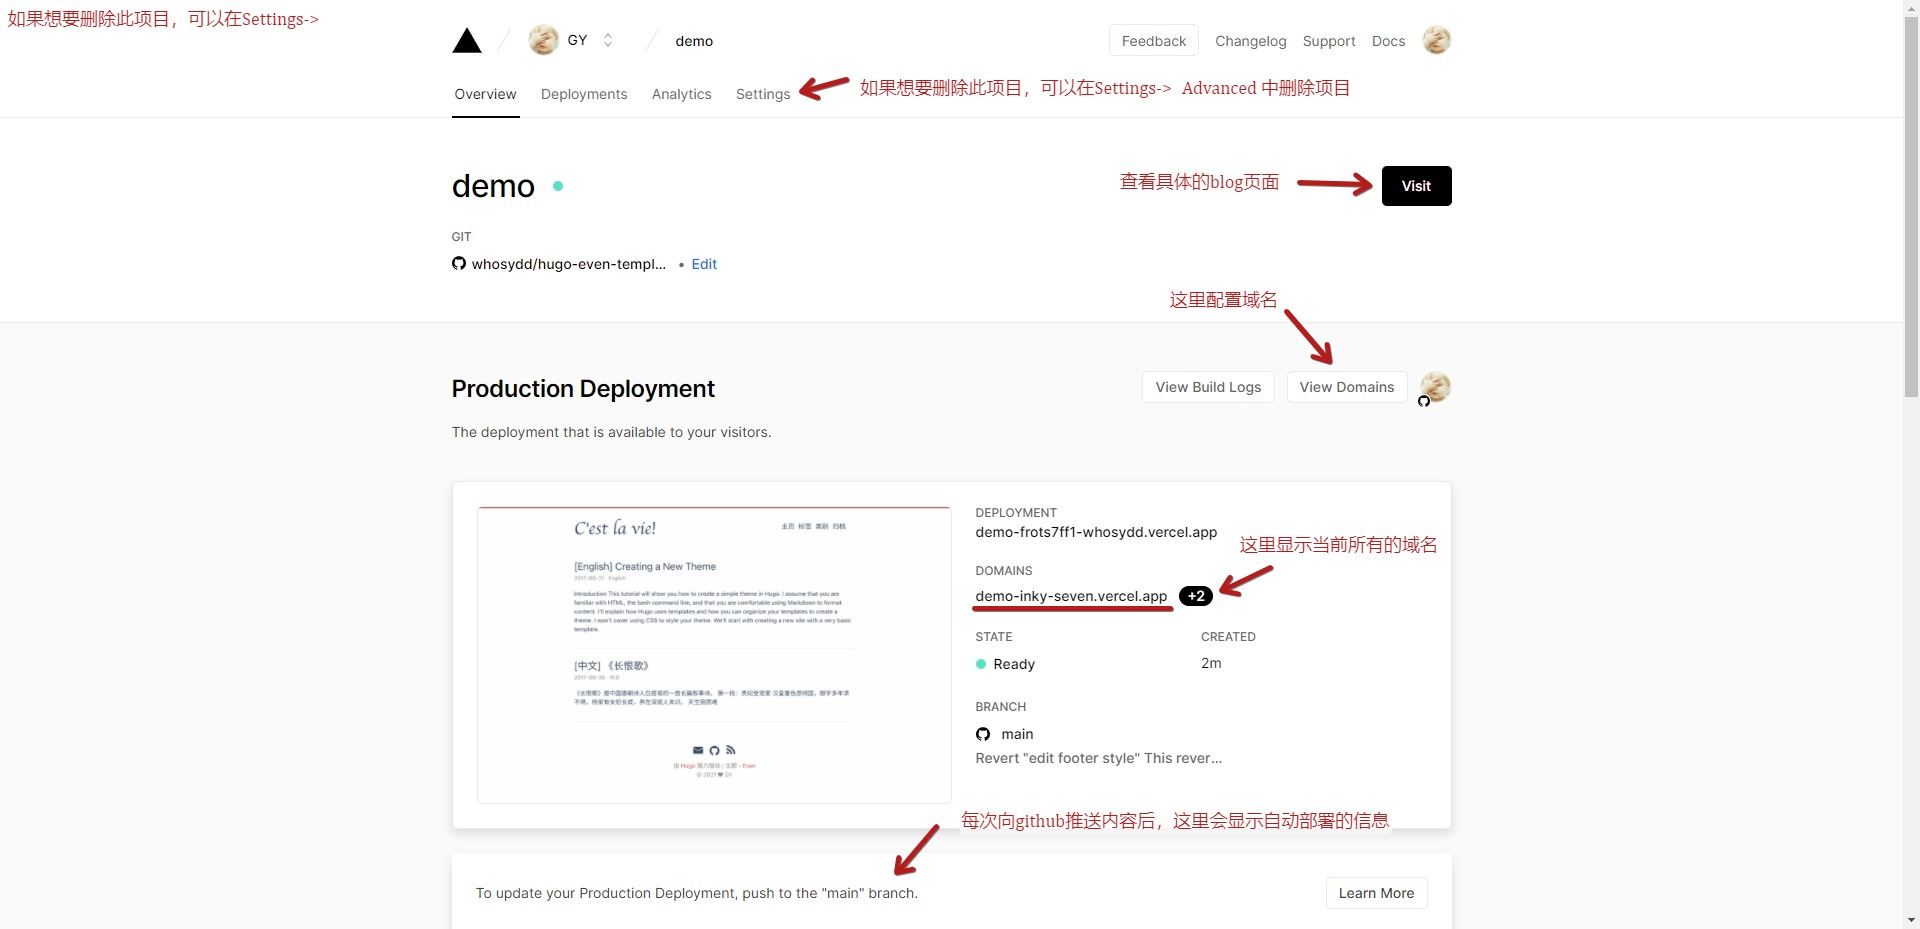
### 删除项目
`Settings -> Advanced -> Delete Project`

### 自动部署
只要第一次部署成功后,以后只需要将本地新写的文章推送到 github 即可,vercel 会在每次 commit 后自动部署
## 最后
由于hugo我也是刚刚接触,所以只是简单配置了一下,还有很多地方都不够完善。如果发现有哪里写的不好或者不对的地方,欢迎 pr~
**C'est la vie!**