https://github.com/widgetti/ipyreact
React for ipywidgets that just works. No webpack, no npm, no hassle
https://github.com/widgetti/ipyreact
Last synced: about 1 year ago
JSON representation
React for ipywidgets that just works. No webpack, no npm, no hassle
- Host: GitHub
- URL: https://github.com/widgetti/ipyreact
- Owner: widgetti
- License: bsd-3-clause
- Created: 2023-04-20T18:59:14.000Z (about 3 years ago)
- Default Branch: master
- Last Pushed: 2025-01-28T12:37:05.000Z (over 1 year ago)
- Last Synced: 2025-05-15T17:57:42.533Z (about 1 year ago)
- Language: TypeScript
- Size: 1.61 MB
- Stars: 126
- Watchers: 6
- Forks: 8
- Open Issues: 24
-
Metadata Files:
- Readme: README.md
- License: LICENSE.txt
Awesome Lists containing this project
README
# ipyreact
React for ipywidgets that just works. No webpack, no npm, no hassle. Just write jsx, tsx and python.
Build on top of [AnyWidget](https://anywidget.dev/).
## Why
Ipyreact adds composability, allowing you to add children to your widget, which will render the whole react tree in
a single react context, without adding extra divs or creating a new react context.
This allows wrapping libraries such as [Material UI](https://mui.com/), [Ant Design](https://ant.design/) and even
[React-three-fiber](https://docs.pmnd.rs/react-three-fiber/getting-started/introduction).
## Tutorial
This tutorial will walk you through the steps of building a complete ipywidget with react.
[](https://widgetti.github.io/ipyreact/lab/?path=full_tutorial.ipynb)
[](https://mybinder.org/v2/gh/widgetti/ipyreact/HEAD?labpath=examples%2Ffull_tutorial.ipynb)
Just click the JupyterLite or Binder link to start the interactive walkthrough.
## Goals
- Take any [Material UI example](https://mui.com/material-ui/react-rating/), copy/paste the code, and it should work in Jupyter Notebook, Jupyter Lab, Voila, and more specifically, [Solara](https://github.com/widgetti/solara).
- Wrap a library such as [Ant Design](https://ant.design/) giving the options to customize any JSON<->JavaScript Object (de)serialization, such as the [DatePicker](https://ant.design/components/date-picker) which uses a dayjs object internally, which cannot be serialized over the wire to Python.
- Compose widgets together to form a single react tree, with the same react context (e.g. useContext).
## Examples
### Inline code
```python
import ipyreact
class ConfettiWidget(ipyreact.ValueWidget):
_esm = """
import confetti from "canvas-confetti";
import * as React from "react";
export default function({value, setValue}) {
return confetti() && setValue(value + 1)}>
{value || 0} times confetti
};"""
ConfettiWidget()
```
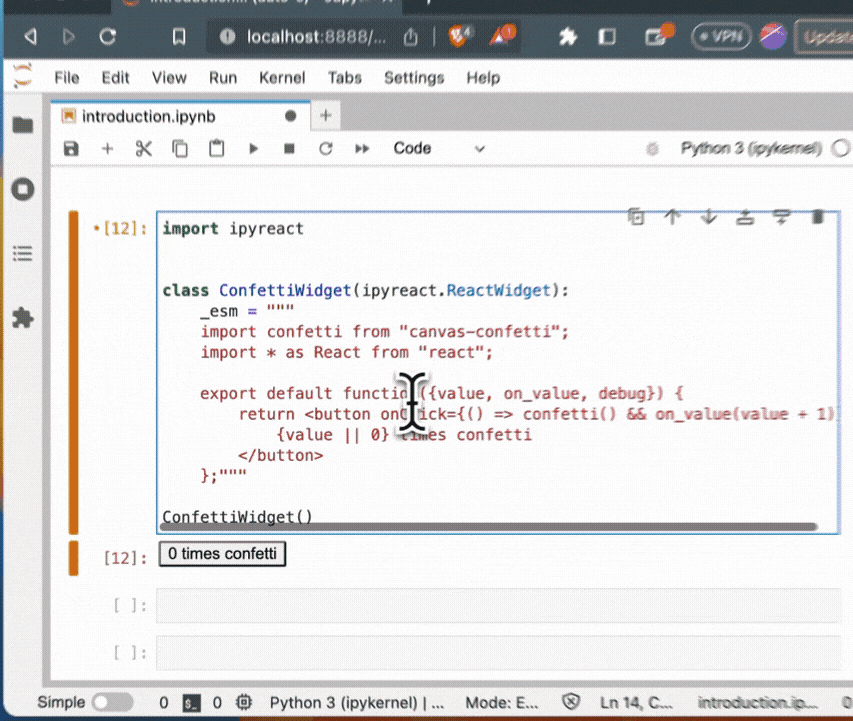
(_NOTE: in the recording we used on_value, we now use setValue_)
### Hot reloading
Create a tsx file:
```tsx
// confetti.tsx
import confetti from "canvas-confetti";
import * as React from "react";
export default function ({ value, setValue }) {
return (
confetti() && setValue(value + 1)}>
{value || 0} times confetti
);
}
```
And use it in your python code:
```python
import ipyreact
import pathlib
class ConfettiWidget(ipyreact.ValueWidget):
_esm = pathlib.Path("confetti.tsx")
ConfettiWidget()
```
Now edit, save, and see the changes in your browser/notebook.
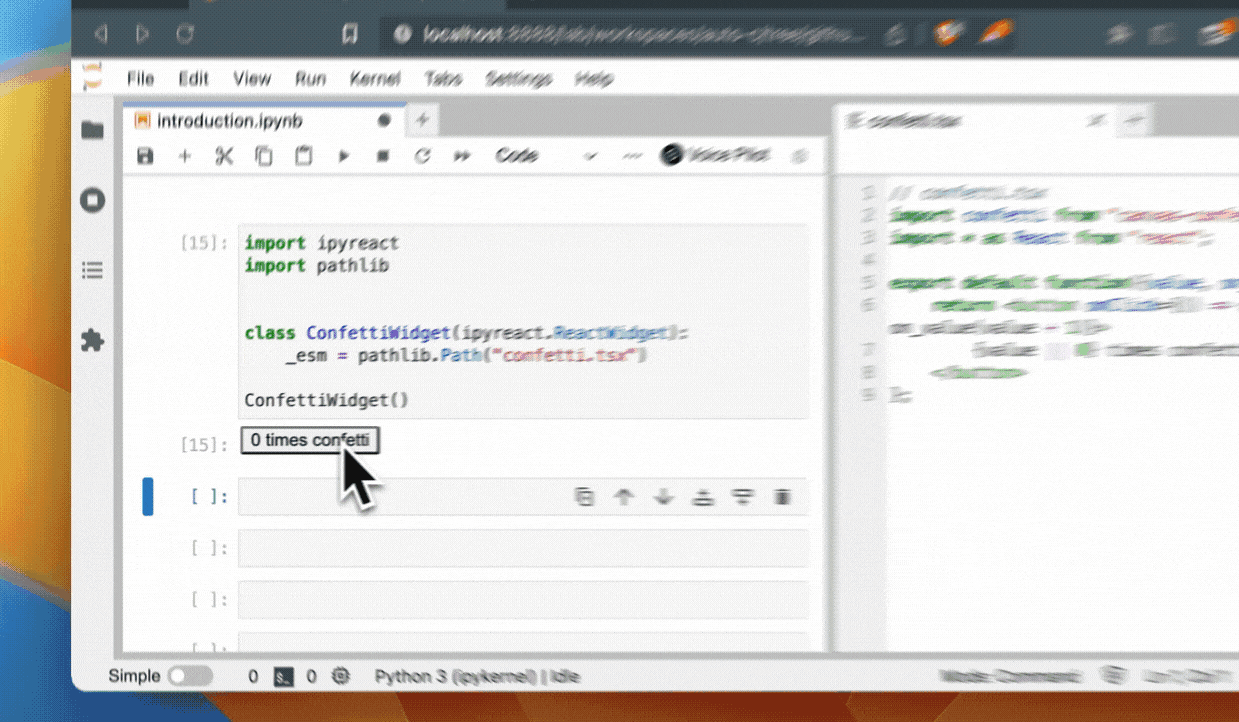
(_NOTE: in the recording we used on_value, we now use setValue_)
### IPython magic
First load the ipyreact extension:
```python
%load_ext ipyreact
```
Then use the `%%react` magic to directly write jsx/tsx in your notebook:
```tsx
%%react
import confetti from "canvas-confetti";
import * as React from "react";
export default function({value, setValue}) {
return confetti() && setValue(value + 1)}>
{value || 0} times confetti
};
```
Access the underlying widget with the name `_last_react_widget` (e.g. `_last_react_widget.value` contains the number of clicks):
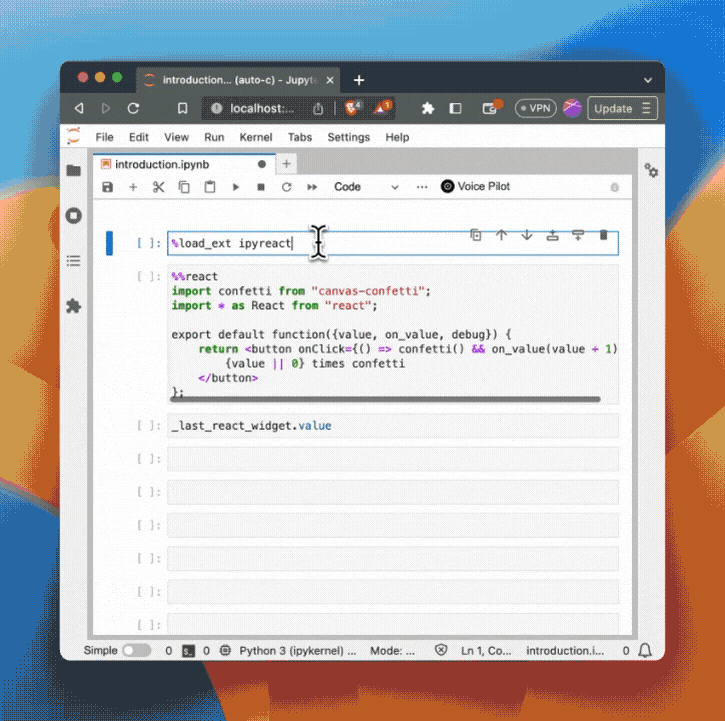
(_NOTE: in the recording we used on_value, we now use setValue_)
## Installation
You can install using `pip`:
```bash
pip install ipyreact
```
## Usage
### Summary
- The `ValueWidget` has an `value` trait, which is a `traitlets.Any` trait. Use this to pass data to your react component, or to get data back from your react component (since it inherits from ipywidgets.ValueWidget it
can be used in combination with ipywidgets' [interact](https://ipywidgets.readthedocs.io/en/latest/examples/Using%20Interact.html)).
- The `ipyreact.Widget` does not have the `value` trait.
- All traits are added as props to your react component (e.g. `{value, setValue...}` pairs in the example above.
- For every trait `ipyreact` automatically provides a `set` callback, which you can use to set the trait value from your react component (e.g. `setValue` in the example above). (_Note: we used `on_value` before, this is now deprecated_)
- Props can de passed as `Widget(props={"title": "My title"})`, and contrary to a trait, will not add a `setTitle` callable to the props.
- Children can be passed using `Widget(children=['text', or_widget])` supporting text, widgets, and un-interrupted rendering of ipyreact widgets.
- Your code gets transpiled using [sucrase](https://github.com/alangpierce/sucrase) in the frontend, no bundler needed.
- Your code should be written in ES modules.
- Set `_debug=True` to get more debug information in the browser console.
- Make sure you export a default function from your module (e.g. `export default function MyComponent() { ... }`). This is the component that will be rendered.
- Pass `events={"onClick": handler}` to the constructor or add a method with the name `event_onClick(self, data=None)` to add a `onClick` callback to your props.
### HTML elements
You do not need to provide the module code to create built-in HTML elements, ipyreact supports the same API as [React's createElement](https://react.dev/reference/react/createElement)
allowing creation of buttons for instance.
```python
import ipyreact
ipyreact.Widget(_type="button", children=["click me"])
```
Note that in addition to all native browser elements, also web components are supported.
### Children
As shown in the above example, we also support children, which supports a list of strings (text), `ipyreact.Widget` widgets that will be rendered as an uninterrupted react tree, or
any other `ipywidgets`
```python
import ipyreact
import ipywidgets as widgets
ipyreact.Widget(_type="div", children=[
"normal text",
ipyreact.Widget(_type="button", children=["nested react widgets"]),
widgets.FloatSlider(description="regular ipywidgets")
])
```
[](https://widgetti.github.io/ipyreact/lab/?path=children.ipynb)
[](https://mybinder.org/v2/gh/widgetti/ipyreact/HEAD?labpath=examples%2Fchildren.ipynb)
### Events
Events can be passed via the event argument. In this case `onClick` will be added as a prop to the button element.
```python
import ipyreact
ipyreact.Widget(_type="button", children=["click me"], events={"onClick": print})
```
Subclasses can also add an `event_onClick` method, which will also add a `onClick` event handler to the props.
[](https://widgetti.github.io/ipyreact/lab/?path=events.ipynb)
[](https://mybinder.org/v2/gh/widgetti/ipyreact/HEAD?labpath=examples%2Fevents.ipynb)
### Importing external modules
Writing JSX code without having to compile/bundle is great, but so is using external libraries.
Ipyreact uses ES modules, which allows native importing of external libraries when written as an ES module.
In the example below, we use https://esm.sh/ which exposes many JS libraries as ES modules that
we can directly import.
```python
import ipyreact
ipyreact.ValueWidget(
_esm="""
import confetti from "https://esm.sh/canvas-confetti@1.6.0";
import * as React from "react";
export default function({value, setValue}) {
return confetti() && setValue(value + 1)}>
{value || 0} times confetti
};
"""
)
```
### Import maps
However, the above code now has a direct link to "https://esm.sh/canvas-confetti@1.6.0" which makes the code very specific to esm.sh.
To address this, we also support [import maps](https://developer.mozilla.org/en-US/docs/Web/HTML/Element/script/type/importmap) to
write code more independant of where the modules come from.
You can provide an import map using `ipyreact.define_import_map`, which takes a dictionary of module names to urls or other modules. By default we support `react` and `react-dom` which is prebundled.
Apart from `react`, the default we provide is:
```python
define_import_map({
"@mui/material": "https://esm.sh/@mui/material@5.11.10?external=react,react-dom",
"@mui/material/": "https://esm.sh/@mui/material@5.11.10&external=react,react-dom/",
"@mui/icons-material/": "https://esm.sh/@mui/icons-material/?external=react,react-dom",
"canvas-confetti": "https://esm.sh/canvas-confetti@1.6.0",
})
```
_Note that it is important to add `external=react,react-dom` for ReactJS based libraries, otherwise [esm.sh](https://esm.sh/#using-import-maps) would import ReactJS again_.
Which means we can now write our ConfettiButton as:
```python
import ipyreact
# note that this import_map is already part of the default
ipyreact.define_import_map({
"canvas-confetti": "https://esm.sh/canvas-confetti@1.6.0",
})
ipyreact.ValueWidget(
_esm="""
import confetti from "canvas-confetti";
import * as React from "react";
export default function({value, setValue}) {
return confetti() && setValue(value + 1)}>
{value || 0} times confetti
};
"""
)
```
And it also means we can copy paste _most_ of the examples from [mui](https://mui.com/)
```tsx
%%react -n my_widget -d
import {Button} from "@mui/material";
import confetti from "canvas-confetti";
import * as React from "react";
export default function({ value, setValue}) {
console.log("value=", value);
return (
confetti() && setValue(value + 1)}
>
{value || 0} times confetti
);
}
```
We use the https://github.com/guybedford/es-module-shims shim to the browser page for the import maps functionality.
This also means that although import maps can be configured per widget, they configuration of import maps is global.
### Bundled ESM modules
## Creating the ES module
While esm.sh is convenient to use, for production use, we recommend creating a standalone bundle. This will load faster and will not require a direct connection to esm.sh, which might not be available in airgapped or firewalled environments.
We will not create a minimal bundle for https://ant.design/
First create a simple file called `antd-minimal.js` that exports what we need.
```javascript
export { Button, Flex, Slider } from "antd";
```
Next, we install the libraries:
```bash
$ npm install antd
```
And use ESBuild to turn this into a self-contained module/bundle, without react, since ipyreact provides that for us.
```
$ npx esbuild ./antd-minimal.js --bundle --outfile=./antd-minimal.esm.js --format=esm --external:react --external:react-dom --target=esnext
```
Now we can define the module with a custom name (we call it antd-minimal).
```python
import ipyreact
from pathlib import Path
ipyreact.define_module("antd-minimal", Path("./antd-minimal.esm.js"))
```
We can now use the components from this module:
```python
def on_click(event_data):
w.children = ["Clicked"]
w = ipyreact.Widget(_module="antd-minimal", _type="Button", children=["Hi there"], events={"onClick": on_click})
w
```
Or, composing multiple ones:
```python
stack = ipyreact.Widget(_module="antd-minimal", _type="Flex",
props={"vertical": True, "style": {"padding": "24px"}},
children=[
ipyreact.Widget(_module="antd-minimal", _type="Button", children=["Ant Design Button"]),
ipyreact.Widget(_module="antd-minimal", _type="Slider",
props={"defaultValue": 3, "min": 0, "max": 11}),
])
stack
```
Input components might need a little bit of custom code, and subclassing `ValueWidget`. It often means binding the value to the right prop of the input component (in this case the Slider takes the same name, `value`) and coupling the event handler (in this case `onChange`) to the `setValue` function.
```python
import traitlets
class Slider(ipyreact.ValueWidget):
_esm = """
import * as React from "react";
import {Slider} from "antd-minimal"
export default ({value, setValue, ...rest}) => {
return setValue(v)} {...rest}/>
}
"""
s = Slider(value=2)
s
```
_Note that it depends on the implementation of the event handler if the value is being passed directly, or a (synthetic) event with the data will be passed as argument. An typical example event handler could be `onChange={(event) => setValue(event.target.value)}`._
Now the slider widget is stateful, and we have bi-directional communication using the `.value` trait.
For instance, we can read it:
```python
s.value
```
Or write to it, and it will be reflected directly in the UI.
```python
s.value = 10
```
Test this out in the notebook:
[](https://widgetti.github.io/ipyreact/lab/?path=antd/antd.ipynb)
[](https://mybinder.org/v2/gh/widgetti/ipyreact/HEAD?labpath=examples%2Fantd%2Fantd.ipynb)
### Bundled ES modules for threejs
See this notebook for a 3D WebGL threejs-fiber example
[](https://widgetti.github.io/ipyreact/lab/?path=threejs-fiber/threejs-fiber.ipynb)
[](https://mybinder.org/v2/gh/widgetti/ipyreact/HEAD?labpath=examples%2Fthreejs-fiber%2Fthreejs-fiber.ipynb)
## Development Installation
Create a dev environment:
```bash
conda create -n ipyreact-dev -c conda-forge nodejs yarn python 'jupyterlab<4'
conda activate ipyreact-dev
```
Install the python. This will also build the TS package.
```bash
pip install -e ".[test, examples, dev]"
pre-commit install
```
When developing your extensions, you need to manually enable your extensions with the
notebook / lab frontend. For lab, this is done by the command:
```
jupyter labextension develop --overwrite .
yarn run build
```
For classic notebook, you need to run:
```
jupyter nbextension install --sys-prefix --symlink --overwrite --py ipyreact
jupyter nbextension enable --sys-prefix --py ipyreact
```
Note that the `--symlink` flag doesn't work on Windows, so you will here have to run
the `install` command every time that you rebuild your extension. For certain installations
you might also need another flag instead of `--sys-prefix`, but we won't cover the meaning
of those flags here.
## Binary data transport
Binary data such as NumPy arrays, or Arrow data can be efficiently transported to the frontend.
Props support object that support the buffer interface. See [this test as an example](https://github.com/widgetti/ipyreact/tree/master/tests/ui/serialize_test.py).
### How to see your changes
#### Typescript:
If you use JupyterLab to develop then you can watch the source directory and run JupyterLab at the same time in different
terminals to watch for changes in the extension's source and automatically rebuild the widget.
```bash
# Watch the source directory in one terminal, automatically rebuilding when needed
yarn run watch
# Run JupyterLab in another terminal
jupyter lab
```
After a change wait for the build to finish and then refresh your browser and the changes should take effect.
#### Python:
If you make a change to the python code then you will need to restart the notebook kernel to have it take effect.
# FAQ
## Which version of React do you use.
We currently only support React 18. Although we have some scaffolding in place to support different version, we do not have funding to support both.
## Why does ipyreact provides React?
If several ReactJS components need to be composed into a single React app, they need to share the same React context. This makes it possible
for features such as React's [useContext](https://react.dev/reference/react/useContext) to work across the whole React tree.
If every library brings its own React, they cannot communicate using this. Also, every child would need to be nested in its own `
`
which can affect the layout of your application. When ipyreact provides React, we can build a true ReactJS application with a normal/true
React render tree.
## I get a React error
For instance, if you see `"Cannot read properties of null (reading 'useReducer')"` it means that you are loading in your own ReactJS version.
If you use https://esh.sh, make sure you add `??external=react,react-dom` at the end of the url, so that your esm bundle doesn't include its own
ReactJS version, but uses the one provided with ipyreact.
If you make your own bundle using esbuild, make sure to add the `--external:react --external:react-dom` flags on the CLI.