https://github.com/wutiange/log-listener-plugin
log-record 客户端对应的的插件(Log-record client corresponding plugin)
https://github.com/wutiange/log-listener-plugin
charles debugger log react-native
Last synced: about 1 year ago
JSON representation
log-record 客户端对应的的插件(Log-record client corresponding plugin)
- Host: GitHub
- URL: https://github.com/wutiange/log-listener-plugin
- Owner: wutiange
- Created: 2024-01-25T12:50:46.000Z (over 2 years ago)
- Default Branch: main
- Last Pushed: 2025-02-18T02:23:25.000Z (over 1 year ago)
- Last Synced: 2025-03-27T09:12:38.180Z (over 1 year ago)
- Topics: charles, debugger, log, react-native
- Language: TypeScript
- Homepage:
- Size: 22.6 MB
- Stars: 1
- Watchers: 1
- Forks: 1
- Open Issues: 0
-
Metadata Files:
- Readme: README.md
Awesome Lists containing this project
README
# log-listener-plugin
[](https://www.npmjs.com/package/@wutiange/log-listener-plugin?activeTab=dependencies)
[](https://www.npmjs.com/package/@wutiange/log-listener-plugin)
[](https://www.npmjs.com/package/@wutiange/log-listener-plugin)
[](./LICENSE)
中文 | [English](packages/log-listener-plugin/README.md)
要想正常使用 [log-record](https://github.com/wutiange/log-record) 客户端来收集日志,方便排查问题,那么就需要把这个插件安装到项目中。
## 1. 安装
使用 npm 安装
```bash
npm install @wutiange/log-listener-plugin
```
使用 yarn 安装
```bash
yarn add @wutiange/log-listener-plugin
```
**由于日志系统使用 http ,所以需要配置项目支持 http 才能正常使用。**
## 2. 使用
在你需要开始记录日志的地方,调用下面的代码即可。
### 2.1 基于自我发现的使用
先安装 react-native-zeroconf ,这个的目的是发现局域网内可用的日志系统。
```bash
yarn add react-native-zeroconf
# 或
npm install react-native-zeroconf
```
具体安装步骤请移步:[react-native-zeroconf](https://www.npmjs.com/package/react-native-zeroconf) ,请不要忽略这行,因为要想使用这个还需要做一些必要的步骤,我也把这些复制到下面,以免被人忽略。
For Android please ensure your manifest is requesting all necessary permissions.
```xml
```
IOS 14 requires you to specify the services you want to scan for and a description for what you're using them.
In your `info.plist` add the following strings:
```plist
NSBonjourServices
_http._tcp
NSLocalNetworkUsageDescription
Access nearby Log Records to view logs
```
接下来只需要在项目中找个合适的位置,一般是在 App.js 中调用。
```ts
import logger from '@wutiange/log-listener-plugin';
// 启动日志记录
logger.config({isAuto: true});
```
### 2.2 基于手动设置的方式使用
```ts
import logger from '@wutiange/log-listener-plugin';
// 填写日志服务器的地址,如果你使用自我发现功能,那么这一步可以省略
logger.config({isAuto: true, testUrl: 'http://127.0.0.1'});
```
### 2.3 设置基本数据
设置基础数据,一般数据从 react-native-device-info 中获取,如果你没有特殊的可以不要调用,内部会根据你安装的 react-native-device-info 自动获取基础数据。这些基础数据的目的是为了过滤数据,不是必须的。
```ts
logger.config({
baseData: {
Brand: DeviceInfo.getBrand(),
Model: DeviceInfo.getModel(),
AppVersion: DeviceInfo.getVersion(),
Carrier: DeviceInfo.getCarrierSync(),
Manufacturer: DeviceInfo.getManufacturerSync(),
SystemName: DeviceInfo.getSystemName(),
}
});
```
### 2.4 单独记录和停止所有记录
尽量不要使用以下 API ,这些 API 也没必要,这些数据都只会保存到你打开的日志系统中,所以都是能收集啥就都收集啥,目的是方便排查问题。
```ts
// 只抓取日志
logger.startRecordLog();
// 只抓取网络日志
logger.startRecordNetwork();
// 停止日志记录,会同时停止日志和网络
logger.unAuto();
```
### 2.5 其他使用说明
如果你希望杀死手机后下次进来仍然能记住之前保存的 IP 地址,那么你可以考虑安装:
```bash
yarn add @react-native-async-storage/async-storage
```
如果你本地有安装其他的 storage ,那么你可以手动设置:
```ts
logger.config({
storage: // 你的 storage ;或者你自己写的,只要遵循 getItem 和 setItem 接口规范即可
})
```
现在把若干配置相关的都放到了 config 中,以此来简化配置,配置的每一项都是可选的:
```ts
type Options = {
/**
* storage 用于存储已设置的日志系统的 url
* @default @react-native-async-storage/async-storage
*/
storage?: Storage
/**
* 设置上传日志的超时时间,单位为毫秒
* @default 3000
*/
timeout?: number
/**
* 日志系统的url
*/
testUrl?: string
/**
* 是否自动开启日志记录
* @default false
*/
isAuto?: boolean
/**
* 设置日志系统的基础数据,这些数据会自动添加到每条日志中
*/
baseData?: Record
}
```
这是 config 每一项的说明。
## 3. 其他重要说明
1. 如果你使用的自我发现模式,那么要保证你的手机和 log-record 客户端在同一个局域网下。
1. 在配置 baseUrl 的时候,必须填写的是 [log-record](https://github.com/wutiange/log-record) 的地址,也就是你在什么电脑打开的 log-record 客户端,那么这里添加的就是对应电脑的 ip 地址。集成这个插件的 app 端要保证跟 log-record 客户端在同一个局域网下。
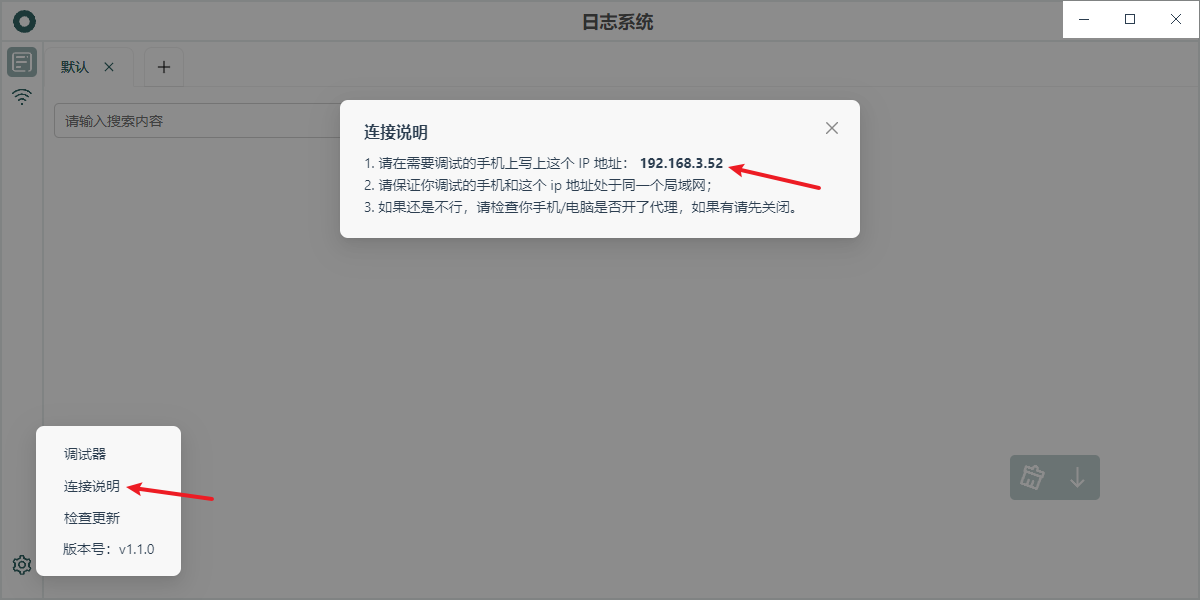
1. 如果你不知道日志系统的 IP ,可以在日志系统的 `设置 > 链接说明(需要版本大于1.0.9)` 中找到,如下图所示: