https://github.com/wxlvip/elementdec
Element UI Deconstruction 项目是为了学习 Element 而创建,在各文件中添加详细的注释,并对原有组件进行优化迭代,以便帮助新手理解源码,并可以按照自己项目需求进行增量开发。
https://github.com/wxlvip/elementdec
element-ui vue webpack
Last synced: about 2 months ago
JSON representation
Element UI Deconstruction 项目是为了学习 Element 而创建,在各文件中添加详细的注释,并对原有组件进行优化迭代,以便帮助新手理解源码,并可以按照自己项目需求进行增量开发。
- Host: GitHub
- URL: https://github.com/wxlvip/elementdec
- Owner: wxlvip
- License: mit
- Created: 2021-11-22T04:02:17.000Z (over 4 years ago)
- Default Branch: master
- Last Pushed: 2022-01-11T03:15:22.000Z (over 4 years ago)
- Last Synced: 2025-09-04T03:59:35.842Z (10 months ago)
- Topics: element-ui, vue, webpack
- Language: Vue
- Homepage:
- Size: 2.56 MB
- Stars: 0
- Watchers: 1
- Forks: 0
- Open Issues: 0
-
Metadata Files:
- Readme: README.md
- Changelog: CHANGELOG.en-US.md
- Contributing: .github/CONTRIBUTING.en-US.md
- License: LICENSE
Awesome Lists containing this project
README








> A Vue.js 2.0 UI Toolkit for Web.
Element will stay with Vue 2.x
For Vue 3.0, we recommend using [Element Plus](https://github.com/element-plus/element-plus) from the same team
## 基本说明
Element版本:element-2.15.7
思想:健壮、可扩展、解耦、易维护
官方文档:[https://element.eleme.cn/#/zh-CN](https://element.eleme.cn/#/zh-CN)
Github地址:[https://github.com/ElemeFE/element](https://github.com/ElemeFE/element)
>说明:Element UI Deconstruction 项目是为了学习 Element 而创建,新增 docs 文档目录,将解构的理解更新在该文件夹下,并会在各文件中添加详细的注释,以便帮助新手理解源码。
>
>除了新增的部分说明文件外,其他大部分为 `Element-2.15.7` 版本的源码,仅供学习之用。
>
>由于 element 官方也在维护组件库,代码可能会更新,因此该说明文档的代码难免会与最新源码有出入,所以我这里注明了版本号,大家注意下即可。
## 目录
```
Element-2.15.7
├──.github:存放了Element UI贡献指南、issue和PR模板
├──build:存放了打包相关的配置文件,项目构建命令的目录
│ ├──bin
│ │ ├──build-entry.js:根据components.json中组件的列表,结合字符串模板生成组件库的入口文件src/index.js
│ │ ├──build-locale.js
│ │ ├──gen-cssfile.js
│ │ ├──gen-indices.js
│ │ ├──i18n.js:为examples/pages中的模板文件生成不同语言的vue文件到examples/pages/[语言]/
│ │ ├──iconInit.js:从packages/theme-chalk/src/icon.scss文件中提取字体图标的类名到examples/icon.json中
│ │ ├──new.js
│ │ ├──new-lang.js
│ │ ├──template.js
│ │ └──version.js:生成版本字符串数组到examples/version.json中,文档会使用
│ └──webpack.test.js
├──examples:文档目录,组件相关示例 demo,这是一个完整独立的Vue项目\
│ ├──components:主题及主题编辑器相关页面
│ │ ├──theme // 主题页面相关
│ │ │ ├──loader
│ │ │ ├──color.js
│ │ ├──theme-configurator // 主题编辑器相关
│ │ │ ├──editor
│ │ │ ├──utils
│ │ │ ├──action.vue
│ │ │ ├──index.vue
│ │ │ ├──main.vue
│ │ │ └──shortcut.vue
│ │ ├──demo-block.vue
│ │ ├──footer.vue
│ │ ├──footer-nav.vue
│ │ ├──header.vue
│ │ ├──search.vue
│ │ ├──side-nav.vue
│ │ └──theme-picker.vue
│ ├──docs:每一个md文档,分别对应着官网组件的展示页面 修改官网组件页面就在该目录下修改,通过项目组编写的 md-loader 进行转换成 vue 文件
├──lib: 构建后生成的文件,发布到npm包
├──packages:组件源码和组件样式文件
│ ├── alert // 具体组件源码包
│ │ ├── src // Vue组件包
│ │ └── index.js // 入口文件
│ ├──theme-chalk:这里面存放的就是所有组件相关的样式,里面有index.scss(用于全局引入时导出所有组件样式)和其他每个组件对应的scss文件(用于按需引入时导出对应的组件样式)
│ └── 89个文件夹 80种组件
├──src:存放入口文件和一些工具辅助函数\把所有的组件做一个统一处理,同时包含自定义指令、项目整体入口、组件国际化、组件 mixins、动画的封装和公共方法
│ ├──directives:放置自定义指令,实现滚轮优化,鼠标点击优化
│ │ ├──mousewheel.js:主要使用mousewheel.js(https://github.com/basilfx/normalize-wheel)来实现鼠标滚轮事件。应用在table组件中,如“固定表头”,“流体高度”中。
│ │ └──repeat-click.js:就是“函数防抖”!主要用在InputNumber 计数器中,控制用户点击频率。请参考https://www.cnblogs.com/mengfangui/p/9515993.html。
│ ├──locale:放置语言的配置文件,i18n国际化
│ ├──mixins:Vue混合器,放置组件用的混合文件
│ │ ├─emitter.js:广播和分发函数
│ │ ├─focus.js:使dom元素获取焦点
│ │ ├─locale.js:国际化输出
│ │ └──migrating.js:主要目的是在浏览器控制台输出 element ui已经移除的一些属性
│ ├──transitions:样式过渡效果,放置动画配置文件
│ ├──utils:工具类包,放置用到工具函数文件
│ │ ├─menu
│ │ ├─popup
│ │ ├─after-leave.js
│ │ ├─aria-dialog.js
│ │ ├─aria-utils.js
│ │ ├─clickoutside.js:点击元素外面才会触发的事件
│ │ ├─date.js:日期格式化js,修改自fecha:https://github.com/taylorhakes/fecha
│ │ ├─date-util.js
│ │ ├─dom.js:对dom元素进行操作,如hasClass,addClass,removeClass,getStyle,setStyle,on(绑定事件),off(解除事件)
│ │ ├─merge.js
│ │ ├─popper.js
│ │ ├─resize-event.js
│ │ ├─scroll-into-view.js
│ │ ├─scrollbar-width.js
│ │ ├─shared.js
│ │ ├─types.js
│ │ ├─util.js:定义一些常用函数:hasOwn,getValueByPath,valueEquals。
│ │ ├─vdom.js:vnode判断,vodne获取
│ │ └──vue-popper.js
│ └──index.js :源码入口文件,组件注册入口,自动生成的。导入了 packages 下的所有组件;对外暴露了install方法,把所有的组件注册到Vue上面,并在Vue原型上挂载了一些全局变量和方法;最终将install方法、变量、方法导出
├──test:单元测试相关文件,这也是一个优秀的开源项目必备的
│ ├── ssr //
│ └── unit // 单元测试目录
│ ├── coverage // 单元测试覆盖率包
│ ├── mocks
│ ├── specs // 测试用例源码包
│ ├── index.js // 测试入口
│ ├── karma.conf.js // karma配置文件
│ └── utils.js // 工具类
├──types:typescript文件包,类型声明文件
│
├──.babelrc: babel 配置文件
├──.eslintignore:eslint忽略文件配置
├──.eslintrc:eslint 配置文件
├──.gitattributes:git 的隐藏文件
├──.gitignore:git忽略文件配置
├──.travis.yml:持续集成(CI)的配置文件
├──CHANGELOG.en-US.md:更新日志,这里Element UI提供了四种不同语言的
├──CHANGELOG.es.md:
├──CHANGELOG.fr-FR.md:法语
├──CHANGELOG.zh-CN.md:中文
├──components.json:配置文件,标明了组件的文件路径,方便 webpack 打包时获取组件的文件路径。在自动化生成文件以及入口时会用到,该文件通过 `Makefile` 也是可以自动化生成的。
├──element_logo.svg:ElementUI 的图标,使用了 svg 格式
├──FAQ.md:ElementUI 开发者对常见问题的解答。
├──LICENSE:开源许可证,Element UI使用的是MIT协议
├──Makefile:Makefile 是一个适用于 C/C++ 的工具,在拥有 make 环境的目录下, 如果存在一个 Makefile 文件。 那么输入 make 命令将会执行 Makefile 文件中的某个目标命令。
├──package.json:npm包核心文件,包管理
├──README.md:说明文档
└──yarn.lock:使用yarn进行包版本锁定
```
>关于Makefile 文件:\
Makefile 是一个适用于 C/C++ 的工具,较早作为工程化工具出现在 UNIX 系统中, 通过 make 命令来执行一系列的编译和连接操作。在拥有 make 环境的目录下, 如果存在一个 Makefile 文件。 那么输入 make 命令将会执行 Makefile 文件中的某个目标命令。
[前端入门->makefile](https://segmentfault.com/a/1190000004437816#articleHeader11)
>
>在 .github 文件夹下的贡献指南中提到过,组件开发规范中的第一条:通过 make new 创建组件目录结构,包含测试代码、入口文件、文档。其中 make new 就是 make 命令中的一种。make 命令是一个工程化编译工具,而 Makefile 定义了一系列的规则来制定文件变异操作,常常使用 Linux 的同学应该不会对 Makefile 感到陌生。
>
>Tip:\
make new [中文]\
1、将新建组件添加到components.json\
2、添加到index.scss\
3、添加到element-ui.d.ts\
4、创建package\
5、添加到nav.config.json\
>
>这里我以make install为例简要说明下执行流程:\
1.执行 make 命令, 在该目录下找到 Makefile 文件。\
2.找到 Makefile 文件中对应命令行参数的 install 目标。这里的目标就是 npm install
## 启动
首先你需要 Node.js 4+,yarn 和 npm 3+。注意:我们使用 yarn 进行依赖版本的锁定,所以请不要使用 npm install 安装依赖。
```shell
git clone git@github.com:wxlvip/ElementDec.git
npm run dev
# or
yarn dev
// 启动调试
yarn dev:play
# open http://localhost:8085
```
```shell
npm run dist
```
运行`make new`为新组件创建项目目录。包括测试代码、入门文件和文档。代码样式,只需遵循ElemeFE的ESLint配置即可。
## 创建组件
1. 编写组件代码
2. 为组件创建文档
3. 为组件创建单元测试
### 编写组件
这里以一个hello-world组件为例。效果如下图,接收一个属性name,输出Hello, {undefined{ name }}
1. 在packages下创建hello-world目录,文件结构如下
```
packages
├──hello-world(新增)
│ ├──src(新增)
│ │ └──main.vue(新增)
│ └──index.js(新增)
└──theme
└──chalk
└──src
└──hello-world.scss(新增)
```
3. 在hello-world中创建index.js和src/main.vue
index.js
```js
// index.js
import HelloWorld from './src/main';
/* istanbul ignore next */
HelloWorld.install = function(Vue) {
Vue.component(HelloWorld.name, HelloWorld);
};
export default HelloWorld;
```
src/main.vue 真实项目中写组件一定要构思和确定好,要可以扩展和新增功能,因为后期改动的成本很大,所以 涉及的三大块 props、event 和 slot 要认真思考
其中name跟使用组件有关如果name为 `ElHelloWorld` 则在页面中使用组件的方式为 ``,如果name 为 `WxlHeader` 则使用组件时为``
```vue
export default {
name: 'ElHelloWorld',
props: ['name', 'url'],
// props: {
// name: String,
// url: String
// },
data() {
return {};
}
};
```
3. 在packages/theme-chalk/src下添加 hello-world.scss,之后执行 `yarn build:file` 进行编译生成 css 文件
```css
@charset "UTF-8";
@import "common/var";
@import "mixins/button";
@import "mixins/mixins";
@import "mixins/utils";
@include b(hello-world) {
display: inline-block;
line-height: 1;
white-space: nowrap;
cursor: pointer;
}
```
写好 CSS 样式之后,要执行 `yarn build:file` 命令进行编译生成。注意:`el-`前缀是系统自动添加,无需在样式中添加
4. 在components.json中注册hello-world组件
```shell
"hello-world": "./packages/hello-world/index.js"
```
### 添加文档
在 examples/docs/zh-CN 下添加 hello-world.md
在 examples/nav.config.json 中注册 对应的就是官方文档:组件/左侧列表 按照自上而下顺序存储,注册时要几种语言都要注册以便在不同语言下都能显示
```
// 页面中引入指令名称,同组件名称一致
你好世界
```
### 添加测试
在test/unit/specs下创建hello-world.spec.js
```js
import {createTest} from '../util';
import HelloWorld from 'packages/hello-world/index';
describe.only('test HelloWorld', () => {
const name = '测试hello-world组件';
const vm = createTest(HelloWorld, {
name
}, true);
it('there should be .hello-world', () => {
expect(vm.$el.classList.contains('hello-world')).to.be.true;
});
it('should contains name', () => {
expect(vm.$el.textContent).to.contains(name);
});
});
```
`npm run test:watch` 运行
因为单元测试太多了,我们只想测试自己的组件,所以上面的测试我加了only,这样就只会跑这个测试了,等开发完组件,要把这个干掉的。
## 测试
### 在文档中进行测试
1. 可以在文档中 examples/docs/zh-CN/hello-world.md 中添加代码段直接使用组件进行测试,如果样式没有出来或者没有被解析,可能是组件书写存在错误的地方
```html
我是新组件 hello-world 插槽内容
export default {
data() {
return {
}
},
methods: {
onSubmit() {
console.log('submit!');
}
}
}
```
2. 执行 `npm run dev` 命令,启动项目,过程较慢要有耐心
3. 打开 `http://localhost:8085/#/zh-CN/` 文档主页,并切换到 `组件` 菜单,打开 `HelloWorld 你好世界` 组件页面,可观察到效果(完整路径为:http://localhost:8085/#/zh-CN/component/hello-world)
### 管方提供测试方式
在 `examples/play/index.vue` 中测试
> 修改 `examples/play/index.vue` 文件, 在页面中直接使用你自定义的组件, 然后运行`npm run dev:play`,访问 [http://localhost:8085](http://localhost:8085), 获取运行结果,这种方式启动更快更友好.
```vue
我是新组件 hello-world 插槽内容
export default {
data() {
return {
input: 'Hello Element UI!'
};
}
};
```
### 本地环境测试
将项目通过 `npm run dist` 命令进行打包,将在根目录生成的 lib 文件,替换掉项目中的 `node_modules\element-ui\lib` 文件,重启项目即可直接在项目中使用并调试新增组件。(本测试方法及 `npm run dist` 命令存在的问题,在下面打包环节有有介绍)
## 样式
### 基本说明
- element 样式用的是 sass, 文件后缀为 `scss`,样式文件存放路径为 `packages/theme-chalk/src` 样式名称为各组件名称,例如:hello-world.scss
- 公共样式配置是在 `packages/theme-chalk/src/common/var.scss` 文件中,包含色彩、背景色、边框以及其他组件的公共样式的配置。
- mixins 变量配置文件:`packages/theme-chalk/src/mixins/config.scss`,其中,样式前缀 `el` 的配置也在其中
- mixins 函数配置文件:`packages/theme-chalk/src/mixins/mixins.scss`,sass 的 mixin 函数可以在该文件中进行定义
element的样式:
```scss
@include when(disabled) {
.el-input__inner {
background-color: $--input-disabled-fill;
border-color: $--input-disabled-border;
color: $--input-disabled-color;
cursor: not-allowed;
&::placeholder {
color: $--input-disabled-placeholder-color;
}
}
.el-input__icon {
cursor: not-allowed;
}
}
```
在看下最后编译的class命名:
```css
.el-input--medium .el-input__inner {
height: 36px;
line-height: 36px;
}
.el-input--suffix .el-input__inner {
padding-right: 30px;
}
```
可以看出命名规则是BEM 命名规范( [了解更多](https://zhuanlan.zhihu.com/p/33188830) )B(代表块)__E(代表元素)--M(代表修饰符)
### 样式前缀
`el-` 前缀所在配置文件路径 `packages/theme-chalk/src/mixins/config.scss` 部分样式是直接写在scss中写死的,部分是通过 `packages/theme-chalk/src/mixins/mixins.scss` 中的 b 函数更改的
为了避免之前 Element 原有样式出问题,最好是新增一个函数和前缀配置,进行更改新增css代码部分的前缀。保证原有组件的写法与样式使用Element的规范,新增组件启用自己定义的规范,以便向前兼容。
### 色调
全局色调配置文件路径 `packages/theme-chalk/src/common/var.scss` 在该文件中可以配置包括但不限于:
主要品牌色:primary
背景色:white、black、primary-light-1...(1-9)...primary-light-9
辅助功能场景色:success(成功)、warning(警告)、danger(危险)、info(信息)、success-light、warning-light、danger-light、info-light、success-lighter、warning-lighter、danger-lighter、info-lighter
其他还有 文本色、边框色等,各组件基础样式也是在该文件中进行配置
### 主题
主题主页所在路径为:`examples/pages/zh-CN/theme.vue`,访问路径为 `http://localhost:8085/#/zh-CN/theme`\
单个主题编辑页面:`examples/pages/zh-CN/theme-preview.vue` 访问路径 `http://localhost:8085/#/zh-CN/theme/preview`,该页面由以下几部分组成:
- `examples/components/theme/basic-tokens-preview.vue` 页面左侧区域 第一屏组件展示包括 Color && Typography
- `examples/components/theme/components-preview.vue` 页面左侧区域 第二屏及更多组件展示
- `examples/components/theme-configurator/index.vue` 页面右侧区域-属性配置器
```
components:主题及主题编辑器相关页面
├──theme // 主题页面相关
│ ├──loader
│ ├──basic-tokens-preview.vue 页面左侧区域 第一屏组件展示包括 Color && Typography
│ ├──color.js
│ ├──components-preview.vue 页面左侧区域 第二屏及更多组件展示
│ ├──constant.js
│ ├──localstorage.js
│ ├──theme-card.vue 主题页面遍历的 主题card 模板,如:官方主题、我的主题
│ ├──theme-list.js
│ └──utils.js
├──theme-configurator // 主题编辑器相关
│ ├──editor
│ ├──utils
│ ├──action.vue 属性编辑器头部工具栏 包括撤销、重做、重置、下载、选择组件
│ ├──index.vue 页面右侧区域-属性配置器
│ ├──main.vue
│ └──shortcut.vue
├──demo-block.vue
├──footer.vue
├──footer-nav.vue
├──header.vue
├──search.vue
├──side-nav.vue
└──theme-picker.vue
```
通过分析该页面可知,主题页面遍历的主题card模板所在路径为:`examples/components/theme/theme-card.vue`,而页面展示的主题数据配置文件路径在 `examples/components/theme/theme-list.js`
`examples/components/theme/loader/api.js` 配置主题 or 获取主题 同服务器交互文件
`examples/components/theme/loader/ajax.js` 官方封装的 Ajax 用于主题的配置和获取
因为主题配置,官网是通过服务器请求完成的,所以本地下载的源码是不能使用的,要自己建立服务器或者在前端增加这部分功能。
页面编辑器\
`examples/components/theme-configurator/index.vue` 主题配置页面,默认配置也在该页面中,样式编辑器触发的方法为 userConfigChange 可以在该方法中获取到变动的数据的键值对,并 调用 updateVariable 接口方法
`examples/components/theme-configurator/main.vue` 左侧区域
`examples/components/theme-configurator/action.vue` 右侧编辑区域
`examples/components/theme/loader/index.vue` updateVars 提交变更的配置值作为参数并请求返回改变后的css样式值(即新的主题),用于改变页面样式
`examples/components/theme/loader/index.vue` 下载调用的方法也在该页面
服务器部分?
- getVariable 方法\
`https://element-api.ele.me/element/theme/getVariable?version=2.15.7` 获取默认主题样式
- updateVars\
`https://element-api.ele.me/element/theme/updateVariable?version=2.15.7` 传递参数为 global 返回结果为css,当初传
```
// 改变配置时参数 结果:返回css样式
{
"global": {
"$--color-primary": "#47CBC2"
},
"local": {}
}
// 下载的时候的参数 "download": true 结果:下载文件
{
"global": {
"$--color-primary": "#0BE109"
},
"local": {},
"download": true
}
```
通过访问以下链接 `//unpkg.com/element-ui@${version}/lib/theme-chalk/index.css` 可获得不同版本的主题样式,本项目使用的是 2.15.7 版本,`https://unpkg.com/element-ui@2.15.7/lib/theme-chalk/index.css`
通过 theme-chalk-preview 将配置的css样式进行重新生成,并写入到文档页面的head中,以改变文档的主题样式,并提供下载功能,可供项目组下载直接在项目中引入,以改变主题颜色。通过该方法可切断同服务器的交互,使得主题配置服务全部由前端提供。
http://github.com/ElementUI/theme-chalk-preview/archive/refs/heads/master.zip
https://segmentfault.com/a/1190000009762198#articleHeader2
思路:\
1. 先把默认主题文件中涉及到颜色的 CSS 值替换成关键词
2. 根据用户选择的主题色生成一系列对应的颜色值
3. 把关键词再换回刚刚生成的相应的颜色值
4. 直接在页面上加 style 标签,把生成的样式填进去
## 组件
1. 修改组件安装前缀
```
我是新组件 hello-world 插槽内容
// 转换成
我是新组件 hello-world 插槽内容
```
```
// 需要将 组件的 name 属性由 ElHelloWorld 改为 MtiHelloWorld
export default {
name: 'ElHelloWorld',
props: {
name: String,
url: String
},
data() {
return {};
}
};
// 修改后
export default {
name: 'MtiHelloWorld',
props: {
name: String,
url: String
},
data() {
return {};
}
};
```
## 打包
使用以下命令打包:
```shell
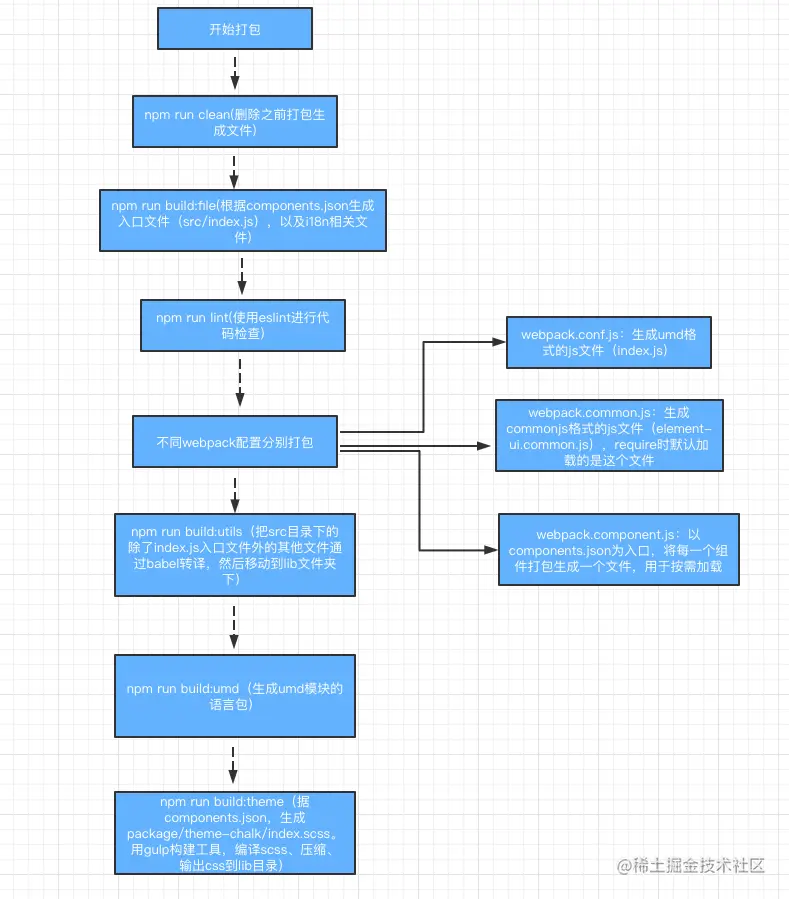
"dist": "npm run clean && npm run build:file && npm run lint && webpack --config build/webpack.conf.js && webpack --config build/webpack.common.js && webpack --config build/webpack.component.js && npm run build:utils && npm run build:umd && npm run build:theme"
```
直接执行 `npm run dist` 命令会卡在 webpack 打包这一步执行不下去,将命令拆分开,单独执行就可以。该命令生成的文件均在根目录下的 `lib` 文件夹下
```shell
npm run clean && npm run build:file && npm run lint
webpack --config build/webpack.conf.js
webpack --config build/webpack.common.js
webpack --config build/webpack.component.js
npm run build:utils && npm run build:umd && npm run build:theme
```
- `npm run clean` 清空 lib 文件夹
- `npm run build:file`
- `npm run lint` 使用 Eslint 检查代码
- `webpack --config build/webpack.conf.js` 打包生成入口文件 `index.js`
- `webpack --config build/webpack.common.js` 打包生成 `element-ui.common.js` 文件
- `webpack --config build/webpack.component.js` 打包生成各组件单独的文件,便于按需加载使用
- `npm run build:utils` 生成 lib 下的 directives、locale、mixins、theme-chalk、transitions、utils
- `npm run build:umd` 生成 lib 下的 umd 文件夹。
- `npm run build:theme` 生成 lib 下的 theme-chalk
对已打包文件进行测试,可以将打包好的文件,替换掉项目中的 `node_modules\element-ui\lib` 文件,重启项目即可直接在项目中使用并调试新增组件。
发布的包(即项目中下载的 node_modules\element-ui 目录下的文件)的目录结构如下:
```
wxl-ui
├──lib // 通过 dist 命令打包生成的文件夹
├──packages // 组件源码包
├──src // 入口文件和一些工具辅助函数
├──types // TS 类型声明文件
├──CHANGELOG.en-US.md
├──CHANGELOG.es.md
├──CHANGELOG.fr-FR.md
├──CHANGELOG.zh-CN.md
├──LICENSE // 开源许可证
├──package.json // npm 核心包管理文件
└──README.md // 说明文档
```
### 打包流程
## 发布
1. 注册 npm 账号
2. 打包文件,将打包文件上传
[comment]: <> (1.打包之后的 lib/element-ui.common.js 文件中 引用的 element-ui路径跟新,创建的npm包名不一致,需要替换更改)
[comment]: <> (2. 组件 cascader-panel.js 中引入的其他包的路径 也为 element-ui)
[comment]: <> (./node_modules/wxl-ui/lib/cascader-panel.js)
[comment]: <> (Module not found: Error: Can't resolve 'element-ui/lib/checkbox' in 'D:\www\wxl\node_modules\wxl-ui\lib')
[comment]: <> (3.组件 select.js 同上16处)
[comment]: <> (./node_modules/wxl-ui/lib/select.js)
[comment]: <> (Module not found: Error: Can't resolve 'element-ui/lib/input' in 'D:\www\wxl\node_modules\wxl-ui\lib')
[comment]: <> (4.组件 input-number.js 同上5处)
[comment]: <> (./node_modules/wxl-ui/lib/input-number.js)
[comment]: <> (Module not found: Error: Can't resolve 'element-ui/lib/input' in 'D:\www\wxl\node_modules\wxl-ui\lib')
[comment]: <> (8.lib/input.js 同上8处)
[comment]: <> (./node_modules/wxl-ui/lib/input.js)
[comment]: <> (Module not found: Error: Can't resolve 'element-ui/lib/mixins/emitter' in 'D:\www\wxl\node_modules\wxl-ui\lib')
[comment]: <> (9.lib/checkbox.js 同上2处)
[comment]: <> (./node_modules/wxl-ui/lib/checkbox.js)
[comment]: <> (Module not found: Error: Can't resolve 'element-ui/lib/mixins/emitter' in 'D:\www\wxl\node_modules\wxl-ui\lib')
[comment]: <> (10.lib/checkbox-group.js 同上2处)
[comment]: <> (./node_modules/wxl-ui/lib/checkbox-group.js)
[comment]: <> (Module not found: Error: Can't resolve 'element-ui/lib/mixins/emitter' in 'D:\www\wxl\node_modules\wxl-ui\lib')
[comment]: <> (11.lib/option.js 同上4处)
[comment]: <> (./node_modules/wxl-ui/lib/option.js)
[comment]: <> (Module not found: Error: Can't resolve 'element-ui/lib/mixins/emitter' in 'D:\www\wxl\node_modules\wxl-ui\lib')
[comment]: <> (12.lib/radio.js 同上2处)
[comment]: <> (./node_modules/wxl-ui/lib/radio.js)
[comment]: <> (Module not found: Error: Can't resolve 'element-ui/lib/mixins/emitter' in 'D:\www\wxl\node_modules\wxl-ui\lib')
[comment]: <> (13.lib/scrollbar.js 同上8处)
[comment]: <> (./node_modules/wxl-ui/lib/scrollbar.js)
[comment]: <> (Module not found: Error: Can't resolve 'element-ui/lib/utils/dom' in 'D:\www\wxl\node_modules\wxl-ui\lib')
[comment]: <> (14.lib/tooltip.js 同上6处)
[comment]: <> (./node_modules/wxl-ui/lib/tooltip.js)
[comment]: <> (Module not found: Error: Can't resolve 'element-ui/lib/utils/dom' in 'D:\www\wxl\node_modules\wxl-ui\lib')
[comment]: <> (15.lib/popover.js 同上6处)
[comment]: <> (./node_modules/wxl-ui/lib/popover.js)
[comment]: <> (Module not found: Error: Can't resolve 'element-ui/lib/utils/dom' in 'D:\www\wxl\node_modules\wxl-ui\lib')
[comment]: <> (5.lib/mixins/locale.js 同上1处)
[comment]: <> (./node_modules/wxl-ui/lib/mixins/locale.js)
[comment]: <> (Module not found: Error: Can't resolve 'element-ui/lib/locale' in 'D:\www\wxl\node_modules\wxl-ui\lib\mixins')
[comment]: <> (23.lib/mixins/migrating.js 同上2处)
[comment]: <> (./node_modules/wxl-ui/lib/mixins/migrating.js)
[comment]: <> (Module not found: Error: Can't resolve 'element-ui/lib/utils/util' in 'D:\www\wxl\node_modules\wxl-ui\lib\mixins')
[comment]: <> (6.lib/utils/date-util.js 同上2处)
[comment]: <> (./node_modules/wxl-ui/lib/utils/date-util.js)
[comment]: <> (Module not found: Error: Can't resolve 'element-ui/lib/locale' in 'D:\www\wxl\node_modules\wxl-ui\lib\utils')
[comment]: <> (17.lib/utils/clickoutside.js 同上1处)
[comment]: <> (./node_modules/wxl-ui/lib/utils/clickoutside.js)
[comment]: <> (Module not found: Error: Can't resolve 'element-ui/lib/utils/dom' in 'D:\www\wxl\node_modules\wxl-ui\lib\utils')
[comment]: <> (18.lib/utils/popup/index.js 同上2处)
[comment]: <> (./node_modules/wxl-ui/lib/utils/popup/index.js)
[comment]: <> (Module not found: Error: Can't resolve 'element-ui/lib/utils/merge' in 'D:\www\wxl\node_modules\wxl-ui\lib\utils\popup')
[comment]: <> (19.lib/utils/popup/popup-manager.js 同上1处)
[comment]: <> (./node_modules/wxl-ui/lib/utils/popup/popup-manager.js)
[comment]: <> (Module not found: Error: Can't resolve 'element-ui/lib/utils/dom' in 'D:\www\wxl\node_modules\wxl-ui\lib\utils\popup')
[comment]: <> (20.lib/utils/vue-popper.js 同上1处)
[comment]: <> (./node_modules/wxl-ui/lib/utils/vue-popper.js)
[comment]: <> (Module not found: Error: Can't resolve 'element-ui/lib/utils/popup' in 'D:\www\wxl\node_modules\wxl-ui\lib\utils')
[comment]: <> (21.lib/utils/util.js 同上1处)
[comment]: <> (./node_modules/wxl-ui/lib/utils/util.js)
[comment]: <> (Module not found: Error: Can't resolve 'element-ui/lib/utils/types' in 'D:\www\wxl\node_modules\wxl-ui\lib\utils')
[comment]: <> (24.lib/utils/vdom.js 同上1处)
[comment]: <> (./node_modules/wxl-ui/lib/utils/vdom.js)
[comment]: <> (Module not found: Error: Can't resolve 'element-ui/lib/utils/util' in 'D:\www\wxl\node_modules\wxl-ui\lib\utils')
[comment]: <> (7.lib/locale/index.js 同上1处)
[comment]: <> (./node_modules/wxl-ui/lib/locale/index.js)
[comment]: <> (Module not found: Error: Can't resolve 'element-ui/lib/locale/lang/zh-CN' in 'D:\www\wxl\node_modules\wxl-ui\lib\locale')
[comment]: <> (22.lib/locale/format.js 同上1处)
[comment]: <> (./node_modules/wxl-ui/lib/locale/format.js)
[comment]: <> (Module not found: Error: Can't resolve 'element-ui/lib/utils/util' in 'D:\www\wxl\node_modules\wxl-ui\lib\locale')
[comment]: <> (16.lib/transitions/collapse-transition.js 同上1处)
[comment]: <> (./node_modules/wxl-ui/lib/transitions/collapse-transition.js)
[comment]: <> (Module not found: Error: Can't resolve 'element-ui/lib/utils/dom' in 'D:\www\wxl\node_modules\wxl-ui\lib\transitions')
[comment]: <> (在打包的时候修改配置文件 config 中的路径目录)
[comment]: <> (原本就是require 无需转换的无法直接替换 )
[comment]: <> (wxl-ui\lib\mixins\locale.js)
[comment]: <> (/wxl-ui/lib/utils/date-util.js)
[comment]: <> (./node_modules/wxl-ui/lib/locale/index.js)
[comment]: <> (./node_modules/wxl-ui/lib/transitions/collapse-transition.js)
[comment]: <> (./node_modules/wxl-ui/lib/utils/clickoutside.js)
[comment]: <> (./node_modules/wxl-ui/lib/utils/popup/index.js)
[comment]: <> (./node_modules/wxl-ui/lib/utils/popup/popup-manager.js)
[comment]: <> (./node_modules/wxl-ui/lib/utils/vue-popper.js)
[comment]: <> (./node_modules/wxl-ui/lib/utils/util.js)
[comment]: <> (./node_modules/wxl-ui/lib/locale/format.js)
[comment]: <> (./node_modules/wxl-ui/lib/mixins/migrating.js)
[comment]: <> (./node_modules/wxl-ui/lib/utils/vdom.js)
关于打包后 npm 包目录与打包不一致问题,可通过以下三步进行解决:\
这里我设置的 npm 包名为 `wxl-ui`\
1. 更改 webpack 别名映射目录
```
exports.alias = {
main: path.resolve(__dirname, '../src'),
packages: path.resolve(__dirname, '../packages'),
examples: path.resolve(__dirname, '../examples'),
'element-ui': path.resolve(__dirname, '../'),
'mti-ui': path.resolve(__dirname, '../')
};
```
2. 更改打包引入路径为含有包名称的路径
```
Object.keys(Components).forEach(function(key) {
externals[`element-ui/packages/${key}`] = `wxl-ui/lib/${key}`;
});
externals['element-ui/src/locale'] = 'wxl-ui/lib/locale';
utilsList.forEach(function(file) {
file = path.basename(file, '.js');
externals[`element-ui/src/utils/${file}`] = `wxl-ui/lib/utils/${file}`;
});
mixinsList.forEach(function(file) {
file = path.basename(file, '.js');
externals[`element-ui/src/mixins/${file}`] = `wxl-ui/lib/mixins/${file}`;
});
transitionList.forEach(function(file) {
file = path.basename(file, '.js');
externals[`element-ui/src/transitions/${file}`] = `wxl-ui/lib/transitions/${file}`;
});
```
3. 将根目录 src 下的以下文件中 require 路径中的`element-ui` 目录 更改成与你的npm包名一致的目录
```
src/locale/format.js
src/locale/index.js
src/mixins/locale.js
src/mixins/migrating.js
src/transitions/collapse-transition.js
src/utils/popup/index.js
src/utils/popup/popup-manager.js
src/utils/clickoutside.js
src/utils/date-util.js
src/utils/util.js
src/utils/vdom.js
src/utils/vue-popper.js
```
4. 如果不进行第三步的话则每次都需要更改打包后的文件,将打包好的lib下的以下文件中 require 路径中的`element-ui` 目录 更改成与你的npm包名一致的目录
```
lib/mixins/locale.js
lib/utils/date-util.js
lib/locale/index.js
lib/transitions/collapse-transition.js
lib/utils/clickoutside.js
lib/utils/popup/index.js
lib/utils/popup/popup-manager.js
lib/utils/vue-popper.js
lib/utils/util.js
lib/locale/format.js
lib/mixins/migrating.js
lib/utils/vdom.js
```
打包好文件后,按照上面目录将文件复制到 npm 发布文件夹下即可
## 部署文档
使用 `yarn deploy:build` 命令进行编译文档
`"deploy:build": "npm run build:file && cross-env NODE_ENV=production webpack --config build/webpack.demo.js && echo element.eleme.io>>examples/element-ui/CNAME"`
编译成功后可以部署在 Nginx 服务器上进行访问,生成的文档涉及到一些网络资源可以下载到本地进行部署 https://blog.csdn.net/txyzqc/article/details/109700596
- `npm run build:file` 该指令主要用来自动化生成一些文件,详情见上面说明
- `cross-env NODE_ENV=production webpack --config build/webpack.demo.js` 标准的webpack配置文件。这个其实是文档构建的webpack配置
- `echo element.eleme.io>>examples/element-ui/CNAME` ?不明白想做什么?输出目录是examples/element-ui
16.13.0 (Currently using 64-bit executable)
14.17.6
https://github.com/coreybutler/nvm-windows/releases/
Git-2.34.1-64-bit
https://git-scm.com/download/win
## 其他
- Element UI是面向开发人员、设计人员和产品经理的基于Vue 2.0的组件库。\
- 需要node.js4+,因为使用yarn锁定以来版本,所以这里官方推荐使用yarn进行包管理,而不是npm
- 出于兼容性和文件大小的考虑,我们的巴别塔配置只导入了preset-2015,所以不推荐使用ES2015中的Array.Prototype.find和Object.Assign这样的接口。\
- http://localhost:8085
- Element-Plus:[https://github.com/element-plus/element-plus](https://github.com/element-plus/element-plus)
- vue-element-admin:[https://github.com/PanJiaChen/vue-element-admin](https://github.com/PanJiaChen/vue-element-admin)