https://github.com/xavierjiezou/litmnist
Deep learning project template based on PyTorch Lightning and Hydra.
https://github.com/xavierjiezou/litmnist
config deep-leaning hydra image-classification mnist python pytorch pytorch-lightning template yaml
Last synced: 2 months ago
JSON representation
Deep learning project template based on PyTorch Lightning and Hydra.
- Host: GitHub
- URL: https://github.com/xavierjiezou/litmnist
- Owner: XavierJiezou
- License: mit
- Created: 2022-05-06T05:46:09.000Z (over 3 years ago)
- Default Branch: main
- Last Pushed: 2022-05-26T14:42:26.000Z (over 3 years ago)
- Last Synced: 2024-10-11T09:28:33.697Z (12 months ago)
- Topics: config, deep-leaning, hydra, image-classification, mnist, python, pytorch, pytorch-lightning, template, yaml
- Language: Python
- Homepage: https://pypi.org/project/litmnist/
- Size: 3.18 MB
- Stars: 8
- Watchers: 1
- Forks: 3
- Open Issues: 0
-
Metadata Files:
- Readme: README.md
- Changelog: CHANGELOG.md
- License: LICENSE
Awesome Lists containing this project
README
[](https://pixelied.com/editor/design/6282f5970515730397249959)
# LitMNIST
基于 [PyTorch Lightning](https://github.com/PyTorchLightning/pytorch-lightning) + [Hydra](https://github.com/facebookresearch/hydra) 的深度学习项目模板。
*(以 [MNIST](http://yann.lecun.com/exdb/mnist/) 分类任务为例)*
点击 [Use this template](https://github.com/XavierJiezou/LitMNIST/generate) 即可使用该模板来初始化你的新仓库。


喜欢这个项目吗?请考虑捐赠([微信](https://raw.githubusercontent.com/XavierJiezou/ys-dl/main/image/wechat.jpg) | [支付宝](https://raw.githubusercontent.com/XavierJiezou/ys-dl/main/image/alipay.jpg)),以帮助它改善!
## 目录
LitMNIST
- [演示](#演示)
- [安装](#安装)
- [运行](#运行)
- [结构](#结构)
- [用法](#用法)
- [基础](#基础)
- [进阶](#进阶)
- [提示](#提示)
- [更新](#更新)
- [证书](#证书)
- [参考](#参考)
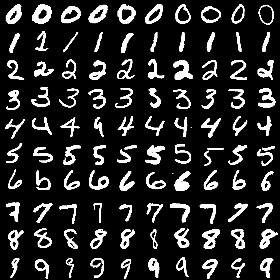
## 演示
## 安装
> 开始之前,你必须熟练使用 [PyTorch Lightning](https://www.pytorchlightning.ai/),并对 [Hydra](https://hydra.cc/) 有一定的了解。
1. 克隆仓库到本地
```bash
git clone https://github.com/XavierJiezou/LitMNIST.git
cd LitMNIST
```
2. 创建并激活 conda 虚拟环境
```bash
conda create -n myenv python=3.8
conda activate myenv
```
3. 安装项目依赖包(如需安装 GPU 版 PyTorch,请参考[官网安装教程](https://pytorch.org/get-started/))
```bash
pip install -r requirements.txt
```
## 运行
### CPU
```bash
python train.py
```
### GPU
```bash
python train.py \
trainer.gpus=4 \
+trainer.strategy=ddp_find_unused_parameters_false \
datamodule.num_workers=16 \
datamodule.pin_memory=True \
datamodule.persistent_workers=True
```
## 结构
项目的主要目录结构如下:
```bash
├── configs # 存放 Hydra 配置文件
│ ├── callbacks # Callbacks 配置(例如 EarlyStopping、ModelCheckpoint 等)
│ ├── datamodule # Datamodule 配置(例如 batch_size、num_workers 等)
│ ├── debug # 调试配置
│ ├── experiment # 实验配置
│ ├── hparams_search # 超参数搜索配置
│ ├── local # 本地配置(暂时可以忽略)
│ ├── log_dir # 日志存放目录配置
│ ├── logger # 日志配置
│ ├── model # 模型配置
│ ├── trainer # Trainer 配置
│ │
│ ├── test.yaml # 测试的主要配置
│ └── train.yaml # 训练的主要配置
│
├── data # 存放项目数据
│
├── logs # 存放项目日志(Hydra 日志 和 PyTorch Lightning loggers 生成的日志)
│
├── src # 项目源代码
│ ├── datamodules # LightningDataModule
│ ├── models # 存放基于原生 PyTorch 框架编写的模型
│ ├── litmodules # LightningModule
│ ├── utils # 存放一些实用的脚本(例如数据预处理的脚本)
│ │
│ ├── testing_pipeline.py # 测试流水线(实例化对象)
│ └── training_pipeline.py # 训练流水线(实例化对象)
│
├── tests # 单元测试(可选)
│
├── test.py # 开始测试(加载配置文件)
├── train.py # 开始训练(加载配置文件)
│
├── .env # 存储私有环境变量(例如 wandb 的 API_KEY)【注意:该文件不受版本控制】
├── .gitignore # 设置版本控制需要排除的文件或目录(例如 .env 文件)
├── requirements.txt # 项目依赖环境(pip install -r requirements.txt)
└── README.md # 项目概述文档
```
## 用法
本仓库是一个基于 [PyTorch Lightning](https://github.com/PyTorchLightning/pytorch-lightning) + [Hydra](https://github.com/facebookresearch/hydra) 的深度学习项目模板。因此你仅需要套用该模板,并作出如下修改:
1. 编写你自己的 PyTorch `nn.Module` 模型(参见 [src/models/simple_densenet.py](/src/models/simple_densenet.py))
2. 编写你自己的 PyTorch Lightning `LightningModule`(参见 [src/litmodules/mnist_litmodule.py](/src/litmodules/mnist_litmodule.py))
3. 编写你自己的 PyTorch Lightning `LightningDataModule`(参见 [src/datamodules/mnist_datamodule.py](/src/datamodules/mnist_datamodule.py))
4. 编写你自己的实验配置文件(参见 [configs/experiment/example.yaml](/configs/experiment/example.yaml))
5. 使用选定的实验配置运行训练代码:`python train.py experiment=`
### 基础
[train.py](/train.py) 集成了模型**训练**、**验证**及**测试**的一整套工作流,安装好环境后,运行即可:
```bash
python train.py
```
[test.py](/test.py) 仅包含**测试**步骤,允许你单独加载预训练模型进行测试(但要指定模型路径):
```bash
python test.py ckpt_path=checkpoints/last.ckpt
```
### 进阶
- 从命令行覆盖任何配置参数
> Hydra 允许你轻松覆盖配置文件中定义的任何参数。
`train.py` 默认从 [configs/train.yaml](configs/train.yaml) 中获取参数。因此,你可以先修改 `yaml` 配置文件中的参数,然后再运行。
或者,你也可以在命令行中直接指定参数。命令行中参数的优先级要大于 `yaml` 配置文件中参数的优先级。
```bash
python train.py trainer.max_epochs=3
```
对于某些不太重要的参数,它们没有在 `yaml` 配置文件中定义,因此你在命令行中指定的时候必须添加 `+`:
```bash
python train.py +trainer.precision=16
```
- 在 CPU、GPU、多 GPU 和 TPU 上训练
> PyTorch Lightning 使得在不同硬件上训练模型变得容易。
在 CPU 上训练
```bash
python train.py trainer.gpus=0
```
在 GPU 上训练
```bash
python train.py trainer.gpus=1
```
在 TPU 上训练
```bash
python train.py +trainer.tpu_cores=8
```
基于 DDP(Distributed Data Parallel,分布式数据并行)的训练【4 个 GPU】
```bash
python train.py trainer.gpus=4 +trainer.strategy=ddp
```
基于 DDP(Distributed Data Parallel,分布式数据并行)的训练【8 个 GPU,两个节点】
```bash
python train.py trainer.gpus=4 +trainer.num_nodes=2 +trainer.strategy=ddp
```
- 混合精度训练
> PyTorch Lightning 允许你使用半精度或混合精度以减少训练期间的内存占用。(在 GPU 上能够实现 3 倍的加速效果,但可能损失精度)
```bash
python train.py trainer.gpus=1 +trainer.precision=16
```
- 使用 PyTorch Lightning 中的日志记录器来记录训练日志
> PyTorch Lightning 集成了多种主流日志记录框架,包括 TensorBoard 和 Weights&Biases等。
这里以 [wandb](https://wandb.ai/) 为例,展示如何使用:
1. 安装 `wandb`
```bash
pip install wandb
```
2. 转到 [wandb.ai/authorize](https://wandb.ai/authorize) 获取 **API key**
3. 执行 `login` 命令(需要用到上一步获取的 **API key**)
```bash
wandb login
```
4. 在 [configs/logger/](/configs/logger/) 目录下新建一个名为 `wandb.yaml` 的文件,并写入以下内容
```yaml
wandb:
_target_: pytorch_lightning.loggers.wandb.WandbLogger
project: "mnist"
```
5. 执行训练代码的时候指定 `logger` 为 `wandb`
```bash
python train.py logger=wandb
```
- 根据自定义实验配置来训练模型
> 配置文件见 [configs/experiment/](/configs/experiment/)
```bash
python train.py experiment=example
```
- 带回调函数的训练
> 配置文件见 [configs/callbacks/](/configs/callbacks/)
```python
python train.py callbacks=default
```
- 使用 Pytorch Lightning 中的训练策略
> 点击[这里](https://pytorch-lightning.readthedocs.io/en/latest/common/trainer.html)了解 Pytorch Lightning 中的各种训练策略
梯度裁剪来避免梯度爆炸
```bash
python train.py +trainer.gradient_clip_val=0.5
```
随机加权平均可以使您的模型更好地泛化
```bash
python train.py +trainer.stochastic_weight_avg=true
```
梯度累积
```bash
python train.py +trainer.accumulate_grad_batches=10
```
- 轻松调试
> 配置文件见 [configs/debug/](/configs/debug/)
默认调试模式(运行 1 个 epoch)
```bash
python train.py debug=default
```
仅对 test epoch 进行调试
```bash
python train.py debug=test_only
```
执行一次 train,val 和 test 步骤(仅使用 1 个 batch)
```bash
python train.py +trainer.fast_dev_run=true
```
训练完成后打印各个阶段的执行时间(用于快速发现训练瓶颈)
```bash
python train.py +trainer.profiler="simple"
```
- 断点续训
```bash
python train.py trainer.resume_from_checkpoint="/path/to/name.ckpt"
```
- 一次执行多个实验
例如,下方代码将按顺序运行所有参数组合(共 6 个)的实验。
```bash
python train.py -m datamodule.batch_size=32,64,128 litmodule.lr=0.001,0.0005
```
此外,你也可以执行 [/configs/experiment/](/configs/experiment/) 目录下的的所有实验
```bash
python train.py -m 'experiment=glob(*)'
```
- 使用 Optuna 进行超参数搜索
> [Optuna Sweeper plugin | Hydra](https://hydra.cc/docs/next/plugins/optuna_sweeper/)
1. 安装 **hydra-optuna-sweeper** 插件
```bash
pip install hydra-optuna-sweeper
```
2. 修改 [configs/hparams_search/](/configs/hparams_search/) 目录下的配置文件
3. 执行训练代码的时候指定 `hparams_search`
```bash
python train.py -m hparams_search=mnist_optuna
```
- 使用 Tab 键智能提示可选配置参数
> [Tab completion | Hydra](https://hydra.cc/docs/tutorials/basic/running_your_app/tab_completion/)
```bash
$ eval "$(python train.py -sc install=bash)" # 安装
$ python train.py logger= # 按下 Tab 键后会智能提示有哪些可选参数
logger=comet logger=csv logger=many_loggers logger=mlflow logger=neptune logger=tensorboard logger=wandb
```
## 提示
- 在 `.env` 文件中设置私有环境变量
1. 例如,你可以将 [comet](https://www.comet.ml/) 的 **API Key** 添加到 `.env` 文件中
```bash
COMET_API_KEY="xxx"
```
2. 并在配置文件 [configs/logger/comet.yaml](/configs/logger/comet.yaml) 中进行调用
```yaml
comet:
_target_: pytorch_lightning.loggers.comet.CometLogger
api_key: ${oc.env:COMET_API_KEY}
```
3. 在训练的时候指定 `logger` 参数为 `comet`
```bash
python train.py logger=comet
```
注意:`.env` 文件不应受版本控制,因此我们已将其添加到 `.gitignore` 文件中了。
- 使用 [torchmetrics](https://github.com/PytorchLightning/metrics) 计算指标
推荐使用 PytorchLightning 官方提供的 [torchmetrics](https://github.com/PytorchLightning/metrics) 库来计算指标(像准确率,F1 score 和混淆矩阵等)。这对于多 GPU 训练尤为重要!并且,推荐对每个步骤使用不同的指标实例,以确保所有 GPU 进程都有正确的累积值。下面给出了一个简单示例。
```python
from torchmetrics.classification.accuracy import Accuracy
class LitModel(LightningModule):
def __init__(self)
self.train_acc = Accuracy()
self.val_acc = Accuracy()
def training_step(self, batch, batch_idx):
...
acc = self.train_acc(predictions, targets)
self.log("train/acc", acc)
...
def validation_step(self, batch, batch_idx):
...
acc = self.val_acc(predictions, targets)
self.log("val/acc", acc)
...
```
- 可以使用 [DVC](https://github.com/iterative/dvc) 对数据和模型这些大文件进行版本控制
```bash
dvc init
dvc add data/MNIST
git add data/MNIST.dvc data/.gitignore
git commit -m "Add raw data"
```
## 更新
见 [CHANGELOG.md](/CHANGELOG.md)
## 证书
[MIT License](/License)
## 参考
此模板引用了以下仓库并进行了一些细微的修改。
[](https://github.com/ashleve/lightning-hydra-template)