https://github.com/xmaman/soundengineexamples
Demoapplication for XMAMan.SoundEngine-NuGet-Package
https://github.com/xmaman/soundengineexamples
Last synced: about 1 year ago
JSON representation
Demoapplication for XMAMan.SoundEngine-NuGet-Package
- Host: GitHub
- URL: https://github.com/xmaman/soundengineexamples
- Owner: XMAMan
- Created: 2025-04-17T08:28:50.000Z (about 1 year ago)
- Default Branch: main
- Last Pushed: 2025-04-17T10:12:40.000Z (about 1 year ago)
- Last Synced: 2025-05-18T11:09:54.355Z (about 1 year ago)
- Language: C#
- Size: 8.23 MB
- Stars: 0
- Watchers: 1
- Forks: 0
- Open Issues: 0
-
Metadata Files:
- Readme: readme.md
Awesome Lists containing this project
README
# SoundEngine-Examples
This project shows how to use the XMAMan.SoundEngine-NuGet-Package.
The XMAMan.SoundEngine-NuGet-Package can be used for creating sounds in your games, for creating a audiorecorder or creating a audioplayer.
* Usecases if you want to create a game:
* case 1: playing backgroundmusic. Example: [marioUnderground.mp3](https://github.com/XMAMan/SoundEngineExamples/raw/refs/heads/main/Data/SoundExamples/marioUnderground.mp3)
* case 2: play tones that can be held indefinitely and where the frequency is adjustable. Example: [movingDownSound.wma](https://github.com/XMAMan/SoundEngineExamples/raw/refs/heads/main/Data/SoundExamples/movingDownSound.wma)
* case 3: play tones with a predefined length created by a oscillator-signal-source. Example: [hitGroundSound.wma](https://github.com/XMAMan/SoundEngineExamples/raw/refs/heads/main/Data/SoundExamples/hitGroundSound.wma)
* case 4: play a simple mp3/wma/wav-file
* Usecases if you want to create a audiorecorder:
* case 5: use the microphone and change your voice by using effects like hall/delay or sound like a robot. Example: [RobotAndHallEffect.mp3](https://github.com/XMAMan/SoundEngineExamples/raw/refs/heads/main/Data/SoundExamples/RobotAndHallEffect.mp3)
* Usecases if you want to create a audioplayer:
* case 6: play a audiofile and visualize the frequency bands
To use this NuGet-Package, you need the MusicMachine-editor where you define your songs. This editor can be found here: [MusicMachine.exe](https://github.com/XMAMan/SoundEngineExamples/tree/main/MusicMachine)
This editor is needet for creating *.music-files, which can be used from the XMAMan.SoundEngine-NuGet-Package for playing music.
The project from here contains three wpf-projects to show how to use all cases. For case 1 to 4 there is the AudioOutput-project which looks like this:
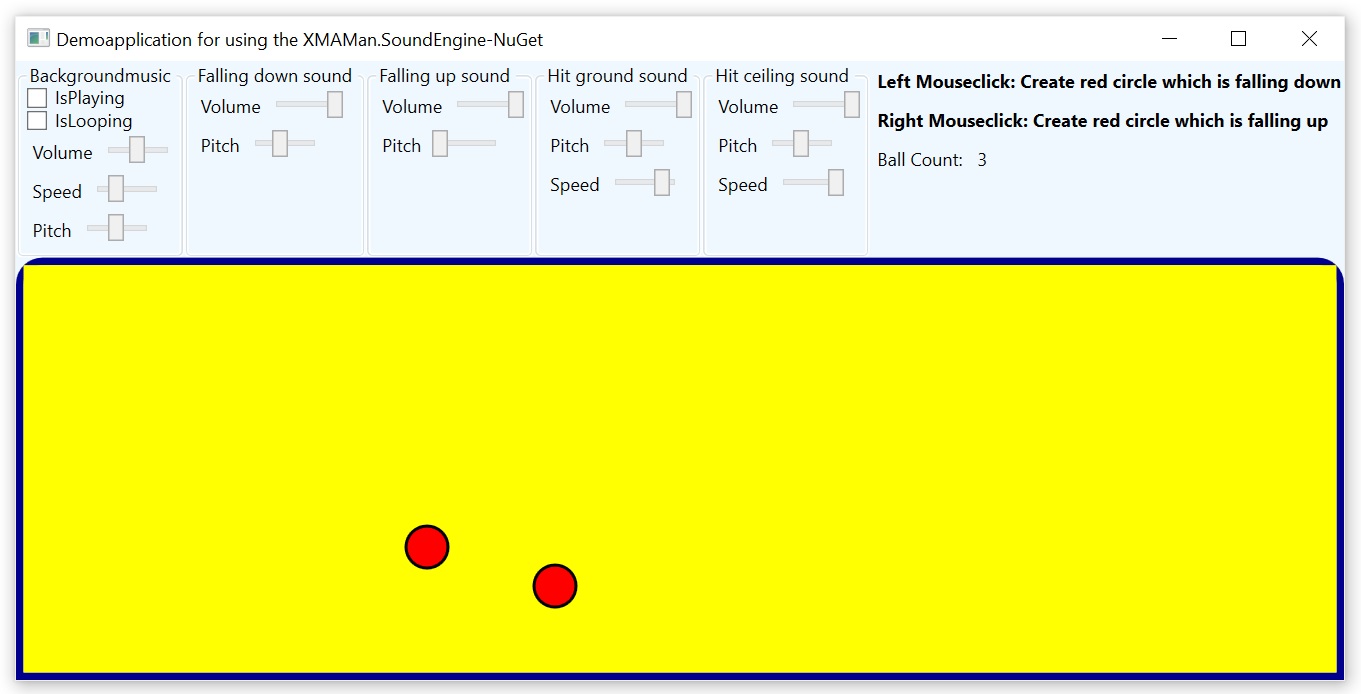
You can create with the mouse red balls, which are moving up or down and creating sounds during this.
For case 5 there is the AudioInput-project: 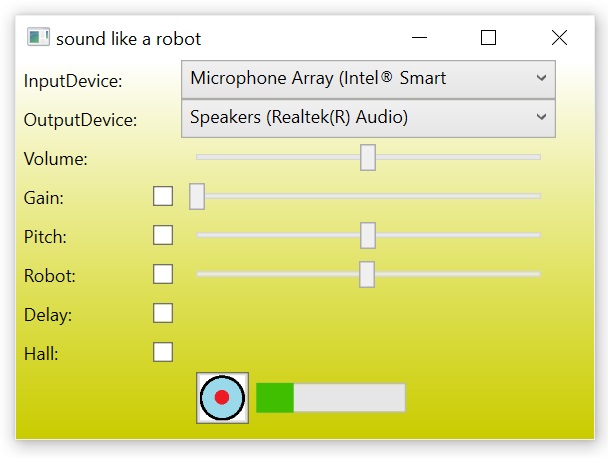
and case 6 is shown by the AudioPlayer-project: 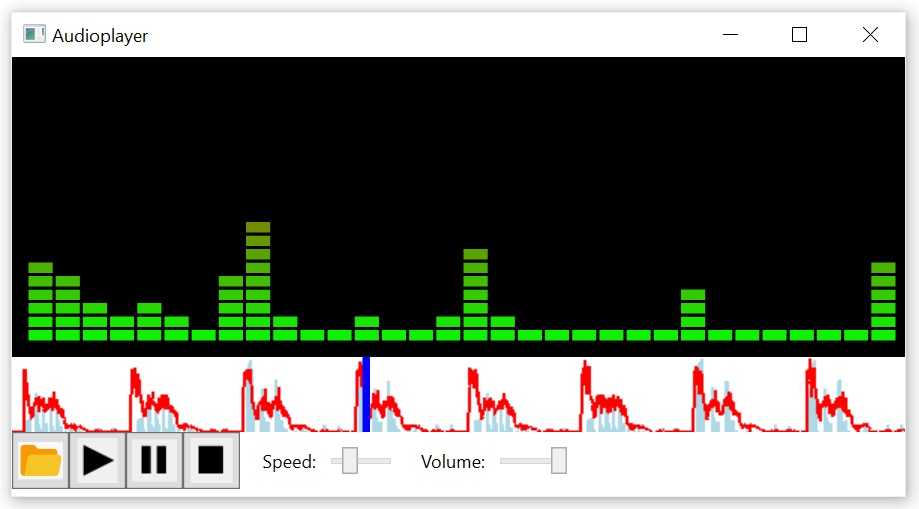
which can play and visualize an audiofile.
# Usecases if you want to create a game
## Case 1: playing backgroundmusic
### Case 1 Step 1: Define the backgroundmusic in the MusicMachine-Editor to create a *.music-file
If you want to play background music, then you can use a midi File as starting point and modify this file or you create your own songs by defining the notes and instruments by your own.
In our case we want to use a midiFile as starting-point and modify this file.
Download the midiFile from this exampleproject from here and save it in a local folder on your system: [Super Mario Galaxy - Retro Theme 2.mid](https://github.com/XMAMan/SoundEngineExamples/raw/refs/heads/main/Data/Super%20Mario%20Galaxy%20-%20Retro%20Theme%202.mid)
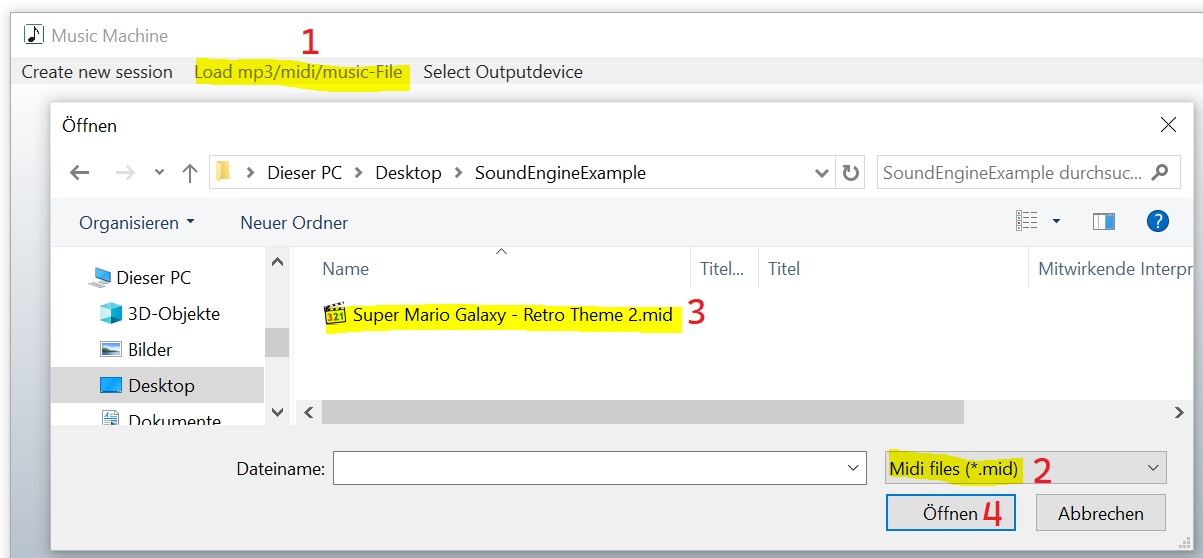
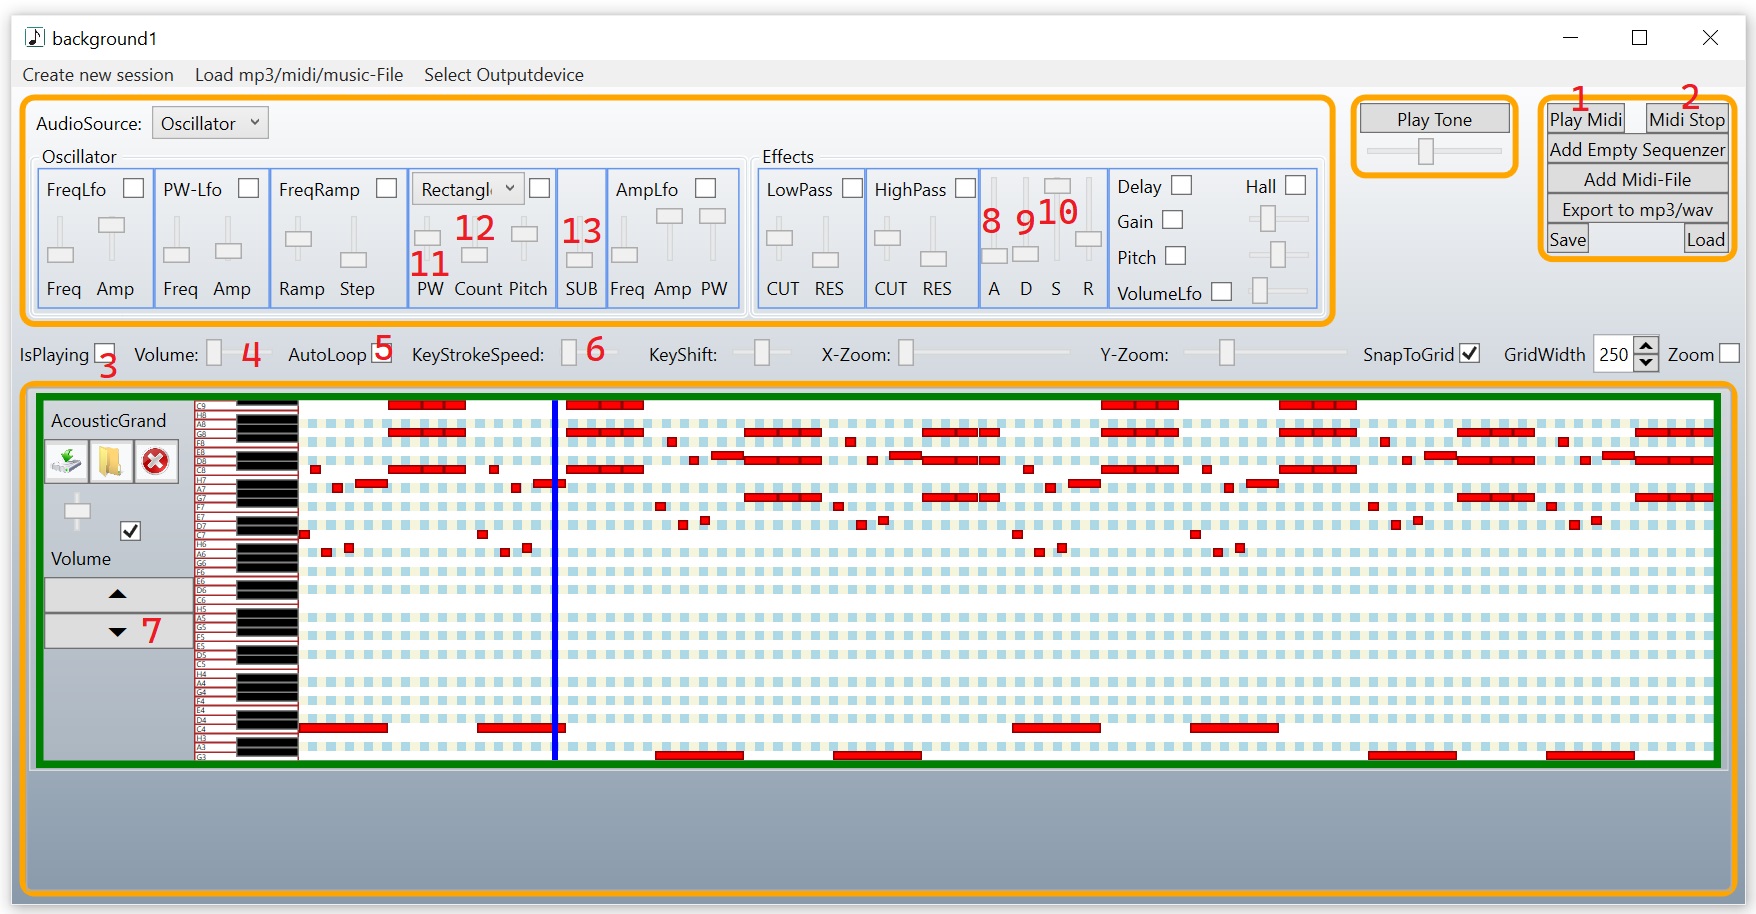
Start at first the MusicMachine.exe and click in the contextbar on "Load mp3/midi/music-File" (1), select *.mid as filetype (2), select the mid-file(3) and click on open (4).
The red rectangles are the notes from this song. You can here the original-midi-sound by pressing the "Play Midi"-Button (see (1) in the image). With (2) you stop the original-midi-output.
With the "IsPlaying"-checkbox (3) you start the playback by using the synthesizer. (4) will change the volume. Durring the playback you see that the blue line is moving forward. This is the actual
playposition. If you activate the AutoLoop-checkbox (5), then the blue line will jump automatically to the start if it reached the end of the song.
This is your music-file after loading the mid-file: [background1.music](https://github.com/XMAMan/SoundEngineExamples/raw/refs/heads/main/Data/background1.music)
The speed from this song is slow so we increase the KeyStrokeSpeed with the slider (6) a little bit. Also the pitch from the song is very high so we will bring it down by 4 octaves by pressing
button (7) 4 times.
This two changes produces a song that sounds like this: [background2.mp3](https://github.com/XMAMan/SoundEngineExamples/raw/refs/heads/main/Data/SoundExamples/background2.mp3)
This is your music-file after KeyStrokeSpeed-increase and octave-shift: [background2.music](https://github.com/XMAMan/SoundEngineExamples/raw/refs/heads/main/Data/background2.music)
The next change will be the keydown-speed from a single Piano Key Press. Move the AttackTime-Slider (8) completly down and the Decay-Time-Slider (9) is only a little bit over zero. This two
changes will increase the keydown-speed. The next change is the sustain volume-change by moving slider (10) down. This ensures that the sound is less sustained.
We are using a rectangle-signal at the moment. With the pulsewidth-slider (11) can we change the form from this signal. If we move this slider a little bit up then it sounds better.
The Count-Slider (12) defines, how many rectangle-signals are used. Move this slider down so we are only using one signal-source. Increase a little bit the SUB-Slider (13). This will add a second
rectangle-signalsource but with a lower pitch. This is our bass.
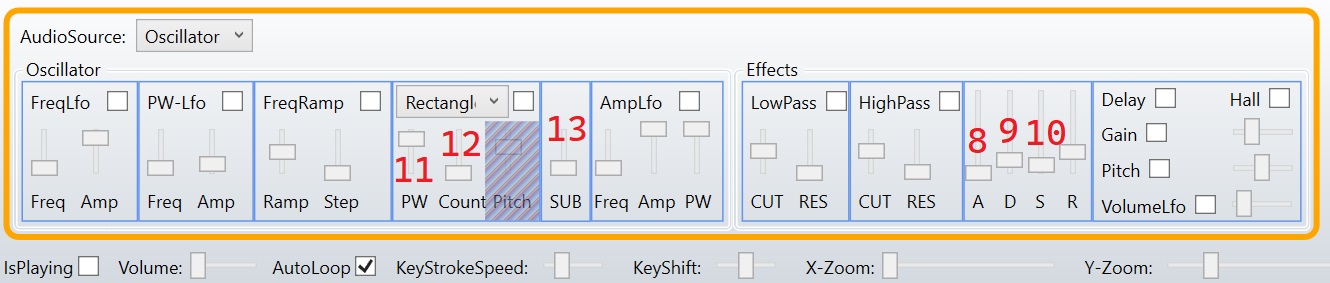
Your settings should now look like this:
And produces a sound like this:
[background3.mp3](https://github.com/XMAMan/SoundEngineExamples/raw/refs/heads/main/Data/SoundExamples/background3.mp3)
This is your music-file after changing PW, Count, SUB, A,D,S: [background3.music](https://github.com/XMAMan/SoundEngineExamples/raw/refs/heads/main/Data/background3.music)
For the high chords we want to use a different instrument. To do this we add the the midi-File again and split the song into two instruments.
Press at first on the "Add Midi-File"-Button (1) and change the Y-Zoom-Slider (2) which will only change the visual appearance. So both sequencer should be visible. Use also the
Zoom-Checkbox (3) which will fit the notes into the view. The blue marked notes are the accords from this song and we want to use a other instrument for this notes.

This is your music-file after adding the mid-file again as second sequencer: [background4.music](https://github.com/XMAMan/SoundEngineExamples/raw/refs/heads/main/Data/background4.music)
Mark the notes (blue marked in the image) block by block by holding the left mouse down and select with a selectionrectangle the accord-notes in the upper sequencer. After selection press the delete-key to
remove the selected notes. Do this for every accord-note-block. Do this also for all not-accord-notes in the second sequencer. Then you should get this result:
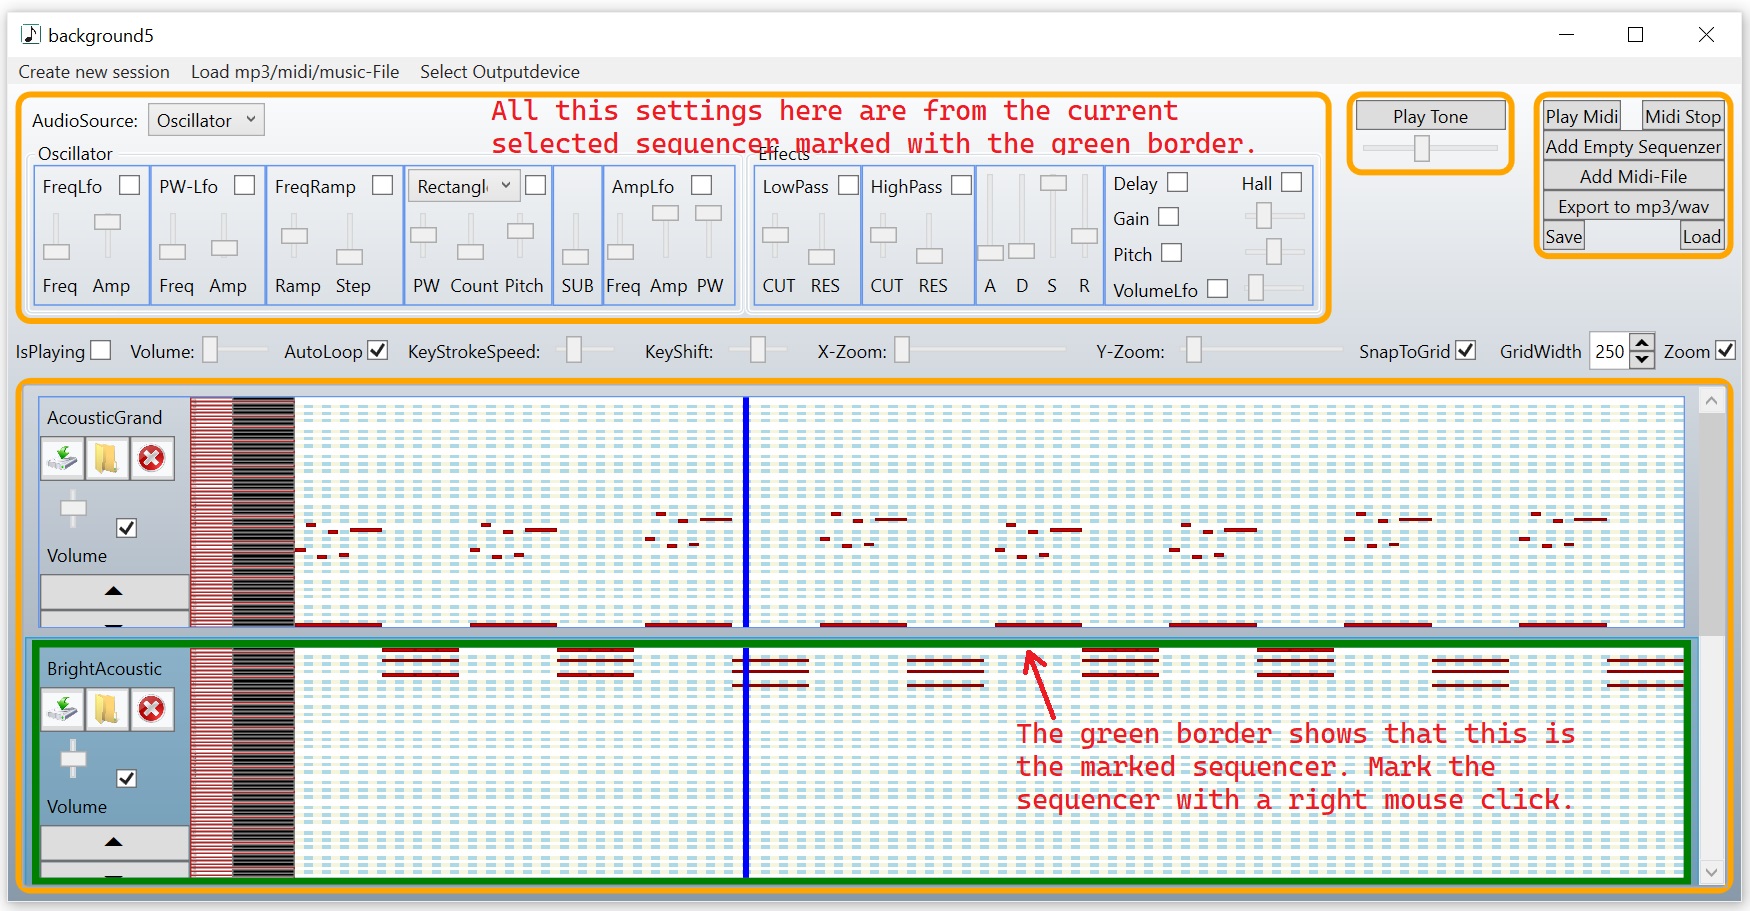
This is your music-file after removing in the first sequencer the blue marked accord-notes and in the second sequencer the not-accord-notes: [background5.music](https://github.com/XMAMan/SoundEngineExamples/raw/refs/heads/main/Data/background5.music)
If you right-click on the sequencer then you see, that the green border is changing so you see, that this sequencer is selected now. You will also see, that the settings in the upper area will
change, if you switch between the upper and lower sequencer.
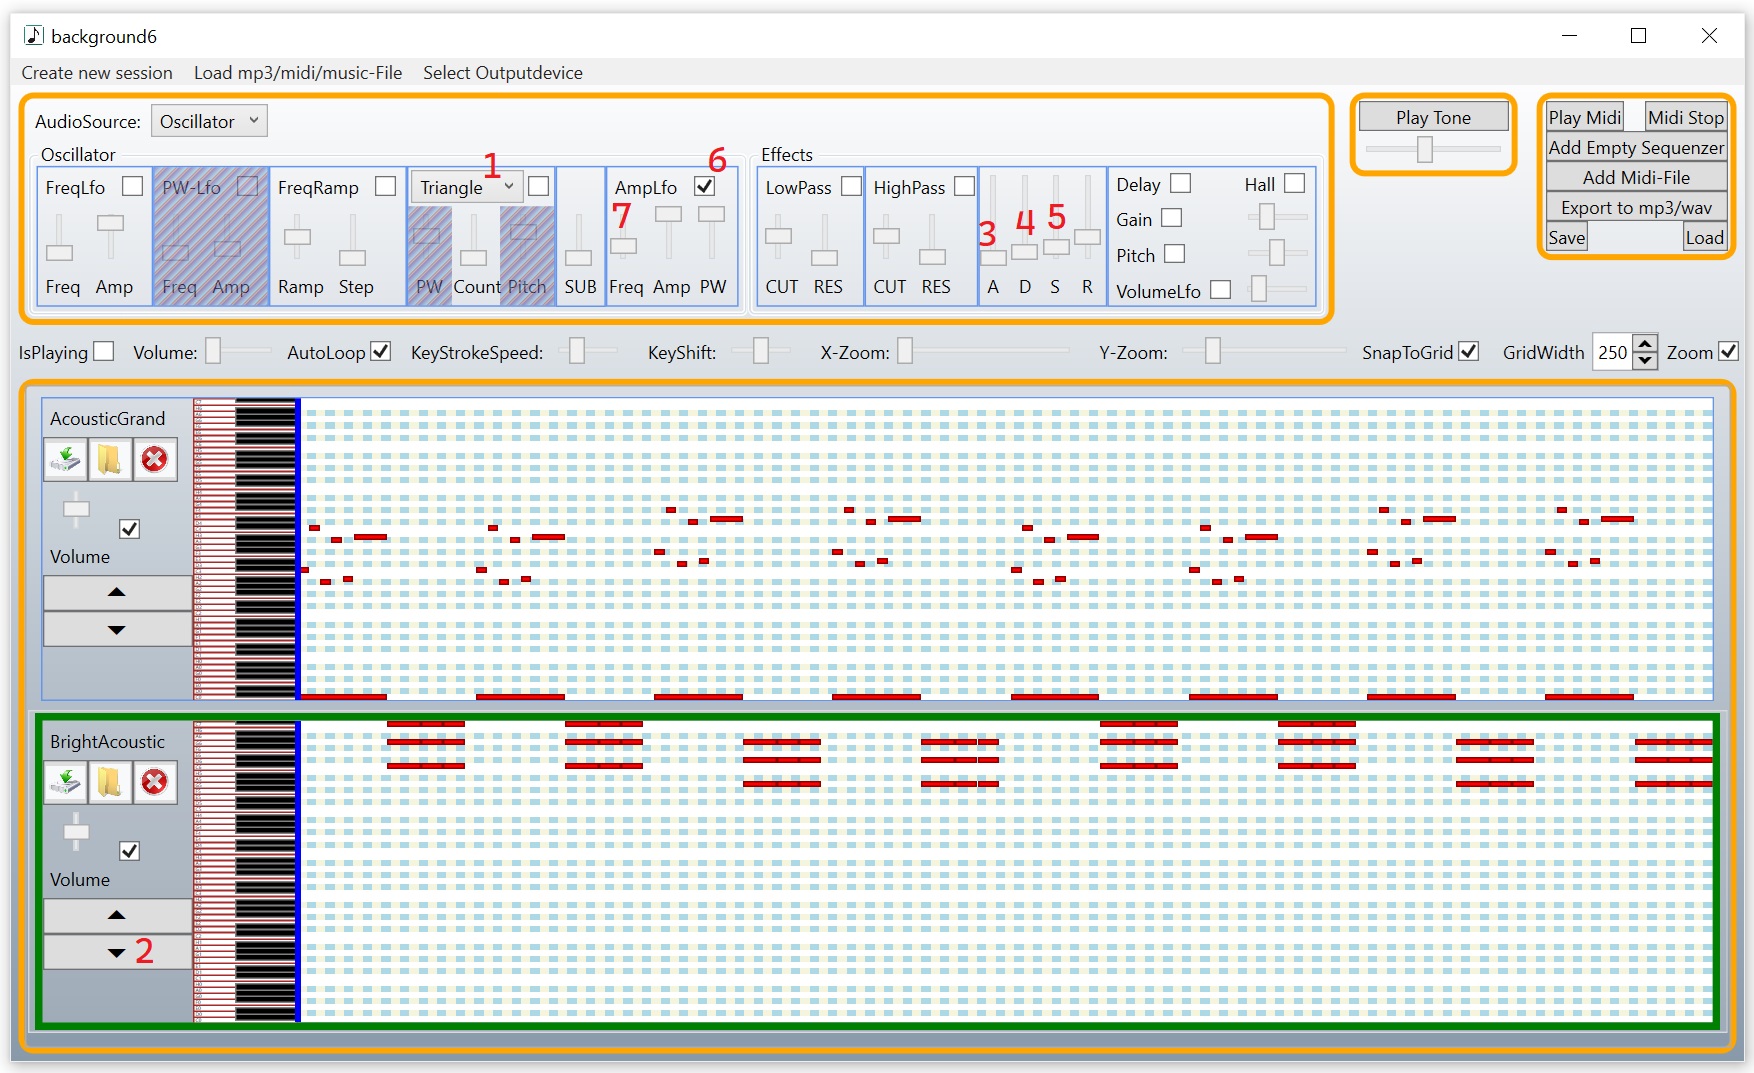
The next step is now to define the instrument for the accord-notes. Select with a mouse-right-click the second sequencer. For this sequencer we will use a Triangle-Signal.
Use the signal-source-combobox (1) and select "Triangle" and we change again the pitch by two octaves down by pressing Button (2) two times. For the attack-time (3) we use again zero and the
decaytime (4) becomes also a low value. The sustain-volume (5) should now a little bit higher then for the first sequencer because this are accords here. To get a flutter effect we use the
amplitude-low-frequency-oscillator (6) and change the frequence for this oscillator a little bit (7).
All your settings should now look like this for the second sequencer:
And produce this song: [background6.mp3](https://github.com/XMAMan/SoundEngineExamples/raw/refs/heads/main/Data/SoundExamples/background6.mp3)
Save now this file as a *.music-file by pressing the "Save"-Button in the upper right area. You can find the file from this example here:
[background6.music](https://github.com/XMAMan/SoundEngineExamples/raw/refs/heads/main/Data/background6.music)
### Case 1 Step 2: Use the *.music-file in your game
For this step: Open the AudioOutput-project from here: https://github.com/XMAMan/SoundEngineExamples/tree/master/Source/SoundEngineExamples.sln
If you now want to use the *.music-file in your game-project you have to use the XMAMan.SoundEngine-NuGet-Package and create a SoundGenerator-object. This object will start intern a audio-timer which
will produce the sound. The SoundGenerator-class implements the IDisposable-interface so you have to call the Dispose-method after receiving the Windows.Closed-event. With AddMusicFile you will load
the *.music-file into the memory and get a IMusicFileSnipped-object, were can control the playback from the backGround music.
```csharp
class ViewModel : IDisposable
{
private SoundGenerator soundGenerator;
private IMusicFileSnipped backGroundMusic; // This controls the background music
public ViewModel()
{
this.soundGenerator = new SoundGenerator();
this.backGroundMusic = soundGenerator.AddMusicFile(WorkingDirectory + "background6.music");
this.backGroundMusic.Volume = 0.5f // 0..1 here you can change the volume from you backGroundMusic
this.backGroundMusic.AutoLoop = true; // start the playback again if the end is reached
this.backGroundMusic.KeyStrokeSpeed = 2; // play with duplicated speed
this.backGroundMusic.KeyShift = -1; // decrease the pitch by one octave
this.backGroundMusic.Play(); // start playback
}
public void Dispose()
{
this.soundGenerator.Dispose(); // Destroy the AudioTimer inside from this object
}
}
```
## Case 2: play tones that can be held indefinitely and where the frequency is adjustable
### Case 2 Step 1: Define the instrument in the MusicMachine-Editor to create a *.music-file
In our next case we want to simulate a ball, which is falling down. Durring the movement there should be a sound, where the pitch is changing. This type of sound have no predefined length because
we don't now how far will the ball falling.
To define how such a sound sounds like we use again the MusicMachine-Editor and create again a *.music-file but now we don't have to define any notes. Start at first the
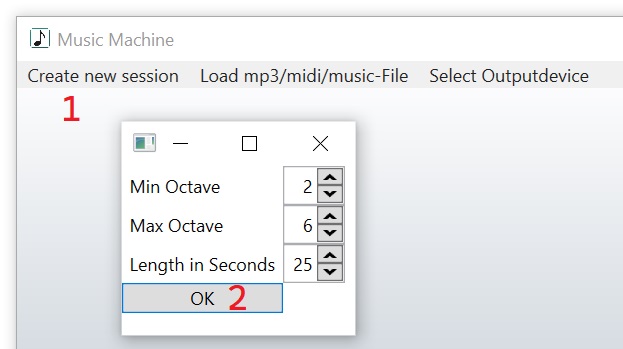
[MusicMachine.exe](https://github.com/XMAMan/SoundEngineExamples/tree/main/MusicMachine) and click on "Create new session" (1) in the context bar and then on ok (2) in the dialog.
We will use a Triangle-Signal (1) and FreqRamp-Effect (2). This effect will automatically decrease the pitch. Move the Ramp-Slider (3) a little bit down to increase to pitch-down-speed.
With the Test-Tone-Slider (4) we define the starting-frequency. Move this slider a little bit left the decrease the starting value. Press the "Play Tone"-Button and hold it to hear the sound.

See: [movingBall1.music](https://github.com/XMAMan/SoundEngineExamples/raw/refs/heads/main/Data/movingBall1.music)
If the ball is created with a left click, then it should move down and play the just defined sound. If the user use the right mouse then the ball should fly up and for this case we want to define a
other sound, where the pitch goes up. We will also save this second sound in the same *.music-file. To do so click on "Add Empty Sequenzer" (1) in the right top window area and then right click
on the second sequencer (2) the mark this. We use the Triangle-Signal (3) again and also the FreqRamp-Effect (4). But now we move the Ramp-Slider (5) a little bit up which will increase the pitch
durring playback.
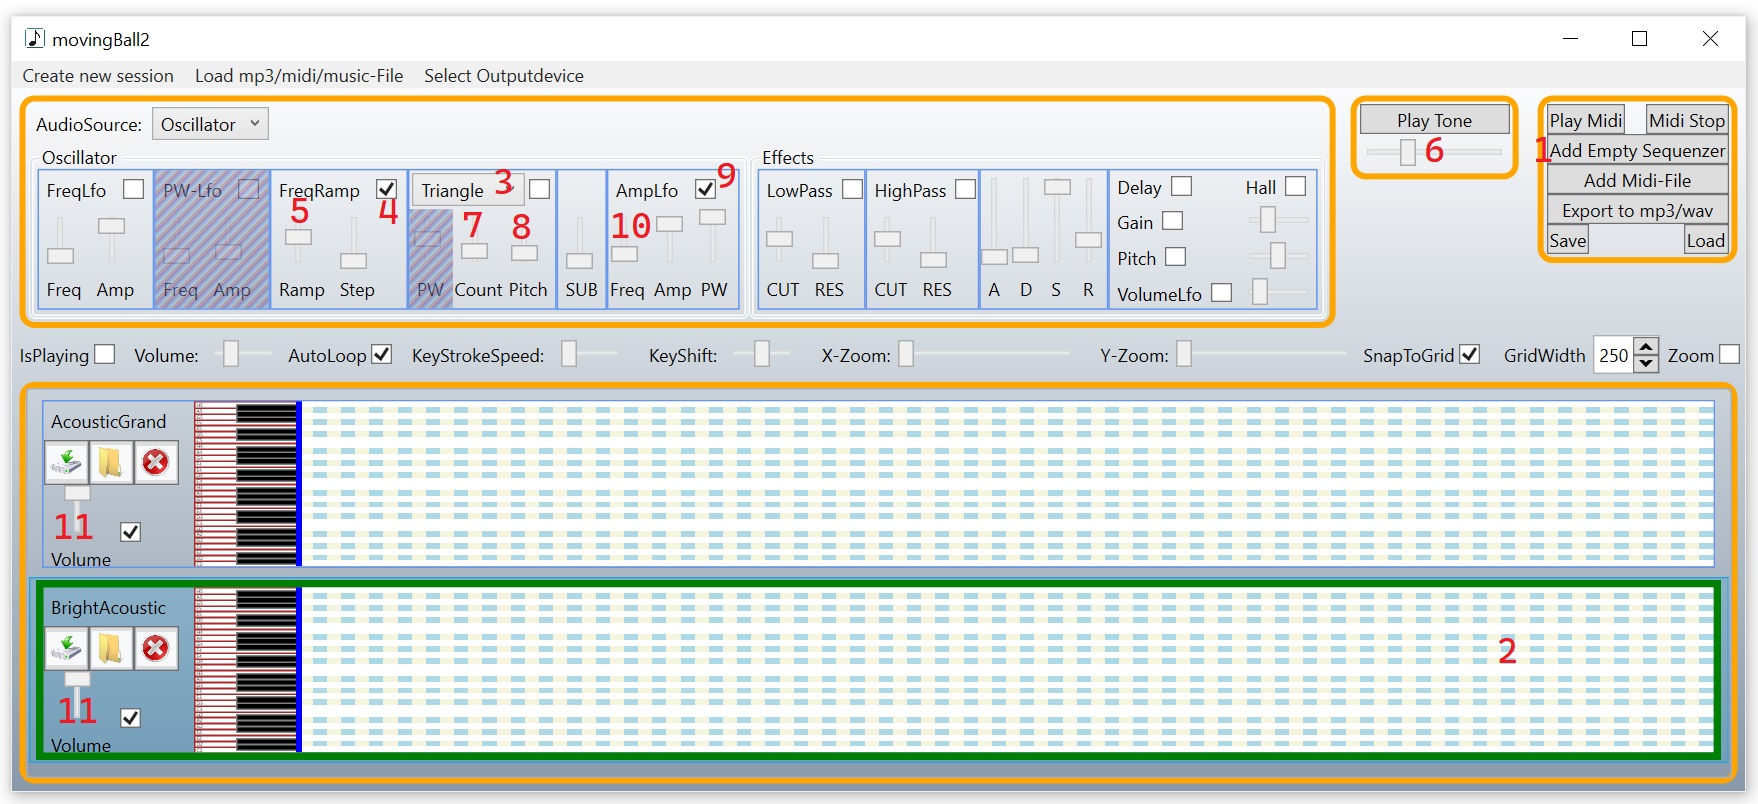
You can test the second sound by clicking on the "Play Tone"-Button again. With the Slider below (6) you define the start-frequency. A better way of starting the Test-tone-playback is pressing "A" for the first
sequencer and "S" for the second sequencer. Hold this keys pressed.
If you hold "A" then the moving-down-sound sounds like this: [movingDownSound.wma](https://github.com/XMAMan/SoundEngineExamples/raw/refs/heads/main/Data/SoundExamples/movingDownSound.wma)
If you hold "S" then the moving-up-sound sounds like this: [movingUpSound.wma](https://github.com/XMAMan/SoundEngineExamples/raw/refs/heads/main/Data/SoundExamples/movingUpSound.wma)
Hold the "S"-key pressed and then change the Count-Slider (7) a little bit up to increase the signal-source-count and the Pitch-Slider (8) a little bit down. Each signal-source will use a slightly
modified frequency. Change also die FreqRamp-Effect (4) durring holding "A" or "S" to here how the sound is changing durring playback.
For the moving-up-sound we will also use the Amplitude-Low-Frequency-Oscillator (9) with a low frequency (10). You can change from each sequencer his own soundvolume by using the slider on the left
side from the sequencers (11).
This is our created music-file: [movingBall2.music](https://github.com/XMAMan/SoundEngineExamples/raw/refs/heads/main/Data/movingBall2.music)
### Case 2 Step 2: Use the *.music-file in your game
We have now a *.music-file with two different instruments. To use this in code use again the SoundGenerator-object but instead of using the AddMusicFile-method we are using AddSynthSoundCollection.
This method returns a IFrequenceToneSnipped-array with two items in our case because we have defined two sequencers.
The following example show, how to read the music-file and start the playback from a tone with no predefined length. You have to call Stop to end the playback.
```csharp
class ViewModel : IDisposable
{
private SoundGenerator soundGenerator;
private IMusicFileSnipped backGroundMusic; // This controls the background music
public ViewModel()
{
this.soundGenerator = new SoundGenerator();
var movingSounds = this.soundGenerator.AddSynthSoundCollection(WorkingDirectory + "movingBall2.music");
IFrequenceToneSnipped movingDownSound = movingSounds[0];
IFrequenceToneSnipped movingUpSound = movingSounds[1];
movingDownSound.Play(); // First call from Play: start playback
movingDownSound.Play(); // second call from Play: This will start the playback again from the beginning
//... wait as long as you want
movingDownSound.Stop();
}
public void Dispose()
{
this.soundGenerator.Dispose(); // Destroy the AudioTimer inside from this object
}
}
```
In the demoapplication a left-mouse-click creates a ball which is falling down. If you click multiple times then you can create multiple balls. In this case every ball has its own fallingdown-sound
and we need for each a own IFrequenceToneSnipped-object, where the ball can control the playback from Play/Stop.
If you want to play the same sound multiple times then you need to use the GetCopy-method. This is needet, if you have multiple objects (in our example balls), which are creating the same sound
but each sound has his own start- and stop-time. You can call Play/Stop for each sound (ISoundSnipped-object) as often as you want. If your object, which is creating the sounds is destroyed, then its
recommended to Dispose the ISoundSnipped-object. Otherwise the SoundGenerator will hold a reference on this object and if you create with GetCopy many ISoundSnipped-objects, then the memory-usage
would become bigger with the time.
```csharp
var movingSounds = this.soundGenerator.AddSynthSoundCollection(WorkingDirectory + "movingBall2.music");
IFrequenceToneSnipped movingDownSound = movingSounds[0];
var movingDownSound1 = movingDownSound.GetCopy();
var movingDownSound2 = movingDownSound.GetCopy();
movingDownSound1.Play(); // Play is now used for movingDownSound1 and not for movingDownSound
movingDownSound2.Play(); // call Play for movingDownSound2. This will create a second playback for this sound.
//... wait as long as you want
movingDownSound1.Stop();
movingDownSound2.Stop();
//If you don't need the movingDownSound1-object anymore, then you should Dispose it
movingDownSound1.Dispose();
//the same for movingDownSound2
movingDownSound2.Dispose();
}
```
## Case 3: play tones with a predefined length created by a oscillator-signal-source
### Case 3 Step 1: Define the instrument and the tonelength in the MusicMachine-Editor to create a *.music-file
If the ball hits the ground, we want to play a drum-sound. This sound should be defined with the MusicMachine-Editor. So start the editor and create a new session and use the default-settings.
The sound should sound soft so we use a sinus-signal (1). We also want multiple signalsources so we increase the Count-Slider (4) and change the Pitch (5) a little bit. This will create a
sinus-sound with choruseffect. The sound should decrease so we use the FreqRamp-Effect (2) and move the Ramp-Slider (3) a little bit down. The drum should play short so we set the attack-time (6)
and the sustain-volume (8) to zero. The decaytime (7) defines the length from our sound. Since the sound is currently very quiet we are using the Gain-Effect (9) and move the gain-slider (10)
a little bit left.
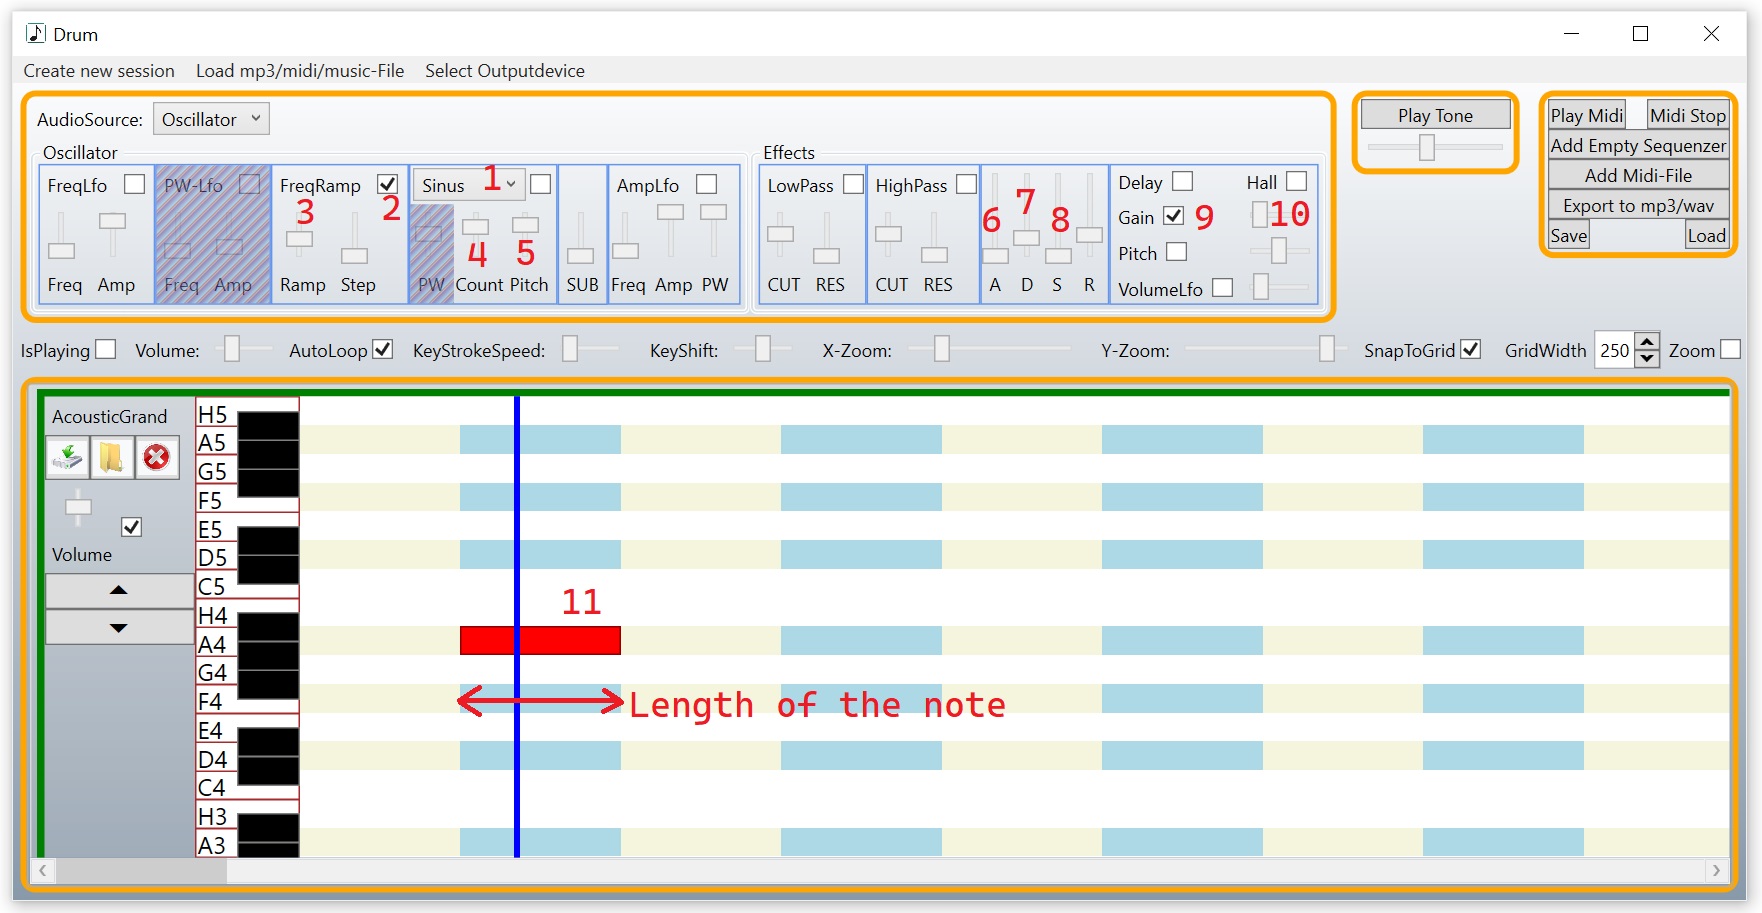
We now add a single note by left-clicking in the sequencer-note-area (11). You can move the right side from the rectangle(note) to the left or right to define the key-down-time. With this
single note our *.music-file has now a predefined length and we don't need the stop-command durring using in the game.
This is our created music-file: [Drum.music](https://github.com/XMAMan/SoundEngineExamples/raw/refs/heads/main/Data/Drum.music)
### Case 3 Step 2: Use the *.music-file in your game
The usage from the ground-hit-sound is similar to the usage from the background-music. Both examples uses a *.music-file as input. The difference is, that the background music contains multiple notes
and sequencer and the hit-sound has only one sequencer with one note. We are using the GetCopy-method here because we want to create this song for each ball-object so the song can be played
multiple times. GetCopy creates a new instance from this song and saves it in the SoundGenerator. The hitSound should only played one time and after that we can remove the copy from the SoundGenerator
by using the EndTrigger to register a handler, which is called after the song was played. We call in this handler "hitSound.Dispose()" to remove the hitSound-copy from the SoundGenerator.
```csharp
class ViewModel : IDisposable
{
private SoundGenerator soundGenerator;
private IMusicFileSnipped hitGroundSound; // This controls the sound when the ball hits the ground
public ViewModel()
{
this.soundGenerator = new SoundGenerator();
this.hitGroundSound = this.soundGenerator.AddMusicFile(WorkingDirectory + "Drum.music");
//create a copy from the hitGroundSound-object and saves it in the SoundGenerator.
ISoundSnippedWithEndTrigger hitSound = this.hitGroundSound.GetCopy();
hitSound.EndTrigger += () =>
{
hitSound.Dispose(); //remove the hitSound-object in the SoundGenerator
};
hitSound.Play(); //start playing the hitSound
}
public void Dispose()
{
this.soundGenerator.Dispose(); // Destroy the AudioTimer inside from this object
}
}
```
## Case 4: play a simple mp3/wma/wav-file
To play a mp3/wma/wav-file you only need to add it to the SoundGenerator with AddSoundFile and you can play it then with Play. If you want it to play mulitple times at the same time then use again
the GetCopy-function and call Play for every copy.
```csharp
class ViewModel : IDisposable
{
private SoundGenerator soundGenerator;
private IAudioFileSnipped hitCeilingSound; // This controls the sound when the ball hits the ceiling
public ViewModel()
{
this.soundGenerator = new SoundGenerator();
this.hitCeilingSound = this.soundGenerator.AddSoundFile(WorkingDirectory + "427788__fullmetaljedi__metal-to-glass05-broke-it.wav");
//create a copy from the hitCeilingSound-object and saves it in the SoundGenerator.
ISoundSnippedWithEndTrigger hitSound = this.hitCeilingSound.GetCopy();
hitSound.EndTrigger += () =>
{
hitSound.Dispose(); //remove the hitSound-object in the SoundGenerator after playing it one time
};
hitSound.Play(); //start playing the hitSound one time
}
public void Dispose()
{
this.soundGenerator.Dispose(); // Destroy the AudioTimer inside from this object
}
}
```
You can also use a audiofile in the MusicMachine and create your own songs with it. For doing this add a empty sequencer and use AudioFile as audiosource (1). Click on the yellow rectangle (2)
and select a mp3/wma/wav-file to open it. After that you can move the blue sliders (3) to define the start- and stop-time. You can change the pitch (4) and speed (5) from this audiofile.
Create now notes in the sequencer-area below. You can use the same audio-file multiple times by inserting multiple sequencers and define for each sequencer then your own values for pitch and
speed.
This could be a song only created with a single *.wav-file with three different pitches.
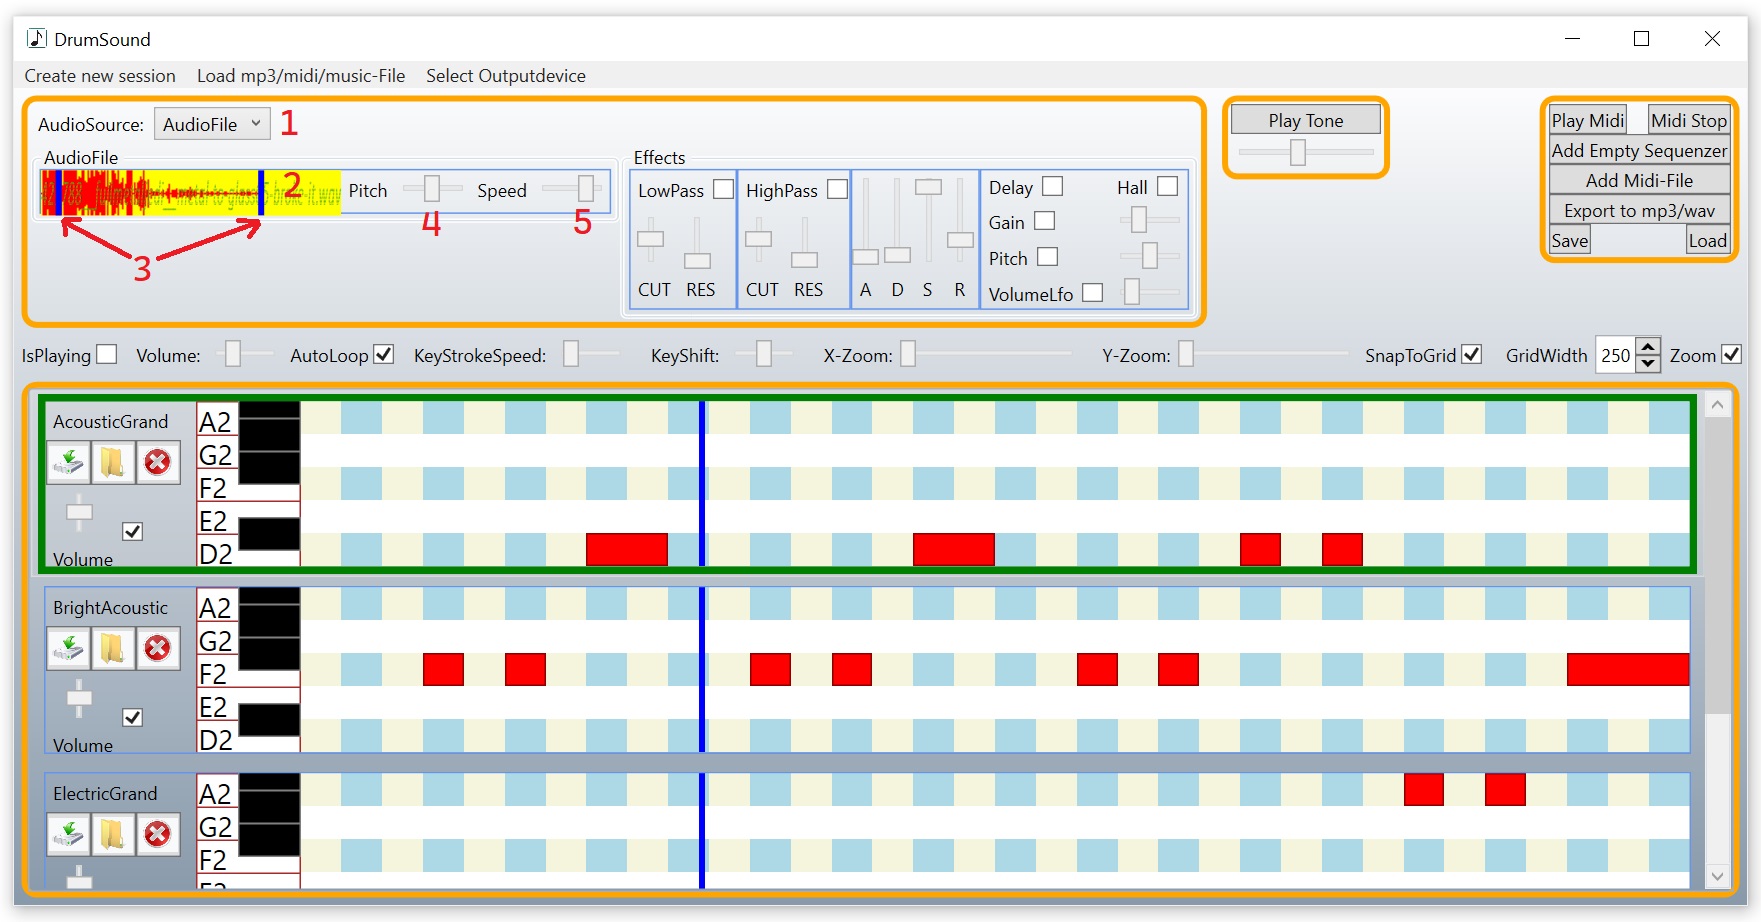
This music file [DrumSound.music](https://github.com/XMAMan/SoundEngineExamples/raw/refs/heads/main/Data/DrumSound.music) creates this song: [DrumSound.mp3](https://github.com/XMAMan/SoundEngineExamples/raw/refs/heads/main/Data/SoundExamples/DrumSound.mp3)
# Usecases if you want to create a audiorecorder
For this step: Open the AudioInput-project from here: https://github.com/XMAMan/SoundEngineExamples/tree/master/Source/SoundEngineExamples.sln
If you want to use a audioinput-device, then you have to use the AudioRecorder from the SoundGenerator-object. This will save the data from the microphone in the float-list 'recordData'. If you press
the StartStop-Button, then you can save the recorded data as mp3-file.
```csharp
class ViewModel : IDisposable
{
private SoundGenerator soundGenerator = new SoundGenerator(); // This comes from the XMAMan.SoundEngine-NuGet-Package
private List recordData = new List(); //This saves our data from the microphone
private bool isRecording = false;
public ReactiveCommand StartStopCommand { get; private set; }
[Reactive] public double OutputVolume { get; set; } = 0; //This property is used for showing the output volume
public ViewModel()
{
this.soundGenerator.AudioRecorder.StartRecording();
//handler for the audio-output-timer
this.soundGenerator.AudioOutputCallback += (sender, buffer) =>
{
if (this.isRecording)
{
this.recordData.AddRange(buffer);
}
this.OutputVolume = buffer.Sum(x => Math.Abs(x)) / buffer.Length;
};
//handler for the StartStop-Button
this.StartStopCommand = ReactiveCommand.CreateFromTask(async () =>
{
if (this.isRecording)
{
//Stop recording and save recorded data into mp3-file.
this.isRecording = false;
this.soundGenerator.AudioFileWriter.ExportAudioStreamToFile(this.recordData.ToArray(), this.soundGenerator.SampleRate, "output.mp3");
}
else
{
//Start recording and clear the recordData-buffer
this.isRecording = true;
this.recordData.Clear();
}
});
}
public void Dispose()
{
this.soundGenerator.Dispose(); // Destroy the AudioTimer inside from this object
}
}
```
After calling StartRecording, all audiodata from the selected audio-input-device is send to the current selected audio-output-device. To switch the current selected audio-device there are this functions:
```csharp
string[] inputDevices = soundGenerator.AudioRecorder.GetAvailableDevices();
soundGenerator.AudioRecorder.SelectedDevice = inputDevices[0]; //here you select which input device to use.
string[] outputDevices = soundGenerator.GetAvailableOutputDevices();
soundGenerator.SelectedOutputDevice = outputDevices[0]; //use outputdevice with index 0
```
The sound, which comes from the microphone can be modified before sending it to the output device. To do this enable by example the hall-effect with this:
```csharp
soundGenerator.AudioRecorder.UseHallEffect = true;
```
## You can use this demo-application for this cases:
### Case 1: You have a telephone call and want to sound like a robot.
You need two headsets connected to you computer. Headset 1 is placed beside your computer and headset 2 is on your head. In the demoapplication use headset 1 for audiooutput and headset 2 for audioinput.
Go the the soundsettings on you windows-system and use headset 1 as input-device for your stereomixer. In your telephone-app use stereomix as inputdevice and headset 2 as outputdevice. Activate the
robot-effect in the demoapplication from this example here and the other person from your call will hear your voice with the robot-effect.
### Case 2: You want to here a video from youtube with hall/robot-effect
You need two headsets connected to you computer. Headset 1 is placed beside your computer and headset 2 is on your head. In the demoapplication use the stereomix as audioinput and headset 2 as audiooutput.
In the windows-soundsettings use headset 1 as default-outputdevice and the stereomix uses headset 1 as input-source. If you now play a video from youtube then headset 1 is used for output and the
stereomixer will use this data as a virtual microphone. The demoapplication from here is using the unmodified audiosignal from youtube and will it modifie and play it on headset 2, which is located on
your head. You will hear the youtube-video with changed sound.
### Case 3: You want to record your own voise
Select your headset/microphone-array as input-device and and use "NoOutput" as output-device. This is necessary otherwise you would hear your own voice about your speakers at the same time as you
hear your voice from you mouth. That sounds confusing. Now you can press the record-button and speak. After pressing the button again you can save your audio data as mp3/wav-file.
# Usecases if you want to create a audioplayer
For this step: Open the AudioPlayer-project from here: https://github.com/XMAMan/SoundEngineExamples/tree/master/Source/SoundEngineExamples.sln
You can create a audiplayer and visualize the audiodata by doing two steps. Step 1 is that call AddSoundFile which adds the audiodata from a file to the SoundGenerator-object. Then you have two options
for audio-data-visulisation. Option 1: Show the lowpass-signal with GetLowPassSignalImage. Option 2 is a spectrum analyzer.
The spectrum analyzer is the black area and the lowpass-signal the image blow:

If you hear a low frequence signal, then the left side is changing and if you here a high frequence signal then the right side is changing in the spectrum analyzer. Use by example the
background6.mp3-file to see this effect.
```csharp
class ViewModel : IDisposable
{
private SoundGenerator soundGenerator = new SoundGenerator(); // This comes from the XMAMan.SoundEngine-NuGet-Package
private IAudioFileSnipped audioFile = null;
private AudioFileAnalyser analyser = null;
[Reactive] public BitmapImage SampleImage { get; set; } //Option 1 for visulisation: single image
[Reactive] public float[] FrequencySpectrum { get; set; } //Option 2 for visulisation: spectrum analyzer
public ViewModel()
{
this.audioFile = soundGenerator.AddSoundFile(openFileDialog.FileName);
this.analyser = new AudioFileAnalyser(this.audioFile.AudioFileSamples, this.audioFile.SampleRate);
//Option 1 for audio-visulisation: Create a image which shows the low-frequency-signal.
this.SampleImage = SignalImageCreator.GetLowPassSignalImage(analyser, this.ImageWidth, this.ImageHeight).ToBitmapImage();
//Option 2 for visulisation: spectrum analyzer
this.timer = Observable.Interval(TimeSpan.FromMilliseconds(100))
.Subscribe(x =>
{
//Timer-Action
if (this.audioFile != null && this.analyser != null)
{
double position = this.audioFile.SampleIndex / this.audioFile.SampleCount;
this.FrequencySpectrum = this.analyser.GetFrequenceSpectrumFromTime(position);
}
});
}
public void Dispose()
{
this.soundGenerator.Dispose(); // Destroy the AudioTimer inside from this object
}
}
```
```xml
xmlns:controls="clr-namespace:AudioWpfControls.Controls;assembly=AudioWpfControls"
```