https://github.com/xreef/abb_aurora_solar_inverter_library
Arduino, esp32 and esp8266 library for ABB (ex PowerOne) Aurora Inverter, implement a full methods to retrieve data from the Inverter via RS-485
https://github.com/xreef/abb_aurora_solar_inverter_library
abb arduino aurora esp32 esp8266 inverter library powerone rs485
Last synced: 3 months ago
JSON representation
Arduino, esp32 and esp8266 library for ABB (ex PowerOne) Aurora Inverter, implement a full methods to retrieve data from the Inverter via RS-485
- Host: GitHub
- URL: https://github.com/xreef/abb_aurora_solar_inverter_library
- Owner: xreef
- License: other
- Created: 2020-08-20T19:35:31.000Z (almost 5 years ago)
- Default Branch: master
- Last Pushed: 2022-04-07T05:59:43.000Z (over 3 years ago)
- Last Synced: 2025-03-27T20:07:43.511Z (4 months ago)
- Topics: abb, arduino, aurora, esp32, esp8266, inverter, library, powerone, rs485
- Language: C
- Homepage: https://www.mischianti.org
- Size: 271 KB
- Stars: 31
- Watchers: 8
- Forks: 5
- Open Issues: 0
-
Metadata Files:
- Readme: README.md
- License: LICENSE.md
Awesome Lists containing this project
README
06/04/2022: v1.0.3 Fix package size
#
#
ABB Aurora protocol
-------------------
### You can refer the complete documentation on my site
[ABB Aurora PV inverter library for Arduino, esp8266 and esp32](https://www.mischianti.org/2020/08/20/abb-aurora-pv-inverter-library-for-arduino-esp8266-and-esp32/)
I create this library to develop this [Web Monitor interface.](https://www.mischianti.org/category/tutorial/web-monitoring-station-for-abb-aurora-inverter-ex-power-one-now-fimer/)
Here the base information of RS485 ABB Aurora communication Protocol.

ABB PowerOne Aurora communication protocol Library arduino esp8266 esp32 Main
The communication between Host and processor works via a Serial Interface RS485 or RS232.
Configuration parameters in both cases are:
- 19200 baud (default value)
- 1 stop bit
- no parity
The structure of the answer has also fixed length (6 Bytes + 2 Bytes for Checksum) :
**Transmission State** is coded as follows:
0 = Everything is OK.
51 = Command is not implemented
52 = Variable does not exist
53 = Variable value is out of range
54 = EEprom not accessible
55 = Not Toggled Service Mode
56 = Can not send the command to internal micro
57 = Command not Executed
58 = The variable is not available, retry
**Global State** shows the state of the addressed device, the details are specified in the description of the commands.
Arduino UNO and MAX485
----------------------
You can use an Arduino UNO and a MAX485 IC, if you prefer can buy a module.
You can find IC on [AliExpress](https://s.click.aliexpress.com/e/_d6o7wph)
You can find module on [AliExpress](https://s.click.aliexpress.com/e/_dYTw9rD)
You can ArduinoUNO on [AliExpress](http://s.click.aliexpress.com/e/bilC7QEk)
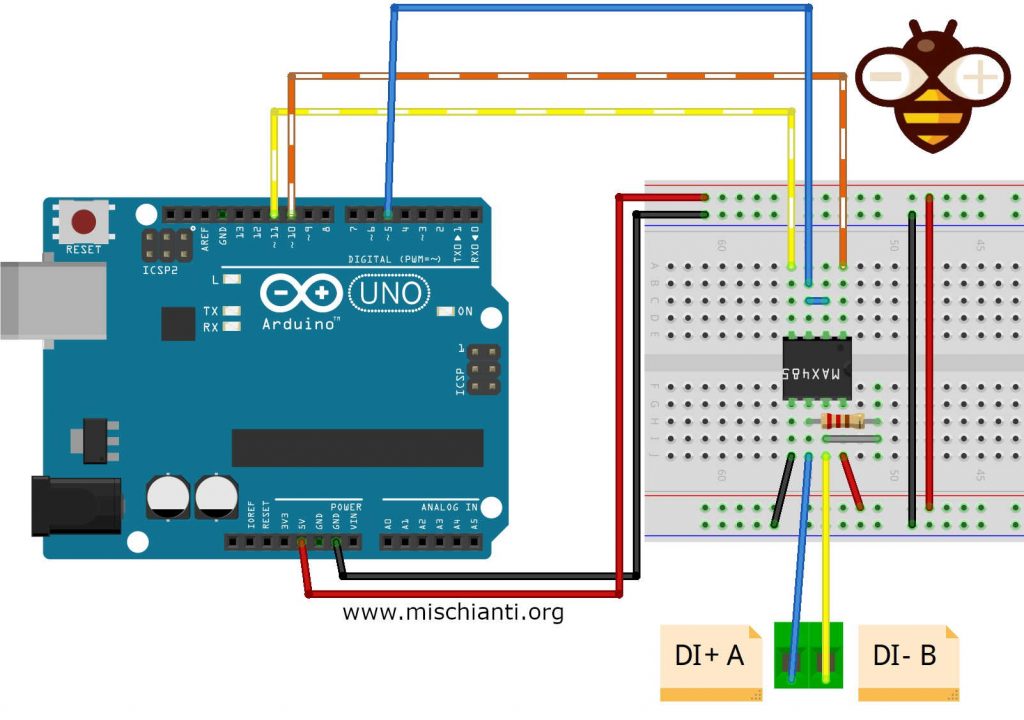
Here the simple connection schema, the resistor must be 120Ω, i use 104Ω.

MAX485 Arduino connection schema
I create a library derived from a project that you can find in the web created by [drhack](http://www.drhack.it/arduino/32-lettura-inverte-power-one-aurora.html), It’s a fantastic works (thanks to drhack) but I find It quite difficult to use, with specific hardware and not so reusable.
So I try to standardize the library and made It simple (the people that use my library know that “simplify first” It’s my motto.
esp8266 and MAX3485
-------------------
If you want use an esp8266 (I create a centraline with Wemos D1 mini) you must buy a MAX3485 tha work at the correct voltage.
You can find IC on [AliExpress](https://s.click.aliexpress.com/e/_d8ENRNN) [eBay](https://rover.ebay.com/rover/1/711-53200-19255-0/1?icep_id=114&ipn=icep&toolid=20004&campid=5338536765&mpre=https%3A%2F%2Fwww.ebay.com%2Fitm%2F5-PCS-MAX3485CPA-DIP-8-MAX3485-3-3V-Powered-Transceiver%2F302191492920%3Fhash%3Ditem465c043f38%3Ag%3A5DYAAOSwk1JWfXIY)
You can find module on [AliExpress](https://s.click.aliexpress.com/e/_d8vTejl) [eBay](https://rover.ebay.com/rover/1/711-53200-19255-0/1?icep_id=114&ipn=icep&toolid=20004&campid=5338536765&mpre=https%3A%2F%2Fwww.ebay.com%2Fitm%2FMAX3485-TTL-To-RS485-Module-MCU-Development-Converter-Module-Board-Accessories%2F382910038180%3Fhash%3Ditem59273780a4%3Ag%3A8aIAAOSwY7lcufQE%26frcectupt%3Dtrue)
You can find WeMos D1 mini on [AliExpress](http://s.click.aliexpress.com/e/ct2C48ti)
Here the simple connection schema, the resistor must be 120Ω, i use 104Ω.

MAX3485 and esp8266 connection schema
As you can see It’s quite simple to connect.
### Constructor
As usual I try to create It more generic as possible, so If you want use `HardwareSerial `or `SoftwareSerial `you are free to choiche.
You must specify an address, that address normally is 2, but you must check It in your inverter menu.
You can create a **chain of inverters** that communicate via RS485. An address can be chosen from 2 to 63. The address on the inverter is set through the display and the pushbutton panel.
To change address go to `SETTINGS --> Insert password (default 0000) --> Address`.
This menu allows you to set the serial port addresses of the individual inverters connected to the RS485 line.
The addresses that can be assigned are 2 to 63. The UP and DOWN buttons scroll through the numerical scale. ‘AUTO’ selection cannot be used at present.
#### HardwareSerial
// Aurora(byte inverterAddress, HardwareSerial* serial, byte serialCommunicationControlPin)
Aurora inverter = Aurora(2, &Serial, 5);
- `inverterAddress`: as described is the inverter address set on device.
- `serial`: is the `HardwareSerial`.
- `serialCommunicationControlPin`: is the pin that activate transmission of serial communication.
#### SoftwareSerial
// Aurora(byte inverterAddress, byte rxPin, byte txPin, byte serialCommunicationControlPin)
Aurora inverter = Aurora(2, 10, 11, 5);
- `inverterAddress`: as described is the inverter address set on device.
- `rxPin: `is the SoftwareSerial RX pin.
- `txPin: `is the SoftwareSerial TX pin.
- `serialCommunicationControlPin`: is the pin that activate transmission of serial communication.
For software serial you can pass external SoftwareSerial instance.
`// Aurora(byte inverterAddress, SoftwareSerial* serial, byte serialCommunicationControlPin) `|
#### Usage
You can refer the complete documentation on my site
[ABB Aurora PV inverter library for Arduino, esp8266 and esp32](https://www.mischianti.org/2020/08/20/abb-aurora-pv-inverter-library-for-arduino-esp8266-and-esp32/)
First you must startup the communication with `begin` command:
`inverter.begin();`|
Than there are a lot of command that you can use to make query to your Inverter:
```cpp
void begin();
void clearReceiveData();
DataState readState();
DataVersion readVersion();
DataDSP readDSP(byte type, byte global = (byte)1);
DataTimeDate readTimeDate();
bool writeTimeDate(unsigned long epochTime);
DataLastFourAlarms readLastFourAlarms();
DataJunctionBoxState readJunctionBoxState(byte nj);
bool readJunctionBoxVal(byte nj, byte par);
DataSystemPN readSystemPN();
DataSystemSerialNumber readSystemSerialNumber();
DataManufacturingWeekYear readManufacturingWeekYear();
DataFirmwareRelease readFirmwareRelease();
DataCumulatedEnergy readCumulatedEnergy(byte par);
bool writeBaudRateSetting(byte baudcode);
DataConfigStatus readConfig();
DataTimeCounter readTimeCounter(byte param);
// Central
bool readFlagsSwitchCentral();
bool readCumulatedEnergyCentral(byte var, byte ndays_h, byte ndays_l, byte global);
bool readFirmwareReleaseCentral(byte var);
bool readBaudRateSettingCentral(byte baudcode, byte serialline);
bool readSystemInfoCentral(byte var);
bool readJunctionBoxMonitoringCentral(byte cf, byte rn, byte njt, byte jal, byte jah);
bool readSystemPNCentral();
bool readSystemSerialNumberCentral();
```
Example code
------------
Here an example of reading via Arduino.
```cpp
/*
Test Arduino MAX485 Aurora ABB connection
by Mischianti Renzo
https://www.mischianti.org/
*/
#include "Arduino.h"
#include
#include
#include
//SoftwareSerial mySerial(10, 11); // RX, TX
//Aurora inverter = Aurora(2, &Serial1, 5);
Aurora inverter = Aurora(2, 10, 11, 5);
void SerialPrintData(byte *data) {
for (int i = 0; i < 8; i++) {
Serial.print((int)data[i]);
Serial.print(F(" "));
}
Serial.println(F(" "));
}
void setup()
{
Serial.begin(19200);
inverter.begin();
}
// The loop function is called in an endless loop
void loop()
{
Serial.print(F("freeMemory(1)="));Serial.println(freeMemory());
Aurora::DataCumulatedEnergy cumulatedEnergy = inverter.readCumulatedEnergy((byte)1);
Serial.println(F("------------------------------------------"));
Serial.println(F("INVERTER 2"));
Serial.print(F(" Data ROW = ")); SerialPrintData(inverter.receiveData);
Serial.print(F(" Read State = ")); Serial.println(cumulatedEnergy.state.readState);
Serial.print(F("Transmission State = ")); Serial.println(cumulatedEnergy.state.getTransmissionState());
Serial.print(F(" Global State = ")); Serial.println(cumulatedEnergy.state.getGlobalState());
Serial.print(F(" Energia = ")); Serial.print(cumulatedEnergy.energy); Serial.println(" Wh");
// free(&cumulatedEnergy);
Serial.println(F("------------------------------------------"));
Aurora::DataLastFourAlarms lastFour = inverter.readLastFourAlarms();
Serial.println(F("INVERTER 2"));
Serial.print(F(" Data ROW = ")); SerialPrintData(inverter.receiveData);
Serial.print(F(" Read State = ")); Serial.println(lastFour.state.readState);
Serial.print(F("Transmission State = ")); Serial.println(lastFour.state.getTransmissionState());
Serial.print(F(" Global State = ")); Serial.println(lastFour.state.getGlobalState());
Serial.print(F(" Alarms 1 = ")); Serial.println(lastFour.getAlarm1State());
Serial.print(F(" Alarms 2 = ")); Serial.println(lastFour.getAlarm2State());
Serial.print(F(" Alarms 3 = ")); Serial.println(lastFour.getAlarm3State());
Serial.print(F(" Alarms 4 = ")); Serial.println(lastFour.getAlarm4State());
// free(&lastFour);
Serial.println(F("------------------------------------------"));
Aurora::DataVersion version = inverter.readVersion();
Serial.println("INVERTER 2");
Serial.print(F(" Data ROW = ")); SerialPrintData(inverter.receiveData);
Serial.print(F(" Read State = ")); Serial.println(version.state.readState);
Serial.print(F("Transmission State = ")); Serial.println(version.state.getTransmissionState());
Serial.print(F(" Global State = ")); Serial.println(version.state.getGlobalState());
Serial.print(F(" Version = ")); Serial.print(version.getModelName().name); Serial.print(F(" ")); Serial.print(version.getIndoorOutdoorAndType()); Serial.print(F(" ")); Serial.print(version.getGridStandard()); Serial.print(F(" ")); Serial.print(version.getTrafoOrNonTrafo()); Serial.print(F(" ")); Serial.println(version.getWindOrPV());
Serial.println(F("------------------------------------------"));
// free(&version);
Aurora::DataConfigStatus configStatus = inverter.readConfig();
Serial.print(F(" Data ROW = ")); SerialPrintData(inverter.receiveData);
Serial.print(F(" Read State = ")); Serial.println(configStatus.state.readState);
Serial.print(F("Transmission State = ")); Serial.println(configStatus.state.getTransmissionState());
Serial.print(F(" Global State = ")); Serial.println(configStatus.state.getGlobalState());
Serial.print(F(" config = ")); Serial.println(configStatus.getConfigStatus());
Serial.println(F("------------------------------------------"));
// free(&version);
Serial.print(F("freeMemory(2)="));Serial.println(freeMemory());
Aurora::DataTimeCounter timeCounter = inverter.readTimeCounter(CT_TOTAL_RUN);
Serial.print(F(" Data ROW = ")); SerialPrintData(inverter.receiveData);
Serial.print(F(" Read State = ")); Serial.println(timeCounter.state.readState);
Serial.print(F("Transmission State = ")); Serial.println(timeCounter.state.getTransmissionState());
Serial.print(F(" Global State = ")); Serial.println(timeCounter.state.getGlobalState());
Serial.print(F(" time in sec = ")); Serial.println(timeCounter.upTimeInSec);
Serial.print(F(" time in verb = ")); Serial.print(timeCounter.getSecondsInDateElements()[0]); Serial.print(F("Y ")); Serial.print(timeCounter.getSecondsInDateElements()[1]); Serial.print(F("D "));Serial.print(timeCounter.getSecondsInDateElements()[2]);Serial.print(F("H "));Serial.print(timeCounter.getSecondsInDateElements()[3]);+Serial.print(F("M "));Serial.print(timeCounter.getSecondsInDateElements()[4]);Serial.println(F("S "));
Serial.println(F("------------------------------------------"));
// free(&version);
Serial.print(F("freeMemory(2)="));Serial.println(freeMemory());
delay(4000);
}
```
As you can see the usage is quite simple.
Here the video of the result call.
[](https://www.youtube.com/watch?v=khTdjJFrQss)
Thanks
------

