https://github.com/xukeawsl/socks-server
A C++11 socks5 proxy server based on asio network library
https://github.com/xukeawsl/socks-server
asio cpp11 linux-server socks5-proxy spdlog windows-server
Last synced: 3 months ago
JSON representation
A C++11 socks5 proxy server based on asio network library
- Host: GitHub
- URL: https://github.com/xukeawsl/socks-server
- Owner: xukeawsl
- License: mit
- Created: 2022-10-07T12:02:51.000Z (over 3 years ago)
- Default Branch: master
- Last Pushed: 2025-01-22T12:44:39.000Z (over 1 year ago)
- Last Synced: 2025-04-10T05:09:28.741Z (about 1 year ago)
- Topics: asio, cpp11, linux-server, socks5-proxy, spdlog, windows-server
- Language: C++
- Homepage:
- Size: 9.61 MB
- Stars: 63
- Watchers: 2
- Forks: 15
- Open Issues: 0
-
Metadata Files:
- Readme: README.md
- License: LICENSE
Awesome Lists containing this project
README
# Socks5 代理服务器
[](https://github.com/xukeawsl/socks-server/blob/master/LICENSE)
[](https://app.codacy.com/gh/xukeawsl/socks-server/dashboard?utm_source=gh&utm_medium=referral&utm_content=&utm_campaign=Badge_grade)
[](https://github.com/xukeawsl/socks-server)
[](https://github.com/xukeawsl/socks-server/releases)
[](https://img.shields.io/github/repo-size/xukeawsl/socks-server?color=yellow)
[](https://ci.appveyor.com/project/xukeawsl/socks-server)
## 平台
* Linux (g++ 4.8+)
* Windows (mingw)
## 特性
* 无认证模式
* 用户名/密码认证模式
* 支持 `CONNECTION` 和 `UDP ASSOCIATE` 命令
* 支持通过 `IPV4(6)/域名` 访问远程机器
## 优点
* **高性能**, 采用多线程 + 异步 IO 模型
* **可靠性强**, 良好的异常处理,无内存泄漏,日志详细
* **代码结构清晰**, 可读性强
## 使用
### 1. 下载仓库并创建构建目录
```bash
$ git clone https://github.com/xukeawsl/socks-server.git
$ cd socks-server
$ mkdir build
$ cd build
```
### 2. CMake 构建
* Linux
```bash
cmake ..
cmake --build .
```
* Windows
```bash
cmake -G "MinGW Makfiles" ..
cmake --build .
```
默认的构建类型是 `Debug`, 可以通过 `-DBUILD_TYPE=Release` 指定构建类型为 `Release`
## 调整服务器日志级别
* 通过 `cmake` 的 `LOG_LEVEL` 选项调整日志等级, 支持 `spdlog` 的日志级别
* `Debug` 默认的日志级别是 `Debug`, 且日志同时输出到文件和控制台
* `Release` 默认的日志级别是 `Info`, 日志只输出到文件中
```bash
# Trace, Debug, Info, Warn, Error, Critical, Off
cmake -DLOG_LEVEL=Info ..
```
## 设置安装目录
```bash
# Linux
cmake -DCMAKE_PREFIX=/usr/local ..
# Windows
cmake -G "MinGW Makefiles" -DCMAKE_PREFIX=D:/ ..
```
## 安装
```bash
# 使用之前设置的路径安装
cmake --build . --target install
# 或者
cmake --install .
# 安装时指定路径
cmake --install . --prefix /usr/local
```
## 配置服务器参数
* 通过修改 `config.json` 文件内容进行服务器参数配置
```json
{
"server" : {
"host" : "127.0.0.1",
"port" : 1080
},
"log" : {
"log_file" : "logs/server.log",
"max_rotate_size" : 1048576,
"max_rotate_count" : 10
},
"auth" : {
"username" : "socks-user",
"password" : "socks-passwd"
},
"supported-methods" : [0, 2],
"timeout" : 60
}
```
1. `server` 配置服务器相关参数
* `host` : 监听的 ip 地址 (默认 `127.0.0.1`,ipv6 可以监听 `::`)
* `port` : 监听的端口号 (默认 `1080`)
* `thread_num` : 后台工作线程个数 (默认为 cpu 核心数)
2. `log` 配置日志文件相关参数
* `log_file` : 日志文件的路径 (相对路径是基于构建目录的,默认为 `logs/server.log`)
* `max_rotate_size` : 单个滚动日志文件的最大大小 (默认为 `1` MB)
* `max_rotate_count` : 最大滚动日志文件个数 (默认 `10` 个)
3. `auth` 配置代理服务器认证的用户名/密码
* `username` : 用户名(需要认证则必填)
* `password` : 密码(需要认证则必填)
4. `supported-methods` 配置代理服务器支持的认证方法
* `0` : 不需要认证
* `2` : 需要用户名/密码认证
5. `timeout` 配置连接的超时时间 (默认为 `10` 分钟,单位为 `s`)
## docker-compose 部署
* 在 `docker-compose.yml` 所在目录下执行如下命令即可在后台自动部署服务
```bash
docker-compose up -d
```
## Valgrind 内存检测
* 检测程序是否存在内存泄漏:`valgrind --leck-check=full ../bin/socks-server`
```valgrind
==38396== Memcheck, a memory error detector
==38396== Copyright (C) 2002-2017, and GNU GPL'd, by Julian Seward et al.
==38396== Using Valgrind-3.18.1 and LibVEX; rerun with -h for copyright info
==38396== Command: ../bin/socks_server
==38396== Parent PID: 38395
==38396==
==38396==
==38396== HEAP SUMMARY:
==38396== in use at exit: 0 bytes in 0 blocks
==38396== total heap usage: 256,650 allocs, 256,650 frees, 184,504,189 bytes allocated
==38396==
==38396== All heap blocks were freed -- no leaks are possible
==38396==
==38396== For lists of detected and suppressed errors, rerun with: -s
==38396== ERROR SUMMARY: 0 errors from 0 contexts (suppressed: 0 from 0)
```
## Benchmark 压力测试
* 测试机器 : `AMD EPYC 7K62 48-Core @ 2.6 GHz`
* 测试工具使用 https://github.com/cnlh/benchmark
* 使用 cinatra 库在本地搭建 ping-pong 测试服务器 https://github.com/qicosmos/cinatra
```cpp
#include "cinatra.hpp"
using namespace cinatra;
int main() {
http_server server(std::thread::hardware_concurrency());
server.listen("127.0.0.1", "80");
server.set_http_handler("/ping", [](request& req, response& res) {
res.set_status_and_content(status_type::ok, "pong");
});
server.run();
return 0;
}
```
* 添加本地域名解析 `vim /etc/hosts`
```bash
127.0.0.1 www.test.com
```
* 测试结果 : `QPS 6w+`
```bash
# 为了对比,同时测试了不通过 socks5 代理的 qps
# 单核 10w 次请求
# -------------------------------
# Requests/sec: 58744.86
./benchmark -n 100000 -proxy socks5://127.0.0.1:1080 http://www.test.com/ping
# Requests/sec: 81741.00
./benchmark -n 100000 http://www.test.com/ping
# -------------------------------
# 单核 100w 次请求
# -------------------------------
# Requests/sec: 64033.18
./benchmark -n 1000000 -proxy socks5://127.0.0.1:1080 http://www.test.com/ping
# Requests/sec: 85083.83
./benchmark -n 1000000 http://www.test.com/ping
# -------------------------------
# 多核 100 并发连接 10w 请求
# -------------------------------
# Requests/sec: 70531.02
./benchmark -c 100 -n 100000 -proxy socks5://127.0.0.1:1080 http://www.test.com/ping
# Requests/sec: 127494.87
./benchmark -c 100 -n 100000 http://www.test.com/ping
# -------------------------------
# 多核 1k 并发连接 10w 请求
# -------------------------------
# Requests/sec: 60594.40
./benchmark -c 1000 -n 100000 -proxy socks5://127.0.0.1:1080 http://www.test.com/ping
# Requests/sec: 81868.17
./benchmark -c 1000 -n 100000 http://www.test.com/ping
# -------------------------------
# 多核 1w 并发连接 10w 请求
# -------------------------------
# Requests/sec: 36597.17
./benchmark -c 10000 -n 100000 -proxy socks5://127.0.0.1:1080 http://www.test.com/ping
# Requests/sec: 61744.69
./benchmark -c 10000 -n 100000 http://www.test.com/ping
# -------------------------------
# 多核 100 并发连接 100w 次请求
# -------------------------------
# Requests/sec: 64534.48
./benchmark -c 100 -n 1000000 -proxy socks5://127.0.0.1:1080 http://www.test.com/ping
# Requests/sec: 105114.19
./benchmark -c 100 -n 1000000 http://www.test.com/ping
# -------------------------------
# 多核 1k 并发连接 100w 次请求
# -------------------------------
# Requests/sec: 64263.99
./benchmark -c 1000 -n 1000000 -proxy socks5://127.0.0.1:1080 http://www.test.com/ping
# Requests/sec: 87528.75
./benchmark -c 1000 -n 1000000 http://www.test.com/ping
# -------------------------------
# 多核 1w 并发连接 100w 次请求
# -------------------------------
# Requests/sec: 51305.73
./benchmark -c 10000 -n 1000000 -proxy socks5://127.0.0.1:1080 http://www.test.com/ping
# Requests/sec: 75776.02
./benchmark -c 10000 -n 1000000 http://www.test.com/ping
# -------------------------------
```
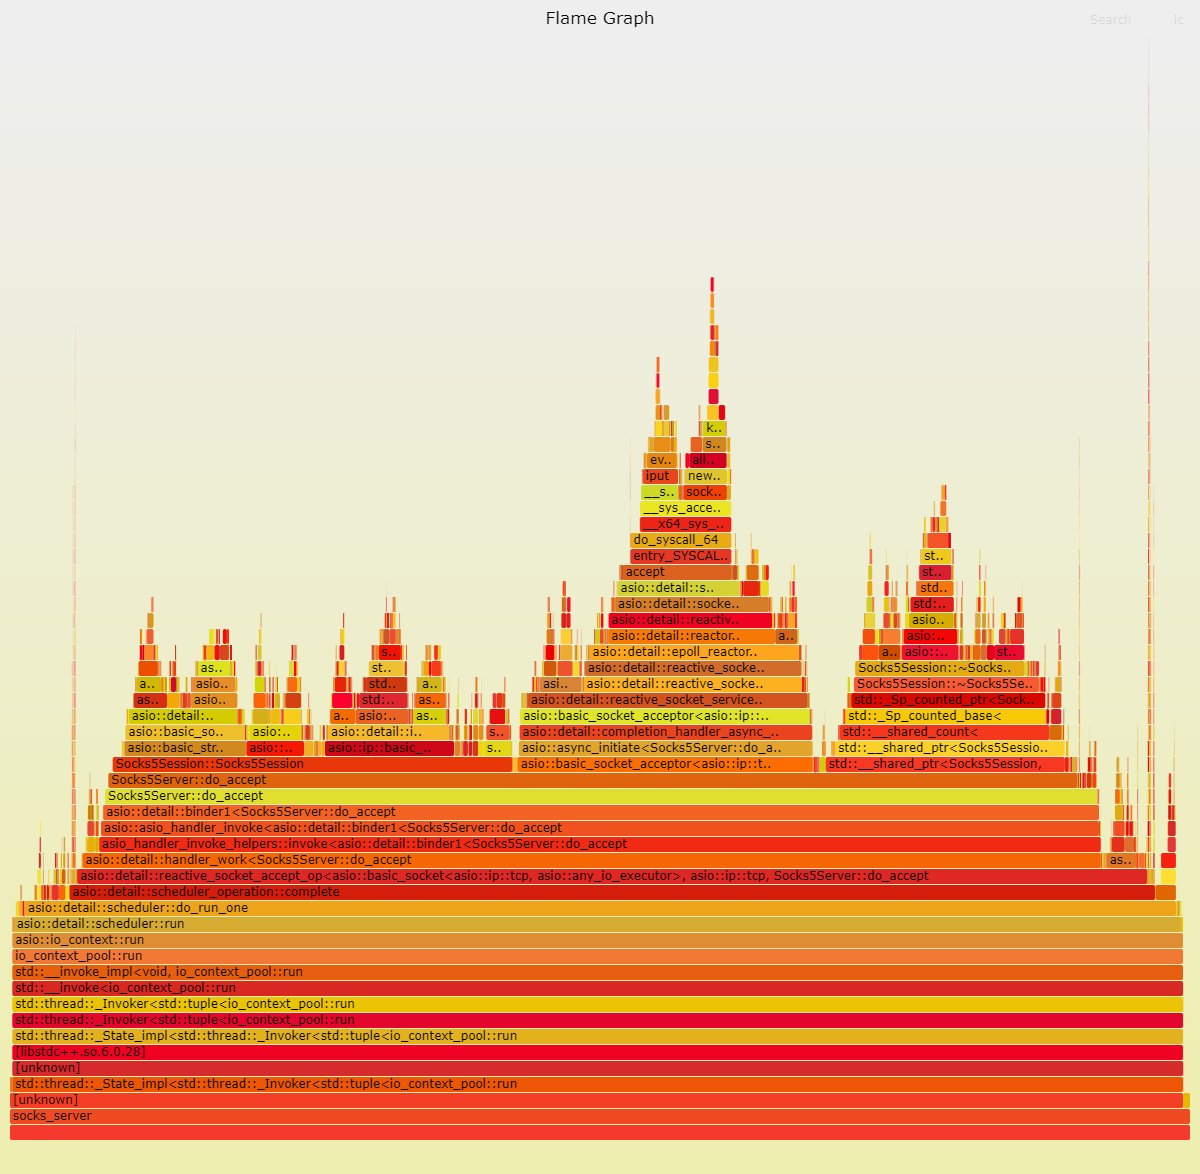
## FlameGraph 火焰图分析
* `ps -ef | grep socks_server` 查看 socks_server 进程的 PID (假设为 `779810`)
* 安装好 `perf` 工具并克隆 [FlameGraph](https://github.com/brendangregg/FlameGraph) 仓库到机器上
* 进入 `FlameGraph` 目录,依次执行以下命令
```bash
# 以 999Hz 的频率对进程 779810 采样 60s
perf record -F 999 -p 779810 -g -- sleep 60
perf script > out.perf
# 折叠调用栈
./stackcollapse-perf.pl out.perf > out.folded
# 生成火焰图
./flamegraph.pl out.folded > socks_server.svg
```
## 水平扩展
* 将 `nginx` 作为 tcp 负载均衡器, 可以实现水平拓展, `nginx` 对外监听 `1080` 端口, 然后根据指定的负载均衡策略转发到相应机器上, 也可以是同一台机器上的不同端口(实现多进程), 如下配置, 负载均衡策略是优先转发到连接数最少的节点, `5000` 作为备用节点, 当 `3000` 和 `4000` 都挂掉时启用
```conf
stream {
upstream socks_server {
least_conn;
server 127.0.0.1:3000;
server 127.0.0.1:4000;
server 127.0.0.1:5000 backup;
}
server {
listen 1080;
proxy_pass socks_server;
}
}
```
## 参考文档
* [RFC1928 : SOCKS Protocol Version 5](https://www.rfc-editor.org/rfc/inline-errata/rfc1928.html)
* [RFC1929 : Username/Password Authentication for SOCKS V5](https://www.rfc-editor.org/rfc/rfc1929.html)
## 其它实现
基于多进程+协程模型实现的版本(限制C++20和Linux平台):https://github.com/xukeawsl/coro_socks