https://github.com/yhotta240/firebase-auth-template
ReactにFirebaseを統合して認証機能を実装しました。
https://github.com/yhotta240/firebase-auth-template
bootstrap bootstrap5 firebase firebase-auth javascript modal nodejs react react-bootstrap template
Last synced: 3 months ago
JSON representation
ReactにFirebaseを統合して認証機能を実装しました。
- Host: GitHub
- URL: https://github.com/yhotta240/firebase-auth-template
- Owner: yhotta240
- Created: 2024-04-02T01:36:16.000Z (about 2 years ago)
- Default Branch: main
- Last Pushed: 2024-04-02T08:10:53.000Z (about 2 years ago)
- Last Synced: 2025-03-14T15:27:09.041Z (over 1 year ago)
- Topics: bootstrap, bootstrap5, firebase, firebase-auth, javascript, modal, nodejs, react, react-bootstrap, template
- Language: JavaScript
- Homepage: https://firebase-auth-template.vercel.app
- Size: 391 KB
- Stars: 1
- Watchers: 1
- Forks: 0
- Open Issues: 0
-
Metadata Files:
- Readme: README.md
Awesome Lists containing this project
README
## はじめに
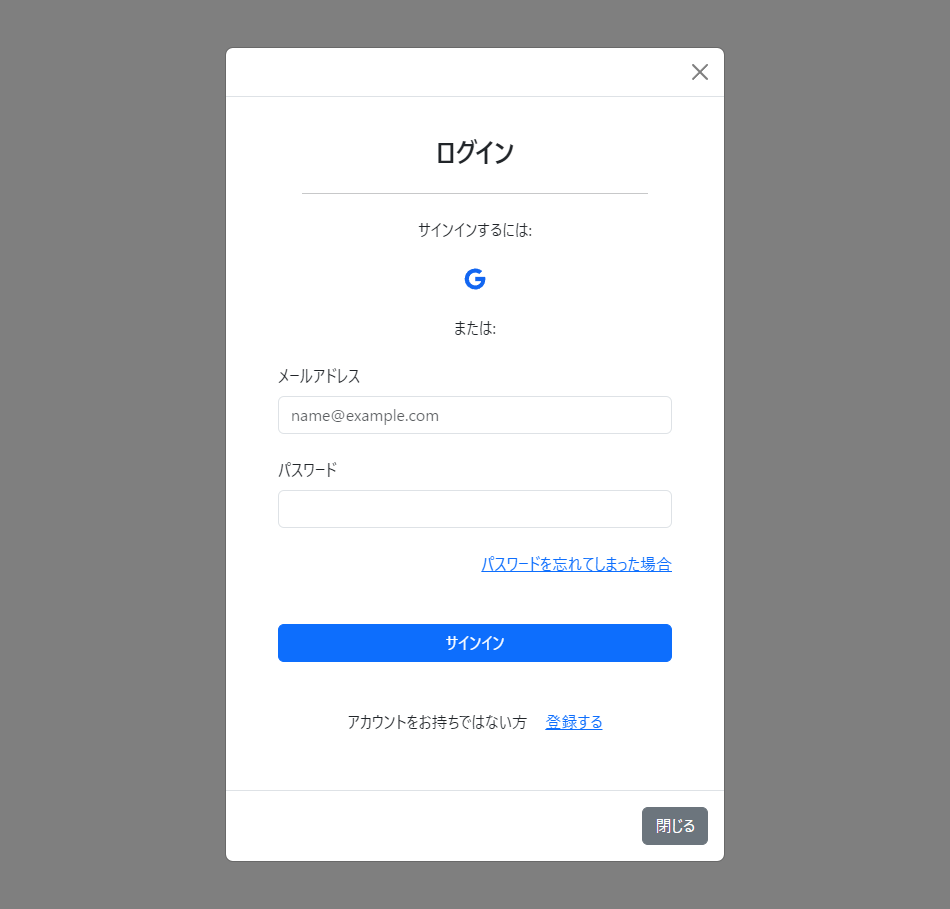
ReactにFirebaseを統合して認証機能を実装しました。そして今回は認証機能だけでなく、React Bootstrapのモーダルウィンドウを活用して、ログインとユーザー登録をスムーズに行えるようにしてみました。
## 完成イメージ
ユーザー登録からログインへ移動することもできます(逆も同じ)
## デモページ
https://firebase-auth-template.vercel.app/
にて公開しています。
## クラス図
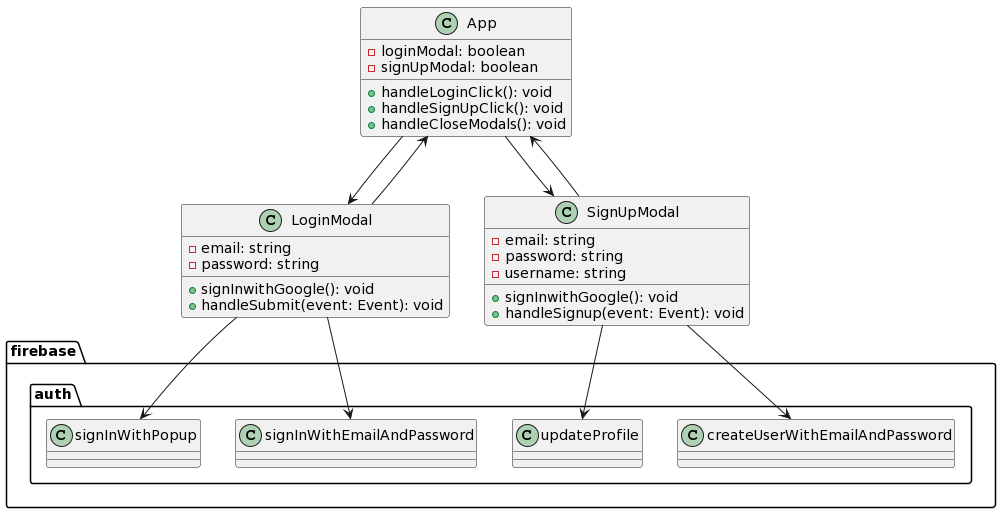
chatGPTに書かせたので間違ってるかもしれません。
https://www.plantuml.com/plantuml/umla/bP3DQiCm48JlVWgHKqfm7i27aX12AQHW2A5dsThOeckjq4zoA7ttoggn0dPeSXBipgo-cOrrt3ZVOLOZjvPjjMRV6MCvGsga-Y31iM0L4G9NSMvbeqvwibYnbYk1SEXjEvJrr_AbO1UIucPvZDvxsnsIXNZOZjkVh2VAyrTs67d6qJ6XP0D_KWqneECoW5fdf6hYH0VTbOou6QvYgdTrbQvz8seGvk1zrKctX0ieLx1z_oJAz6yaMvobWOfRM7FlslNVzSzmVT_ZR9Ke1uZ5mywIjDSJUQXYY9xQU2vxphm5etW7JnSI95xVAIJHpEQg3N079mjcjfN_x5wBO2yDdIN2H1rRsO0IliDV
## Reactプロジェクトの作成
vscのコマンドラインでReactアプリケーションの新しいプロジェクトを作成します。例えば、Create React Appを使用して次のようにします。
```bash
npx create-react-app firebase-auth-app
cd firebase-auth-app
code . //フォルダを開く
```
## React Bootstrapのセットアップ
React BootstrapとBootstrapをインストールします。
```bash
npm install react-bootstrap bootstrap
```
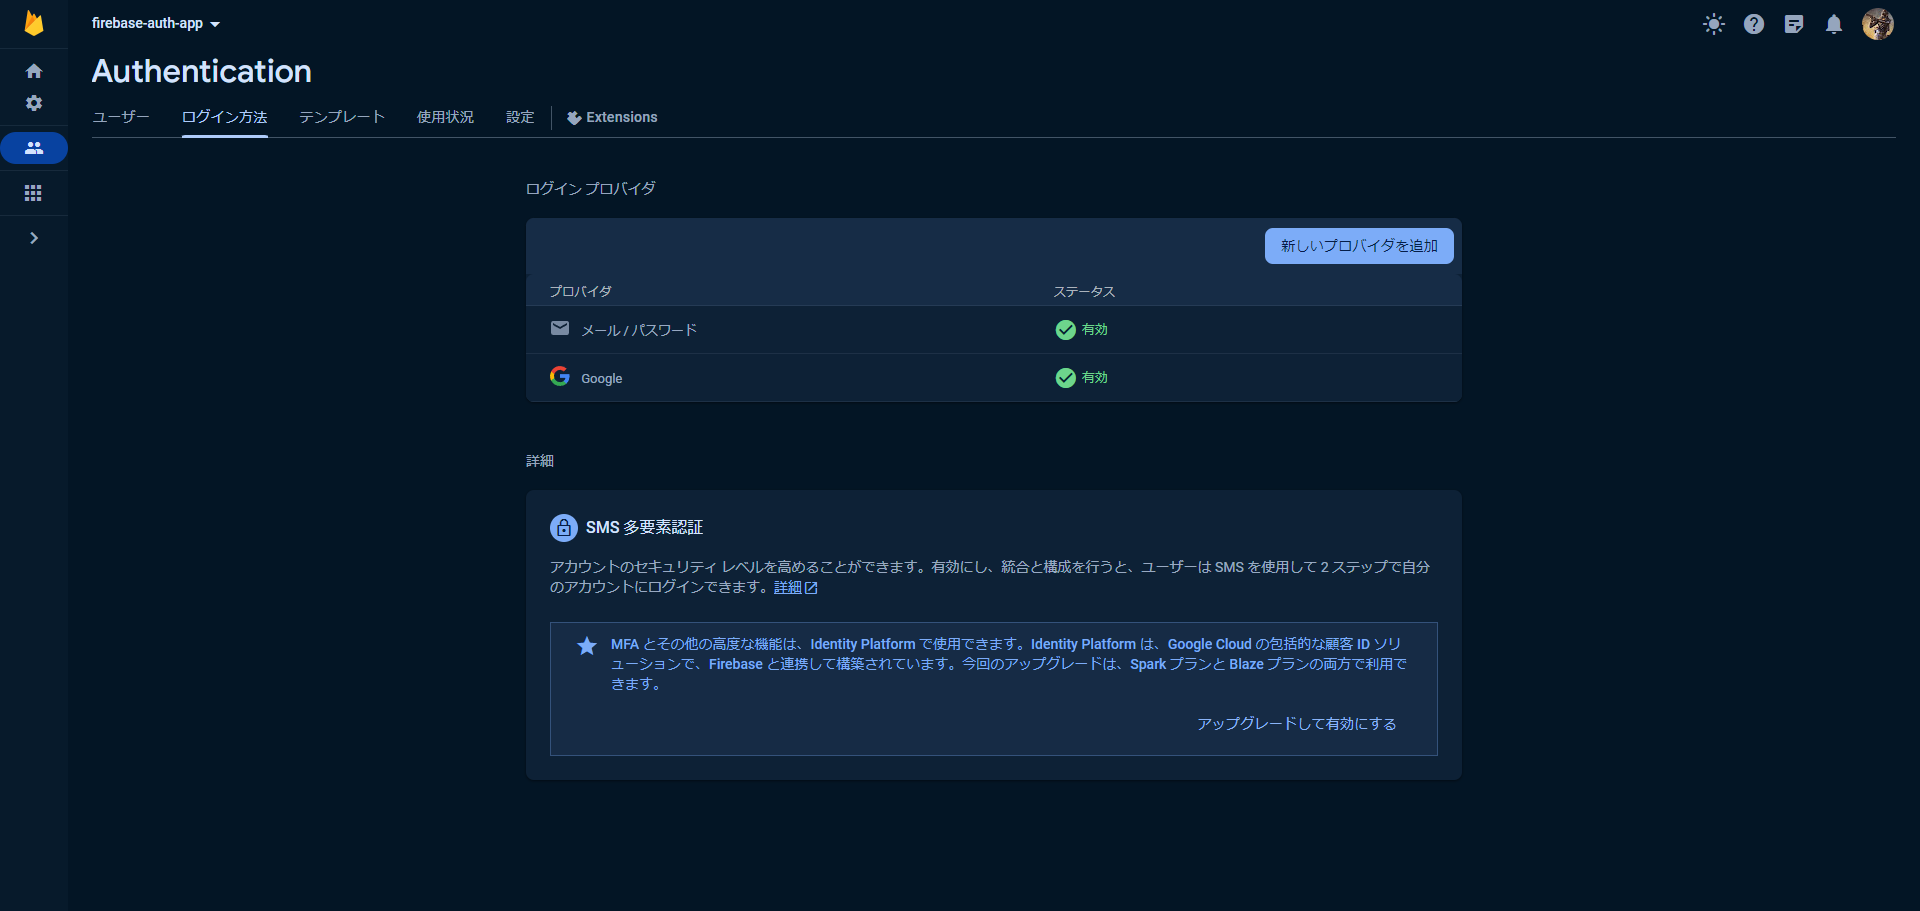
## Firebaseプロジェクトのセットアップ
Firebaseコンソールにログインし、[新しいプロジェクト](https://console.firebase.google.com/u/0/)を作成します。
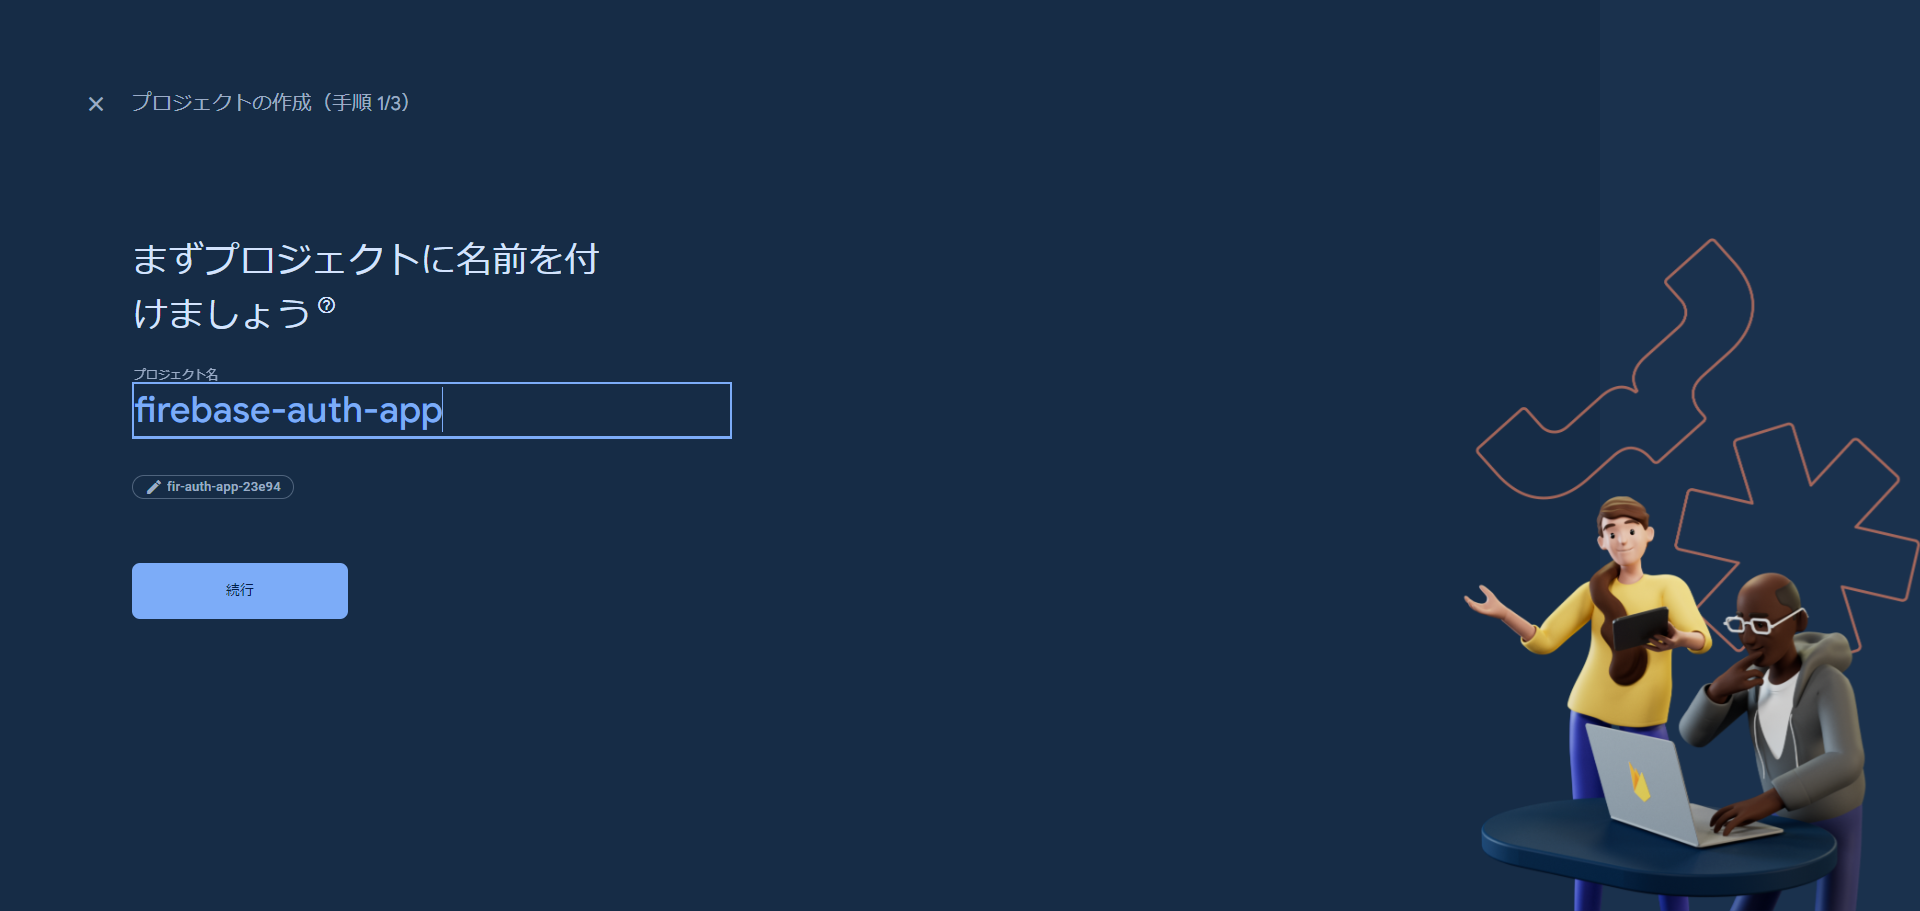
プロジェクトを作成したら、Firebase Authenticationを有効にします(必要に応じてCloud Firestoreなどの他のFirebaseサービスも追加で有効にしておくと便利です)。
今回はメール/パスワードとGoogle認証を有効にしておきます。
Firebaseプロジェクトにアプリを登録し、自身のウェブアプリにFirebaseを追加します。
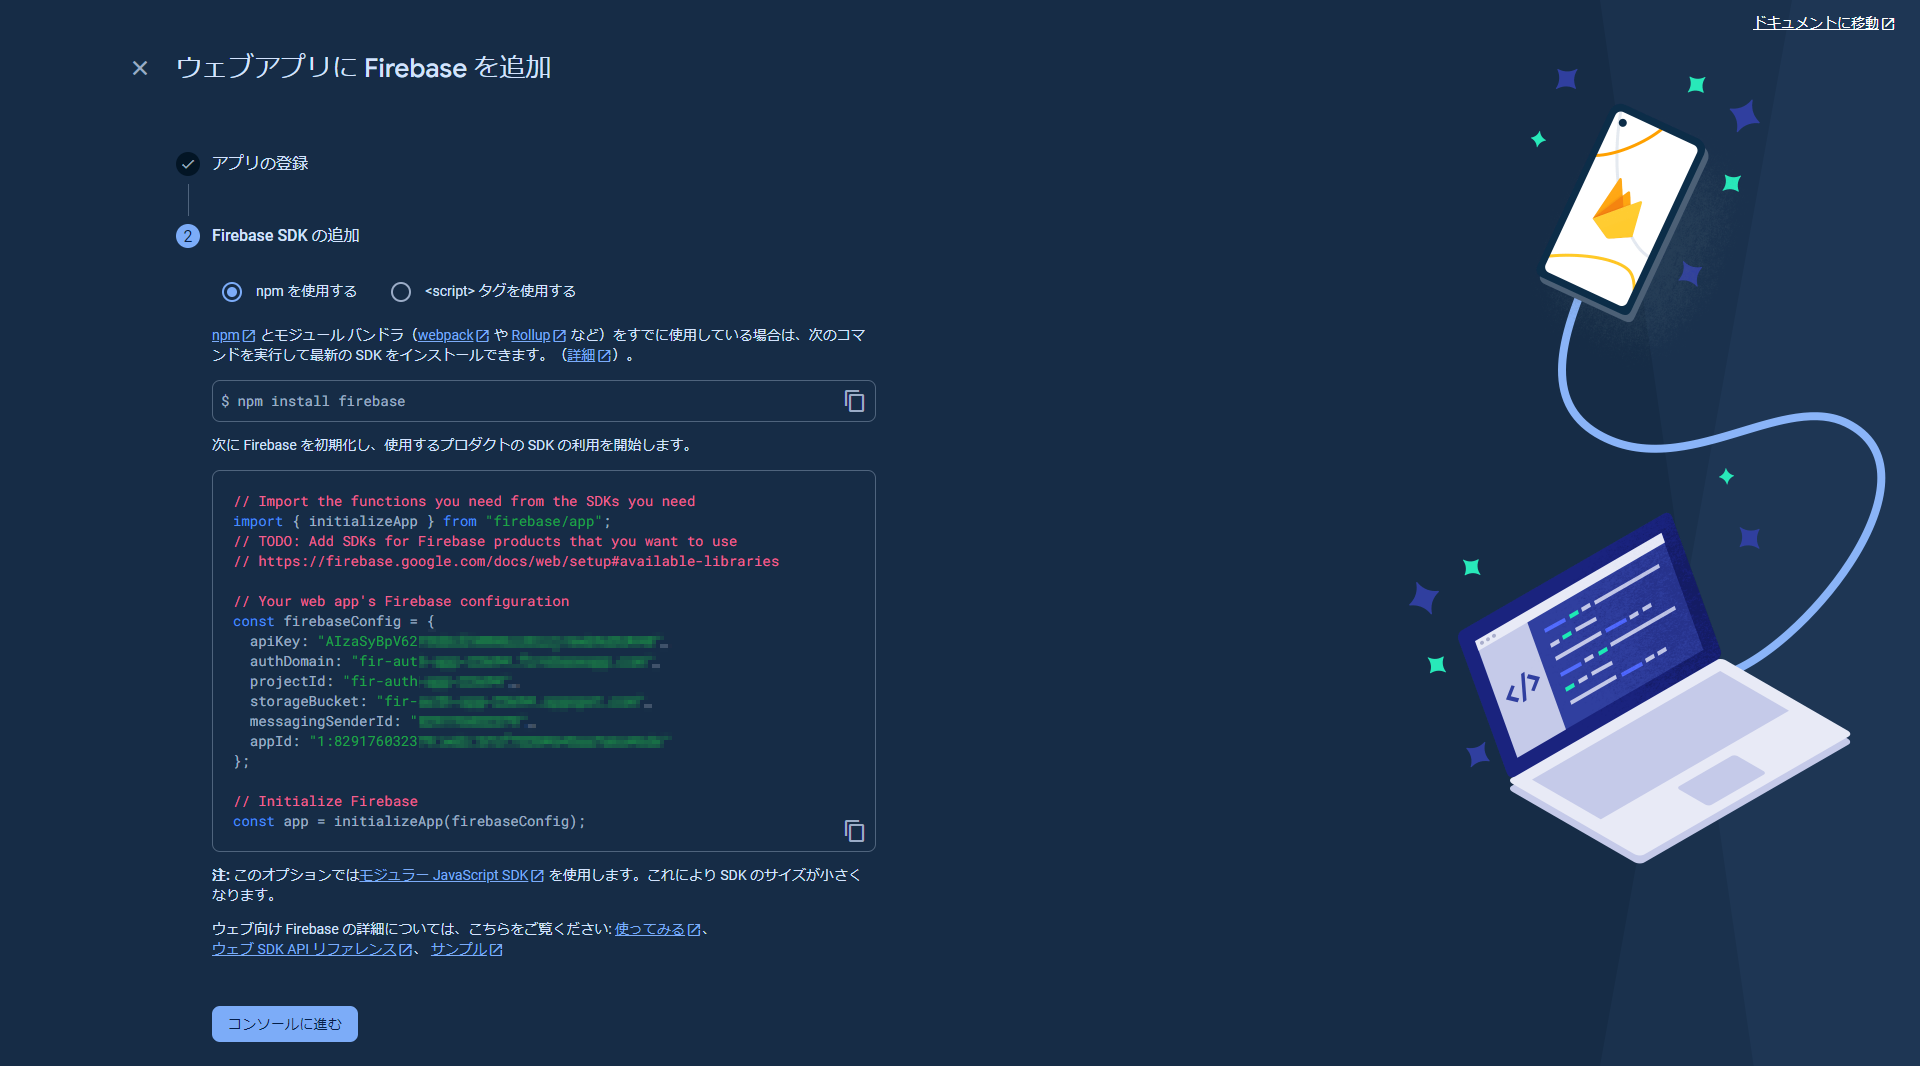
Firebase SDKの構成オブジェクトをReactに追加します。
```bash
npm install firebase
```
Firebaseコンソールから取得した設定を使用して、srcディレクトリ内にfirebase.jsファイルを作成します。
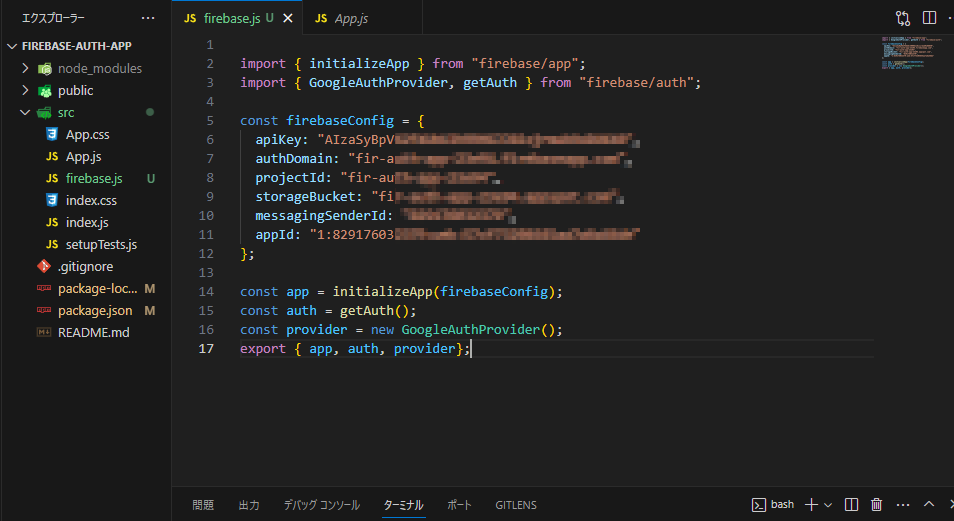
firebase.jsファイルに以下の内容を追加します。
```react:firebase.jsx
// firebase.js
import { initializeApp } from "firebase/app";
import { GoogleAuthProvider, getAuth } from "firebase/auth";
const firebaseConfig = {
apiKey: process.env.REACT_APP_FIREBASE_API_KEY,
authDomain: process.env.REACT_APP_FIREBASE_AUTH_DOMAIN,
projectId: process.env.REACT_APP_FIREBASE_PROJECT_ID,
storageBucket: process.env.REACT_APP_FIREBASE_STORAGE_BUCKET,
messagingSenderId: process.env.REACT_APP_FIREBASE_MESSAGING_SENDER_ID,
appId: process.env.REACT_APP_FIREBASE_APP_ID,
};
const app = initializeApp(firebaseConfig);
const auth = getAuth(app);
const provider = new GoogleAuthProvider();
export { auth, provider};
```
FirebaseのAPIキーやその他の機密情報を.env.localファイルに保存します。このファイルはGitなどのバージョン管理システムから除外されるため、機密情報が外部に公開される心配はありません。.env.localファイルは以下のようになります。
```makefile:.env.local
REACT_APP_FIREBASE_API_KEY=your-api-key
REACT_APP_FIREBASE_AUTH_DOMAIN=your-auth-domain
REACT_APP_FIREBASE_PROJECT_ID=your-project-id
REACT_APP_FIREBASE_STORAGE_BUCKET=your-storage-bucket
REACT_APP_FIREBASE_MESSAGING_SENDER_ID=your-messaging-sender-id
REACT_APP_FIREBASE_APP_ID=your-app-id
```
https://firebase.google.com/docs/auth/web/google-signin?hl=ja
https://firebase.google.com/docs/auth/web/start?hl=ja
## ファイル構成
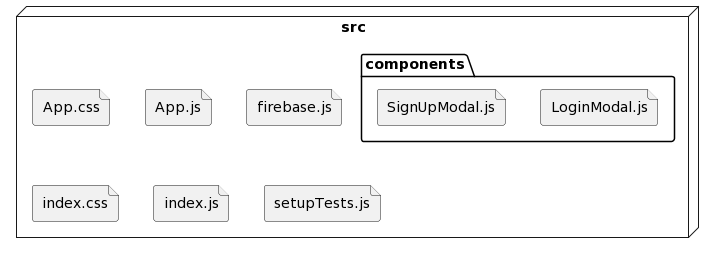
https://www.plantuml.com/plantuml/umla/SoWkIImgAStDuL9NUDoy-d7pdiVD7O-RsnytBNxSlEPnqtemTnLNNdvAge9ISL6oaa8rbm8Gg2i0EPWA7pUkUzmyzN7JmiTDIu3cWPMcPUO0zJeM5EWb5nSheGbbeOYaPHQb9YKMfw89P-Qbf5O0TMCAeYaiJYqfBGX9BIuf1aj0NPgSdrkGdvUQLrACwM28vloSbDGY1IM4GfWt4KRxvATdvldcfoJcmEr4I0PdfkU55g3ArdBLSZcavgM00XS0
## ログイン用モーダルウィンドウの作成
最初にGoogleのアイコンを使用するのでreact-iconsをインストールしておきます。
```bash
npm instal react-icons
```
srcディレクトリ内にcomponentsフォルダを作成し、その中にLoginModal.jsを作成します。
以下は、ログイン用のモーダルウィンドウを作成するコードです。
```react:LoginModal.jsx
// LoginModal.jsx
import React, { useState } from 'react';
import { IoLogoGoogle } from "react-icons/io";
import { provider, auth } from '../firebase'; // Firebaseの認証関連の設定をインポート
import { signInWithPopup, signInWithEmailAndPassword } from 'firebase/auth'; // Firebaseの認証関連のメソッドをインポート
import { Button, Modal, Container, Form } from 'react-bootstrap'; // Bootstrapのコンポーネントをインポート
const LoginModal = ({ show, handleClose, showSignUpModal }) => {
const [email, setEmail] = useState('');
const [password, setPassword] = useState('');
// Googleアカウントを使用してログイン
const signInwithGoogle = async () => {
try {
await signInWithPopup(auth, provider);// FirebaseのsignInWithPopupメソッドを使用してGoogleアカウントでのサインインを試行
handleClose(); // モーダルを閉じる
} catch (error) {
console.error('Googleサインインエラー:', error.message); // エラーメッセージを表示
console.error(error); // エラーをコンソールに出力
}
};
// メールアドレスとパスワードでのログイン処理
const handleSubmit = async (event) => {
event.preventDefault();
try {
await signInWithEmailAndPassword(auth, email, password);
handleClose(); // モーダルを閉じる
} catch (error) {
alert('ログインエラー:', error.message);
console.error(error);
}
};
return (
<>
ログイン
サインインするには:
または:
メールアドレス
setEmail(e.target.value)}
/>
パスワード
setPassword(e.target.value)}
/>
サインイン
アカウントをお持ちではない方
登録する
閉じる
>
);
}
export default LoginModal;
```
## ユーザ登録用モーダルウィンドウの作成
ユーザ登録用のモーダルウィンドウも同様に作成します。
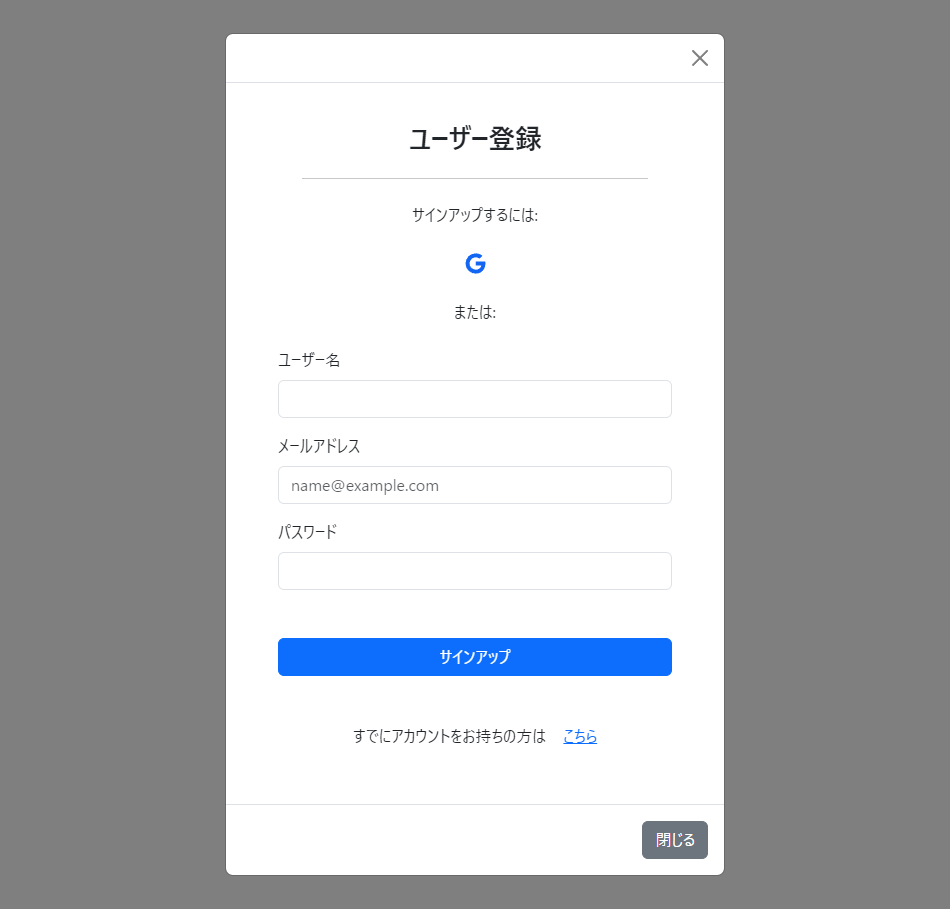
以下は、ユーザ登録用のモーダルウィンドウを作成するコードです。
```react:SignUpModal.jsx
// SignUpModal.jsx
import React, { useState } from 'react';
import { IoLogoGoogle } from "react-icons/io";
import { provider, auth } from '../firebase'; // Firebaseの認証関連の設定をインポート
import { signInWithPopup, createUserWithEmailAndPassword, updateProfile } from 'firebase/auth'; // Firebaseの認証関連のメソッドをインポート
import { Button, Modal, Container, Form } from 'react-bootstrap'; // Bootstrapのコンポーネントをインポート
const SignUpModal = ({ show, handleClose, showLoginModal }) => {
const [email, setEmail] = useState('');
const [password, setPassword] = useState('');
const [username, setUsername] = useState('');
// Googleアカウントでのサインイン処理
const signInwithGoogle = async () => {
try {
await signInWithPopup(auth, provider); // FirebaseのsignInWithPopupメソッドを使用してGoogleアカウントでのサインインを試行
handleClose(); // モーダルを閉じる
} catch (error) {
alert('Googleサインアップエラー:', error.message); // エラーメッセージを表示
console.error(error); // エラーをコンソールに出力
}
};
// メールアドレスとパスワードでのサインアップ処理
const handleSignup = async (event) => {
event.preventDefault();
try {
const userCredential = await createUserWithEmailAndPassword(auth, email, password); // FirebaseのcreateUserWithEmailAndPasswordメソッドを使用してサインアップを試行
const user = userCredential.user;
handleClose(); // モーダルを閉じる
// ユーザー名の設定
await updateProfile(user, {
displayName: username
});
} catch (error) {
alert('サインアップエラー:', error.message); // エラーメッセージを表示
console.error(error); // エラーをコンソールに出力
}
}
return (
<>
ユーザー登録
サインアップするには:
または:
ユーザー名
setUsername(e.target.value)}
/>
メールアドレス
setEmail(e.target.value)}
/>
パスワード
setPassword(e.target.value)}
/>
サインアップ
すでにアカウントをお持ちの方は
こちら
閉じる
>
);
}
export default SignUpModal;
```
モーダル
https://react-bootstrap.netlify.app/docs/components/modal
フォーム
https://react-bootstrap.netlify.app/docs/forms/overview
## アプリケーションの統合
最後に、Appコンポーネントでこれらのモーダルウィンドウを使用します。
ついでに認証後の処理とログアウトの処理も追加します。
```react:App.jsx
import './App.css';
import React, { useState, useEffect } from 'react';
import LoginModal from './components/LoginModal';
import SignUpModal from './components/SignUpModal';
import { Button } from 'react-bootstrap';
import 'bootstrap/dist/css/bootstrap.min.css';
import { onAuthStateChanged } from 'firebase/auth';
import { auth } from './firebase';
function App() {
// ログインしているユーザーの情報を管理するステート
const [user, setUser] = useState(null);
// モーダルの表示状態を管理するステート
const [modals, setModals] = useState({ login: false, signUp: false });
// ログインモーダルを表示する処理
const handleLoginClick = () => {
setModals({ login: true, signUp: false });
};
// ユーザ登録モーダルを表示する処理
const handleSignUpClick = () => {
setModals({ login: false, signUp: true });
};
// モーダルを閉じる処理
const handleCloseModals = () => {
setModals({ login: false, signUp: false });
};
// Firebaseの認証状態が変化した際の処理
useEffect(() => {
const unsubscribe = onAuthStateChanged(auth, (user) => {
if (user) {
setUser(user);
} else {
setUser(null);
}
});
return () => unsubscribe();
}, []);
// ログアウト処理
const handleLogout = () => {
auth.signOut();
// ログアウト後の処理を記述する(例:リダイレクトなど)
};
return (
{user ? (
// ログインしている場合の表示
{user.email} でログイン中
ログアウト
) : (
// ログインしていない場合の表示
<>
ログイン
ユーザー登録
>
)}
{/* ログイン用モーダル */}
);
}
export default App;
```
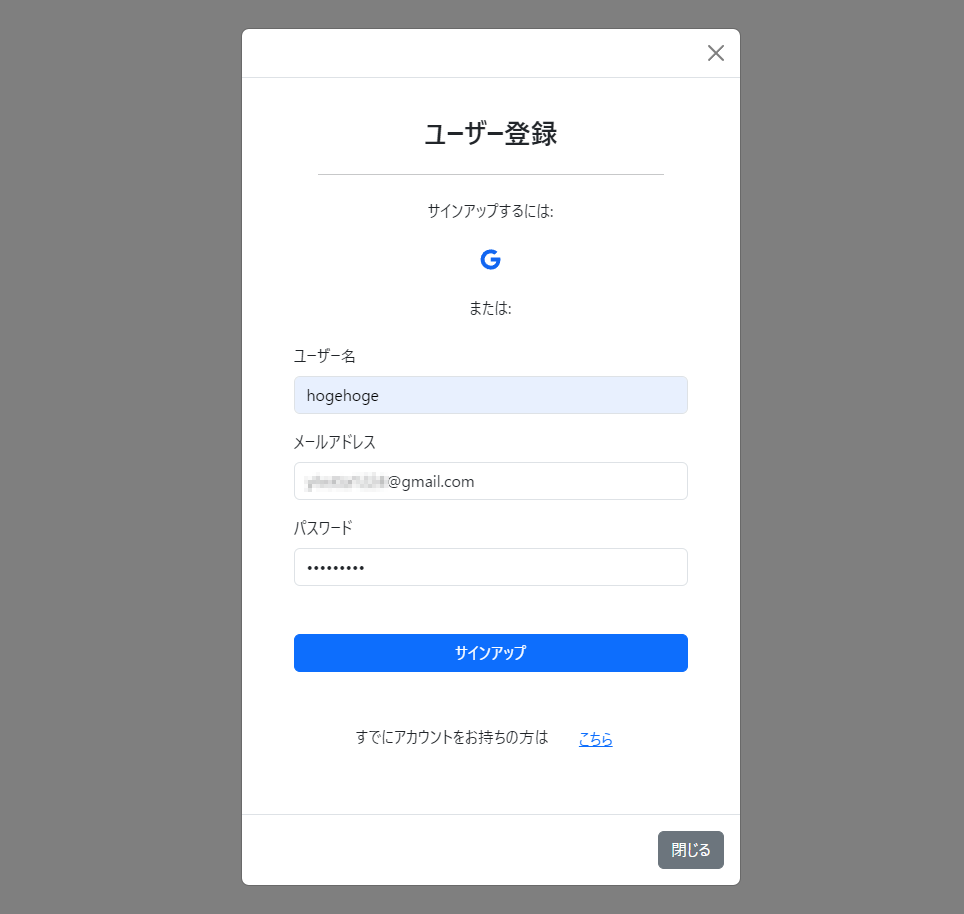
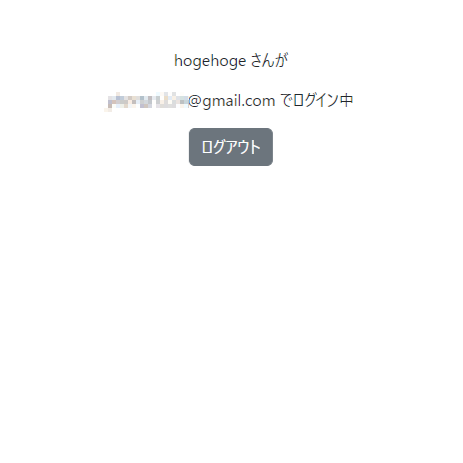
## テスト
#### ユーザー登録機能のテスト
## まとめ
Firebase認証とReact Bootstrapを組み合わせて使用することで、ログインやユーザー登録などの認証機能を簡単に実装できました。
Firebaseの認証機能を利用することで、信頼性の高い認証システムを簡単に導入できるうえ、React Bootstrapを使用することで、UIデザインやレスポンシブデザインに関する考えをあまりすることなく、見栄えの良いUIを構築できました。
これにより、少ないコードと短時間で効率よく機能的なログイン・ユーザー登録フォームを作成することができます。
---
コードはGitHubでご覧いただけます:[GitHubリンク](https://github.com/yhotta240/firebase-auth-template)
https://github.com/yhotta240/firebase-auth-template
qiitaで同じ内容を記載しています。
https://qiita.com/yhotta240/items/0e83cee50db2cf9a091e
## 参考
Firebaseドキュメント
https://firebase.google.com/docs/auth/web/start?hl=ja&_gl=1*s2h8pb*_up*MQ..*_ga*OTgzNTY1MjYxLjE3MTE5NDEyMjE.*_ga_CW55HF8NVT*MTcxMTk0MTIyMC4xLjAuMTcxMTk0MTI0OC4wLjAuMA..#add-initialize-sdk
React Bootstrapドキュメント
https://react-bootstrap.netlify.app/
Bootstrap5設置ガイド
https://bootstrap-guide.com/