https://github.com/yidas/deployer-php-cli
CI/CD Deployment tool written in PHP supported for popular frameworks (Yii2, Laravel, CI3)
https://github.com/yidas/deployer-php-cli
ci-cd continuous-delivery continuous-integration deployment php-cli rsync
Last synced: about 1 year ago
JSON representation
CI/CD Deployment tool written in PHP supported for popular frameworks (Yii2, Laravel, CI3)
- Host: GitHub
- URL: https://github.com/yidas/deployer-php-cli
- Owner: yidas
- License: mit
- Created: 2016-04-28T02:38:16.000Z (about 10 years ago)
- Default Branch: master
- Last Pushed: 2022-10-07T08:14:35.000Z (over 3 years ago)
- Last Synced: 2025-04-15T00:54:45.171Z (about 1 year ago)
- Topics: ci-cd, continuous-delivery, continuous-integration, deployment, php-cli, rsync
- Language: PHP
- Homepage:
- Size: 186 KB
- Stars: 12
- Watchers: 3
- Forks: 9
- Open Issues: 0
-
Metadata Files:
- Readme: README.md
- License: LICENSE
Awesome Lists containing this project
README
Deployer PHP-CLI
================
CI/CD Deployment tool written in PHP supported for popular frameworks
[](https://packagist.org/packages/yidas/deployer-php-cli)
[](https://packagist.org/packages/yidas/deployer-php-cli)
FEATURES
--------
- *Deploy to **multiple** servers by **projects/groups***
- ***Yii2, Laravel, Codeigniter3** Frameworks support*
- ***Pipeline support** for Git, Composer, test and customized tasks*
- ***CI/CD** automation solution*
Helping developers to deploy codes from local instance to remote instances.
---
OUTLINE
-------
* [Demonstration](#demonstration)
* [Requirements](#requirements)
* [Installation](#installation)
- [Composer Installation](#composer-installation)
- [Wget Installation](#wget-installation)
- [Make Command](#make-command)
- [Startup](#startup)
- [Upgrade](#upgrade)
* [Configuration](#configuration)
- [Project Setting](#project-setting)
- [Config Options](#config-options)
- [Git](#git)
- [Composer](#composer)
- [Test](#test)
- [Tests](#tests)
- [Rsync](#rsync)
- [Commands](#commands)
- [Example](#example)
* [Usage](#usage)
- [Interactive Project Select](#interactive-project-select)
- [Non-Interactive Project Select](#non-interactive-project-select)
- [Skip Flows](#skip-flows)
- [Revert & Reset back](#revert--reset-back)
* [Implementation](#implementation)
- [Permissions Handling](#permissions-handling)
* [CI/CD](#cicd)
- [Webhook](#webhook)
- [PHP Web Setting](#php-web-setting)
- [Gitlab](#gitlab)
* [Additions](#additions)
- [Rsync without Password](#rsync-without-password)
- [Save Binary Encode File](#save-binary-encode-file)
- [Yii2 Deployment](#yii2-deployment)
- [Minify/Uglify by Gulp](#minifyuglify-by-gulp)
---
DEMONSTRATION
-------------

### Command Line
Deploy local project to remote servers by just executing the deployer in command after installation:
```
$ deployer
```
> Alternatively, you could call the original bootstrap: `$ ./deployer`, `$ php ./deployer`
The interactive result could like be:
```
$ deployer
Your available projects in configuration:
[0] your.project.com
[1] second.project.com
[2] other.site.com
Please select a project [number or project, Ctrl+C to quit]:0
Selected Project: your.project.com
Successful Excuted Task: Git
Successful Excuted Task: Composer
Successful Excuted Task: Composer
Successful Excuted Task: Test UnitTest
Successful Excuted Task: Commands before: Minify assets
Successful Excuted Task: Deploy to 127.0.0.11
Successful Excuted Task: Deploy to 127.0.0.12
Successful Excuted Task: Deploy
Successful Excuted Task: Commands after: Email notification
```
Or you could run by non-interactive mode with the same purpose:
```
$ deployer --project="your.project.com"
```
---
REQUIREMENTS
------------
This library requires the following:
- PHP(CLI) 5.4.0+
- RSYNC
---
INSTALLATION
------------
### Composer Installation
Using Composer by `sudoer` or `root` to install is the easiest way with auto-installer:
```
composer create-project --prefer-dist yidas/deployer-php-cli
```
### Wget Installation
You could see [Release](https://github.com/yidas/deployer-php-cli/releases) for picking up the package with version, for example:
```
$ wget https://github.com/yidas/deployer-php-cli/archive/master.tar.gz -O deployer-php-cli.tar.gz
```
After download, uncompress the package:
```
$ tar -zxvf deployer-php-cli.tar.gz
```
> In addition, you can rename the unzipped folder by `mkdir deployer-php-cli && tar -zxvf deployer-php-cli.tar.gz --strip-components 1 -C deployer-php-cli`
#### Make Command
To make a command for deployer, if the package folder is `deployer-php-cli` then create a symbol by following command:
```
$ sudo chmod +x $(pwd -L)/deployer-php-cli/deployer
$ sudo ln -s $(pwd -L)/deployer-php-cli/deployer /usr/bin/deployer
```
### Startup
After installation, you could start to set up the `config.inc.php` for deployer, and enjoy to use:
```
$ deployer
```
### Upgrade
To upgrade, you could re-install the deployer and copy the old `config.inc.php` to the new one, for example:
```
$ cp ./deployer-php-cli/config.inc.php ./
$ rm -r deployer-php-cli
$ composer create-project --prefer-dist yidas/deployer-php-cli
$ mv ./config.inc.php ./deployer-php-cli
```
---
CONFIGURATION
-------------
### Project Setting:
You need to set up the projects configuration such as servers, source and destination in `config.inc.php` file:
```php
[
'servers' => [
'127.0.0.1',
],
'source' => '/home/user/project',
'destination' => '/var/www/html/prod/',
],
];
```
> You could refer [config.inc.php](https://github.com/yidas/deployer-php-cli/blob/master/config.inc.php) file as an example..
### Config Options:
Configuration provides many features' setting, you could customize and pick up the setting you need.
|Key|Type|Description|
|:-|:-|:-|
|**servers**|array|Distant server host list|
|**user**|array\|string|Local/Remote server user, auto detect current user if empty|
|**source**|string|Local directory for deploy, use `/` as end means `*` |
|**destination**|string|Remote path for synchronism|
|**exclude**|array|Excluded files based on sourceFile path|
|verbose|bool|Enable verbose with more infomation or not|
#### Git
To use Git into deploy task, you need to init or clone Git to the source directory at the first time:
```
$ git clone git@gitlab.com:username/project-to-deploy.git sourceDir
```
|Key|Type|Description|
|:-|:-|:-|
|enabled|bool|Enable git or not|
|checkout|bool|Execute git checkout -- . before git pull |
|branch|string|Branch name for git pull, pull default branch if empty |
|submodule|bool|Git submodule enabled |
#### Composer
To use Composer into deploy task, make sure that there are composer files in the source directory.
|Key|Type|Description|
|:-|:-|:-|
|enabled|bool|Enable Composer or not|
|path|string|Composer executing relative path which supports multiple array paths|
|command|string|Update command likes `composer update`|
#### Test
To use Test into deploy task, make sure that there are test configuration in the source directory.
|Key|Type|Description|
|:-|:-|:-|
|enabled|bool|Enable Test or not|
|name|string|The test name for display|
|type|string|Test type, support `phpunit`.|
|command|string|The test bootstrap command supported relative filepath such as `./vendor/bin/phpunit`|
|configuration|string|The test configuration file supported relative filepath such as `./phpunit.xml`|
#### Tests
For multiple test tasks, using array to declare each [test options](#test):
```php
return [
'default' => [
'tests' => [
[
'name' => 'Test Task 1',
// ...
],
[
'name' => 'Test Task 2',
// ...
],
],
// ...
```
#### Rsync
|Key|Type|Description|
|:-|:-|:-|
|enabled|bool|Enable rsync or not|
|params|string|Addition params of rsync command|
|timeout|int|Timeout seconds of each rsync connections|
|sleepSeconds|int|Seconds waiting of each rsync connections|
|identityFile|string|Identity file path for appling rsync|
#### Commands
Commands provides you to customize deploy tasks with many trigger hooks.
|Key|Type|Description|
|:-|:-|:-|
|init|array|Addition commands triggered at initialization|
|before|array|Addition commands triggered before deploying|
|after|array|Addition commands triggered after deploying|
### Example
* Copy `project` directory form `/var/www/html/` to destination under `/var/www/html/test/`:
```php
'source' => '/var/www/html/project',
'destination' => '/var/www/html/test/',
```
* Copy all files (`*`) form `/var/www/html/project/` to destination under `/var/www/html/test/`:
```php
'source' => '/var/www/html/project/',
'destination' => '/var/www/html/test/',
```
---
USAGE
-----
```
Usage:
deployer [options] [arguments]
./deployer [options] [arguments]
Options:
-h, --help Display this help message
--version Show the current version of the application
-p, --project Project key by configuration for deployment
--config Show the seleted project configuration
--configuration
--skip-git Force to skip Git process
--skip-composer Force to skip Composer process
--git-reset Git reset to given commit with --hard option
-v, --verbose Increase the verbosity of messages
```
### Interactive Project Select
```
$ deployer
Your available projects in configuration:
[0] default
[1] your.project.com
Please select a project [number or project, Ctrl+C to quit]:your.project.com
Selected Project: your.project.com
Successful Excuted Task: Git
Successful Excuted Task: Composer
Successful Excuted Task: Deploy to 127.0.0.11
Successful Excuted Task: Deploy
```
### Non-Interactive Project Select
```
$ deployer --project="your.project.com"
```
### Skip Flows
You could force to skip flows such as Git and Composer even when you enable then in config.
```
$ deployer --project="default" --skip-git --skip-composer
```
### Revert & Reset back
You could reset git to specified commit by using `--git-reset` option when you get trouble after newest release.
```
$ deployer --project="default" --git-reset="79616d"
```
> This option is same as executing `git reset --hard 79616d` in source project.
---
IMPLEMENTATION
--------------
Assuming `project1` is the developing project which you want to deploy.
Developers must has their own site to develop, for example:
```
# Dev host
/var/www/html/dev/nick/project1
/var/www/html/dev/eric/project1
```
In general, you would has stage `project1` which the files are same as production:
```
# Dev/Stage host
/var/www/html/project1
```
The purpose is that production files need to be synchronous from stage:
```
# Production host
/var/www/html/project1
```
This tool regard stage project as `source`, which means production refers to `destination`, so the config file could like:
```php
return [
'project1' => [
...
'source' => '/var/www/html/project1',
'destination' => '/var/www/html/',
...
```
After running this tool to deploy `project1`, the stage project's files would execute processes likes `git pull` then synchronise to production.
### Permissions Handling
##### 1. Local and Remote Users
You could create a user on local for runing Deployer with `umask 002`. It will run process by the local user you set even you run Deployer by root:
```php
return [
'project1' => [
'user' => [
'local' => 'deployer',
'remote' => 'deployer',
],
...
```
##### 2. Application File Permissions
Deployer uses `rsync` to deploy local source project to remote ***without*** `--no-perms`, which means that the source files' permission would keep on remote, but the files' owner would re-generate by remote user including `root` with `--no-owner --no-group`.
On the remote user, you could set the user's default groud ID to `www-data` in `/etc/passwd`, which the ***local user*** generates `664/775` mod files to deploy for ***remote*** `www-data` access.
> For local user, `umask 002` could be set in `~/.bashrc` or global. Note that the permission need to apply for source files such as init from Git clone.
---
CI/CD
-----
### Webhook
Deployer provides webhook feature for triggering project deployment by any webhook service such as Gitlab.
To use webhook, you need add webhook setting into the projects you needed in `config.inc.php`:
```php
return [
'project' => [
// ...
'webhook' => [
'enabled' => true,
'provider' => 'gitlab',
'project' => 'yidas/deployer-php-cli',
'token' => 'da39a3ee5e6b4b0d3255bfef95601890afd80709',
'branch' => 'release',
'log' => '/tmp/deployer-webhook-project.log'
],
],
];
```
|Key|Type|Description|
|:-|:-|:-|
|enabled|bool|Enable Webhook or not|
|provider|string|Webhook provider such as `gitlab`|
|project|string|Provider's project name likes `username/project`|
|token|string|Webhook secret token|
|branch|string|Listening branch for push event|
|log|bool\|string|Enabled log and specify the log file|
#### PHP Web Setting
Deployer need a user to excute deployment, and the user is usually not the PHP web user.
For PHP-FPM, you could add a new PHP pool socket with the current user setting for the webhook site, for example `/etc/php/fpm/pool.d/deployer.conf`:
```php
[deployer]
user = deployer
group = www-data
listen = /run/php/php7.0-fpm_deployer.sock
```
Then give the new socket to the webhook server setting, for Nginx eaxmple `/etc/nginx/site-enabled/webhook`:
```nginx
server_name webhook.your.com;
root /srv/deployer/deployer-php-cli/webhook;
location ~ \.php$ {
include snippets/fastcgi-php.conf;
fastcgi_param SCRIPT_FILENAME $request_filename;
fastcgi_pass unix:/run/php/php7.0-fpm_deployer.sock;
}
```
After a successful webhook, Deployer would prepare to process while responding the status and the result url for checking the deployment result.
> Note: The `PATH` environment variable between Shell and PHP should be set to the same to prevent any unexpected problems.
#### Gitlab
- Prividor key: `gitlab`
According to above Nginx website setting, the webhook URL could be `https://webhook.your.com/gitlab`. After setting `config.inc.php` and setting up scecret token, you could give a push event to go!
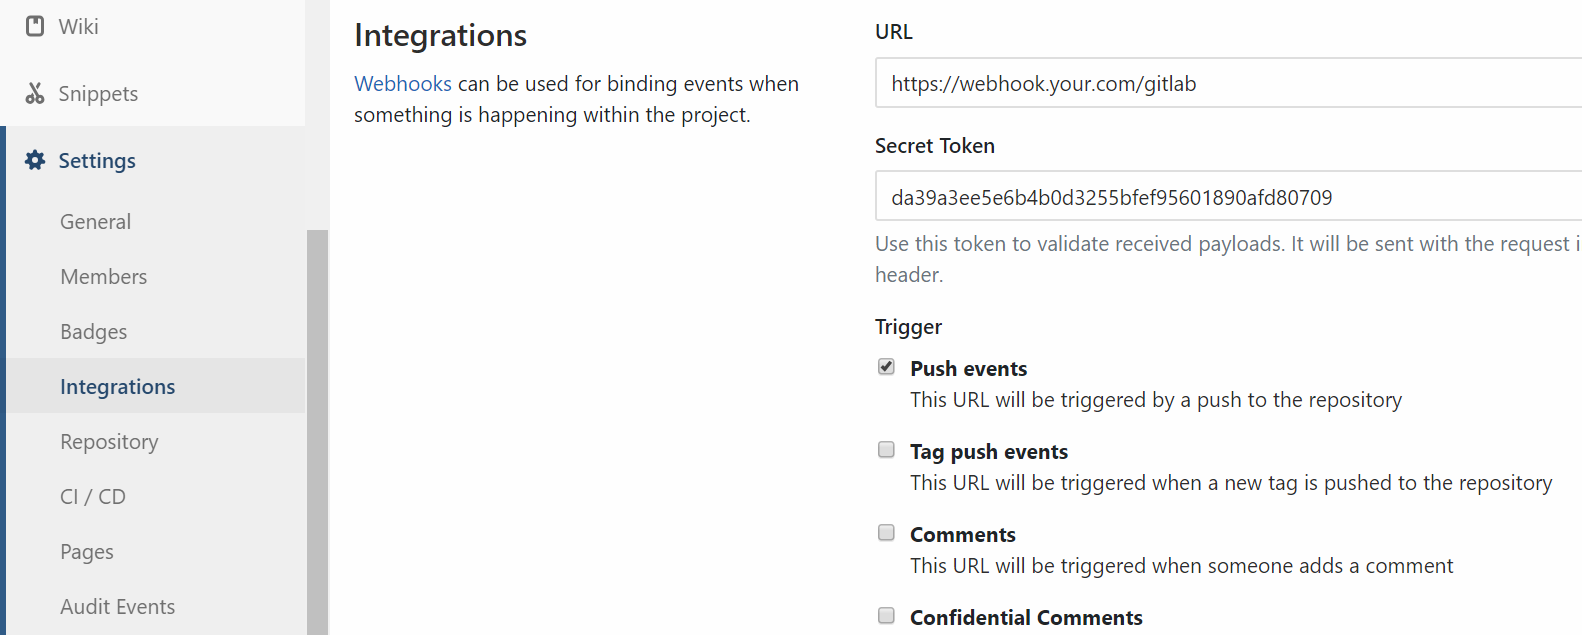
> Note: Default setting is listen `release` branch's push event to trigger.
To browse the web page for result log report, enter the same webhook URL with `log` and `token` parameters to access.
For example: `https://webhook.your.com/gitlab?log={project-name}&token={project-token}`
---
ADDITIONS
---------
### Rsync without Password:
You can put your local user's SSH public key to destination server user for authorization.
```
.ssh/id_rsa.pub >> .ssh/authorized_keys
```
### Save Binary Encode File:
While excuting script, if you get the error like `Exception: Zend Extension ./deployer does not exist`, you may save the script file with binary encode, which could done by using `vim`:
```
:set ff=unix
```
### Yii2 Deployment
For `yii2-app-advanced`, you need to enable Composer and set yii2 init command in `config.inc.php`:
```php
'composer' => [
'enabled' => true,
],
'commands' => [
'before' => [
'yii2 init prod' => './init --env=Production --overwrite=All',
],
],
```
### Minify/Uglify by Gulp
#### 1. Install NPM, for Debian/Ubuntu:
```
apt-get install npm
```
#### 2. Install Gulp by NPM
```
npm install -g gulp
```
#### 3. Create Gulp Project
```
cd /srv/tools/minify-project
npm init
npm install gulp --save-dev
touch gulpfile.js
```
#### 4. Set Gulp with packages
Package: [gulp-uglify](https://www.npmjs.com/package/gulp-uglify)
```
$ npm install gulp-uglify --save-dev
$ npm install pump --save-dev
```
`gulpfile.js`:
```javascript
var gulp = require('gulp');
var uglify = require('gulp-uglify');
var pump = require('pump');
var assetPath = '/srv/your.project.com/assets/js';
gulp.task('compress', function (callback) {
pump([
gulp.src(assetPath+'/**/*.js'),
uglify(),
gulp.dest(assetPath)
],
callback
);
});
```
#### 5. Set Gulp Process into Deployer
```
'source' => '/srv/project',
'commands' => [
'before' => [
'Minify inner JS' => [
'command' => 'cd /srv/tools/minify-project; gulp compress',
],
],
],
```