https://github.com/yujiosaka/chatiq
ChatIQ is a versatile Slack bot using GPT & Weaviate-powered long-term memory to accomplish various tasks.
https://github.com/yujiosaka/chatiq
bolt chatgpt chatgpt-api langchain slack slack-bot weaviate
Last synced: about 1 year ago
JSON representation
ChatIQ is a versatile Slack bot using GPT & Weaviate-powered long-term memory to accomplish various tasks.
- Host: GitHub
- URL: https://github.com/yujiosaka/chatiq
- Owner: yujiosaka
- License: gpl-3.0
- Created: 2023-05-29T04:04:34.000Z (about 3 years ago)
- Default Branch: main
- Last Pushed: 2024-03-17T22:48:13.000Z (about 2 years ago)
- Last Synced: 2025-01-20T23:03:03.475Z (over 1 year ago)
- Topics: bolt, chatgpt, chatgpt-api, langchain, slack, slack-bot, weaviate
- Language: Python
- Homepage:
- Size: 845 KB
- Stars: 30
- Watchers: 2
- Forks: 6
- Open Issues: 6
-
Metadata Files:
- Readme: README.md
- Changelog: CHANGELOG.md
- Contributing: .github/CONTRIBUTING.md
- Funding: .github/FUNDING.yml
- License: LICENSE
- Code of conduct: .github/CODE_OF_CONDUCT.md
Awesome Lists containing this project
README
# ChatIQ [](https://github.com/yujiosaka/ChatIQ/actions/workflows/ci_cd.yml) [](https://codecov.io/gh/yujiosaka/ChatIQ)
###### [Usage](https://github.com/yujiosaka/ChatIQ#how-to-use) | [Prerequisites](https://github.com/yujiosaka/ChatIQ#Prerequisites) | [Installation](https://github.com/yujiosaka/ChatIQ#installation) | [Development](https://github.com/yujiosaka/ChatIQ#development) | [Deployment](https://github.com/yujiosaka/ChatIQ#local-deployment) | [Configuration](https://github.com/yujiosaka/ChatIQ#configuration) | [Limitations](https://github.com/yujiosaka/ChatIQ#limitations-and-considerations) | [FAQ](https://github.com/yujiosaka/ChatIQ#faq) | [Tips](https://github.com/yujiosaka/ChatIQ#tips) | [Changelog](https://github.com/yujiosaka/ChatIQ/blob/master/CHANGELOG.md) | [License](https://github.com/yujiosaka/ChatIQ/blob/master/LICENSE)
ChatIQ is a versatile Slack bot using GPT & Weaviate-powered long-term memory to accomplish various tasks.
## Features

- Provides Home view for configurations.
- Extracts context from the channel description and topic.
- Uses OpenAI's GPT model for generating responses.
- Reads conversation replies in the mentioned thread.
- Uses [Weaviate](https://weaviate.io/) to store conversations in long-term memory.
- Stores titles and previews of unfurling links in long-term memory.
- Stores plain text and PDF file attachments in long-term memory.
- Detects channel privacy to keeps private conversations within the channel.
- Support integrating with existing [Flask](https://flask.palletsprojects.com/) or [Bolt](https://github.com/SlackAPI/bolt-python) applications.
- Easily deployable to Kubernetes using provided configurations.
## How to Use
### Configure workspace settings
Click ChatIQ app to configure Slack workspace settings in App Home.
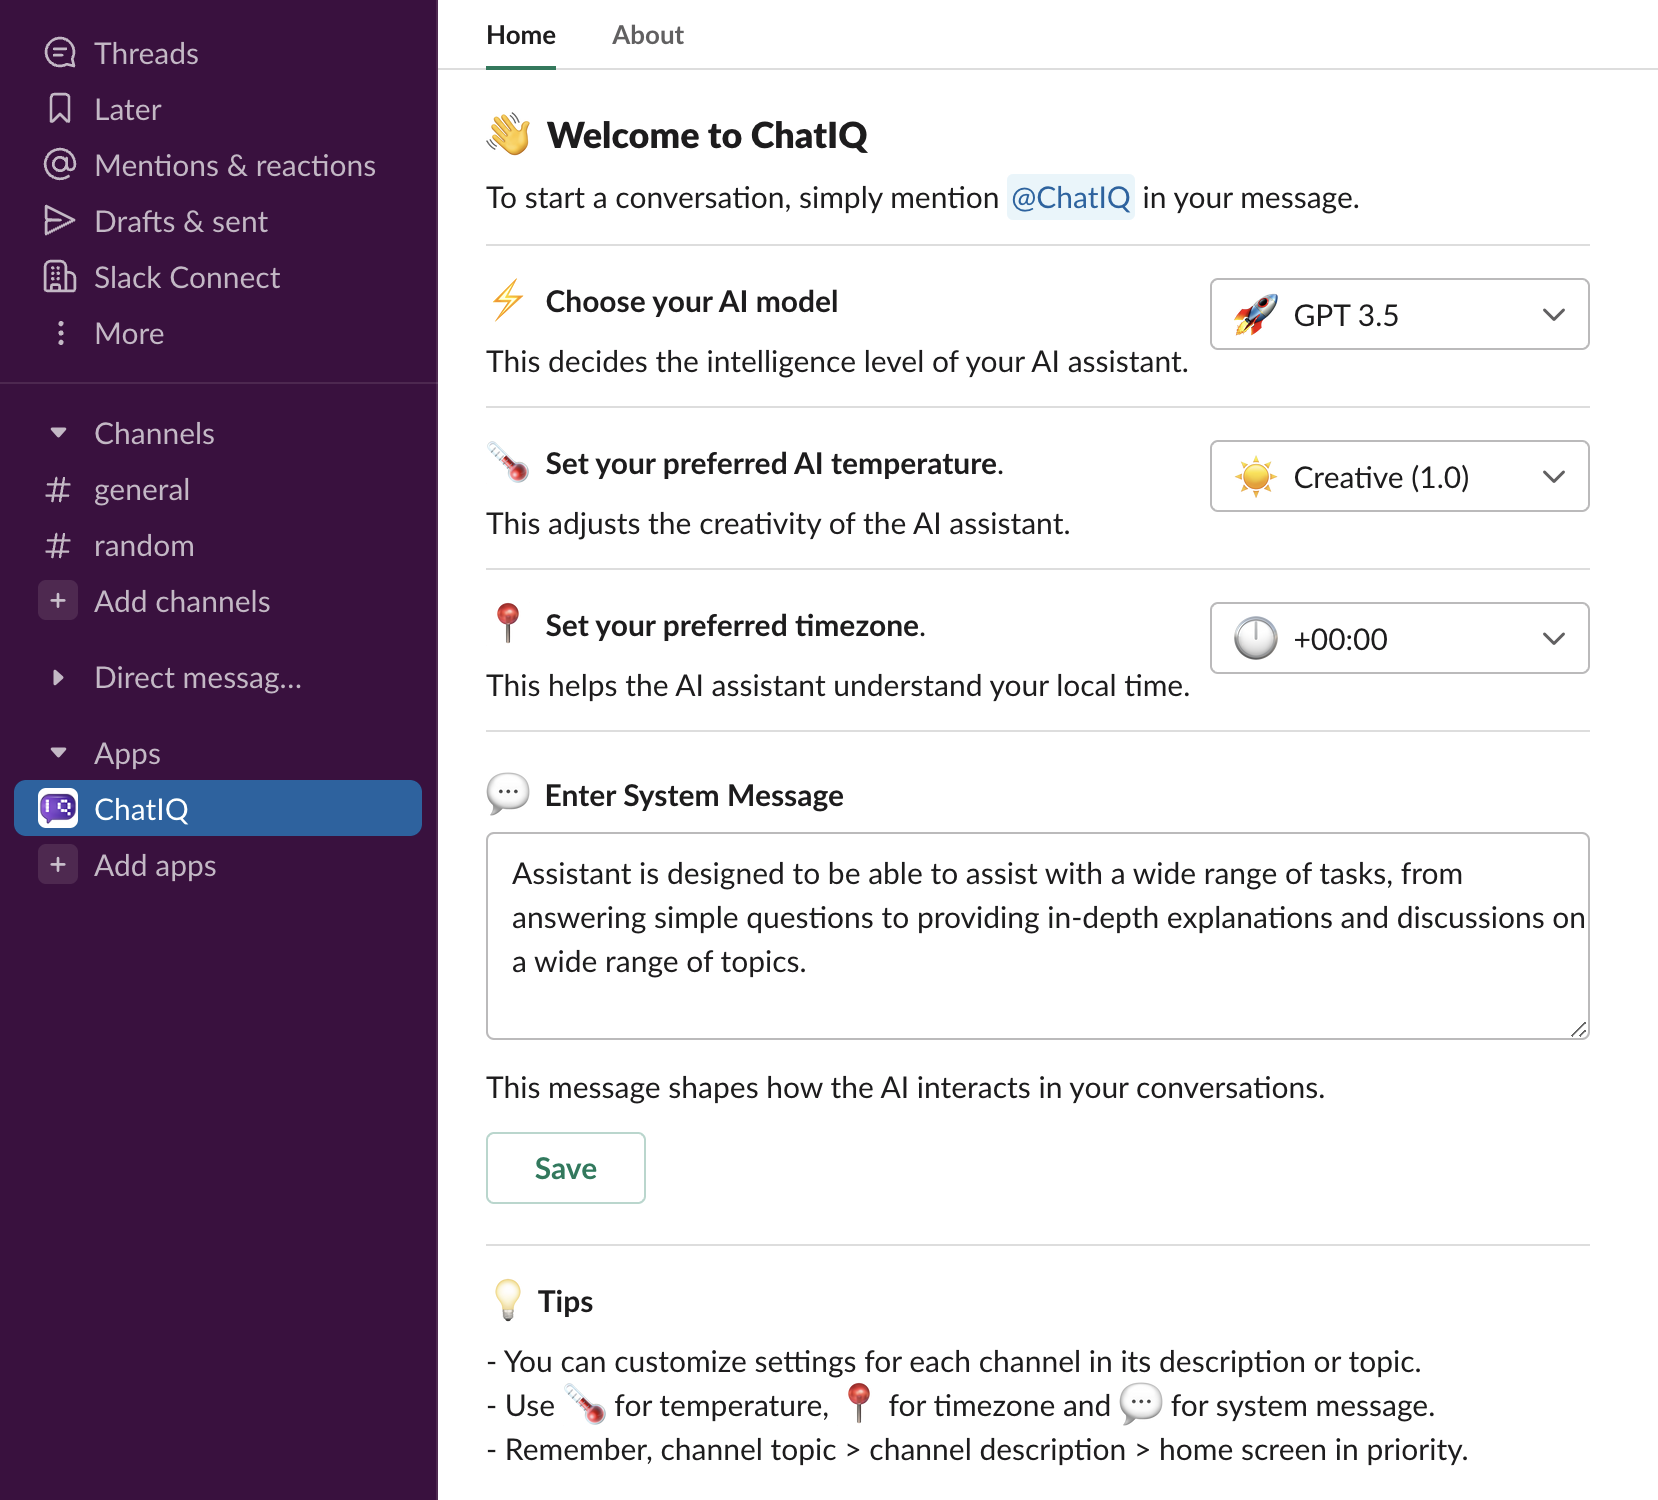
### Configure channel settings
Use emojis in Slack channel topics and descriptions to override workspace settings.
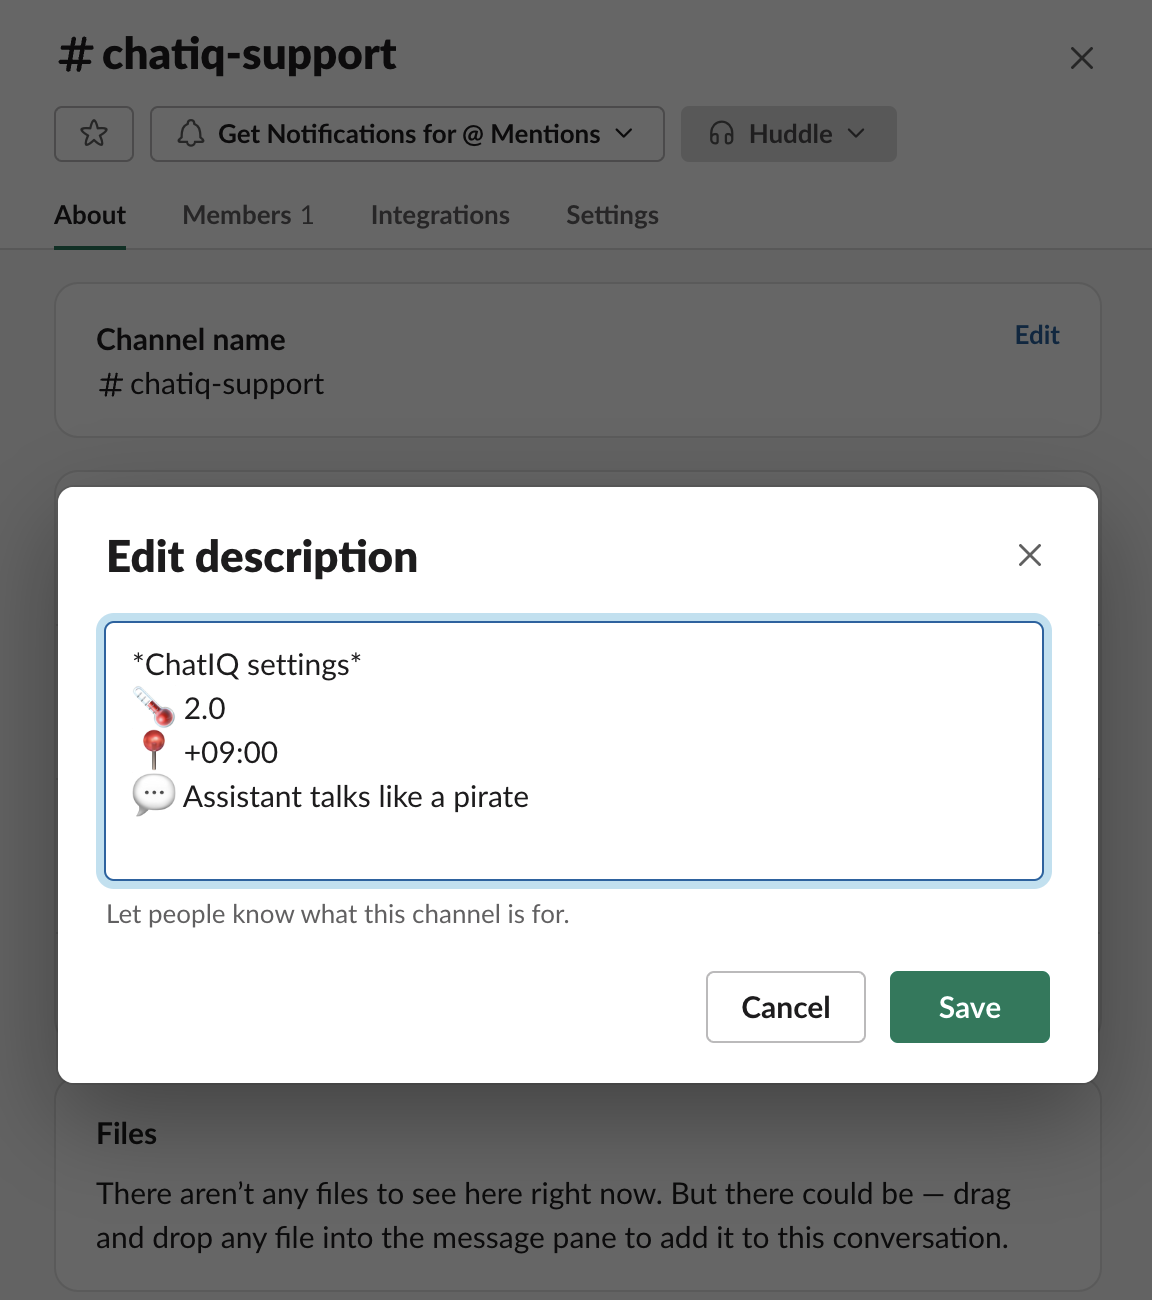
- Use :thermometer: for temperature, :round_pushpin: for timezone and :speech_balloon: for system message to override workspace settings.
- Override channel descriptions by channel topics. (channel topic > channel description > app home in priority)
### Start conversation
Mention `@ChatIQ` to start conversation.
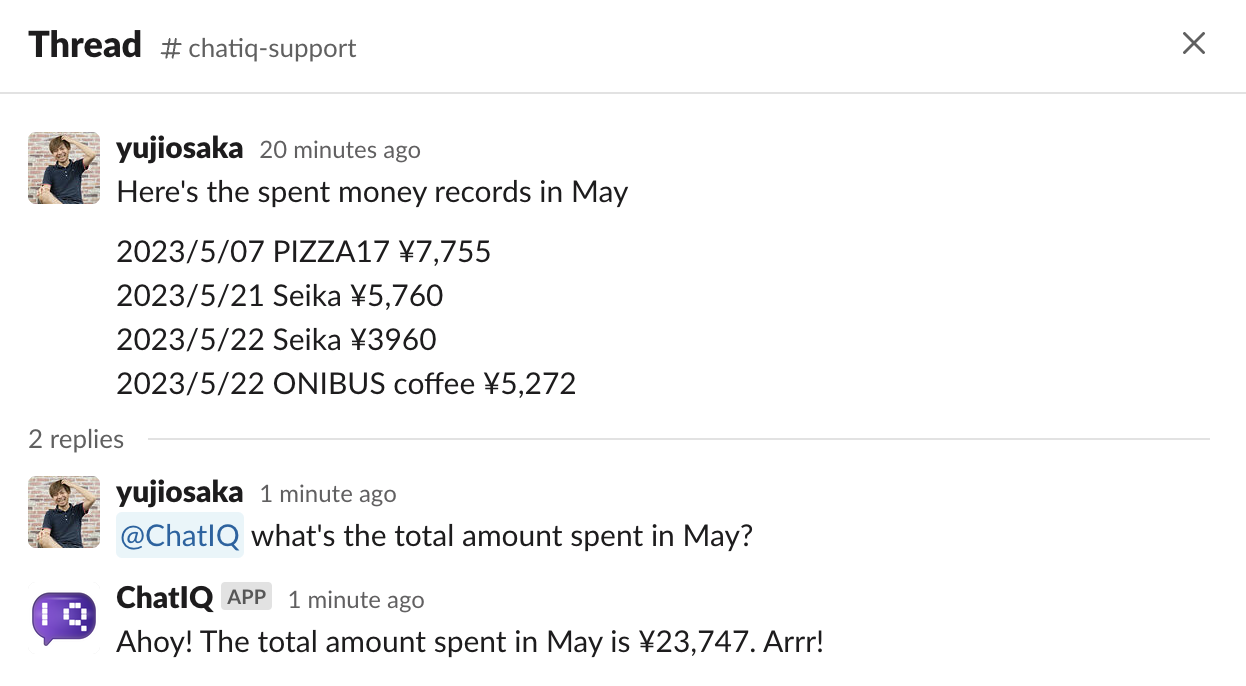
### Reads from long-term memory
More interestingly, you can ask `@ChatIQ` for the past conversations and even uploaded files in the current channel and public channels that`@ChatIQ` is invited to.

## Prerequisites
- Python 3.10
- A Slack bot token
- An OpenAI API key
- A Weaviate instance
- A PostgreSQL instance
### Weaviate Setup
If you plan to run the chatbot locally without Docker Compose or Kubernetes, you will need to set up a Weaviate instance. Follow the [instructions](https://weaviate.io/developers/weaviate/installation) to install and configure Weaviate.
When running the chatbot with Docker Compose or Kubernetes, no additional setup is required for Weaviate as it is included in the configurations.
### PostgreSQL Setup
The chatbot requires a PostgreSQL database to store OAuth tokens and state information. If you're running the bot locally without Docker Compose or Kubernetes, you will need to set up and configure a PostgreSQL instance. Please refer to the [official PostgreSQL documentation](https://www.postgresql.org/docs/current/tutorial-install.html) for installation instructions.
When running the chatbot with Docker Compose or Kubernetes, no additional setup is required for PostgreSQL as it is included in the configurations.
## Installation
To install the package, you can use `pip`:
```sh
pip install chatiq
```
## Standalone Server
After installing the `chatiq` package, you can start the server by running:
```sh
chatiq
```
By default, the server listens on port 3000. To specify a different port, use the `-p` or `--port` option:
```sh
chatiq --port 4000
```
To configure the server, you can set various environment variables. A complete list of available environment variables and their default values can be found in the [.env.example](https://github.com/yujiosaka/ChatIQ/blob/main/.env.example) file.
## Integration with FastAPI
ChatIQ does not officially support [FastAPI](https://github.com/slackapi/python-slack-sdk/issues/1276) because [one of the critical components in Python Slack SDK for multi-workspace support does not yet support asyncio](https://github.com/slackapi/python-slack-sdk/issues/1276).
But the rest of the codebase is independent from server frameworks. So feel free to try integrating with FastAPI on your own. FastAPI will be officially supported as soon as the upstream issue is resolved.
## Integration with Flask
ChatIQ can be integrated with [Flask](https://flask.palletsprojects.com/). Below are examples of how to set up a simple ChatIQ server with Flask.
First, install Flask and an ASGI server like [Gunicorn](https://gunicorn.org/):
```sh
pip install gunicorn
```
Create a file named `app.py` with the following content:
```python
from flask import Flask, make_response, request
from slack_bolt import BoltRequest
from slack_bolt.adapter.flask import SlackRequestHandler
from chatiq import ChatIQ
# Initialize ChatIQ with your settings
chatiq = ChatIQ(
slack_client_id="your-slack-client-id", # Optional, or read SLACK_CLIENT_ID from environment variables
slack_client_secret="your-slack-client-secret", # Optional, or read SLACK_CLIENT_SECRET from environment variables
slack_signing_secret="your-slack-signing-secret", # Optional, or read SLACK_SIGNING_SECRET from environment variables
openai_api_key="your-openai-api-key", # Optional, or read OPENAI_API_KEY from environment variables
postgres_url="your-postgres-url", # Optional, or read POSTGRES_URL from environment variables
weaviate_url="your-weaviate-url", # Optional, or read WEAVIATE_URL from environment variables
rate_limit_retry=True, # Optional. Enable the rate limit retry handler (default is False)
)
# Start listening for Slack events
chatiq.listen()
# Create a Flask app
app = Flask(__name__)
# Create a SlackRequestHandler with the Bolt app from ChatIQ
handler = SlackRequestHandler(chatiq.bolt_app)
# Handle installation and OAuth redirect endpoints
@app.route("/slack/install", methods=["GET"])
@app.route("/slack/oauth_redirect", methods=["GET"])
def oauth_redirect():
# Use the SlackRequestHandler to handle these requests
return handler.handle(request)
# Handle Slack events
@app.route("/slack/events", methods=["POST"])
def endpoint():
# Get the request body and headers
body = request.get_data().decode("utf-8")
headers = {k: v for k, v in request.headers}
# Create a BoltRequest from the request data
bolt_req = BoltRequest(body=body, headers=headers)
# Dispatch the Bolt request in the ChatIQ's Bolt app
bolt_resp = chatiq.bolt_app.dispatch(bolt_req)
# Return the response from the Bolt app
return make_response(bolt_resp.body, bolt_resp.status, bolt_resp.headers)
```
Run the Flask app with Gunicorn:
```sh
gunicorn app:app
```
## Integration with Existing Bolt Apps
In addition to integrating with web frameworks, ChatIQ can also be plugged into your existing [Bolt](https://github.com/SlackAPI/bolt-python) apps. This allows you to add the functionality of ChatIQ to your existing Slack apps. Here's a simple example:
```python
from slack_bolt import App
from chatiq import ChatIQ
# Assume that you have an existing Bolt app
bolt_app = App(...)
# Initialize ChatIQ with the existing Bolt app
chatiq = ChatIQ(
bolt_app=bolt_app,
openai_api_key="your-openai-api-key", # Optional, or read OPENAI_API_KEY from environment variables
postgres_url="your-postgres-url", # Optional, or read POSTGRES_URL from environment variables
weaviate_url="your-weaviate-url", # Optional, or read WEAVIATE_URL from environment variables
rate_limit_retry=True, # Optional. Enable the rate limit retry handler (default is False)
)
# Start listening for Slack events
chatiq.listen()
```
Please note that if the same event is registered multiple times in a Bolt app, all the handlers will execute in the order they were registered. Therefore, the event handlers of ChatIQ will be added after your existing handlers. If your existing Bolt app has settings that conflict with ChatIQ, it might cause unexpected behaviors.
## Development
There are two ways to set up the development environment: manually or using Visual Studio Code and the [Dev Containers](https://marketplace.visualstudio.com/items?itemName=ms-vscode-remote.remote-containers).
### Manual Setup
1. Clone the repository:
```sh
git clone https://github.com/yujiosaka/ChatIQ.git
```
2. Navigate to the project directory:
```sh
cd chatiq
```
3. Install `poetry`:
```sh
pip install poetry
```
4. Run the `setup_dev_env.sh` script to set up your development environment:
```sh
./setup_dev_env.sh
```
5. Set the required environment variables in a `.env` file.
6. Run the chatbot:
```sh
flask --app chatiq.main:app --debug run
```
### Docker Dev Container Setup
Using Visual Studio Code and the [Dev Containers](https://marketplace.visualstudio.com/items?itemName=ms-vscode-remote.remote-containers) extension, you can simplify the development environment setup process. The extension allows you to develop inside a Docker container and automatically sets up the development environment for you.
1. Install the [Dev Containers](https://marketplace.visualstudio.com/items?itemName=ms-vscode-remote.remote-containers) extension in Visual Studio Code.
2. Clone the repository:
```sh
git clone https://github.com/yujiosaka/ChatIQ.git
```
3. Open the cloned repository in Visual Studio Code.
4. When prompted by Visual Studio Code, click "Reopen in Container" to open the project inside the Docker container.
5. The extension will build the Docker container and set up the development environment for you. This may take a few minutes.
6. Set the required environment variables in a `.env` file.
7. Build and run the Docker container with Docker Compose:
```sh
docker-compose up --build
```
## Local Deployment
To deploy the services locally, follow the steps below:
### Set up the repository
1. Clone the repository:
```sh
git clone https://github.com/yujiosaka/ChatIQ.git
```
2. Navigate to the project directory:
```sh
cd chatiq
```
### Secrets and ConfigMaps
Before deploying the services, you need to set up Kubernetes Secrets and ConfigMaps.
1. Create a `.env` file from the `.env.example` file and fill it with your actual values.
2. Use the following command to create Kubernetes Secrets:
```sh
make create-secrets
```
3. For ConfigMaps, use the following command:
```sh
make create-configmap
```
By default, the ConfigMap will be created with the `LOG_LEVEL` value set to `info`. If you want to use a different value, you can specify it as an argument:
```sh
make create-configmap LOG_LEVEL=debug
```
### Deploying to Kubernetes
To deploy the services to Kubernetes, use the following command:
```sh
make deploy
```
This command applies all Kubernetes configuration files located in the `./kubernetes/` directory.
Make sure you have a compatible version of Kubernetes running. The project has been tested and verified with Kubernetes version `1.25.4`. You can check your Kubernetes version using the following command:
```sh
kubectl version
```
### Accessing Services
To access the deployed services, use the following command to get the list of services and their corresponding URLs:
```sh
kubectl get services
```
To check the availability of the service, you can access the health check endpoint at http://localhost:3000/healthcheck.
### Cleaning Up
To delete all the deployed resources, use the following command:
```sh
make delete
```
Note: Make sure you have `kubectl` configured to communicate with your Kubernetes cluster.
### Docker Hub Repository
Docker images for this project are available in the [Docker Hub repository](https://hub.docker.com/r/yujiosaka/chatiq). You can find suitable images for different versions or tags of the ChatIQ application.
## Configuration
To configure and install ChatIQ in your Slack workspace, follow the steps below:
### Create a new app from the manifest
1. Go to Slack's [Your Apps](https://api.slack.com/apps) page and click on "Create an App".
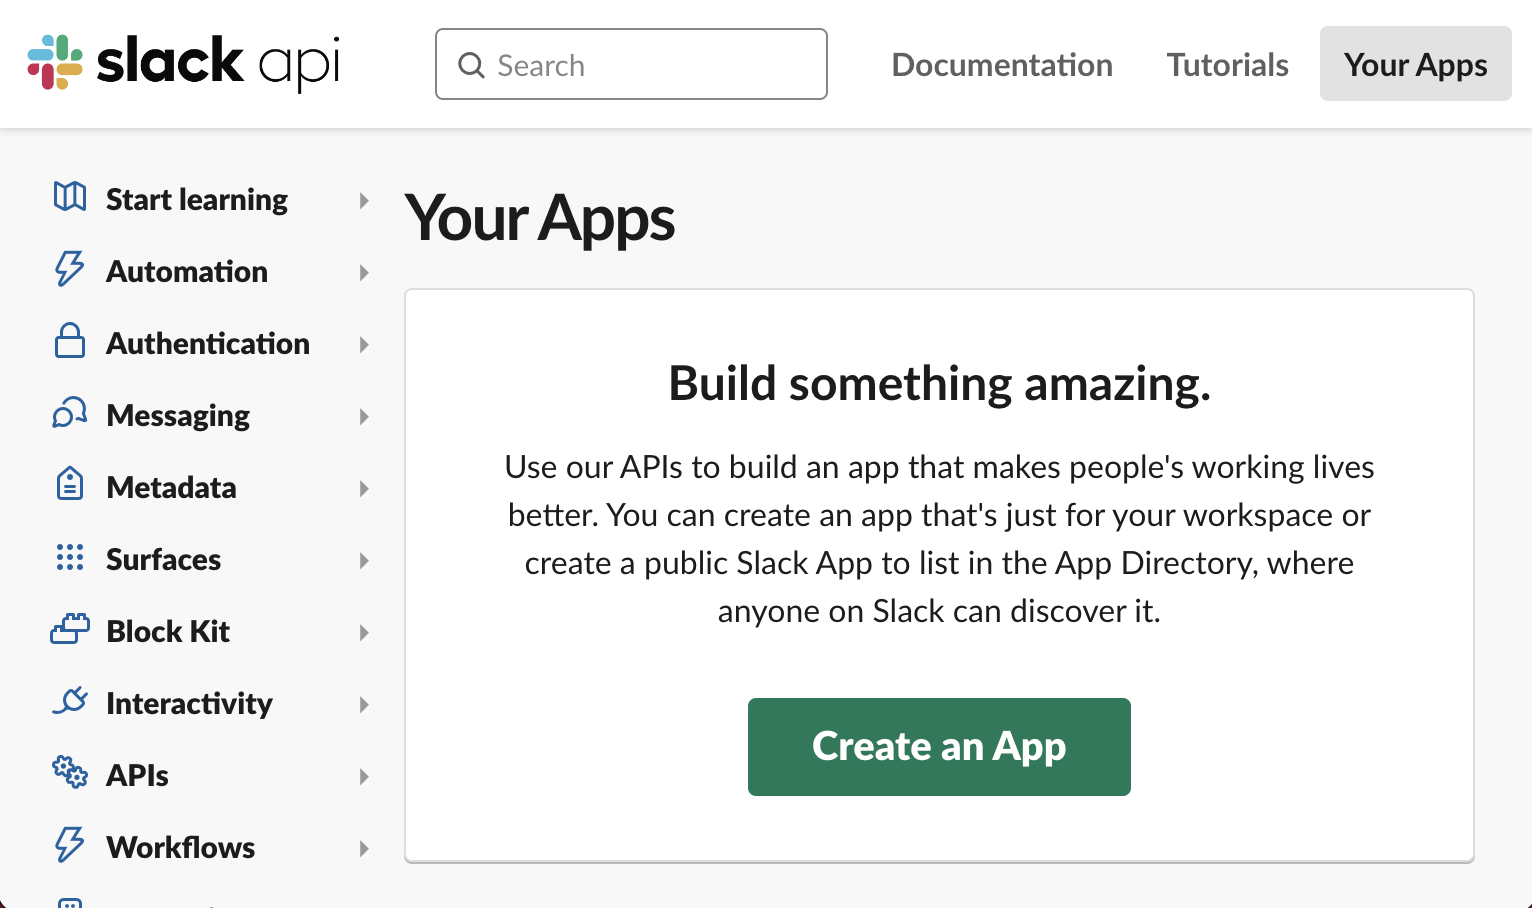
2. Select "From an app manifest" as the creation method.
3. Choose the workspace where you want to install the app and click the "Next" button.
4. Copy the contents of the [manifest.yaml](https://github.com/yujiosaka/ChatIQ/blob/main/manifest.yml) file and paste it into the text field. Then click the "Next" button.
5. Review the app details and click "Create" to create the app.
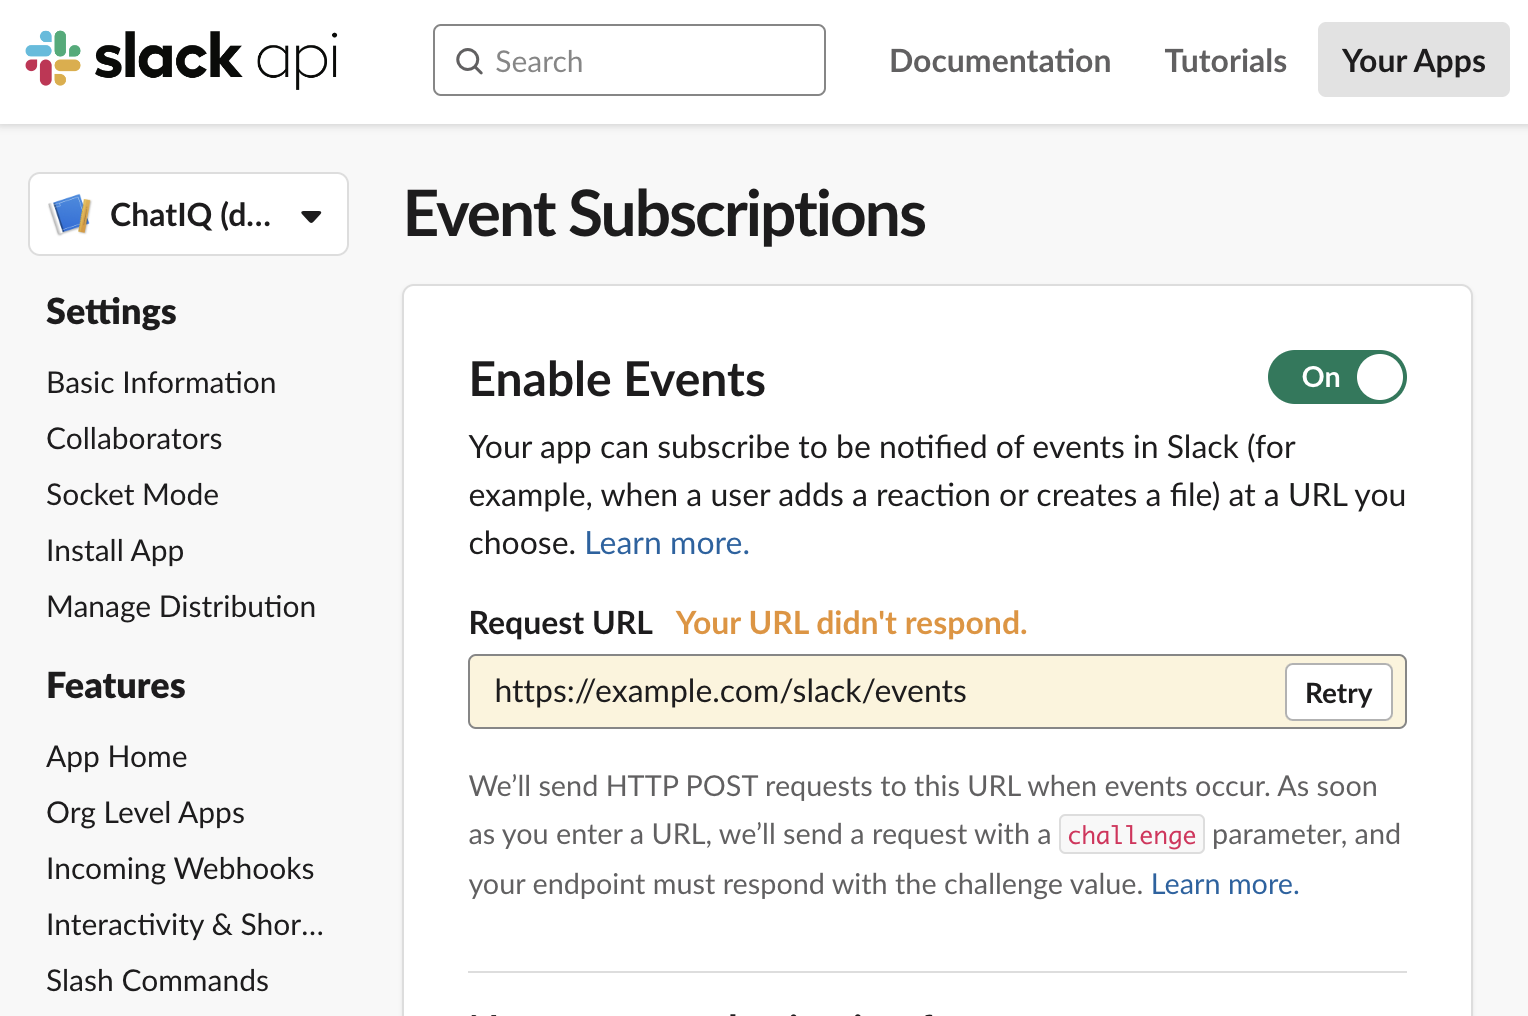
### Modify the URLs
Before installing the app, you need to modify the URLs in Slack's app settings:
- In the "Event Subscriptions" section, update the "Request URL" field by replacing `example.com` with your app's domain.
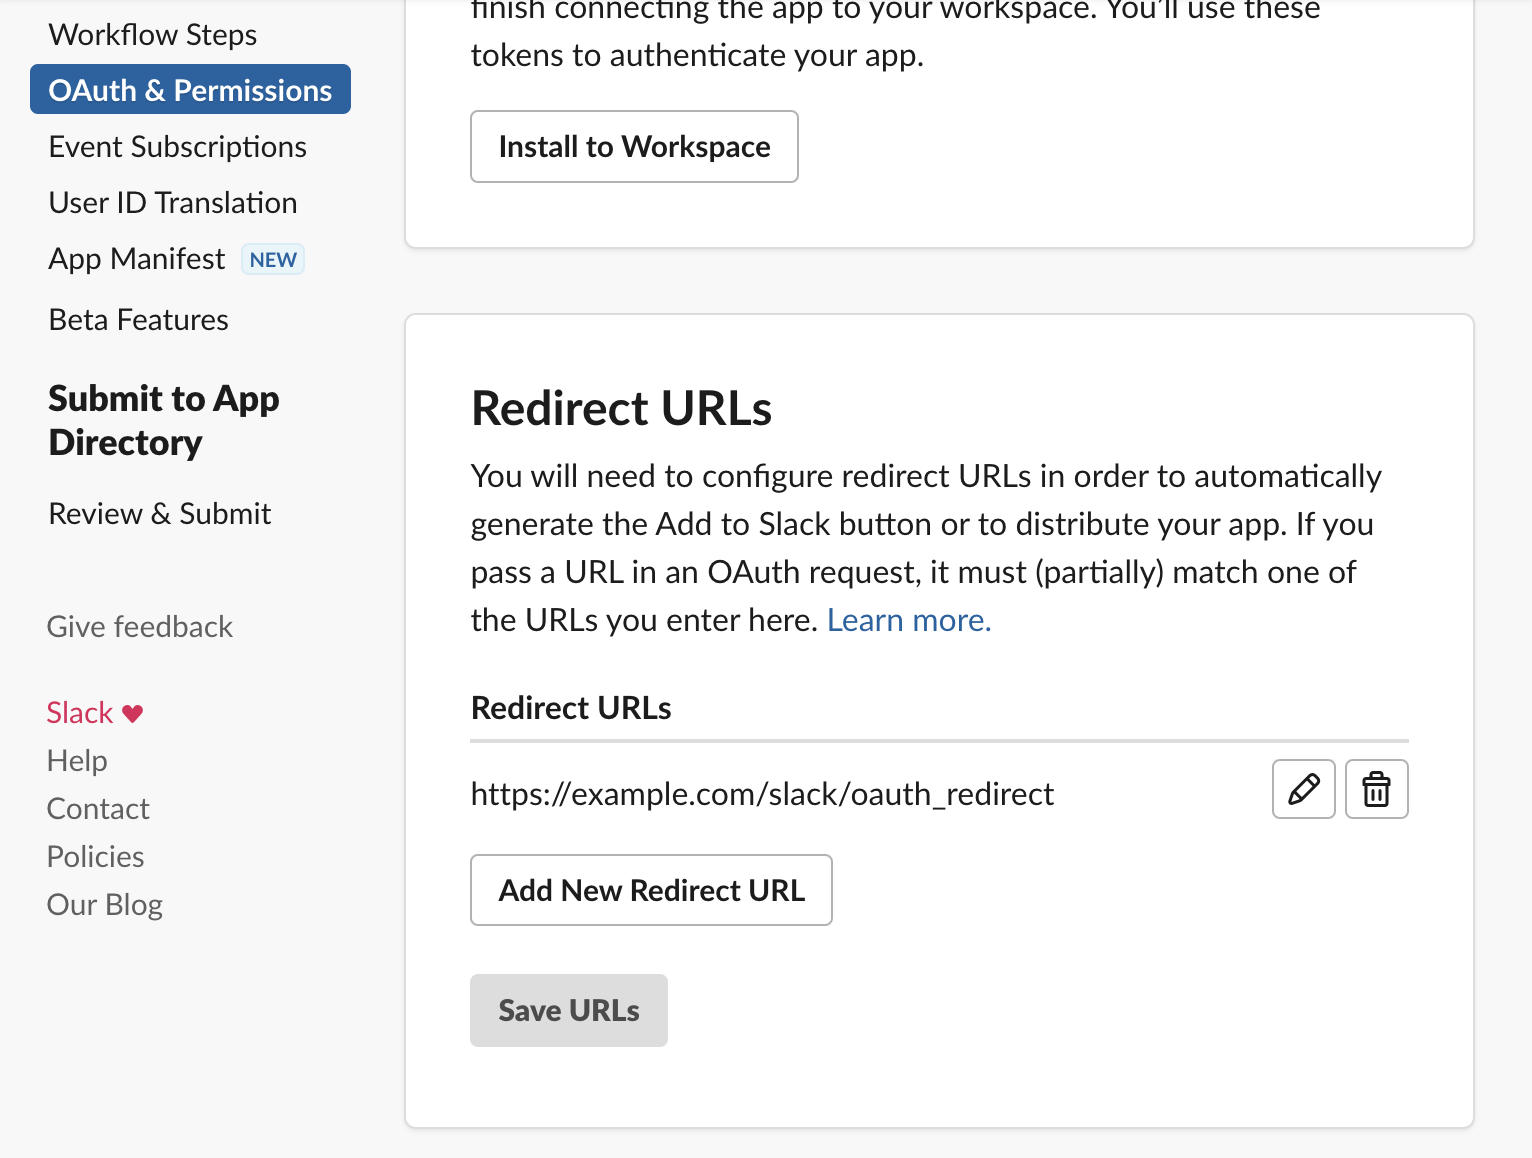
- In the "OAuth & Permissions" section, update the "Redirect URLs" by replacing `example.com` with your app's domain.
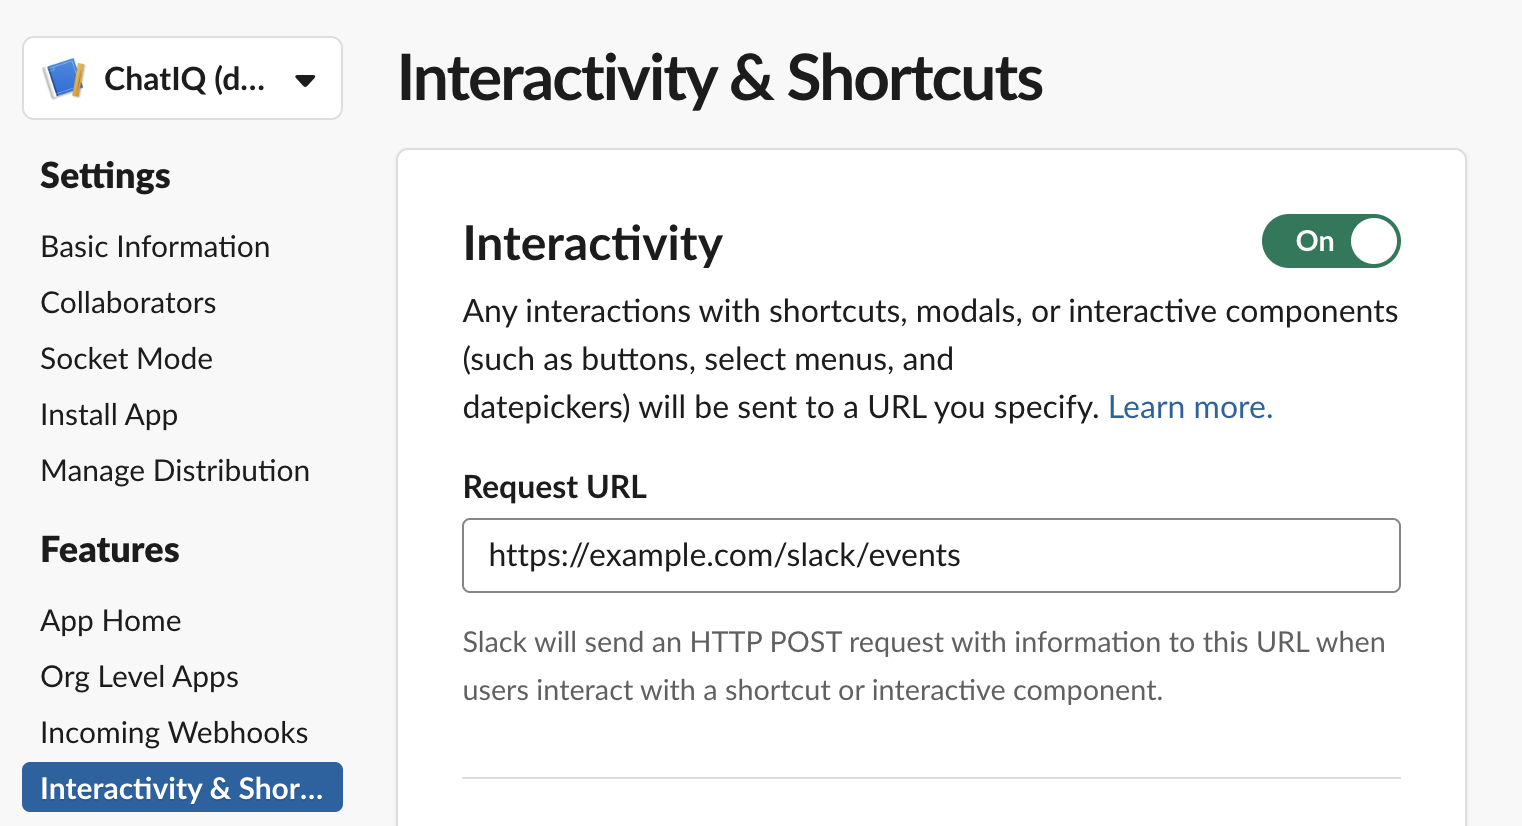
- In the "Interactivity & Shortcuts" section, update the "Request URL" field by replacing `example.com` with your app's domain.
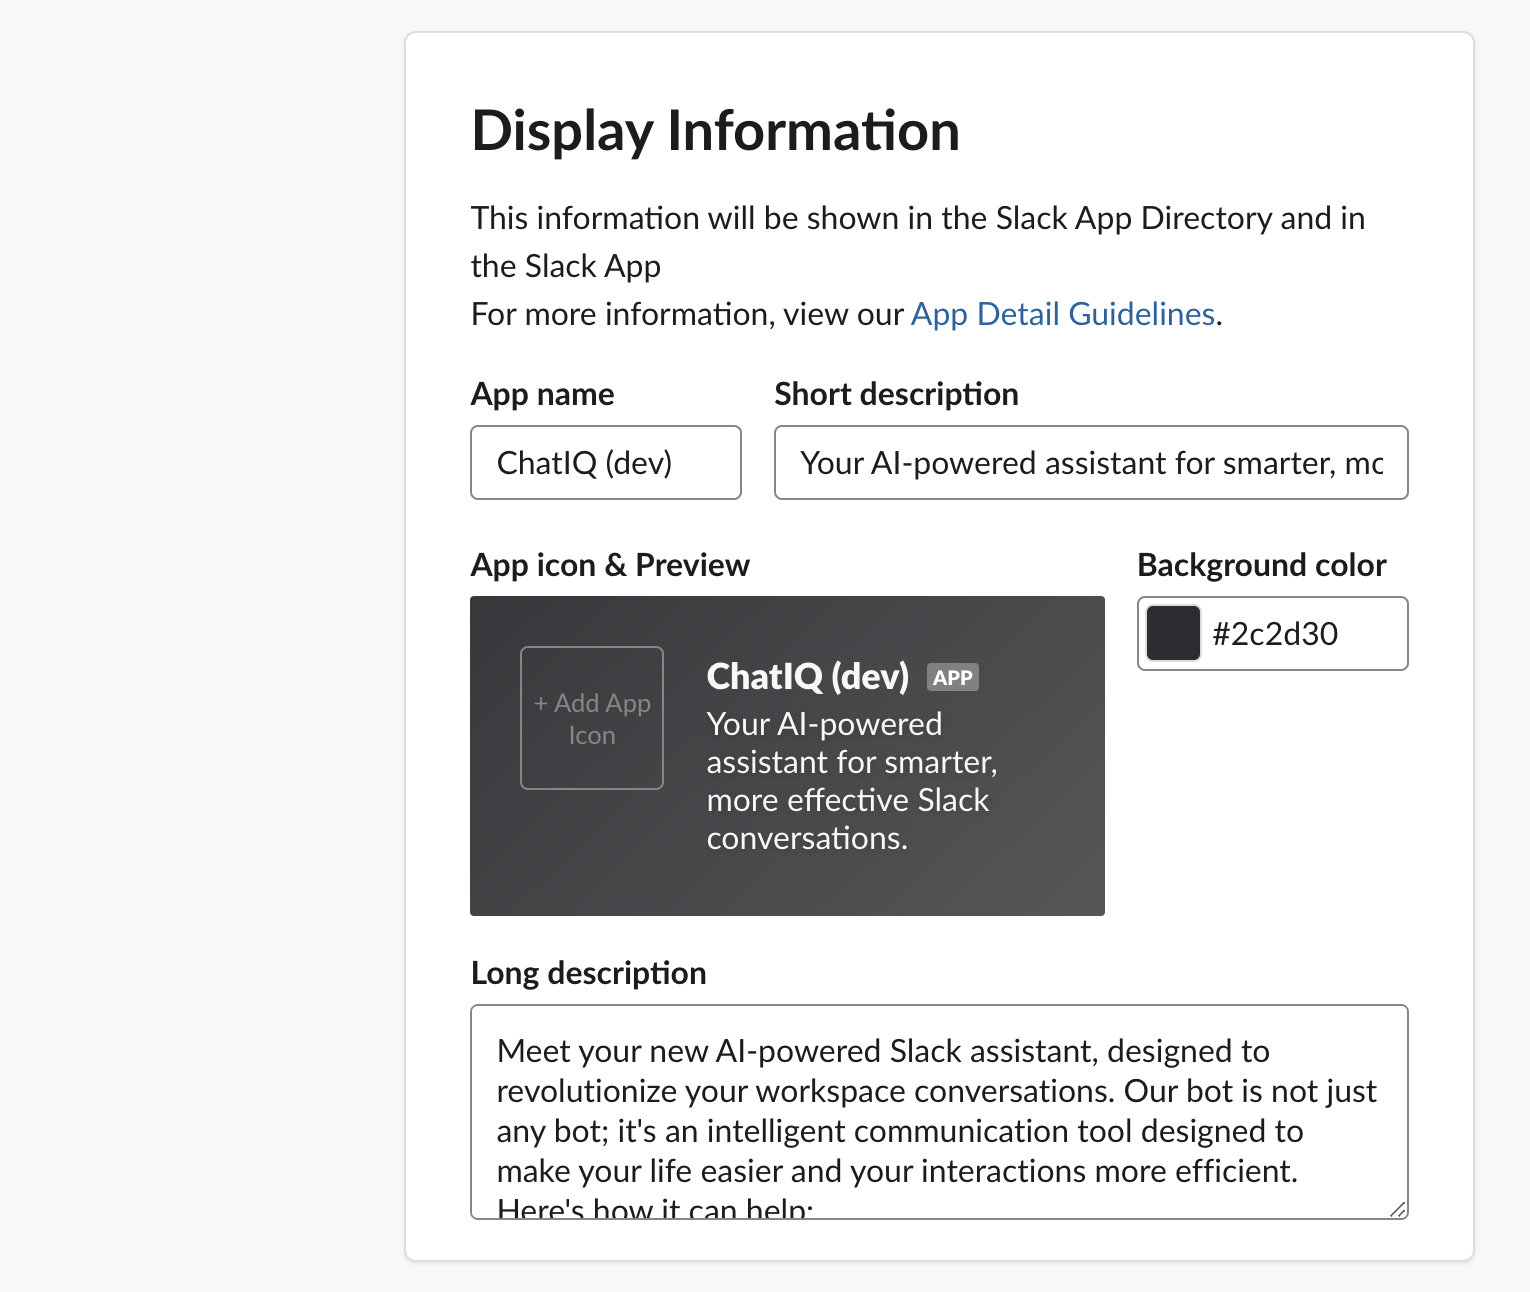
### (Optional) Upload the app icon
To add an app icon, go to the "Display Information" section in the Basic Information settings. Click the "+ Add App Icon" button and upload the desired icon image. You can use [this icon](https://github.com/yujiosaka/ChatIQ/blob/main/images/icon.png) for the ChatIQ app.
### Updating App Credentials
Before starting the application, you need to update the `.env` file with the required credentials. Follow the steps below:
1. Create a `.env` file from the `.env.example` file.
2. Retrieve the "Client ID", "Client Secret", and "Signing Secret" from the "App Credentials" section in the "Basic Settings" menu of your Slack app.
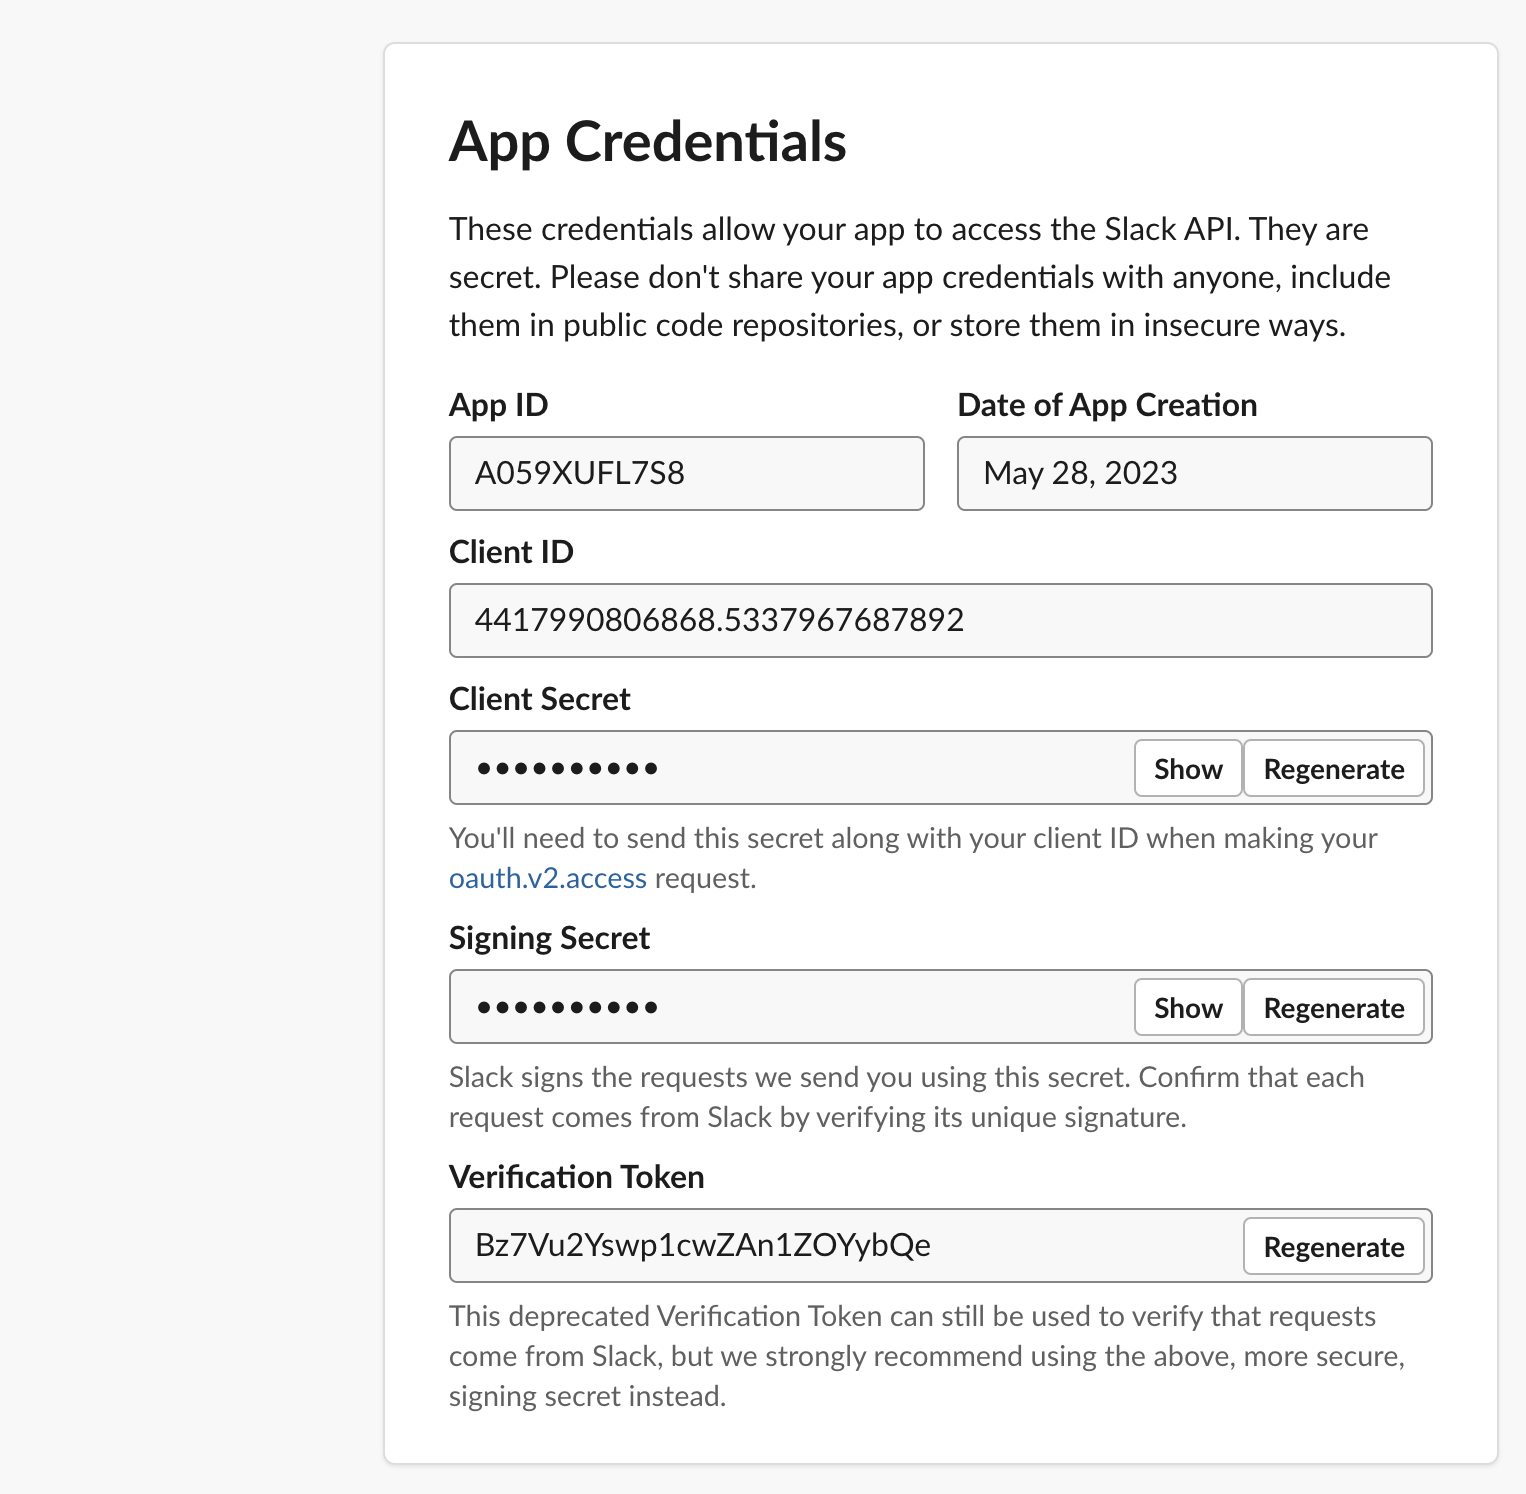
3. Replace the placeholders in the `.env` file with your actual credentials. Make sure to update the `OPENAI_API_KEY` with your own OpenAI API Key as well.
4. Save the `.env` file.
5. (Re)start the application.
### Install the app to your workspace
1. Open the following URL in your web browser: `https:///slack/install`

2. Click the "Add to Slack" button.
3. Grant the necessary permissions to the app by clicking "Allow".
That's it! The ChatIQ Slack app is now installed in your workspace.
## Building and Publishing
1. To build the project, use the `poetry build` command:
```sh
poetry build
```
2. To upload the built package to PyPI, use `poetry publish` command:
```sh
poetry publish
```
## Linting and Formatting
This project uses `flake8` for linting, `black` for code formatting, `isort` for organizing imports, and `pytype` for type checking.
To lint the code, run:
```sh
flake8
```
To format the code, run:
```sh
black .
```
To organize imports, run:
```sh
isort .
```
To perform type checking with pytype, run:
```sh
pytype chatiq
```
## Limitations and Considerations
### Text Length and Token Limitation
OpenAI language models have inherent token limitations. For example, the GPT-3.5-turbo model, currently supported by ChatIQ, has a maximum limit of 4096 tokens. As a result, very long messages might exceed this token limit and cannot be processed.
To circumvent this issue, ChatIQ truncates messages to a limit of 3000 tokens. The token limit of 3000 (instead of the maximum 4096) has been chosen to allow room for the wrapping prompt and the inclusion of relevant information from long-term memory in the vectorstore.
Please note that this token limit is set based on the chosen language model and may vary if a different model is selected. The ability to select a different model for each team/workspace will be provided in future updates, enabling you to adjust this token limit according to your specific needs and the capabilities of the chosen model.
### Considerations for CJK Characters
When using languages with CJK (Chinese, Japanese, and Korean) characters, note that these languages may consume tokens at a higher rate compared to others for the same number of characters due to the way the tokenizer processes these scripts. This may result in a message hitting the token limit with fewer characters than expected. Always consider the token consumption of your chosen language when interacting with the bot.
## FAQ
### 1. How is ChatIQ different from ChatGPT?
The main difference between ChatIQ and ChatGPT is that the responses generated by ChatIQ are not private and can be shared with others. While ChatGPT provides individual users with private responses, ChatIQ integrates with Slack, enabling team collaboration and knowledge sharing. It allows team members to benefit from the useful responses generated by GPT and facilitates sharing information within the workspace.
Additionally, ChatIQ has the capability to read and analyze conversations, including uploaded files, whereas ChatGPT cannot access internal information like sales decks and documents. This feature of ChatIQ enhances its usefulness for business purposes.
### 2. How is ChatIQ different from the ChatGPT app in Slack?
The [ChatGPT app for Slack](https://www.salesforce.com/news/stories/chatgpt-app-for-slack/) is still in beta and its features may change over time. From what is currently known, the ChatGPT app in Slack offers specific functionalities such as providing summarization of threads and assisting in drafting replies to messages. It also aims to enhance the search experience within Slack.
On the other hand, ChatIQ provides more flexibility in its use cases. It allows you to use ChatGPT directly within Slack, similar to the ChatGPT app, but with the added advantage of being able to share the generated responses with others. ChatIQ serves as a versatile Slack bot that can be utilized for a wide range of tasks, making it a valuable tool for team collaboration and knowledge sharing.
### 3. What are the security and privacy concerns with ChatIQ?
It is important to be aware that when using ChatIQ, the conversation is sent to OpenAI for processing. OpenAI's [Terms of use](https://openai.com/policies/terms-of-use) explicitly state that the content provided via their API will not be used to develop or improve their services. You can refer to OpenAI's TOS for more details on their data usage policy.
Furthermore, ChatIQ stores past conversations and uploaded files in Vectorstore. The decision to make ChatIQ an open-source tool was made to ensure that users have control over their data and do not need to store sensitive information externally. However, it is still advised to exercise caution when inviting the bot to highly sensitive channels, as conversations in those channels will be stored. It is recommended to avoid sharing confidential or sensitive information in channels where the bot is invited.
## Tips
### Debugging
If you're encountering issues with the chatbot, you can modify the log level by setting the corresponding environment variables.
To modify the log level, you can pass the `LOG_LEVEL` environment variable when running the services with Docker Compose:
```sh
LOG_LEVEL=debug docker-compose up
```
This will override the default log level and set it to `debug`. You can replace `debug` with any desired log level.
### Tracing
If you want to trace the LangChain runs by the chatbot, you can use LangChain server, which is already configured with Docker Compose. After running `docker compose up`, you can access `http://localhost:4173/` to see the traced chains.
## License
This project is licensed under the GPLv3 License. See [LICENSE](https://github.com/yujiosaka/ChatIQ/blob/main/LICENSE) for details.