https://github.com/yuthelloworld/react-mobx-starter-kit
A React-Mobx starter kit. React, mobx, react-router-dom, webpack3, all is in.
https://github.com/yuthelloworld/react-mobx-starter-kit
Last synced: about 1 month ago
JSON representation
A React-Mobx starter kit. React, mobx, react-router-dom, webpack3, all is in.
- Host: GitHub
- URL: https://github.com/yuthelloworld/react-mobx-starter-kit
- Owner: YutHelloWorld
- License: mit
- Created: 2017-08-29T01:15:14.000Z (almost 9 years ago)
- Default Branch: master
- Last Pushed: 2017-09-12T15:30:35.000Z (almost 9 years ago)
- Last Synced: 2025-01-11T20:33:11.540Z (over 1 year ago)
- Language: JavaScript
- Size: 266 KB
- Stars: 2
- Watchers: 1
- Forks: 1
- Open Issues: 0
-
Metadata Files:
- Readme: README.md
- License: LICENSE
Awesome Lists containing this project
README
# React-mobx-starter-kit
[](https://travis-ci.org/YutHelloWorld/react-mobx-starter-kit)
[](https://standardjs.com)
[](https://github.com/YutHelloWorld/vortex-react/blob/master/LICENSE)
基于[React](https://facebook.github.io/react/)/[Mobx](http://redux.js.org/)/[React-Router v4](https://github.com/ReactTraining/react-router/tree/master/packages/react-router-dom)/[Webpack v3](https://webpack.js.org/)的脚手架。
> Redux替换Mobx的版本,可以查看这个仓库:[vortex-react](https://github.com/YutHelloWorld/vortex-react)
## 目录
### § [技术栈](#feature)
### § [快速开始](#getting-start)
- [安装](#installation)
- [启动](#start)
- [脚本](#script)
### § [项目架构](#project-structure)
- [目录结构](#file-tree)
- [数据流](#module)
### § [静态部署](#deploy)
### § [规范](#style)
### § [更多文档](#doc)
## § 技术栈
- React
- ES6 + Babel
- Webpack3
- Mobx
- React-Router v4
- Reactstrap + Bootstrap\^4.0.0-alpha.6 (UI)
- Sass
- Eslint
- Express
---
## § 快速开始
在开始之前,希望你已通读以下文档
- [React](https://facebook.github.io/react/)
- [Mobx](https://github.com/mobxjs/mobx)
- [React-Router-Dom](https://github.com/ReactTraining/react-router/tree/master/packages/react-router-dom)
- [ES6](http://babeljs.io/learn-es2015/)
看完一脸还是懵逼请移步参看 [React知识地图系列](https://github.com/YutHelloWorld/Blog/issues/1)
你可以在[Babel REPL](http://babeljs.io/repl/)验证ES6转ES5、JSX语法。
> 推荐升级到 node 6.x + npm 5.x + yarn ^0.27.5环境。**强烈推荐**使用 [`cnpm`](https://github.com/cnpm/cnpm) 安装依赖
> 或手动切换到淘宝 npm 源:`npm set registry https://registry.npm.taobao.org/`
> (经测试,`cnpm` 对于 `node-sass` `PhantomJS`等问题多多的 Package 拥有秒杀能力)
### ⊙ 安装
```bash
git clone https://github.com/yuthelloworld/vortex-react.git
cd
yarn # Install project dependencies (or `cnpm install`)
```
### ⊙ 启动
```bash
yarn start # Start the development server (or `npm start`)
```
### ⊙ 脚本
| `yarn ` | 描述 |
| --------------- | --------------------------- |
| `start` | 启动<http://localhost:3000> |
| `build` | 打包构建到目录 ./dist |
| `lint` | 静态检查 |
| `lint:fix` | 静态检查修复 |
---
## <a name="project-structure">§ 项目架构</a>
### <a name="file-tree">⊙ 目录结构</a>
```bash
.
├── build # 打包配置
├── public # 公共静态资源
├── server # express服务
│ └── main.js # 服务入口js
├── src # 应用源文件
│ ├── index.html # html模板
│ ├── main.js # 程序启动和渲染
│ ├── normalize.js # 浏览器的兼容和垫片
│ ├── components # 全局可复用组件
│ ├── layouts # 主页布局
│ │ └── PageLayout # 导航
│ ├── routes # 动态路由
│ │ ├── index.js # 主路由
│ │ ├── Home # 子路由Home
│ │ │ ├── index.js # 路由定义和异步加载
│ │ │ ├── assets # 组件的静态文件
│ │ │ ├── components # 组件
│ │ │ └── routes ** # 子路由
│ │ └── Counter # 子路由Counter
│ │ ├── index.js # 路由定义
│ │ ├── components # 组件
│ │ └── routes ** # 子路由
│ ├── store # Mobx stores
│ │ ├── stores.js
│ │ └── counterStore.js
│ └── styles # 样式表
└── tests # 单元测试(自行添加)
```
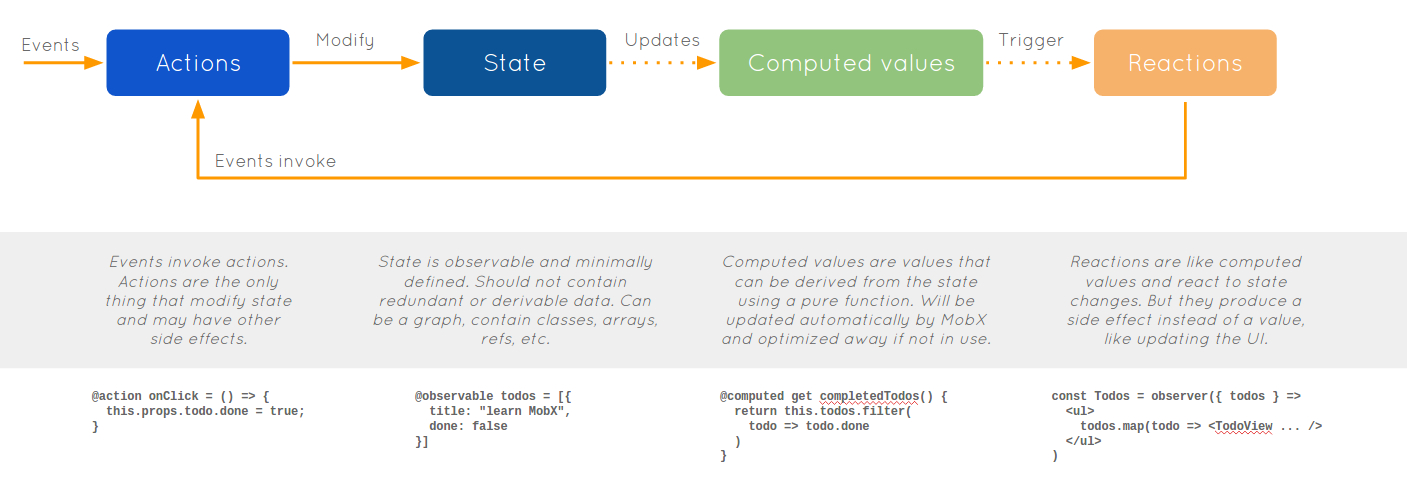
### <a name="module">⊙ 数据流</a>
---
## <a name="deploy">§ 静态部署</a>
>推荐使用`nginx` 反向代理静态web服务来启动应用。请将路由指向`~/dist/index.html`,然后让`React-Router`处理剩下的事,更多参考[这个文档](https://github.com/ReactTraining/react-router/blob/v3/docs/guides/Histories.md#configuring-your-server)。Express在脚手架中用于扩展服务和代理API。
这里以ubuntu为例演示如何用nginx设置反向代理。
- 安装nginx:
```bash
sudo apt-get install nginx
```
- 修改配置文件:
```bash
sudo vi /etc/nginx/sites-available/default
```
- 将以下内容粘贴到文件中:
```bash
server{
listen 8001;
server_name 127.0.0.1; //这里可以改成服务器地址
location / {
proxy_pass http://127.0.0.1:3000;
}
}
```
- 重启nginx服务,并启动应用,打开浏览器访问 <http://localhost:8081>。
```bash
sudo service nginx restart
// 切换到工程目录
yarn start
```
---
## <a name="style">§ 规范</a>
结合[airbnb/javascript](https://github.com/airbnb/javascript)、[Javascript Standard Style](https://standardjs.com/rules-zhcn.html#javascript-standard-style)以及[standard-react](https://github.com/standard/eslint-config-standard-react),配置`.eslintrc`
## <a name="doc">§ 更多文档</a>
[React知识地图系列](https://github.com/YutHelloWorld/Blog/issues/1)