https://github.com/yxlao/camtools
CamTools: Camera Tools for Computer Vision
https://github.com/yxlao/camtools
3d-reconstruction calibration camera computer-graphics computer-vision extrinsic extrinsic-parameters extrinsics intrinsic intrinsic-parameters intrinsics lidar nerf opencv opengl ray raycasting
Last synced: about 1 year ago
JSON representation
CamTools: Camera Tools for Computer Vision
- Host: GitHub
- URL: https://github.com/yxlao/camtools
- Owner: yxlao
- License: mit
- Created: 2021-12-20T08:45:53.000Z (over 4 years ago)
- Default Branch: main
- Last Pushed: 2025-02-18T08:30:02.000Z (over 1 year ago)
- Last Synced: 2025-05-15T14:54:54.785Z (about 1 year ago)
- Topics: 3d-reconstruction, calibration, camera, computer-graphics, computer-vision, extrinsic, extrinsic-parameters, extrinsics, intrinsic, intrinsic-parameters, intrinsics, lidar, nerf, opencv, opengl, ray, raycasting
- Language: Python
- Homepage:
- Size: 756 KB
- Stars: 193
- Watchers: 7
- Forks: 12
- Open Issues: 7
-
Metadata Files:
- Readme: README.md
- Contributing: docs/contributing.rst
- License: LICENSE
Awesome Lists containing this project
README

CamTools: Camera Tools for Computer Vision
Docs |
Repo |
Installation
[](https://github.com/yxlao/camtools/actions/workflows/formatter.yml)
[](https://github.com/yxlao/camtools/actions/workflows/unit_test.yml)
[](https://github.com/yxlao/camtools/actions/workflows/pypi.yml)
[](https://pypi.org/project/camtools)
[](https://camtools.readthedocs.io/en/latest/?badge=latest)
CamTools is a collection of tools for handling cameras in computer vision. It
can be used for plotting, converting, projecting, ray casting, and doing more
with camera parameters. It follows the standard camera coordinate system with
clear and easy-to-use APIs.
## What can you do with CamTools?
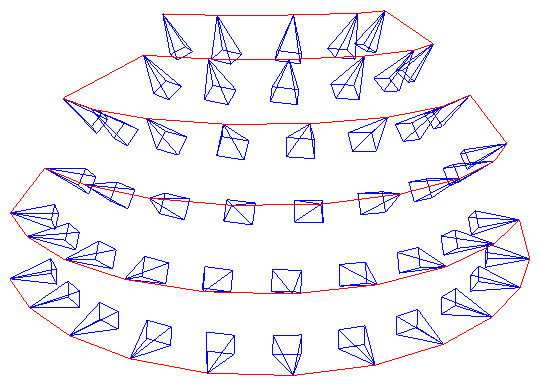
1. Plot cameras. Useful for debugging 3D reconstruction and NeRFs!
```python
import camtools as ct
import open3d as o3d
cameras = ct.camera.create_camera_frustums(Ks, Ts)
o3d.visualization.draw_geometries([cameras])
```
2. Convert camera parameters.
```python
pose = ct.convert.T_to_pose(T) # Convert T to pose
T = ct.convert.pose_to_T(pose) # Convert pose to T
R, t = ct.convert.T_to_R_t(T) # Convert T to R and t
C = ct.convert.pose_to_C(pose) # Convert pose to camera center
K, T = ct.convert.P_to_K_T(P) # Decompose projection matrix P to K and T
# And more...
```
3. Projection and ray casting.
```python
# Project 3D points to pixels.
pixels = ct.project.points_to_pixel(points, K, T)
# Back-project depth image to 3D points.
points = ct.project.im_depth_to_points(im_depth, K, T)
# Ray cast a triangle mesh to depth image given the camera parameters.
im_depth = ct.raycast.mesh_to_im_depth(mesh, K, T, height, width)
# And more...
```
4. Image and depth I/O with no surprises.
Strict type checks and range checks are enforced. The image and depth I/O
APIs are specifically designed to solve the following pain points:
- Is my image of type `float32` or `uint8`?
- Does it have range `[0, 1]` or `[0, 255]`?
- Is it RGB or BGR?
- Does my image have an alpha channel?
- When saving depth image as integer-based `.png`, is it correctly scaled?
```python
ct.io.imread()
ct.io.imwrite()
ct.io.imread_detph()
ct.io.imwrite_depth()
```
5. Command-line tools `ct` (runs in terminal).
```bash
# Crop image boarders.
ct crop-boarders *.png --pad_pixel 10 --skip_cropped --same_crop
# Draw synchronized bounding boxes interactively.
ct draw-bboxes path/to/a.png path/to/b.png
# For more command-line tools.
ct --help
```

6. And more.
- Solve line intersections.
- COLMAP tools.
- Points normalization.
- ...
## Installation
To install CamTools, simply do:
```bash
pip install camtools
```
Alternatively, you can install CamTools from source with one of the following
methods:
```bash
git clone https://github.com/yxlao/camtools.git
cd camtools
# Installation mode, if you want to use camtools only.
pip install .
# Editable mode, if you want to modify camtools on the fly.
pip install -e .
# Editable mode and dev dependencies.
pip install -e .[dev]
# Help VSCode resolve imports when installed with editable mode.
# https://stackoverflow.com/a/76897706/1255535
pip install -e .[dev] --config-settings editable_mode=strict
# Enable torch-related features (e.g. computing image metrics)
pip install camtools[torch]
# Enable torch-related features in editable mode
pip install -e .[torch]
```
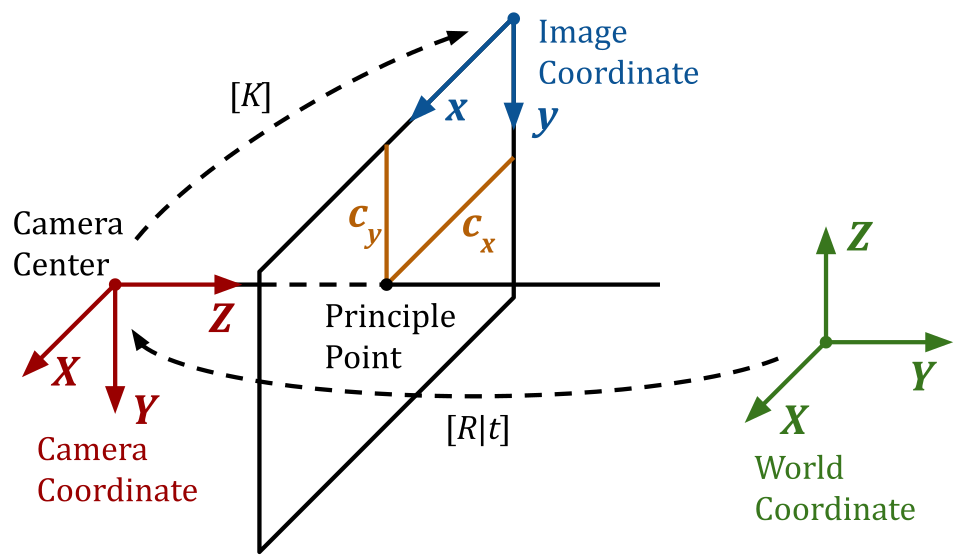
## Camera coordinate system
A homogeneous point `[X, Y, Z, 1]` in the world coordinate can be projected to a
homogeneous point `[x, y, 1]` in the image (pixel) coordinate using the
following equation:
$$
\lambda
\left[\begin{array}{l}
x \\
y \\
1
\end{array}\right]=\left[\begin{array}{ccc}
f_{x} & 0 & c_{x} \\
0 & f_{y} & c_{y} \\
0 & 0 & 1
\end{array}\right]\left[\begin{array}{llll}
R_{00} & R_{01} & R_{02} & t_{0} \\
R_{10} & R_{11} & R_{12} & t_{1} \\
R_{20} & R_{21} & R_{22} & t_{2}
\end{array}\right]\left[\begin{array}{c}
X \\
Y \\
Z \\
1
\end{array}\right].
$$
We follow the standard OpenCV-style camera coordinate system as illustrated at
the beginning of the README.
- **Camera Coordinates:** right-handed, with $Z$ pointing away from the camera
towards the view direction and $Y$ axis pointing down. Note that the OpenCV
convention (camtools' default) is different from the OpenGL/Blender
convention, where $Z$ points towards the opposite view direction, $Y$ points
up and $X$ points right. To convert between the OpenCV camera coordinates and
the OpenGL-style coordinates, use the conversion functions:
- `ct.convert.T_opencv_to_opengl()`
- `ct.convert.T_opengl_to_opencv()`
- `ct.convert.pose_opencv_to_opengl()`
- `ct.convert.pose_opengl_to_opencv()`
- **Image Coordinates:** starts from the top-left corner of the image, with $x$
pointing right (corresponding to the image width) and $y$ pointing down
(corresponding to the image height). This is consistent with OpenCV. Pay
attention that the 0th dimension in the image array is the height (i.e., $y$)
and the 1st dimension is the width (i.e., $x$). That is:
- $x$ <=> $u$ <=> width <=> column <=> the 1st dimension
- $y$ <=> $v$ <=> height <=> row <=> the 0th dimension
- `K`: `(3, 3)` camera intrinsic.
```python
K = [[fx, s, cx],
[ 0, fy, cy],
[ 0, 0, 1]]
```
- `T` or `W2C`: `(4, 4)` camera extrinsic.
```python
T = [[R | t = [[R00, R01, R02, t0],
0 | 1]] [R10, R11, R12, t1],
[R20, R21, R22, t2],
[ 0, 0, 0, 1]]
```
- `T` is also known as the world-to-camera `W2C` matrix, which transforms a
point in the world coordinate to the camera coordinate.
- `T`'s shape is `(4, 4)`, not `(3, 4)`.
- `T` is the inverse of `pose`, i.e., `np.linalg.inv(T) == pose`.
- The camera center `C` in world coordinate is projected to `[0, 0, 0, 1]` in
camera coordinate.
- `R`: `(3, 3)` rotation matrix.
```python
R = T[:3, :3]
```
- `R` is a rotation matrix. It is an orthogonal matrix with determinant 1, as
rotations preserve volume and orientation.
- `R.T == np.linalg.inv(R)`
- `np.linalg.norm(R @ x) == np.linalg.norm(x)`, where `x` is a `(3,)`
vector.
- `t`: `(3,)` translation vector.
```python
t = T[:3, 3]
```
- `t`'s shape is `(3,)`, not `(3, 1)`.
- `pose` or `C2W`: `(4, 4)` camera pose. It is the inverse of `T`.
- `pose` is also known as the camera-to-world `C2W` matrix, which transforms a
point in the camera coordinate to the world coordinate.
- `pose` is the inverse of `T`, i.e., `pose == np.linalg.inv(T)`.
- `C`: camera center.
```python
C = pose[:3, 3]
```
- `C`'s shape is `(3,)`, not `(3, 1)`.
- `C` is the camera center in world coordinate. It is also the translation
vector of `pose`.
- `P`: `(3, 4)` the camera projection matrix.
- `P` is the world-to-pixel projection matrix, which projects a point in the
homogeneous world coordinate to the homogeneous pixel coordinate.
- `P` is the product of the intrinsic and extrinsic parameters.
```python
# P = K @ [R | t]
P = K @ np.hstack([R, t[:, None]])
```
- `P`'s shape is `(3, 4)`, not `(4, 4)`.
- It is possible to decompose `P` into intrinsic and extrinsic matrices by QR
decomposition.
- Don't confuse `P` with `pose`. Don't confuse `P` with `T`.
- For more details, please refer to the following blog posts:
[part 1](https://ksimek.github.io/2012/08/14/decompose/),
[part 2](https://ksimek.github.io/2012/08/22/extrinsic/),
and [part 3](https://ksimek.github.io/2013/08/13/intrinsic/).
## Building Documentation
To build and view the documentation locally:
```bash
# Install documentation dependencies
pip install -e .[docs]
# Build the documentation
make -C docs clean && make -C docs html
# (Optional) Build the documentation with warnings as errors
make -C docs clean && make -C docs html SPHINXOPTS="-W --keep-going"
# Start a local server to view the documentation
python -m http.server 8000 --directory docs/_build/html
```
Then open your browser and navigate to `http://localhost:8000` to view the documentation.
The documentation is also automatically built by GitHub Actions on pull requests and pushes to main. After merging to main, you can view:
- Public documentation at https://camtools.readthedocs.io/en/latest/
- Admin panel at https://app.readthedocs.org/projects/camtools/
## Contributing
- Follow [Angular's commit message convention](https://github.com/angular/angular/blob/main/CONTRIBUTING.md#-commit-message-format) for PRs.
- This applies to PR's title and ultimately the commit messages in `main`.
- The prefix shall be one of `build`, `ci`, `docs`, `feat`, `fix`, `perf`, `refactor`, `test`.
- Use lowercase.
- Format your code with [black](https://github.com/psf/black). This will be enforced by the CI.
## Build with CamTools
If you use CamTools in your project, consider adding one of the following
badges to your project.

