https://github.com/zenitheesc/haze-remover
Computer vision application to remove fog from images captured during probe and satellite missions
https://github.com/zenitheesc/haze-remover
imaging opencv opencv-python python vision
Last synced: 2 months ago
JSON representation
Computer vision application to remove fog from images captured during probe and satellite missions
- Host: GitHub
- URL: https://github.com/zenitheesc/haze-remover
- Owner: zenitheesc
- License: mit
- Created: 2021-03-06T21:21:44.000Z (over 5 years ago)
- Default Branch: main
- Last Pushed: 2021-04-28T21:35:33.000Z (about 5 years ago)
- Last Synced: 2025-06-08T16:37:52.391Z (about 1 year ago)
- Topics: imaging, opencv, opencv-python, python, vision
- Language: Python
- Homepage:
- Size: 2.39 MB
- Stars: 1
- Watchers: 0
- Forks: 0
- Open Issues: 0
-
Metadata Files:
- Readme: README.md
- License: LICENSE
Awesome Lists containing this project
README
Haze Remover
Software development to remove fog from images captured during probe missions.


Environment and Tools •
Steps to run and debug
## Environment and tools
- [Python](https://www.python.org/): ^3.8.5,
- [Google Maps Static API](https://developers.google.com/maps/documentation/maps-static/overview),
- [OpenCV](https://opencv.org/): ^4.2.0,
- [Tensorflow](https://www.tensorflow.org/): ^2.5.0,
## Steps to run and debug
The first thing you need to do is create a .env file at the root of the project.
```bash
.
├── dataset
│ ├── generate.py
│ ├── google_mps_api.py
│ └── __init__.py
├── error.png
├── images
│ ├── clean
│ ├── hazed
│ └── originais
├── LICENSE
├── main.py
├── network
│ ├── haze.py
│ ├── run.py
│ └── validation.py
├── README.md
└── .env <---
```
Inside .env file you must add the following line
```
GOOGLE_API_KEY="YOUR_API_KEY"
```
To generate your google maps api key follow the instructions in https://developers.google.com/maps/documentation/maps-static/overview
All the code related with the data set generation is located at **dataset** module.
After generate and setup your api key, now you can just run the following code at the root of the project directory.
```
python3 main.py
```
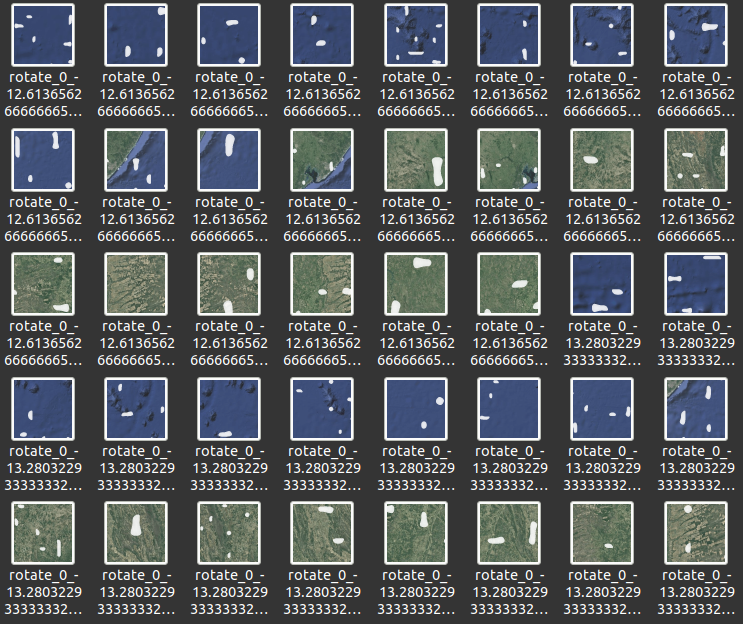
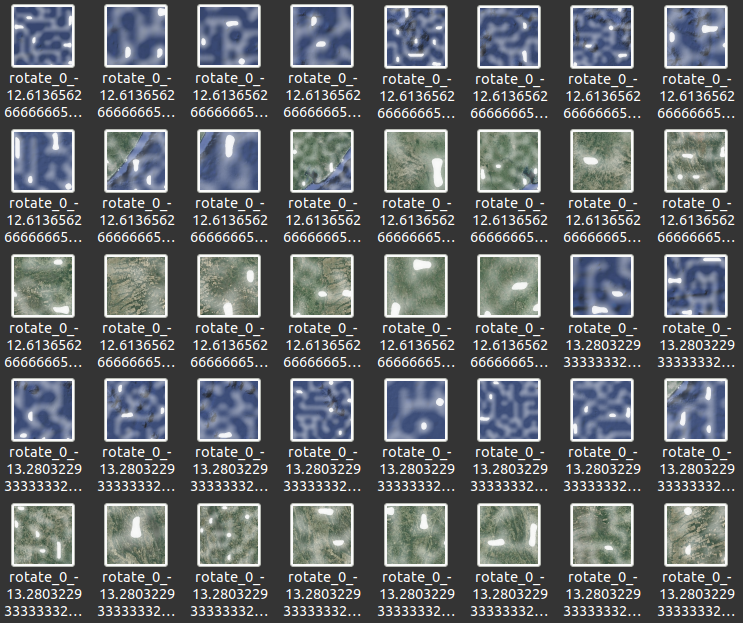
This will generate a certain number of images, half of the images will be clean images and they will be saved at **/images/clean**. The other half will be the hazed images, they will be saved at **/images/hazed** folder. These folders will look like this.
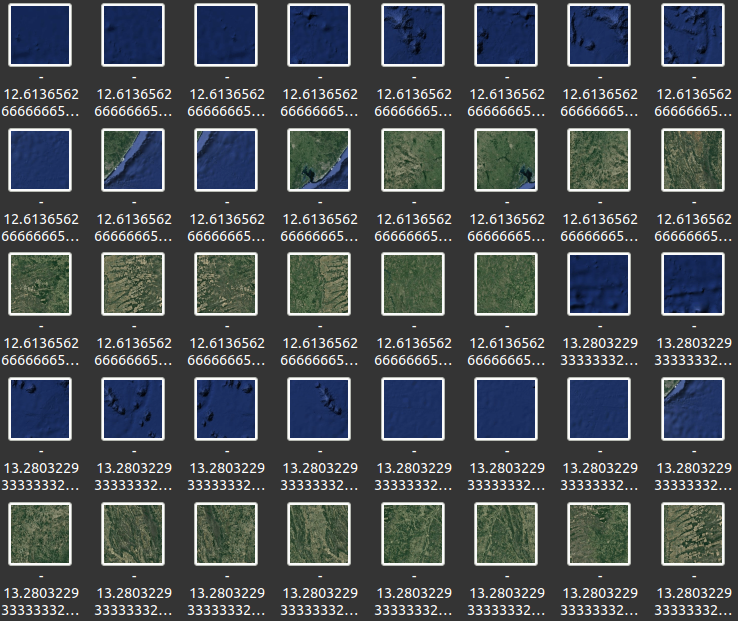
**/images/originais** folder
**/images/clean** folder
**/images/hazed** folder
Before determining the number of images you are going to use, there are a few things you need to know about the code operation.
The function responsible for downloading images is the **imgDownload** located at **dataset/google_maps_api.py**. This function works by taking a coordinate position and then changing the longitude and latitude values in two **for** loops.
```python
for latitude in range(0, 15, 1):
for longitude in range (0, 30, 1):
```
So the number of images that will be downloaded after call **imgDownload** once are going to be 15*30 = 450 images. But you can change these values depending on your need. So far, these are only the clean images.
After downloading the images, the function **generate**, which is responsible for generating the hazed images, will be called. This function is located at **dataset/generate.py**. In addition to generating fog in the images, this function increases the number of images by rotating them 7 times.
Thus, the total number of the images after using one coordinate, by calling **imgDownload** once and than **generate**, are going to be 450 * 8 = 3600. Note that, in the **main** function, located at **./main.py**, we are using 13 different coordinates parameters, so we are calling the **imgDownload** function 13 times. If you use all coordinates, your data set will consist of 3600 * 13 = 46800 images in **/images/clean** and another 46800 images in **/images/hazed**. The folder **/images/originais** contains only the images that have been downloaded, they have no transformation.
To simplify this analysis, use the following formula
```
number_of_clean_images = number_of_hazed_images = range_in_loop * number_of_coordinates * 8
number_of_images_in_originais = range_in_loop
total = number_of_clean_images + number_of_hazed_images + number_of_images_in_originais
```
In our case
```
range_in_loop = 15 * 30 = 450
number_of_coordinates = 13
number_of_clean_images = number_of_hazed_images = 450 * 13 * 8 = 46800
number_of_images_in_originais = 450
total = 46800 + 46800 + 450 = 94050
```
### Using the neural network
After creating your data set, you already can train your neural network. All the code related with the neural network usage is located at **network** folder.
Inside **network** folder you will find 3 files:
- haze.py -> Responsible for training and saving the neural network model.
- validation.py -> Responsible for validating the neural network model trained by haze.py, on the data set.
- run.py -> Take a single image from your local directory and apply the trained neural network.
Note that it may be necessary to change some paths for the files over these 3 files.
To run each of the files, you can just access the **network** folder and type
```bash
python3
```


