https://github.com/zpng/spring-cloud-microservice-examples
spring-cloud-microservice-examples
https://github.com/zpng/spring-cloud-microservice-examples
angularjs cloud eureka-server finagle hystrix java spring-cloud-microservice springboot thrift zipkin
Last synced: over 1 year ago
JSON representation
spring-cloud-microservice-examples
- Host: GitHub
- URL: https://github.com/zpng/spring-cloud-microservice-examples
- Owner: zpng
- Created: 2016-10-28T04:31:24.000Z (over 9 years ago)
- Default Branch: master
- Last Pushed: 2017-03-24T02:18:20.000Z (over 9 years ago)
- Last Synced: 2025-03-30T01:13:19.828Z (over 1 year ago)
- Topics: angularjs, cloud, eureka-server, finagle, hystrix, java, spring-cloud-microservice, springboot, thrift, zipkin
- Language: Java
- Size: 158 KB
- Stars: 360
- Watchers: 55
- Forks: 236
- Open Issues: 7
-
Metadata Files:
- Readme: README.md
Awesome Lists containing this project
README
# spring-cloud-microservice-examples
spring-cloud-microservice-examples
## 说明
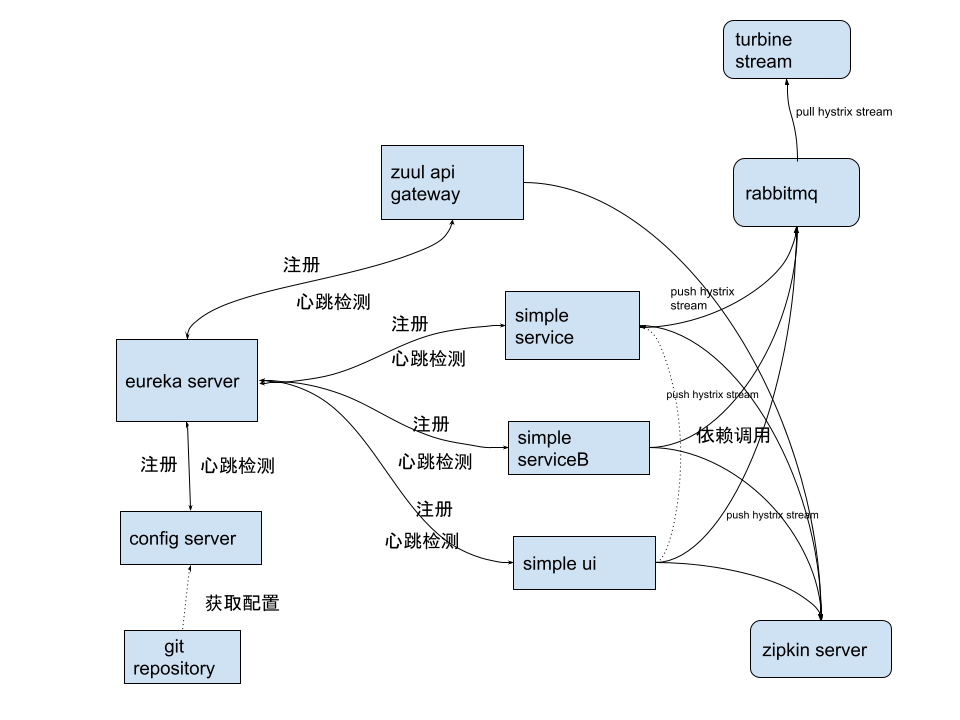
目前该项目实现了 zuul(路由模块), config-server(配置管理), eureka server(服务注册和发现), zipkin(服务调用追踪),hystrix, turbine stream (熔断分析)
simple-service,simple-serviceB两个待发现的服务
simple-ui (一个用angular写的前端页面)
路由功能实现在 cloud-api-gateway 模块,注册到eureka server上面,所有的请求访问 http://localhost:5555, 然后根据路由规则
```
zuul.routes.api-a.path: /cloud-simple-service/**
zuul.routes.api-a.serviceId: cloud-simple-service
zuul.routes.api-b.path: /cloud-simple-serviceB/**
zuul.routes.api-b.serviceId: cloud-simple-serviceB
zuul.routes.api-ui.path: /cloud-simple-ui/**
zuul.routes.api-ui.serviceId: cloud-simple-ui
```
分别请求到 注册到eureka server的cloud-simple-service 和 cloud-simple-serviceB服务。
服务的架构图:
---
## 使用指南
* 先决条件
本机安装rabbitmq,并启动
```
rabbitmq-server
```
本机安装mysql,并启动且创建dev和test数据库,并分别创建表
```
mysql.server start
mysql -uroot
CREATE TABLE `user` (
`id` int(11) NOT NULL,
`username` varchar(255) NOT NULL
) ENGINE=InnoDB DEFAULT CHARSET=utf8
dev数据库的user表中插入数据
INSERT INTO `user` VALUES (1,'dev1'),(2,'dev2'),(3,'dev3');
test数据库的user表中插入数据
INSERT INTO `user` VALUES (1,'test1'),(2,'test2'),(3,'test3');
```
* 运行各模块
```
cd cloud-api-gateway
mvn spring-boot:run #端口5555
cd cloud-config-server
mvn spring-boot:run #端口8888
cd cloud-eureka-server
mvn spring-boot:run #端口8761
cd cloud-simple-service
mvn spring-boot:run #端口8081
cd cloud-simple-service
mvn spring-boot:run --server.port=8082 # cloud-simple-service 以8082端口再次启动服务
cd cloud-simple-ui
mvn spring-boot:run #端口8090
cd cloud-zipkin
mvn spring-boot:run #端口9966
```
* 打开浏览器输入网址并浏览效果
```
查看Eureka Server
http://localhost:8761 #查看eureka
```

---
```
请求simple service, simple service2, simple serviceB
http://localhost:8081/user #simple service
结果:
[
{
id: 1,
username: "dev1"
},
{
id: 2,
username: "dev2"
},
{
id: 3,
username: "dev3"
}
]
http://localhost:8082/user #simple service2
结果:
[
{
id: 1,
username: "dev1"
},
{
id: 2,
username: "dev1"
},
{
id: 3,
username: "dev1"
}
]
http://localhost:8091/user #simple serviceB
结果:
Result from simpleserviceB
```
本项目实现了通过spring-cloud-bus, 传播config-server中config的变化.下面动手验证之.
1. 下载配置git repository
```
git clone git@github.com:zpng/spring-cloud-config-demo.git
```
根目录下有个cloud-config-repo目录,该目录下有两个文件:
cloud-simple-service-dev.properties
cloud-simple-service-test.properties
分别是cloud-simple-service在 dev和test环境下的配置信息
cloud-simple-service-dev.properties内容:
```
mysqldb.datasource.url=jdbc\:mysql\://localhost\:3306/dev?useUnicode\=true&characterEncoding\=utf-8
mysqldb.datasource.username=root
mysqldb.datasource.password=
logging.level.org.springframework.web:DEBUG
```
cloud-simple-service-test.properties内容:
```
mysqldb.datasource.url=jdbc\:mysql\://localhost\:3306/test?useUnicode\=true&characterEncoding\=utf-8
mysqldb.datasource.username=root
mysqldb.datasource.password=
logging.level.org.springframework.web:DEBUG
```
1. 修改 cloud-simple-service-dev.properties 内容,
```
mysql url中使用的dev数据库变为test数据库
mysqldb.datasource.url=jdbc\:mysql\://localhost\:3306/dev?useUnicode\=true&characterEncoding\=utf-8
->
mysqldb.datasource.url=jdbc\:mysql\://localhost\:3306/test?useUnicode\=true&characterEncoding\=utf-8
git add -A
git commit -m "MOD: update config"
git push origin master #将修改push到git repositoy
```
1. 此时并需要重启config-server或者simple-service,只需要发送一个POST请求到config-server,并通过bus传播到使用该配置文件的服务中.
```
curl -X POST http://localhost:8888/bus/refresh #(config-server启动在8888端口)
```
此时刷新前端页面
```
http://localhost:8081/user #simple service
http://localhost:8082/user #simple service2
```
发现数据都已变成:
```
[
{
id: 1,
username: "test1"
},
{
id: 2,
username: "test2"
},
{
id: 3,
username: "test3"
}
]
```
---
1. 验证路由逻辑
cloud-api-gateway服务使用了zuul进行请求转发,转发规则如下:
```
# routes to serviceId
zuul.routes.api-a.path: /cloud-simple-service/**
zuul.routes.api-a.serviceId: cloud-simple-service
zuul.routes.api-b.path: /cloud-simple-serviceB/**
zuul.routes.api-b.serviceId: cloud-simple-serviceB
zuul.routes.api-ui.path: /cloud-simple-ui/**
zuul.routes.api-ui.serviceId: cloud-simple-ui
```
并且zuul服务中进行了token验证,需要请求参数中包含accessToken,accessToken可以为任意值,如果不包含该参数则请求不能
转发过去.
```
http://localhost:5555/cloud-simple-ui/users?accessToken=test
结果:
[
{
id: 1,
username: "test1"
},
{
id: 2,
username: "test2"
},
{
id: 3,
username: "test3"
}
]
http://localhost:5555/cloud-simple-serviceB/user?accessToken=tbbsxxxxd
结果: Result from simpleserviceB
http://localhost:5555/cloud-simple-service/user?accessToken=xxxdaew
结果:
[
{
id: 1,
username: "test1"
},
{
id: 2,
username: "test2"
},
{
id: 3,
username: "test3"
}
]
```
可见zuul已经完全发挥了它的路由作用.
1. Hystrix
Hystrix是熔断器, Hystrx Dashboard实现了监控单个Hystrix stream的功能.
```
http://localhost:8022/hystrix/
```
打开后页面如下:

在其中输入
```
http://localhost:8090/hystrix.stream
```
(cloud-simple-ui服务),即可监控该服务的stream,如下图

注意需要请求几次cloud-simple-ui服务,该图上才会有结果.
1. Turbine
本示例使用了turbine-amqp, 然后各个需要统计hystrix stream的微服务,包含依赖
```
org.springframework.cloud
spring-cloud-netflix-hystrix-stream
org.springframework.cloud
spring-cloud-starter-stream-rabbit
```
即可将stream 发送到rabbitmq队列,然后turbine stream项目获取这些stream, 然后显示在图示上,这样跟之前的区别是可以监控所有
的微服务,而不是单个主机的stream.
同样打开
```
http://localhost:8022/hystrix/
```
在其中输入
```
http://localhost:8989/turbine.stream
```
则可以看到如下图所示

如图所示可以看到 cloud-simple-service, cloud-simple-serviceB, cloud-simple-ui 共3个服务的Hystrix Stream.
1. Zipkin
zipkin可以跟踪微服务的调用以及,各个路径上面的时间,进而分析瓶颈.
打开
```
http://localhost:9966
```
trace如下图:

dependencies如下图:
