Ecosyste.ms: Awesome
An open API service indexing awesome lists of open source software.
https://github.com/DmitrySoshnikov/hdl-js
Hardware description language (HDL) parser, and Hardware simulator.
https://github.com/DmitrySoshnikov/hdl-js
Last synced: 3 months ago
JSON representation
Hardware description language (HDL) parser, and Hardware simulator.
- Host: GitHub
- URL: https://github.com/DmitrySoshnikov/hdl-js
- Owner: DmitrySoshnikov
- License: mit
- Created: 2017-12-11T04:01:38.000Z (over 6 years ago)
- Default Branch: master
- Last Pushed: 2018-10-09T08:36:44.000Z (over 5 years ago)
- Last Synced: 2023-12-29T20:20:20.093Z (6 months ago)
- Language: JavaScript
- Homepage:
- Size: 517 KB
- Stars: 83
- Watchers: 7
- Forks: 10
- Open Issues: 6
-
Metadata Files:
- Readme: README.md
- License: LICENSE
Lists
- awesome-hdl - hdl-js - Hardware description language (HDL) parser, and Hardware simulator. (Meta HDL and Transpilers)
- awesome-hdl - hdl-js - Hardware description language (HDL) parser, and Hardware simulator. (Meta HDL and Transpilers)
README
# hdl-js
[](https://travis-ci.org/DmitrySoshnikov/hdl-js) [](https://badge.fury.io/js/hdl-js) [](https://www.npmjs.com/package/hdl-js)
Hardware description language (HDL) parser, and Hardware simulator.
## Table of Contents
- [Installation](#installation)
- [Development](#development)
- [Usage as a CLI](#usage-as-a-cli)
- [Usage from Node](#usage-from-node)
- [Parser](#parser)
- [Format of an HDL file](#format-of-an-hdl-file)
- [Parsing a file to AST](#parsing-a-file-to-ast)
- [AST nodes specification](#ast-nodes-specification)
- [Emulator](#emulator)
- [Online tool](#online-tool)
- [Built-in gates](#built-in-gates)
- [Viewing gate specification](#viewing-gate-specification)
- [Specifying output format](#specifying-output-format)
- [Columns whitelist](#columns-whitelist)
- [Testing gates on passed data](#testing-gates-on-passed-data)
- [Pins](#pins)
- [Pin size and ranges](#pin-size-and-ranges)
- [Pin events](#pin-events)
- [Connecting pins together](#connecting-pins-together)
- [Creating gates from default spec](#creating-gates-from-default-spec)
- [Exec on set of data](#exec-on-set-of-data)
- [Validating passed data on gate logic](#validating-passed-data-on-gate-logic)
- [Data files for execution](#data-files-for-execution)
- [Gates scripting](#gates-scripting)
- [Executing scripts](#executing-scripts)
- [Script controller commands](#script-controller-commands)
- [Script emulator commands](#script-emulator-commands)
- [Sequential run](#sequential-run)
- [Gate events](#gate-events)
- [Main chip groups](#main-chip-groups)
- [Very basic chips](#very-basic-chips)
- [Basic chips](#basic-chips)
- [ALU](#alu)
- [Memory chips](#memory-chips)
- [Interface chips](#interface-chips)
- [Screen](#screen)
- [Keyboard](#keyboard)
- [Clock](#clock)
- [Clock events](#clock-events)
- [Clock rate](#clock-rate)
- [Composite gates](#composite-gates)
- [Building chips in HDL](#building-chips-in-hdl)
- [Viewing composite gate specification](#viewing-composite-gate-specification)
- [Using custom and built-in gates in implementation](#using-custom-and-built-in-gates-in-implementation)
- [Loading HDL chips from Node](#loading-hdl-chips-from-node)
- [Code generator](#code-generator)
- [Exporting from AST](#exporting-from-ast)
- [Exporting from composite gates](#exporting-from-composite-gates)
## Installation
The `hdl-js` tool can be installed as an [npm module](https://www.npmjs.com/package/hdl-js):
```
npm install -g hdl-js
hdl-js --help
```
## Development
1. Fork https://github.com/DmitrySoshnikov/hdl-js repo
2. If there is an actual issue from the [issues](https://github.com/DmitrySoshnikov/hdl-js/issues) list you'd like to work on, feel free to assign it yourself, or comment on it to avoid collisions (open a new issue if needed)
3. Make your changes
4. Make sure `npm test` still passes (add new tests if needed)
5. Submit a PR
For development from the github repository, run build command to generate the parser module, and transpile JS code:
```
git clone https://github.com//hdl-js.git
cd hdl-js
npm install
npm run build
./bin/hdl-js --help
```
> **NOTE:** JS code transpilation is used to support older versions of Node. For faster development cycle you can use npm run watch command, which continuously transpiles JS code.
## Usage as a CLI
Check the options available from CLI:
```
hdl-js --help
```
```
Usage: hdl-js [options]
Options:
--help, -h Show help [boolean]
--version, -v Show version number [boolean]
--gate, -g Name of a built-in gate or path to an HDL file
--parse, -p Parse the HDL file, and print AST
--list, -l List supported built-in gates
--describe, -d Prints gate's specification
--exec-on-data, -e Evaluates gate's logic on passed data; validates outputs
if passed
--format, -f Values format (binary, hexadecimal, decimal)
[choices: "bin", "hex", "dec"]
--run, -r Runs sequentially the rows from --exec-on-data table
--clock-rate Rate (number of cycles per second) for the System clock
--columns, -c Whitelist of columns (comma-separated) to show in the
table
--script, -s Run testing script, which automatically loads a gate,
tests the logic, and compares the results.
```
> **NOTE:** the implementation of some built-in chips, and the HDL format is heavily inspired by the wonderful [nand2tetris](http://nand2tetris.org/) course by Noam Nisan and Shimon Schocken.
Example of a CLI command to describe `Xor` gate:
```
hdl-js --gate Xor --describe
"Xor" gate:
Description:
Implements bitwise 1-bit Xor ^ operation.
...
```
### Usage from Node
The tool can also be used as a Node module:
```js
const hdl = require('hdl-js');
// Check the API:
console.log(hdl);
```
The `hdl-js` exposes the following API:
- `parse(hdl: string)` -- parses an HDL code; convenient facade method for `parser.parse`
- `parseFile(fileName: string)` -- parses an HDL file; facade for `parser.parseFile`
- `fromHDLFile(fileName: string)` -- loads a gate class defined in an HDL file; facade for `HDLClassFactory.fromHDLFile`
- `fromHDL(hdl: string)` -- creates a gate class according to passed HDL spec; facade for `HDLClassFactory.fromHDL`
- [parser](#parser) -- the parser module exposed
- [emulator](#emulator) -- hardware emulator, which includes:
- `Pin` - a pin "wire" used to patch inputs and outputs of a gate
- `BuiltInGate` -- base class for all built-in gates
- `CompositeGate` -- base class used for user-defined gates from HDL; see [Composite gates](#composite-gates) section
- `HDLClassFactory` -- class loader for gates defined in HDL
- [ScriptInterpreter](#gates-scripting) -- execution engine for test scripts
- [Clock](#clock) -- class to manage clocked gates. Contains:
- `SystemClock` -- main System clock used to synchronize all gated chips
- `BuiltInGates` -- map of all [built-in gates](#built-in-gates):
- `And`
- `Or`
- ...
- `generateFromAST(ast)` -- generates an HDL code from AST; convenient facade for `generator.fromAST`
- `generateFromCompositeGate(gate)` -- generates an HDL code from a composite gate instance; convenient facade for `generator.fromCompositeGate`
- [generator](#code-generator) -- the generator module exposed
## Parser
The `hdl-js` is implemented as an automatic LR parser using [Syntax](https://www.npmjs.com/package/syntax-cli) tool. The parser module is generated from the corresponding [grammar](https://github.com/DmitrySoshnikov/hdl-js/blob/master/src/parser/hdl.g) file.
### Format of an HDL file
A hardware chip is described via the `CHIP` declaration, followed by a _chip name_, and a set of _sections_:
```
CHIP {
...
}
```
The [sections](https://github.com/DmitrySoshnikov/hdl-js/blob/master/src/parser/hdl.g#L121-L127) include:
- `IN` -- inputs of a gate
- `OUT` -- outputs of a gate
- `PARTS` -- the actual implementation _body_ of a chip, composed from other chips
- `BUILTIN` -- refer to a name of a built-in chip: in this case the implementation is fully take from the built-in gate, and the `PARTS` section can be omitted
- `CLOCKED` -- describes which inputs/outputs are [clocked](#clock)
Let's take a look at the [examples/And.hdl](https://github.com/DmitrySoshnikov/hdl-js/blob/master/examples/And.hdl) file:
```
/**
* And gate:
* out = 1 if (a == 1 and b == 1)
* 0 otherwise
*/
CHIP And {
IN a, b;
OUT out;
PARTS:
Nand(a=a, b=b, out=n);
Nand(a=n, b=n, out=out);
}
```
Once we have an HDL file, we can feed it to the parser, and get its AST.
### Parsing a file to AST
The parser can be used from CLI, and from Node.
Taking the [examples/And.hdl](https://github.com/DmitrySoshnikov/hdl-js/blob/master/examples/And.hdl) file from above, and running the:
```
./bin/hdl-js --gate examples/And.hdl --parse
```
We get the following AST (abstract syntax tree):
```js
{
type: 'Chip',
name: 'And',
inputs: [
{
type: 'Name',
value: 'a'
},
{
type: 'Name',
value: 'b'
}
],
outputs: [
{
type: 'Name',
value: 'out'
}
],
parts: [
{
type: 'ChipCall',
name: 'Nand',
arguments: [
{
type: 'Argument',
name: {
type: 'Name',
value: 'a'
},
value: {
type: 'Name',
value: 'a'
}
},
{
type: 'Argument',
name: {
type: 'Name',
value: 'b'
},
value: {
type: 'Name',
value: 'b'
}
},
{
type: 'Argument',
name: {
type: 'Name',
value: 'out'
},
value: {
type: 'Name',
value: 'n'
}
}
]
},
{
type: 'ChipCall',
name: 'Nand',
arguments: [
{
type: 'Argument',
name: {
type: 'Name',
value: 'a'
},
value: {
type: 'Name',
value: 'n'
}
},
{
type: 'Argument',
name: {
type: 'Name',
value: 'b'
},
value: {
type: 'Name',
value: 'n'
}
},
{
type: 'Argument',
name: {
type: 'Name',
value: 'out'
},
value: {
type: 'Name',
value: 'out'
}
}
]
}
],
builtins: [],
clocked: [],
}
```
The `parse` command is also available from Node:
```js
const fs = require('fs');
const hdl = require('hdl-js');
const hdlCode = fs.readFileSync('./examples/And.hdl', 'utf-8');
console.log(hdl.parse(hdlCode)); // HDL AST
```
There is also convenient `parseFile` method:
```js
const hdl = require('hdl-js');
console.log(hdl.parseFile('./examples/And.hdl')); // AST
```
### AST nodes specification
The AST format of the HDL is currently simple, and includes the following node types:
#### `Chip` AST node
This is the top-level `"Chip"` node, and has the following properties:
```js
{
type: 'Chip',
/**
* List of inputs pins.
*/
inputs: [Name, ...],
/**
* List of output pins.
*/
outputs: [Name, ...],
/**
* Gate implementation list.
*/
parts: [ChipCall, ...],
/**
* If present, contains the names of the built-in chips used in this gate.
*/
builtins: [Name, ...],
/**
* If present, shows the list of clocked inputs/outputs.
*/
clocked: [Name, ...],
}
```
#### `Name` AST node
The `Name` type is used to define the names of the input/output pins, names of the arguments in [ChipCall](#chipcall-ast-node), etc. The node has the following properties:
```js
{
type: 'Name',
/*
* The actual name of a pin.
*
* Example: `IN a;`, the `value` is `a`.
*/
value: string,
/**
* The `size` is only available in the input/output names.
*
* Example: `IN a[16];`, the `size` is 16.
*/
size?: number,
/**
* An index of a particular bit. The `index` property is
* only available in the arguments of a `ChipCall`.
*
* Example: `And(a=a[4], ...)`, the `index` is 4 here.
*/
index?: number,
/**
* A range of the bits. The `range` property is
* only available in arguments of a `ChipCall`/
*
* Example: `Mux4Way16(..., sel=address[0..11])`,
* the range (inclusive) here is `0..11`.
*/
range?: {
from: number,
to: number,
},
}
```
#### `ChipCall` AST node
The `ChipCall` can appear only in the `parts` section of the `'Chip'` node. This is an evaluation call to an internal chip, used in implementation of this gate.
It has the following properties:
```js
{
type: 'ChipCall',
/**
* The name of the internal chip, which is being called.
*/
name: string,
/**
* The list of arguments to the call. The values in each argument
* correspond to the inputs/outputs specification of a gate.
*/
arguments: [Argument, ...]
}
```
#### `Argument` AST node
Arguments appear as parts of the [ChipCall](#chipcall-ast-node) node types. An argument has the following properties:
```js
{
type: 'Argument',
/**
* The name of the argument.
*/
name: Name,
/**
* The value of the argument.
*/
value: Constant | Name,
}
```
#### `Constant` AST node
Constants can be used as _input_ values for pins. These are _numbers_, and two special names, `false`, and `true`, which correspond respectively to `0`, and `1` values.
```js
{
type: 'Constant',
/**
* The number value of the constant.
*/
value: NUMBER,
/**
* The value as it appears in the source code.
*/
raw: 'true' | 'false' | NUMBER
}
```
## Emulator
[Hardware emulator](https://github.com/DmitrySoshnikov/hdl-js/tree/master/src/emulator/hardware) module simulates and tests logic gates and chips implemented in the HDL, and also provides canonical implementation of the [built-in chips](https://github.com/DmitrySoshnikov/hdl-js/tree/master/src/emulator/hardware/builtin-gates).
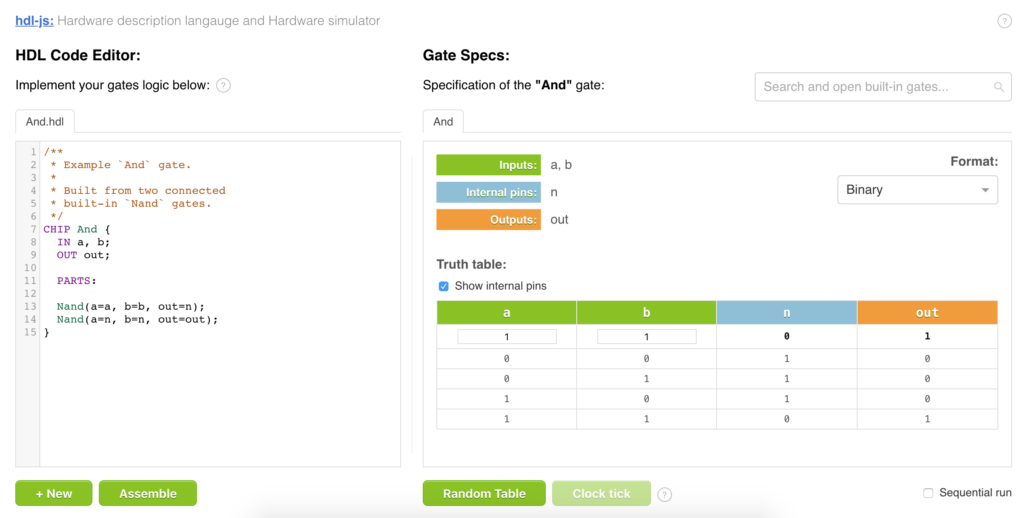
### Online tool
The emulator module is exposed as a UI tool, where you can design chips in HDL, introspect built-in gates, and check the results of gates evaluation.
### Built-in gates
In general, all the gates can be built [manually in HDL](#composite-gates) from the very basic `Nand` or `Nor` gates. However, `hdl-js` also provides implementation of most of the computer chips, built directly in JavaScript.
You can use these gates as building blocks with a guaranteed faster implementation, and also to check your own implementation, in case you build a custom version of a particular basic chip.
The `--list` (`-l`) command shows all the _built-in gates_ available in the emulator. The gates can be analyzed, executed, and used further as basic building blocks in construction of [compound gates](#composite-gates).
```
./bin/hdl-js --list
Built-in gates:
- And
- And16
- Or
- ...
```
Once you know a gate of interest, you can introspect its specification.
### Viewing gate specification
To see the specification of a particular gate, we can use `--describe` (`-d`) option, passing the name of a needed `--gate` (`-g`):
```
./bin/hdl-js --gate And --describe
```
Result:
```
"And" gate:
Description:
Implements bitwise 1-bit And & operation.
Inputs:
- a
- b
Outputs:
- out
Truth table:
┌───┬───┬─────┐
│ a │ b │ out │
├───┼───┼─────┤
│ 0 │ 0 │ 0 │
├───┼───┼─────┤
│ 0 │ 1 │ 0 │
├───┼───┼─────┤
│ 1 │ 0 │ 0 │
├───┼───┼─────┤
│ 1 │ 1 │ 1 │
└───┴───┴─────┘
```
> NOTE: the `--gate` option handles both, built-in gates by name, and custom gates from HDL files.
From Node the specification of a built-in gate is exposed via `Spec` option on the gate class:
```js
const hdl = require('hdl-js');
const {And} = hdl.emulator.BuiltInGates;
console.log(And.Spec);
/*
Output:
{
description: 'Implements bitwise 1-bit And & operation.',
inputPins: ['a', 'b'],
outputPins: ['out'],
truthTable: [
{a: 0, b: 0, out: 0},
{a: 0, b: 1, out: 0},
{a: 1, b: 0, out: 0},
{a: 1, b: 1, out: 1},
]
}
*/
```
### Specifying output format
Using `--format` option it is possible to control the format of the input/output values. For example, the truth table of the `And16` gate in binary (default), and hexadecimal formats:
```
./bin/hdl-js --gate And16 --describe
```
Binary output format:
```
┌──────────────────┬──────────────────┬──────────────────┐
│ a[16] │ b[16] │ out[16] │
├──────────────────┼──────────────────┼──────────────────┤
│ 0000000000000000 │ 0000000000000000 │ 0000000000000000 │
├──────────────────┼──────────────────┼──────────────────┤
│ 0000000000000000 │ 1111111111111111 │ 0000000000000000 │
├──────────────────┼──────────────────┼──────────────────┤
│ 1111111111111111 │ 1111111111111111 │ 1111111111111111 │
├──────────────────┼──────────────────┼──────────────────┤
│ 1010101010101010 │ 0101010101010101 │ 0000000000000000 │
├──────────────────┼──────────────────┼──────────────────┤
│ 0011110011000011 │ 0000111111110000 │ 0000110011000000 │
├──────────────────┼──────────────────┼──────────────────┤
│ 0001001000110100 │ 1001100001110110 │ 0001000000110100 │
└──────────────────┴──────────────────┴──────────────────┘
```
With `--format hex`:
```
./bin/hdl-js --gate And16 --describe --format hex
```
Hexadecimal output format:
```
┌───────┬───────┬─────────┐
│ a[16] │ b[16] │ out[16] │
├───────┼───────┼─────────┤
│ 0000 │ 0000 │ 0000 │
├───────┼───────┼─────────┤
│ 0000 │ FFFF │ 0000 │
├───────┼───────┼─────────┤
│ FFFF │ FFFF │ FFFF │
├───────┼───────┼─────────┤
│ AAAA │ 5555 │ 0000 │
├───────┼───────┼─────────┤
│ 3CC3 │ 0FF0 │ 0CC0 │
├───────┼───────┼─────────┤
│ 1234 │ 9876 │ 1034 │
└───────┴───────┴─────────┘
```
### Columns whitelist
Using the `--columns` (`-c`) option it is possible to specify a _whitelist_ of columns which should be printed.
For example, the resulting list of columns of the [examples/MipsAlu16.hdl](https://github.com/DmitrySoshnikov/hdl-js/blob/master/examples/MipsAlu16.hdl) gate is quite large, and shows a lot of internal pins (such as `cout1`, `cout2`, etc). Often it is desirable to view only needed columns of interest:
```
hdl-js -g examples/MipsAlu16.hdl -e '[{a: 2, b: 3, op: 2}]' -f dec -c a,b,out
```
And the table showing the result for `2 + 3`:
```
Truth table for data:
┌───────┬───────┬─────────┐
│ a[16] │ b[16] │ out[16] │
├───────┼───────┼─────────┤
│ 2 │ 3 │ 5 │
└───────┴───────┴─────────┘
```
### Testing gates on passed data
It is possible to manually test and evaluate the outputs of a gate based on its inputs:
```js
const hdl = require('hdl-js');
const {
emulator: {
/**
* `Pin` class is used to define inputs, and outputs.
*/
Pin,
BuiltInGates: {
And,
}
}
} = hdl;
const and = new And({
inputPins: [
new Pin({name: 'a', value: 1}),
new Pin({name: 'b', value: 1}),
],
outputPins: [
new Pin({name: 'out'}),
],
});
// Run the logic.
and.eval();
// Check "out" pin value:
console.log(and.getOutputPins()[0].getValue()); // 1
```
Input and output pins can also be passed as _plain objects_, rather than as `Pin` instances:
```js
const hdl = require('hdl-js');
const {
And,
And16,
} = hdl.emulator.BuiltInGates;
// Simple names:
const and1 = new And({
inputPins: ['a', 'b'],
outputPins: ['out'],
});
and1.setPinValues({a: 1, b: 0});
and1.eval();
console.log(and1.getPin('out').getValue()); // 0
// Spec with values and sizes:
const and2 = new And16({
inputPins: [
{name: 'a', size: 16, value: 1},
{name: 'b', size: 16, value: 0},
],
outputPins: [
{name: 'out', size: 16},
],
});
and2.eval();
console.log(and2.getPin('out').getValue()); // 0
```
### Pins
As mentioned above, `Pin`s are used to define _inputs_ and _outputs_ of gates. A single pin represents a _wire_, on which a signal can be transmitted. Logically, a pin can store a _number_ of a needed _size_.
For example, a pin of size 16 (default is size 1, i.e. a single "wire"):
```js
const hdl = require('hdl-js');
const {
emulator: {
Pin,
}
} = hdl;
const p1 = new Pin({
value: 'p',
size: 16,
});
p1.setValue(255);
console.log(p1.getValue()); // 255
```
Usually when creating a gate instance, explicit usage of the `Pin` class can be omitted (they are created automatically behind the scene), however, it is possible to get a needed pin using `getPin(name)` method on a gate. Then one can get a value of the pin, or subscribe to its `'change'` event.
#### Pin size and ranges
A pin can be of a needed size. For example, in HDL:
```
IN sel[3];
```
tells that the maximum value of the `sel` pin is 3 bits (`0b111`), or _"3 wires"_.
Individual bits in HDL can be accessed with direct indices (as in the `sel[2]`), or using _range_ notation (as with the `sel[0..1])`:
```
Mux4Way16(..., sel=sel[0..1], ...)
Mux16(..., sel=sel[2], ...);
```
In JS, the individual bits can be manipulated using `setValueAt`, `getRange`, and other methods:
```js
...
const p1 = new Pin({
value: 'p',
size: 3,
value: 0,
});
p1.setValue(0b111); // 7
console.log(p1.getValueAt(1)); // 1
p1.setValueAt(1, 0);
console.log(p1.getValueAt(1)); // 0
console.log(p1.getValue()); // 0b101, i.e. 5
console.log(p1.getRange(0, 1)); // first 2 bits: 0b01
```
#### Pin events
All `Pin` instances emit the following events:
- `change(newValue, oldValue, fromIndex, toIndex)` - an event emitted whenever a pin changes its value.
If the `fromIndex` is passed, this means a specific bit was updated, e.g. `a[2]`. If both, `fromIndex`, and `toIndex` are passed, this means a _range_ was updated, e.g. `a[1..3]`. Otherwise, the whole value was updated.
```js
...
const p1 = new Pin({
value: 'p',
size: 16,
value: 0,
});
p1.on('change', (newValue, oldValue) => {
console.log(`p1 changed from ${oldValue} to ${newValue}.`);
});
p1.setValue(255);
/*
Output:
p1 changed from 0 to 255.
*/
```
#### Connecting pins together
A pin can be a _value source_ for another pin. By connecting (output of) one pin to the (input of) another pin, we can automate handling of the `'change'` event of the destination pin:
```js
...
const a = new Pin({name: 'a', size: 16});
const b = new Pin({name: 'b', size: 16});
// Connect `a` to `b`. The `b` pin now listens
// to the 'change' event of the `a` pin:
a.connectTo(b);
a.setValue(15);
console.log(b.getValue()); // 15
// Disconnect:
a.disconnectFrom(b);
a.setValue(20);
console.log(b.getValue()); // still, 15
```
It is also possible to provide a _specification_ for value updates, which may include updates for indices and ranges:
```js
...
// Auto-connect to: b[2] = a[3]
a.connectTo(b, {
sourceSpec: {index: 3},
destinationSpec: {index: 2},
});
a.setValueAt(3, 1);
console.log(b.getValueAt(2)); // 1
// Disconnect:
a.disconnectFrom(b);
// Connect for range: b[4..7] = a[0..3]
a.connectTo(b, {
sourceSpec: {range: {from: 0, 3}},
destinationSpec: {range: {from: 4, 7}},
});
a.setRange(0, 3, 0b1010);
console.log(b.getRange(4, 7)); // 0b1010;
```
> **NOTE:** the pin connections are used when creating [composite gates from HDL](#building-chips-in-hdl).
### Creating gates from default spec
All gates known their own specification, so we can omit passing explicit pins info, and use `defaultFromSpec` method:
```js
const hdl = require('.');
const {And} = hdl.emulator.BuiltInGates;
// Creates input `a` and `b` pins, and
// ouput `out` pin automatically:
const and = And.defaultFromSpec();
and
.setPinValues({a: 1, b: 0})
.eval();
console.log(and.getPin('out').getValue()); // 0
```
### Exec on set of data
It is also possible to execute and test gate logic on the set of data:
```js
// const and = new And({ ... });
// Test the gate on set of inputs, get the results
// for the outputs.
const inputData = [
{a: 1, b: 0},
{a: 1, b: 1},
];
const {result} = and.execOnData(inputData);
console.log(result);
/*
Output for `result`:
[
{a: 1, b: 0, out: 0},
{a: 1, b: 1, out: 1},
]
*/
```
### Validating passed data on gate logic
In addition, if _output pins_ are passed, the `execOnData` will validates them, and report conflicting pins, if the expected values differ from the actual ones:
```js
// const and = new And({ ... });
// Pass the output pins as well:
const data = [
{a: 1, b: 0, out: 1}, // invalid output
{a: 1, b: 1, out: 1}, // valid
];
let {
result,
conflicts,
} = and.execOnData(data);
// Result is a correct truth table:
console.log(result);
/*
Output for `result`:
[
{a: 1, b: 0, out: 0},
{a: 1, b: 1, out: 1},
]
*/
// Conflicts contain conflicting entries: {row, pins}.
console.log(conflicts);
/*
Conflicts output:
[
{
row: 0,
pins: {
out: {
expected: 1,
actual: 0,
},
},
},
]
*/
```
From the CLI it's controlled via the `--exec-on-data` (`-e`) option.
In the example below we validate the gate logic, passing (incorrect in this case) expected value for the `out` pin of the `Or` gate:
```
./bin/hdl-js -g Or -e '[{"a": 1, "b": 1, "out": 0}]'
Found 1 conflicts in:
- row: 0, pins: out
┌───┬───┬───────┐
│ a │ b │ out │
├───┼───┼───────┤
│ 1 │ 1 │ 0 / 1 │
└───┴───┴───────┘
```
It is possible using actual number values in binary (`0b1111`), hexadecimal (`0xF`), and decimal (`15`) formats. Otherwise, the values have to be passed as strings (`'FFFF'` for `0xFFFF`) with correct `--format` option:
```
./bin/hdl-js -g Not16 -e '[{in: 0xFFFF}]' -f hex
```
Output:
```
Truth table for data:
┌────────┬─────────┐
│ in[16] │ out[16] │
├────────┼─────────┤
│ FFFF │ 0000 │
└────────┴─────────┘
```
### Data files for execution
The `--exec-on-data` (`-e`) option besides accepting the raw data-strings, also accepts _filenames_ which contain the actual data in the _extended JSON_ format. It allows moving the testing data into a separate file, instead of passing the data each time in the command line.
Example `~/my-data.dat`:
```js
[
{a: 1},
{a: 1, b: 1},
{b: 1},
]
```
Now we can apply this _partial data_ on any gate which works with `a` and `b` inputs (for example, `And` gate), and get the calculated results:
```
hdl-js --gate And --exec-on-data ~/my-data.dat
Truth table for data:
┌───┬───┬─────┐
│ a │ b │ out │
├───┼───┼─────┤
│ 1 │ 0 │ 0 │
├───┼───┼─────┤
│ 1 │ 1 │ 1 │
├───┼───┼─────┤
│ 0 │ 1 │ 0 │
└───┴───┴─────┘
```
As we can see, if some pins are not provided, they are defaulted to `0`.
The same data file applied on the `Or` gate, with the corresponding result:
```
hdl-js --gate Or --exec-on-data ~/my-data.dat
Truth table for data:
┌───┬───┬─────┐
│ a │ b │ out │
├───┼───┼─────┤
│ 1 │ 0 │ 1 │
├───┼───┼─────┤
│ 1 │ 1 │ 1 │
├───┼───┼─────┤
│ 0 │ 1 │ 1 │
└───┴───┴─────┘
```
### Gates scripting
The `--exec-on-data` [described above](#validating-passed-data-on-gate-logic) provides only _basic functionality_ for gates testing: you just define expected result in the _declarative_ form, and let the gate execute on data.
For an _advanced_ gates testing, we can use _scripting_, which is an _imperative_ approach for validating chips logic.
> **NOTE**: the scripts format is compatible with the [nand2tetris](http://nand2tetris.org/) course.
The script files have a simple syntax, support different simulator commands (such as `eval`, `tick`, `tock`, etc), and also looping constructs like `while`, and `repeat`.
#### Executing scripts
Script files usually have `.tst` extension, and automatically load needed chips. As a script executes, it validates the outputs with the specified _compare file_ (which usually has `.cmp` extension). As a side effect script produces the `.out` file.
For example, the [And.tst](https://github.com/DmitrySoshnikov/hdl-js/blob/master/src/emulator/hardware/scripting/examples/And.tst) script has corresponding [And.cmp](https://github.com/DmitrySoshnikov/hdl-js/blob/master/src/emulator/hardware/scripting/examples/And.cmp), and produces [And.out](https://github.com/DmitrySoshnikov/hdl-js/blob/master/src/emulator/hardware/scripting/examples/And.out) as the result.
Having the `And.tst`:
```
load And.hdl,
output-file And.out,
compare-to And.cmp,
output-list a%B3.1.3 b%B3.1.3 out%B3.1.3;
set a 0,
set b 0,
eval,
output;
set a 0,
set b 1,
eval,
output;
set a 1,
set b 0,
eval,
output;
set a 1,
set b 1,
eval,
output;
```
We can execute it using the `--script` (`-s`) option:
```
hdl-js --script src/emulator/hardware/scripting/examples/And.tst
```
Output:
```
✓ Script executed successfully!
```
If we have an error in the expected [And.cmp](https://github.com/DmitrySoshnikov/hdl-js/blob/master/src/emulator/hardware/scripting/examples/And.cmp) data, say on line 3:
```
| 0 | 1 | 1 |
```
We'll get the following report:
```
Error executing the script:
Expected on line 3 of src/emulator/hardware/scripting/examples/And.cmp:
1 | a | b | out |
| ...
3 | 0 | 1 | 1 |
Received:
1 | a | b | out |
| ...
3 | 0 | 1 | 0 |
```
In the example above the testing data itself is invalid. Usually though you'll have a correct testing data, and in case of an invalid gate logic, will receive a report on errors in the specific parts.
It is also possible to test the whole directory, passing the directory name instead of an individual `.tst` file. In this case, the directory is scanned for all `.tst` files, which are executed in sequence:
```
hdl-js --script src/emulator/hardware/scripting/examples/n2t/03/
```
Result:
```
[PASS] Bit.tst
[PASS] PC.tst
[PASS] RAM16K.tst
[PASS] RAM4K.tst
[PASS] RAM512.tst
[PASS] RAM64.tst
[PASS] RAM8.tst
[PASS] Register.tst
```
#### Script controller commands
All script commands are divided into _Controller commands_, and _Emulator commands_. The former control the scripts execution, the later operates on the loaded chip.
The basic controller commands are:
- `load ` -- loads needed gate (built-in, or from an hdl-file)
- `output-file ` -- file created as a side effect of execution
- `compare-to ` -- file to compare to
- `output-list ` -- format of the table columns in the output file, supports `B` (binary), `X` (hexadecimal), `D` (decimal), and `S` (string) columns
- `echo ` -- prints a string
- `output` -- prints a line to the output file with the current values on gate pins
Example of a script header with the basic controller commands:
```
load And.hdl,
output-file And.out,
compare-to And.cmp,
output-list a%B3.1.3 b%B3.1.3 out%B3.1.3;
```
The `output-list` contains 3 columns (`a`, `b`, and `out`), each in binary (`B`) format, with needed padding on left, middle, and right.
Looping controller commands are:
- `repeat { }` -- execute a loop needed amount of times
- `while { }` -- a while loop executes until the condition is met
Examples:
```
repeat 5 {
tick, tock;
}
while RAM[1] <> %B101 {
set RAM[1] 5,
ticktock;
}
```
#### Script emulator commands
The emulator commands operate on a loaded gate, and include:
- `set ` -- sets a value of a needed pin or name
- `eval` -- evaluates the logic on currently set pins
- `tick`, `tock`, `ticktock` -- executes appropriate events on the [System clock](#clock)
Example for the `And.hdl`:
```
set a 0,
set b 0,
eval,
output;
```
### Sequential run
When the `--run` (`-r`) command is passed, it is possible to analyze how the pin values change in time (especially for the clocked gates). This options work with both, `--exec-on-data` (`-e`), and `--describe` (`-d`).
Here's an example running the `Register` truth table:
```
./bin/hdl-js --gate Register --describe --run
```
Which executes the gate in time:
### Gate events
All gates emit events, which correspond to their internal logic handlers:
- `eval` -- an event happening on evaluation of the compositional logic
- `clockUp(value)` -- an event happening, when a gate handled the [clock](#clock)'s _rising edge_ (aka "tick")
- `clockDown(value)` -- an event happening, when a gate handled the [clock](#clock)'s _falling edge_ (aka "tock")
Here's an example, how an external observer may subscribe to gate logic events:
```js
const hdl = require('.');
const {
emulator: {
BuiltInGates: {
Register,
},
Clock: {
SystemClock,
},
},
} = hdl;
const r1 = Register.defaultFromSpec();
// Handle the event, when `r1` gets its output value:
r1.on('clockDown', () => {
console.log(`r1 = ${r1.getPin('out').getValue()}`); // 255
});
// Setup the `r1` inputs, on the falling edge (clockDown)
// the value is set to the `out` pin:
r1.setPinValues({
in: 255,
load: true,
});
// Run the full clock cycle:
SystemClock
.reset()
.cycle();
```
> **NOTE:** as described in [Pins](#pins) section, it is also possible to subscribe to `'change'` event of individual pins.
### Main chip groups
All gates are grouped into the following categories:
#### Very basic chips
This group includes two gates which can be used to build _anything else_.
- [Nand](https://github.com/DmitrySoshnikov/hdl-js/blob/master/src/emulator/hardware/builtin-gates/Nand.js) (negative-And)
- [Nor](https://github.com/DmitrySoshnikov/hdl-js/blob/master/src/emulator/hardware/builtin-gates/Nor.js) (negative-Or)
For example, as was shown above, the basic `And` chip can be built on top of two connected `Nand` gates:
```
CHIP And {
IN a, b;
OUT out;
PARTS:
Nand(a=a, b=b, out=n);
Nand(a=n, b=n, out=out);
}
```
#### Basic chips
The basic group of chips includes primitive building blocks for more complex chips. The basic chips themselves are built from the [very basic chips](#very-basic-chips). The group includes:
- [And](https://github.com/DmitrySoshnikov/hdl-js/blob/master/src/emulator/hardware/builtin-gates/And.js)
- [And16](https://github.com/DmitrySoshnikov/hdl-js/blob/master/src/emulator/hardware/builtin-gates/And16.js)
- [Or](https://github.com/DmitrySoshnikov/hdl-js/blob/master/src/emulator/hardware/builtin-gates/Or.js)
- [Or16](https://github.com/DmitrySoshnikov/hdl-js/blob/master/src/emulator/hardware/builtin-gates/Or16.js)
- [Or8Way](https://github.com/DmitrySoshnikov/hdl-js/blob/master/src/emulator/hardware/builtin-gates/Or8Way.js)
- [Nor16Way](https://github.com/DmitrySoshnikov/hdl-js/blob/master/src/emulator/hardware/builtin-gates/Nor16Way.js)
- [Not](https://github.com/DmitrySoshnikov/hdl-js/blob/master/src/emulator/hardware/builtin-gates/Not.js)
- [Not16](https://github.com/DmitrySoshnikov/hdl-js/blob/master/src/emulator/hardware/builtin-gates/Not16.js)
- [Xor](https://github.com/DmitrySoshnikov/hdl-js/blob/master/src/emulator/hardware/builtin-gates/Xor.js)
- [Mux](https://github.com/DmitrySoshnikov/hdl-js/blob/master/src/emulator/hardware/builtin-gates/Mux.js) (multiplexer)
- [Mux16](https://github.com/DmitrySoshnikov/hdl-js/blob/master/src/emulator/hardware/builtin-gates/Mux16.js)
- [Mux4Way16](https://github.com/DmitrySoshnikov/hdl-js/blob/master/src/emulator/hardware/builtin-gates/Mux4Way16.js)
- [Mux8Way16](https://github.com/DmitrySoshnikov/hdl-js/blob/master/src/emulator/hardware/builtin-gates/Mux8Way16.js)
- [DMux](https://github.com/DmitrySoshnikov/hdl-js/blob/master/src/emulator/hardware/builtin-gates/DMux.js) (demultiplexer)
- [DMux4Way](https://github.com/DmitrySoshnikov/hdl-js/blob/master/src/emulator/hardware/builtin-gates/DMux4Way.js)
- [DMux8Way](https://github.com/DmitrySoshnikov/hdl-js/blob/master/src/emulator/hardware/builtin-gates/DMux8Way.js)
For example, the more complex [HalfAdder](https://github.com/DmitrySoshnikov/hdl-js/blob/master/src/emulator/hardware/builtin-gates/HalfAdder.js) chip can be built on top of `Xor`, and `And` gates:
```
CHIP HalfAdder {
IN a, b; // 1-bit inputs
OUT sum, // Right bit of a + b
carry; // Left bit of a + b
PARTS:
Xor(a=a, b=b, out=sum);
And(a=a, b=b, out=carry);
}
```
The `Mux` (multiplexer) gate, which provides basic _selection_ (or _"if"_ operation), and being a basic chip, can itself be built from other basic chips from this group, such as `Not`, `And`, and `Or`.
To see the _full specification_ and _truth table_ of a needed gate, use `--describe` (`-d`) option from CLI.
#### ALU
The _arithmetic-logic unit_ is an abstraction which encapsulates inside several operations, implemented as smaller sub-chips. Usually ALU accepts two numbers, and based on the _OpCode (operation code)_, evaluates needed result. This group of chips includes:
- [HalfAdder](https://github.com/DmitrySoshnikov/hdl-js/blob/master/src/emulator/hardware/builtin-gates/HalfAdder.js) (2 bits adder)
- [FullAdder](https://github.com/DmitrySoshnikov/hdl-js/blob/master/src/emulator/hardware/builtin-gates/FullAdder.js) (3 bits adder)
- [Add16](https://github.com/DmitrySoshnikov/hdl-js/blob/master/src/emulator/hardware/builtin-gates/Add16.js)
- [Inc16](https://github.com/DmitrySoshnikov/hdl-js/blob/master/src/emulator/hardware/builtin-gates/Inc16.js)
- [ALU](https://github.com/DmitrySoshnikov/hdl-js/blob/master/src/emulator/hardware/builtin-gates/ALU.js)
The ALU chip itself evaluates both, arithmetic (such as addition), and logic (such as `And`, `Or`, etc) operations.
#### Memory chips
The basic building block for memory chips is a [Flip-Flop](https://en.wikipedia.org/wiki/Flip-flop_(electronics)). In particular, in this specific case, it's the _DFF (Data/Delay Flip-Flop)_.
On top of `DFF` other storage chips, such as 1 `Bit` abstraction, or 16-bit `Register` abstraction, are built. The group includes the following chips:
- [DFF](https://github.com/DmitrySoshnikov/hdl-js/blob/master/src/emulator/hardware/builtin-gates/DFF.js) (Data/Delay Flip-Flop)
- [Bit](https://github.com/DmitrySoshnikov/hdl-js/blob/master/src/emulator/hardware/builtin-gates/Bit.js) (1-bit memory unit)
- [Register](https://github.com/DmitrySoshnikov/hdl-js/blob/master/src/emulator/hardware/builtin-gates/Register.js) (16-bit memory unit)
- [ARegister](https://github.com/DmitrySoshnikov/hdl-js/blob/master/src/emulator/hardware/builtin-gates/ARegister.js) (Address Register)
- [DRegister](https://github.com/DmitrySoshnikov/hdl-js/blob/master/src/emulator/hardware/builtin-gates/DRegister.js) (Data Register)
- [PC](https://github.com/DmitrySoshnikov/hdl-js/blob/master/src/emulator/hardware/builtin-gates/PC.js) (Program Counter)
- [RAM](https://github.com/DmitrySoshnikov/hdl-js/blob/master/src/emulator/hardware/builtin-gates/RAM.js) (Random Access Memory)
- [RAM8](https://github.com/DmitrySoshnikov/hdl-js/blob/master/src/emulator/hardware/builtin-gates/RAM8.js)
- [RAM64](https://github.com/DmitrySoshnikov/hdl-js/blob/master/src/emulator/hardware/builtin-gates/RAM64.js)
- [RAM512](https://github.com/DmitrySoshnikov/hdl-js/blob/master/src/emulator/hardware/builtin-gates/RAM512.js)
- [RAM4K](https://github.com/DmitrySoshnikov/hdl-js/blob/master/src/emulator/hardware/builtin-gates/RAM4K.js)
- [RAM16K](https://github.com/DmitrySoshnikov/hdl-js/blob/master/src/emulator/hardware/builtin-gates/RAM16K.js)
Memory chips are synchronized by the [clock](https://en.wikipedia.org/wiki/Clock_signal), and operate on _rising_ and _falling_ edges of the [clock cycle](https://en.wikipedia.org/wiki/Clock_rate). Specification, and truth table of such chips contains `$clock` information, where negative values (e.g. `-0`) mean low logical level, and positive (`+0`) -- high logical level, or the rising edge.
The _internal state_ of a clocked chip can _only_ change on the _rising edge_. While the _output_ is _committed_ (usually to reflect the internal state) on the _falling edge_ of the clock. This _delay_ of the output is exactly reflected in the DFF, that is _Delay_ Flip-Flop, name.
See detailed clock description in the next section.
#### Interface chips
The interface chips include the gates, which allow communicating to user input and output. These are:
- [Screen](https://github.com/DmitrySoshnikov/hdl-js/blob/master/src/emulator/hardware/builtin-gates/Screen.js) (video memory)
- [Keyboard](https://github.com/DmitrySoshnikov/hdl-js/blob/master/src/emulator/hardware/builtin-gates/Keyboard.js)
##### Screen
The `Screen` chip represents 256 x 512 video memory, implemented with 8K registers. The gate can manipulate individual pixels using `getPixelAt`, and `setPixelAt` methods.
```js
...
const screen = Screen
.defaultFromSpec()
.clear();
console.log(screen.getPixelAt(1, 16)); // 0
screen.setPixelAt(/* row */ 1, /* column */ 16, 1);
console.log(screen.getPixelAt(1, 16)); // 1
```
##### Keyboard
The `Keyboard` chip is special, and requires callers to implement the actual keyboard listener, depending on a system where the chip is used. Such caller listeners should call `Keyboard.emit('key', key)` event, and the key code is propagated to the output pin:
Example using from a browser environment:
```js
...
const keyboard = Keyboard.defaultFromSpec();
keyboard.getPin('out').on('change', value => {
console.log('Char code: ' + value);
});
document.body.addEventListener('keypress', event => {
Keyboard.emit('key', event.key);
});
```
The `Keyboard` also provides default (blocking) `listen` method, which spawns Node's `stdin` keyboard listening:
```js
...
const keyboard = Keyboard.defaultFromSpec();
keyboard.getPin('out').on('change', value => {
console.log('Char code: ' + value);
});
// Listen to stdin.
keyboard.listen();
```
We can introspect keyboard events using `--describe` option of the `Keyboard` gate:
```
hdl-js --gate Keyboard --describe
```
Result:
```
BuiltIn "Keyboard" gate:
Description:
A keyboard, implemented as a 16 bit register that stores
the currently pressed key code.
Inputs:
Keyboard input
Outputs:
- out[16]
Truth table: press any key...
┌──────┬─────┐
│ char │ out │
├──────┼─────┤
│ A │ 65 │
└──────┴─────┘
Ctrl-c to exit...
```
### Clock
The _System clock_ is used to synchronize clocked chips (see example above in [memory chips](#memory-chips)).
A clock operates on the [clock rate](https://en.wikipedia.org/wiki/Clock_rate), that is, _number of cycles per second_, measured in **Hz**. The higher the clock rate, the faster machine is.
Clock's runtime consists of _cycles_, and _clock cycle_ has two phases: _rising edge_ (aka "tick"), and _falling edge_ (aka "tock").
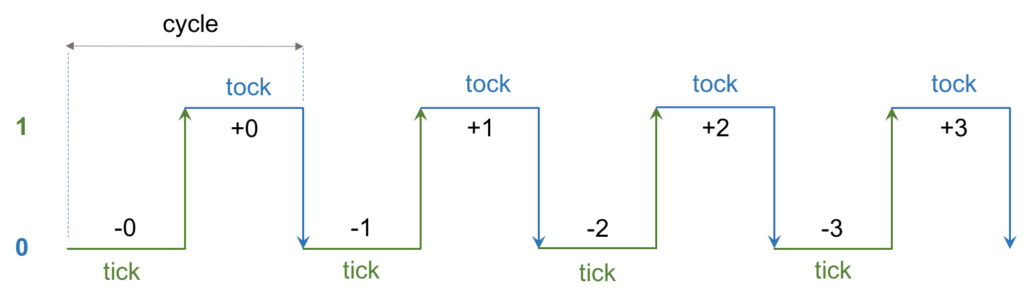
As mentioned in the [memory chips](#memory-chips) section, all clocked gates can change their internal state _only on the rising edge_. And on the falling edge they _commit_ the value form the state to the output pins.
For example, running the:
```
hdl-js --gate Bit --describe
```
Shows the clock information:
```
"Bit" gate:
Description:
1 bit memory register.
If load[t]=1 then out[t+1] = in[t] else out does not change.
Clock rising edge updates internal state from the input,
if the `load` is set; otherwise, preserves the state.
↗ : state = load ? in : state
Clock falling edge propagates the internal state to the output:
↘ : out = state
Inputs:
- in
- load
Outputs:
- out
Truth table:
┌────────┬────┬──────┬─────┐
│ $clock │ in │ load │ out │
├────────┼────┼──────┼─────┤
│ -0 │ 0 │ 0 │ 0 │
├────────┼────┼──────┼─────┤
│ +0 │ 1 │ 1 │ 0 │
├────────┼────┼──────┼─────┤
│ -1 │ 1 │ 0 │ 1 │
├────────┼────┼──────┼─────┤
│ +1 │ 1 │ 0 │ 1 │
├────────┼────┼──────┼─────┤
│ -2 │ 1 │ 0 │ 1 │
├────────┼────┼──────┼─────┤
│ +2 │ 0 │ 1 │ 1 │
├────────┼────┼──────┼─────┤
│ -3 │ 0 │ 0 │ 0 │
└────────┴────┴──────┴─────┘
```
From Node the `Clock` is available on the `emulator` object, and we can also get access to the global singleton `SystemClock`, which is used to synchronize the clocked chips:
```js
const hdl = require('hdl-js');
const {
emulator: {
Clock,
Pin,
},
} = hdl;
const clock = new Clock({rate: 10, value: -5});
const pin = new Pin({name: 'a'});
// Track clock events.
clock.on('tick', value => pin.setValue(value));
clock.tick();
console.log(pin.getValue()); // +5;
```
#### Clock events
The clock emits the following events:
- `tick` - rising edge
- `tock` - falling edge
- `next` - half cycle (`tick` or `tock`)
- `cycle` - full cycle (`tick` -> `tock`)
- `change` - clock value change
All the clocked gates are automatically subscribed to `SystemClock` events, and update the value of their `$clock` pin:
```js
const hdl = require('hdl-js');
const {
emulator: {
Gate,
Clock: {
SystemClock,
},
},
} = hdl;
class MyGate extends Gate {
static isClocked() {
return true;
}
eval() {
// Noop, handle only clock signal.
return;
}
clockUp(clockValue) {
console.log('Handle rising edge:', clockValue);
}
clockDown(clockValue) {
console.log('Handle falling edge:', clockValue);
}
}
MyGate.Spec = {
inputPins: ['a'],
outputPins: ['b'],
};
const gate = MyGate.defaultFromSpec();
// Run full clock cycle.
SystemClock.cycle();
/*
Output:
Handle rising edge: 0
Handle falling edge: -1
*/
```
It is also possible to `start`, `stop`, and `reset` the clock:
```js
const hdl = require('hdl-js');
const {
emulator: {
Clock: {
SystemClock,
},
},
} = hdl;
// Reset the clock:
SystemClock.reset();
// Subscribe to the events:
SystemClock.on('tick', value => console.log('tick:', value));
SystemClock.on('tock', value => console.log('tock:', value));
// Run it:
SystemClock.start();
/*
Output (every second):
tick: +0
tock: -1
tick: +1
tock: -2
tick: +2
tock: -3
...
*/
```
#### Clock rate
The `--clock-rate` parameter controls the rate of the System clock. For example, the second run executes operations faster:
With default clock rate 1:
```
./bin/hdl-js --gate Register --describe --run
```
With clock rate 3:
```
./bin/hdl-js --gate Register --describe --run --clock-rate 3
```
### Composite gates
The _composite gates_ are created from other, more primitive, gates. By connecting inputs and outputs of the internal chips, it is possible to build an _abstraction_ in a view of a resulting component, which encapsulates inside details of smaller sub-parts.
Although it is possible to create a composite gate manually using `CompositeGate` class from `emulator`, usually they are created via HDL.
#### Building chips in HDL
We already discussed briefly [format of the HDL](#format-of-an-hdl-file), and here we show how to create custom chips, building them from smaller blocks.
As mentioned, two [very basic gates](#very-basic-chips), the [Nand](https://github.com/DmitrySoshnikov/hdl-js/blob/master/src/emulator/hardware/builtin-gates/Nand.js), and [Nor](https://github.com/DmitrySoshnikov/hdl-js/blob/master/src/emulator/hardware/builtin-gates/Nor.js), can be used to build everything else in the computer chips.
In the example below, we use the `Nand` gate to implement a custom version of the `And` gate (even though the [built-in And](https://github.com/DmitrySoshnikov/hdl-js/blob/master/src/emulator/hardware/builtin-gates/And.js) gate implementation exists):
```
// File: examples/And.hdl
CHIP And {
IN a, b;
OUT out;
PARTS:
Nand(a=a, b=b, out=n);
Nand(a=n, b=n, out=out);
}
```
Here we connect two `Nand` gates in needed order, patching the output of the first one (via the _internal pin_ `n`) to the inputs of the second `Nand` gate.
From a user perspective, the _interface_ of our `And` gate looks as follows:
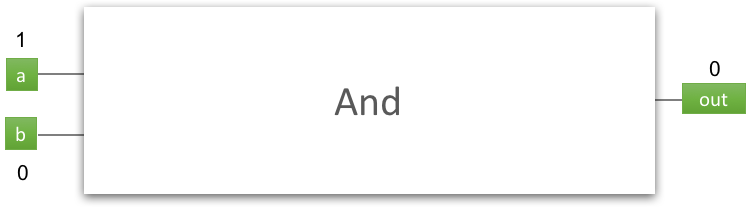
While if we look under the hood of the `And` gate _implementation_, we'll see the following picture:

> **NOTE:** as in other systems, in hardware chips there might be _multiple implementations_ for the _same interface_. E.g. we could build the `And` chip using `Nor` gates, instead of `Nand`.
So how does it work? The `Nand` stands for "negative-And" (or "not-And"). And first we feed our own `a` and `b` inputs to the first internal `Nand` chip, and get the "nand-result", saving it to the temporary (internal) pin `n`:
```
Nand(a=a, b=b, out=n);
```
As you can see, the `Nand` itself defines its inputs as `a`, and `b`, and output as `out`, which is propagated to our internal `n`.
> **NOTE:** run `hdl-js --gate Nand --describe` to see its specification.
Then, if to feed _the same value_ to `Nand` chip, we get the "Not" operation -- and that exactly what we do in the second `Nand` "call", feeding the value of `n` to both, `a`, and `b` inputs:
```
Nand(a=n, b=n, out=out);
```
The resulting `out` from the second `Nand` is fed further to our own `out` [pin](#pin). Eventually we got "not-not-And", and what is just "And":
```
Not(Nand(a, b)) == And(a, b)
```
> **NOTE:** you can also get more details on the implementation in the wonderful [nand2tetris](http://nand2tetris.org/) course by Noam Nisan and Shimon Schocken.
#### Viewing composite gate specification
Getting a specification of a composite gate from HDL doesn't differ from getting the specification of a built-in chip, since the `--gate` option handles both gate types.
For example, to view the specification of our custom `And` gate from above (see also [examples/And.hdl](https://github.com/DmitrySoshnikov/hdl-js/blob/master/examples/And.hdl)), we can just use the same `--describe` (`-d`) option:
```
hdl-js --gate examples/And.hdl --describe
```
What results to:
```
Custom "And" gate:
Description:
Compiled from HDL composite Gate class "And".
Inputs:
- a
- b
Internal pins:
- n
Outputs:
- out
Truth table:
┌───┬───┬───┬─────┐
│ a │ b │ n │ out │
├───┼───┼───┼─────┤
│ 0 │ 0 │ 1 │ 0 │
├───┼───┼───┼─────┤
│ 0 │ 1 │ 1 │ 0 │
├───┼───┼───┼─────┤
│ 1 │ 0 │ 1 │ 0 │
├───┼───┼───┼─────┤
│ 1 │ 1 │ 0 │ 1 │
└───┴───┴───┴─────┘
```
As we can see, it correctly determined our internal pin `n`, and even showed it in the generated truth table.
> **NOTE:** for 1-bit values the generated truth table shows all values. For larger pins, e.g. with size 16, a table with 5 random rows is shown. Try running the `hdl-js -g examples/Not16.hdl -d`.
The truth table allows us also to check, whether our implementation in the `PARTS` section is correct (and it really is in this case!).
As an alternative, check also the specification of the built-in `And` gate -- you'll notice that it doesn't differ much, resulting to the same truth table for inputs and outputs.
And of course it is possible to do a [sequential run](#sequential-run) of a custom gate too:
```
hdl-js --gate examples/Not16.hdl --describe --run
```
#### Using custom and built-in gates in implementation
In the example above, we used built-in native `Nand` gate to implement our own version of the `And` gate. However, once you have implemented some custom gate, you are free to use it further as a _building block_ for _even more abstracted chips_.
For example, if we look at the [examples/Mux.hdl](https://github.com/DmitrySoshnikov/hdl-js/blob/master/examples/Mux.hdl) file:
```
/**
* Multiplexor:
* out = a if sel == 0
* b otherwise
*/
CHIP Mux {
IN a, b, sel;
OUT out;
PARTS:
Not(in=sel, out=nel);
And(a=a, b=nel, out=A);
And(a=b, b=sel, out=B);
Or(a=A, b=B, out=out);
}
```
Assuming the `Mux.hdl` file is in the same directory as the `And.hdl`, the `And` gate in the implementation is loaded exactly from our local _custom_ implementation. Whereas, the `Not`, and `Or` are loaded from the built-ins. If we remove `And.hdl` from this directory, it will also be loaded from built-ins then.
Sometimes you may need to override local HDL-implementation, and use an explicit built-in gate in your call. For this we can use `BUILTIN` directive, which specifies that a particular chip call (or the whole gate definition) should be loaded from a corresponding built-in gate.
Example of providing the full backend for this chip:
```
Chip And {
IN a, b;
OUT out;
// Delegate fully implementation of this chip
// to the built-in `And` chip.
BUILTIN And;
}
```
Example of overriding just some parts:
```
Chip Nand {
IN a, b;
OUT out;
PARTS:
And(a=a, b=b, out=a_and_b);
Not(in=a_and_b, out=out);
BUILTIN And;
}
```
In the example above the `And` gate in the implementation explicitly marked as a built-in, whereas the `Not` gate will be loaded from local HDL (if it exists). This might be very useful at debugging, when you need to exclude potential issues in you local version of `And` gate, and fall-back to the built-in version. Once you have successfully debugged the problem, you can restore loading `And` from local HDL version.
#### Loading HDL chips from Node
In Node it is possible to load a composite HDL gate class using the `HDLClassFactory` module, which is exposed on the `emulator`. The `hdl-js` itself also exposes two convenient wrappers: `fromHDLFile`, and `fromHDL`:
```js
const hdl = require('hdl-js');
// Load `And` class from HDL:
const And = hdl.fromHDLFile('./examples/And.hdl');
// Instance of the class:
const and = And.defaultFromSpec();
// Test:
and
.setPinValues({a: 1, b: 1})
.eval();
// {a: 1, b: 1, n: 0, out: 1}
console.log(and.getPinValues());
```
## Code generator
The _code generator_ module allows _exporting to HDL_ files from gate structures in other forms: from AST, from a composite gate instance, etc.
In general case it's an inverse procedure to parsing. In the simplest case you have a parsed AST, and the code generator can build an HDL code from it.
### Exporting from AST
Having an AST of a gate, it is possible to generate an HDL code for it using the `generator` module. It is also possible to do some manipulations and transformations on this AST prior the generation:
```js
const {
parser,
generator,
} = require('hdl-js');
const originalHDL = `
CHIP And {
IN a, b;
OUT out;
PARTS:
Nand(a=a, b=b, out=n);
Nand(a=n, b=n, out=out);
}
`;
// Obtain the AST.
const ast = parser.parse(originalHDL);
// Slightly transform, reimplementing the second
// part as direct `Not` instead of `Nand`:
const {parts} = ast;
// Not(in=n, out=out);
parts[1] = {
type: 'ChipCall',
name: 'Not',
arguments: [
// First argument: `in=n`
{
type: 'Argument',
name: {type: 'Name', value: 'in'},
value: {type: 'Name', value: 'n'},
},
// Take second argument from the original call: `out=out`
parts[1].arguments[2],
],
};
// Finally, generate the HDL code:
const exportedHDL = generator.fromAST(ast);
console.log(exportedHDL);
/*
Result:
CHIP And {
IN a, b;
OUT out;
PARTS:
Nand(a=a, b=b, out=n);
Not(in=n, out=out);
}
*/
```
### Exporting from Composite Gates
Composite gates are usually created in the _declarative style_ [using HDL](#building-chips-in-hdl) syntax. Alternatively, one may need to create a composite gate directly in the _imperative style_, i.e. manually creating pins, connecting them together, etc.
In the example below we manually create a composite gate, and export it to HDL file:
> **NOTE**: the _preferred way_ of creating composite gates is still using declarative HDL notation. Use manual imperative style only in unusual programmatic cases.
```js
const hdl = require('hdl-js');
const {
generator,
emulator: {
CompositeGate,
Pin,
BuiltInGates: {
And,
Not,
},
},
} = hdl;
/*
We create manually (imperatively) a composite gate, corresponding
to the following declarative definition in HDL:
CHIP MyGate {
IN x[16], y[16];
OUT out[16];
PARTS:
And(a=x[0], b=y[0], out=temp);
Not(in=temp, out=out[1]);
}
*/
// Inputs:
const x = new Pin({name: 'x', size: 16});
const y = new Pin({name: 'y', size: 16});
// Outputs:
const out = new Pin({name: 'out', size: 16});
// Internal pins:
const temp = new Pin({name: 'temp'});
// Parts:
const and = And.defaultFromSpec();
const not = Not.defaultFromSpec();
// Now connect needed pins to each other,
// creating a connection graph:
// ----------------------------------
// And(a=x[0], b=y[0], out=temp);
// a=x[0]
x.connectTo(and.getPin('a'), {
sourceSpec: {index: 0},
});
// b=y[0]
y.connectTo(and.getPin('b'), {
sourceSpec: {index: 0},
});
// out=temp
and.getPin('out').connectTo(temp);
// ----------------------------------
// Not(in=temp, out=out[1]);
// in=temp
temp.connectTo(not.getPin('in'));
// out=out[1]
not.getPin('out').connectTo(out, {
destinationSpec: {index: 1},
});
// Create our gate instance:
const myGate = new CompositeGate({
name: 'myGate',
inputPins: [x, y],
outputPins: [out],
internalPins: [temp],
parts: [and, not],
});
// Finally, export this composite gate to an AST
// structure, and generate HDL code:
const hdlCode = generator.fromCompositeGate(myGate);
console.log(hdlCode);
/*
Result:
CHIP MyGate {
IN x[16], y[16];
OUT out[16];
PARTS:
And(a=x[0], b=y[0], out=temp);
Not(in=temp, out=out[1]);
}
*/
```