Ecosyste.ms: Awesome
An open API service indexing awesome lists of open source software.
https://github.com/rasulomaroff/reactive.nvim
Add a bit of reactivity to your Neovim experience. Apply highlights in different modes and operators, active and inactive windows.
https://github.com/rasulomaroff/reactive.nvim
highlight modes neovim neovim-plugin nvim operators reactivity winhighlight
Last synced: 3 months ago
JSON representation
Add a bit of reactivity to your Neovim experience. Apply highlights in different modes and operators, active and inactive windows.
- Host: GitHub
- URL: https://github.com/rasulomaroff/reactive.nvim
- Owner: rasulomaroff
- License: apache-2.0
- Created: 2023-07-23T09:31:23.000Z (10 months ago)
- Default Branch: main
- Last Pushed: 2024-02-05T09:48:52.000Z (4 months ago)
- Last Synced: 2024-02-06T05:21:12.053Z (4 months ago)
- Topics: highlight, modes, neovim, neovim-plugin, nvim, operators, reactivity, winhighlight
- Language: Lua
- Homepage:
- Size: 144 KB
- Stars: 88
- Watchers: 3
- Forks: 0
- Open Issues: 2
-
Metadata Files:
- Readme: README.md
- License: LICENSE
Lists
- awesome-neovim - rasulomaroff/reactive.nvim - Set global and window-specific highlights or trigger callbacks when modes/operators change or windows are switched. (Color / PHP)
- trackawesomelist - rasulomaroff/reactive.nvim (⭐106) - Set global and window-specific highlights or trigger callbacks when modes/operators change or windows are switched. (Recently Updated / [Mar 03, 2024](/content/2024/03/03/README.md))
- awesome-stars - rasulomaroff/reactive.nvim - Reactivity. Right in your neovim. (Lua)
README
reactive.nvim
Reactivity. Right in your neovim.


## Features
- **Performant**: `reactive.nvim` uses neovim events to apply highlights (`ModeChanged` for mode changes, `WinEnter`, `WinLeave`, and `BufWinEnter` for coloring active/inactive windows), your input isn't monitored at all.
- **Window highlights**: apply highlights only for a current window. Utilizes `'winhighlight'` neovim-specific option. (read more `:h 'winhighlight'`).
- **Highlights**: apply/change global highlights on mode changes.
- **Highly customizable**: you can customize literally any mode, even very specific one like `niI` (triggered when you press Ctrl + o in insert mode)
- **Specificity and priority systems**: if you are coming from FrontEnd, you probably already understand what these term mean. In `Reactive` every mode has its specificity depending on its length. More of this below.
- **Presets**: define your own presets or use builtin ones.
- **Modes**: apply different highlights for different modes.
- **Operators**: you can apply your highlights and window highlights on any operator like 'd', 'c', 'y' and others (all operators supported).
- **Custom operators**: you can even apply highlights on your custom operators! Always wanted to highlight a cursor line (or whatever), when using a specific external plugin's operator? Now it's possible.
- **Extendable**: other plugin creators (especially theme ones) can use `reactive.nvim` to add dynamic highlights to their plugins.
## Contents
- [Overview](#overview)
- [Status](#status)
- [Getting started](#getting-started)
- [Requirements](#requirements)
- [Installation](#installation)
- [Usage](#usage)
- [Commands](#commands)
- [Configuration](#configuration)
- [Config Spec](#config-spec)
- [Preset Spec](#preset-spec)
- [ModeConfig Spec](#modeconfig-spec)
- [StaticConfig Spec](#staticconfig-spec)
- [Shortcuts](#shortcuts)
- [Advanced](#advanced)
- [Loading presets](#loading-presets)
- [Custom operators](#custom-operators)
- [Shared mode configs](#shared-mode-configs)
- [Mode propagation](#mode-propagation)
- [Specificity and priority](#specificity-and-priority)
- [Extending Reactive](#extending-reactive)
## Overview
> `reactive` is a plugin that brings interactivity in your Neovim experience. It allows you to apply window-local or global highlights on mode changes or on window entering/leaving.
> If you're a plugin developer and considering using `reactive` as a dependency, you can make your plugin (especially if it's a colortheme) much more reactive and more pleasant to use.
> Read [extending reactive](#extending-reactive) for more on that.
### Demos
#### Changing colors when modes are switched:
https://github.com/rasulomaroff/reactive.nvim/assets/80093436/d9699ef3-c33d-436c-9fd8-1e181f36866b
#### Changing colors when operators are triggered:
https://github.com/rasulomaroff/reactive.nvim/assets/80093436/1c9fd0ee-307d-4d2c-a4b4-b36e8c1654c2
#### Changing colors of active & inactive windows:
https://github.com/rasulomaroff/reactive.nvim/assets/80093436/5cac055e-e613-487f-b7c2-04c88465df35
#### All together:
You can see how a cursor color and a cursor line color change when I switch modes/operators: Green for "insert" mode, blue for "change" operator, red for "delete" operator, orange for "yank" operator,
violet for "visual" mode, cyan for "replace" mode. Moreover, when you switch windows you can see how those colors changed for inactive window.
https://github.com/rasulomaroff/reactive.nvim/assets/80093436/3a3d32b9-d63b-4f8e-a1d3-e9f8ca5ea3d0
> If you watched closely, you could see how `reactive` works with [`telepath.nvim`](https://github.com/rasulomaroff/telepath.nvim). Now you will know which window
> you jumped in and what your current operator is.
## Status
**`reactive`** is in its early stages and some fields with their values may change in favor of convenience in the future, but this should **not** stop you
from trying this plugin out. Breaking changes (if any) won't happen suddenly and unexpectedly, if they don't break the core behavior of a plugin. In other cases,
they will be marked `deprecated` and you'll be notified in your Neovim console.
## Getting started
### Requirements
Neovim version: `>= 0.7.0`
### Installation
- With [`lazy.nvim`](https://github.com/folke/lazy.nvim):
```lua
{ 'rasulomaroff/reactive.nvim' }
```
- With [`packer.nvim`](https://github.com/wbthomason/packer.nvim)
```lua
use { 'rasulomaroff/reactive.nvim' }
```
### Usage
To quickly understand what you can do with this plugin, just use built-in presets, but I encourage you to build your preset and not rely on built-in ones, which can be changed in the future.
For the full spec look [here](#config-spec).
```lua
require('reactive').setup {
builtin = {
cursorline = true,
cursor = true,
modemsg = true
}
}
```
Alternatively, you can add your own [preset](#preset-spec):
```lua
require('reactive').add_preset {
-- your preset configuration here
}
```
You don't need to call the `setup` function to initialize `reactive`. It will be initialized as soon as you require it.
The `setup` function is only needed when you want to configure presets that some other plugins added or load their presets.
For the full spec look [here](#config-spec).
```lua
require('reactive').setup {
configs = {
-- a key here is a preset name, a value can be a boolean (if false, presets will be disabled)
-- or a table that overwrites preset's values
presetone = {
modes = {
i = {
winhl = {
-- overwrites StatusLine highlight group in insert mode
StatusLine = { bg = '', fg = '' }
}
}
}
},
-- disables `presettwo`
presettwo = false
}
}
```
Loading presets that you or other plugin authors added to the folder (`reactive/presets/yourpresetname.lua`).
More on that [here](#loading-presets)
```lua
require('reactive').setup {
load = { 'yourpresetname' } -- you can also use a string
}
```
### Commands
Reactive has the following commands you can use:
1. `ReactiveStart` - starts `reactive` by initializing listeners, such as events on `ModeChanged`, `WinEnter` etc.
2. `ReactiveStop` - removes listeners.
3. `ReactiveToggle` - toggles state between 2 commands above.
4. `Reactive enable ` - enables selected preset.
5. `Reactive disable ` - disables selected preset.
6. `Reactive toggle ` - toggles selected preset.
## Configuration
### Config Spec
This is a table you're passing to the `setup` method.
| Property | Type | Description |
|----------|------------------------------------|----------------------------------------------------------------------------------------------------------------------------------------------------------------------------------------------------------------------------------------------------------------------------------|
| builtin | `table` | This field is there for demonstration purposes, but you can actually use it if the colors meet your needs. The key is a preset name and a value is either a boolean or a table of preset fields you want to overwrite. Take a look at the [Preset Spec](#preset-spec). |
| configs | `table` | The key is a preset name. You can enable lazy presets here by passing `true` as a value or disable some by passing `false`. You can also customize a preset by passing a table with fields you want to overwrite. Take a look at the [Preset Spec](#preset-spec). |
| load | `string` or `table` | This is a shortcut for the `load_preset` method which allows you to load presets from the `reactive/presets/` directory. You can either put a name of a preset to this field or pass a table with preset names that should be loaded. Read about it [here](#loading-presets). |
### Preset Spec
The `name` field is required.
| Property | Type | Description |
|-----------|-----------------------------------------------------------------------|-----------------------------------------------------------------------------------------------------------------------------------------------------------------------------------------------------------------------------------------------------------------------------------------|
| name | `string` | This is your preset's name. It should be unique across other presets. |
| lazy | `boolean` | This property is meant to be used by other plugin developers. By making your preset lazy you can delay its usage till a user decides to activate it. |
| priority | `number` | You can set a priority of any preset, if you faced conflicting preset highlights, for example. It's not recommended to set this field, if you are a plugin developer. |
| skip | `fun(): boolean` or `{ winhl?: fun(): boolean, hl?: fun(): boolean }` | This function will be called on every mode change, so that you can define when your preset shouldn't be applied. It should return true, if you want to skip applying highlights. You can also pass a table with functions, if you want to disable only window highlights or highlights. |
| init | `fun()` | This function will be called once when a preset inits. |
| modes | `table` | This is a table where a key is a mode (check `:h mode()` for understanding all the modes Neovim has), and a value is a `ModeConfig` specification. |
| static | `StaticConfig` | Static highlights are applied when there're no such highlights in the `modes` field. |
**Example of a preset:**
```lua
local my_preset = {
name = 'my-preset',
skip = function()
return vim.api.nvim_buf_get_option(0, 'buftype') == ''
end,
modes = {
n = {
-- normal mode configuration
},
i = {
-- insert mode configuration
}
}
}
```
### ModeConfig Spec
Mode config is a table, containing following field and values:
| Property | Type |
|-----------|----------------------------------------------------------------------------|
| winhl | `table` |
| hl | `table` |
| operators | `table` - but without `operators` field |
| opfuncs | `table` - but without `operators` and `opfuncs` fields |
| exact | `boolean` or `{ winhl?: boolean, hl?: boolean }` |
| frozen | `boolean` or `{ winhl?: boolean, hl?: boolean }` |
| from | `fun(modes: { from: string, to: string })` |
| to | `fun(modes: { from: string, to: string })` |
#### winhl
type: `table`
Table of window-local highlights, that will be applied in a specific mode/operator/opfunc.
A key in this table is a name of a highlight group and value - its value. The same you set with `vim.api.nvim_set_hl(0, name, value)`.
Example:
```lua
winhl = {
StatusLine = { fg = '#000000', bg = '#ffffff' }
}
```
#### hl
type: `table`
Table of highlights, that will be applied in a specific mode/operator/opfunc. Very similar to `winhl`, but these highlights are set globally (in every window).
For example, `Cursor` hl group cannot be highlighted window-locally, so you can set it here.
Example:
```lua
hl = {
Cursor = { fg = '#00ff00', bg = '#ff00ff' }
}
```
#### operators
type: `ModeConfig`
> [!NOTE]
> This field can only be used inside operator-pending modes, like `no`, `nov`, `noV`, and `no\x16`.
This field allows you to configure operators as you configure modes. This is a table where a key is an operator ('d', 'y' or any other valid one, check `:h operator` to see all existing operators),
and a value is a `ModeConfig` spec. Highlights that you specify in this table will be prioritized over those from `modes`.
Example:
```lua
operators = {
d = {
winhl = {
-- if the `no` mode has StatusLine highlight, it will be overwritten by this one below
StatusLine = { fg = 'yourcolor', bg = 'yourcolor' }
}
}
}
```
#### opfuncs
type: `ModeConfig`
> [!NOTE]
> This field can only be used inside the `g@` operator and is **experimental**.
You can apply highlights depending on your custom operators. Spec here will be the same as in the `modes` and `operator` fields.
Read more about using custom operators [here](#custom-operators).
#### from
type: `fun(modes: { from: string, to: string })`
> [!NOTE]
> This field can only be used inside modes, not inside operators/opfuncs.
A callback that will be executed when neovim goes into another mode **from** this one.
Example:
```lua
modes = {
i = {
from = function(modes)
-- callback that will be executed every time you leave an insert mode
end
}
}
```
#### to
type: `fun(modes: { from: string, to: string })`
> [!NOTE]
> This field can only be used inside modes, not inside operators/opfuncs.
A callback that will be executed when neovim goes **into** this mode.
```lua
modes = {
n = {
to = function(modes)
-- callback that will be executed every time you enter a normal mode
end
}
}
```
#### exact
type: `boolean` or `{ winhl?: boolean, hl?: boolean }`
> [!NOTE]
> This field will be checked **only** for the exact mode triggered. For example, if a triggered mode is `Rv`, `reactive` will check the `exact` field only
> for `Rv` mode, not for `R`. If you would like to stop mode propagation, look at the `frozen` field.
You don't really need to use this field if the mode you're configuring consists of one letter. It allows you not to apply highlights from modes
that are less specific than triggered one. For example, if you set this is as `true` for `niI` mode and that mode is triggered, `reactive` won't
apply highlights from `ni` and `n` modes. (It does it by default due to [mode propagation](#mode-propagation)).
You can also pass a table identifying which field you want to be exact.
#### frozen
type: `boolean` or `{ winhl?: boolean, hl?: boolean }`
This field tells `reactive` to stop propagation of mode highlights. Can be a boolean value to stop propagation of highlights completely or a table which
specifies which highlights should be stopped. So, for example you specified `frozen = true` for the `n` (normal) mode, that means that `reactive` won't
apply normal mode's highlights to any further `n*` mode, like `no`, `niI`, `niR` etc. You can read more about the mode propagation [here](#mode-propagation).
A complete example of a preset can look like the following:
```lua
local my_preset = {
name = 'my-preset',
init = function()
-- making our cursor to use `MyCursor` highlight group
vim.opt.guicursor:append 'MyCursor'
end,
modes = {
n = {
winhl = {
-- we use `winhl` because we want to highlight CursorLine only in a current window, not in all of them
-- if you want to change global highlights, use the `hl` field instead.
CursorLine = { bg = '#21202e' }
},
hl = {
MyCursor = { bg = '#FFFFFF' }
},
},
no = {
-- You can also specify winhl and hl that will be applied with every operator
winhl = {},
hl = {},
operators = {
d = {
winhl = {
CursorLine = { bg = '#450a0a' }
},
hl = {
MyCursor = { bg = '#fca5a5' }
}
},
y = {
winhl = {
CursorLine = { bg = '#422006' },
},
hl = {
MyCursor = { bg = '#fdba74' }
}
}
}
},
i = {
winhl = {
CursorLine = { bg = '#042f2e' }
},
hl = {
MyCursor = { bg = '#5eead4' }
}
}
}
}
```
### StaticConfig Spec
> [!NOTE]
> Highlights from the `static` field will be only applied when there're no alternatives for them in the `modes` field.
Example:
```lua
{
modes = {
-- here is your modes config
},
static = {
hl = {
-- put your `fallback` highlights here
},
winhl = {
active = {
-- put your highlights for a current window here
},
inactive = {
-- put your highlights for non-current windows here
}
},
}
}
```
### Shortcuts
There are some useful shortcuts if you want to match all visual or select modes. Unfortunately, `visual` mode, `visual-line` mode, and `visual-block` mode start from different
characters and cannot be match just by typing `v` as other modes can be, for example:
1. `insert` mode - `i` (matches all insert modes)
2. `replace` - `R` (matches all replace modes)
Given that, to match all visual modes you need to use the following config:
```lua
modes = {
-- \x16 here stands for visual block mode, which you can cause by pressing CTRL + v
[{ 'v', 'V', '\x16' }] = {
-- your config here
}
}
```
For select modes:
```lua
modes = {
[{ 's', 'S', '\x13' }] = {
-- your config here
}
}
```
## Advanced
### Loading presets
> If you're a plugin developer, please read [this](#extending-reactive).
> Want to load a preset from other plugin? - Proceed to the 3rd step.
If you don't want to use the `add_preset` method for some reasons, for example your preset is giant or you have several ones, then it is completely fine. For that reason there's a more clean way to do it:
1. Create a file(s) with a desired preset name(s) inside `reactive/presets/yourpresetname.lua` directory. You should put this directory where Neovim will be able to access it. The best way to it is just
to put it inside your `lua/` directory so the full path will look like this `lua/reactive/presets/yourpresetname.lua`.
2. Return a [preset](#preset-spec) from that file.
`lua/reactive/presets/statusline.lua`
```lua
return {
name = 'statusline', -- this field is required and should match your file name
modes = {
i = {
hl = {
StatusLine = {}
}
}
}
}
```
3. Load this preset either using the `setup` method or the `load_preset` method.
```lua
require('reactive').setup {
load = 'statusline' -- you can also use a table if you want to load several presets like that { 'statusline', 'another' }
}
```
or
```lua
require('reactive').load_preset 'statusline'
```
### Custom operators
> [!IMPORTANT]
> This feature is experimental. Consider possible further changes.
You can apply highlights on custom operators the way you do for built-in operators.
This is a config for `delete` operator.
```lua
operators = {
d = {}
}
```
As you may or may not know, all custom operators in Neovim utilize `g@` operator. Documentation says this operator(g@) calls a function set with the 'operatorfunc' option.
So, to specify a custom operator you need to use `g@` operator. Let's say we want to highlight `StatusLine` dark violet when [`substitute.nvim`](https://github.com/gbprod/substitute.nvim)
triggers its `substitute` operator.
From its documentation we see that we should set this mapping to get it work:
```lua
vim.keymap.set("n", "s", require('substitute').operator, { noremap = true })
```
To also tell `reactive` that this operator is triggered, we need to change this mapping to look like this:
```lua
vim.keymap.set("n", "s", function()
-- this way reactive will know that substitute's operator is triggered
-- the string you pass into this function should be unique across other custom operators
-- this method should called BEFORE the actual function
require('reactive').set_opfunc 's'
require('substitute').operator()
end, { noremap = true })
```
> [!WARNING]
> You can't pass any string to the `set_opfunc` function since that string will eventually be decoded to be used in a highlight group's name.
> Do **NOT** put any symbols there, except `.` and `@`. Also try to make the string short. As already been said, the string you pass into this
> function should be unique across other custom operators.
Now to highlight `StatusLine` when that operator is triggered, you Lua code will look like this:
```lua
operators = {
['g@'] = {
-- don't forget you can also set highlights for each custom operator, that will be applied
-- every time the `g@` operator is triggered
winhl = {},
hl = {},
opfuncs = {
-- 's' here is that unique name we passed into the `set_opfunc` method in the mapping
s = {
winhl = {
StatusLine = { bg = '#5b21b6' }
}
}
}
}
}
```
### Shared mode configs
You can apply the same config for several modes at once by specifying a key as an array. This also works for operators and operator functions (opfuncs).
Example:
```lua
{
modes = {
[{ 'n', 'i', 'v' }] = {
-- shared mode config for a normal, insert and visual mode
},
no = {
operators = {
[{ 'd', 'c' }] = {
-- shared mode config for delete and change operators
},
['g@'] = {
opfuncs = {
[{ 'firstoperator', 'secondoperator' }] = {
-- shared mode config for your custom operators
}
}
}
}
}
}
}
```
### Mode propagation
First of all, take a look at this picture. This is how mode propagation works.
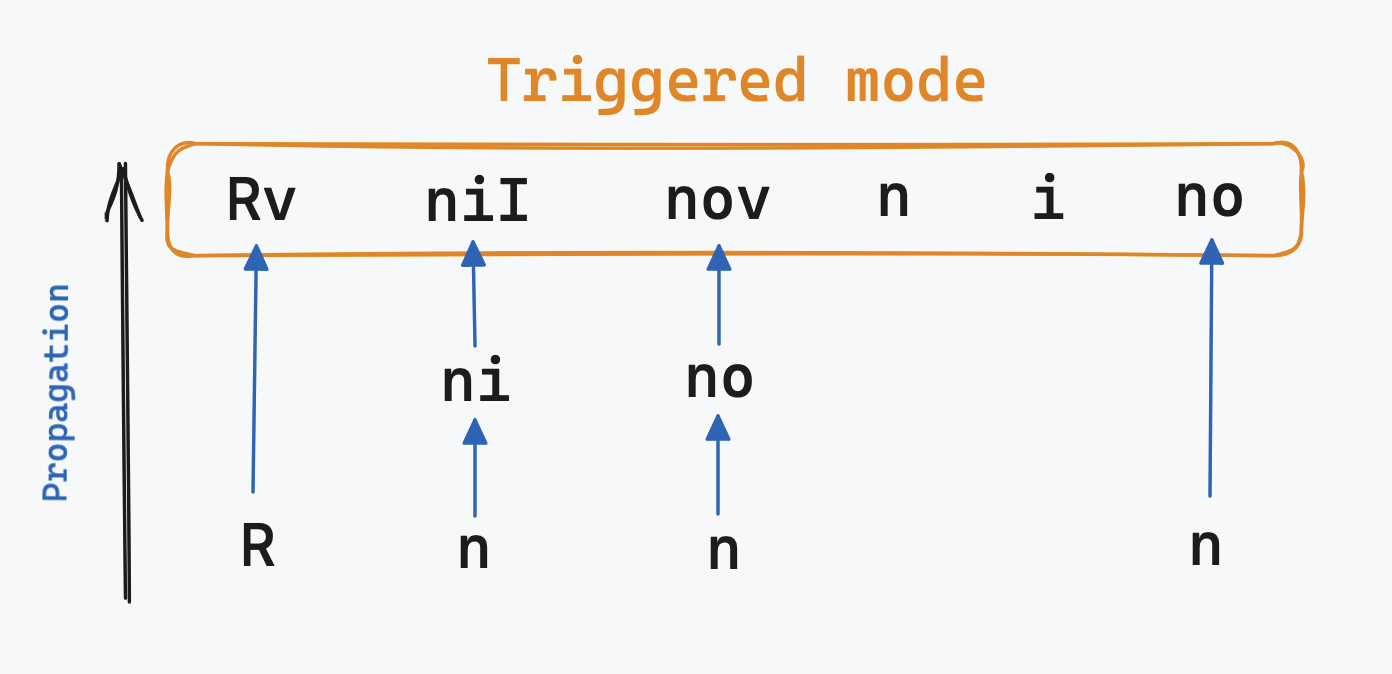
As you can see, when some mode containing 2 or more characters is triggered, it starts propagating from the first character, and then continues
all the way up to the exact match. When propagating, `reactive` will start to form what's called a `Snapshot`. It's a table containing all of window and global highlights
that must be applied now.
**Why**
You're possibly thinking right now: "Why do we ever need it?". Well, because if you think how modes in Vim/Neovim are implemented, you'll notice that they're made in a very clever and thoughtful
way.
Let's take the `Rv` mode from the example above. Documentation says it is a 'Virtual Replace' mode, triggered by `gR` keys. If you use this mode,
you'll notice that it's very similar to the usual 'Replace' mode. It obviously has some differences, but the first letter in `Rv` is `R`, identifying
that it's a `Replace` mode at first, but a bit specific.
Now let's take `nov` mode (Operator-pending, forced charwise mode). The propagation sequence here will be `n` -> `no` -> `nov`.
1. `n` -> `no` - when you're in the operator-pending mode, you're still kind of partially in the normal mode as well, because nothing has happenend yet and
Neovim is waiting for your next action.
2. `no` -> `nov` - this is still the operator-pending mode, but now more specific. It's forced to act charwise.
#### `exact` and `frozen` fields
This is why we need these fields. If you look at that picture again, you can imagine that `frozen` field removes the blue arrow. For example, if you specify
`frozen = true` for the `n` mode, `nov` mode won't get highlights from `n` mode (but will from `no`). But if you only want to get highlights from the triggered mode with
no propagation at all, specifying `exact = true` for a mode will do what you want. The `exact` field is only checked for the whole mode match (if a triggered mode is `no`, the
`exact` field is only checked for the `no` mode, not for the `n`).
##### Performance considerations
You may think that this is a performance issue, since there's no sense in first forming a table with highlights and then erase everything if the last mode is `exact` and
**_you will be right_**. This is why `reactive` goes backwards from `niI`, then `ni`, finally `n`. If `niI` has `exact` option, `reactive` will stop looking further.
### Specificity and priority
#### Specificity
Now we have mode propagation, modes, operators, custom operators. How do we know which highlights should be applied? This is when specificity and priority step in.
Specificity depends on a mode length, meaning that the longer the mode is, the more specific it is.
Let's say we have such a config:
```lua
modes = {
n = {
winhl = {
WinBar = { ... }
StatusLine = { ... }
}
},
no = {
winhl = {
WinBar = { ... }
}
}
}
```
If the `operator-pending` mode is triggered, which is the equivalent to `no`, the `no`'s mode length is 2, whereas the `n`'s is 1. That means that a resulted `Snapshot` will contain `WinBar` highlight from the `no` mode and `StatusLine` highlight
from the `n` mode. Thus, `no` is more specific than `n`. Highlights from the `n` mode will be applied just because the `no` mode has `n` letter at the first character.
#### Priority
Priority is intended to solve highlight conflicts between `modes` | `operators` | `operator functions`.
They are listed below in order of priority:
1. Operator functions
2. Operators
3. Modes
4. Static
Meaning that highlights from operator functions will be prioritized over those from operators, whereas highlights from operators will be prioritized over
those from modes. The last colors that will be applied are those from the `static` field.
_Be aware that **Specificity** is still the most important factor. Highlights from a more specific mode will still overwrite those from a less specific one, even if they were
applied from an operator or an operator function._
## Extending Reactive
The process of extending `reactive` is made as straightforward as possible. If your plugin wants to use `reactive`, just require it and add your preset.
```lua
require('reactive').add_preset {
name = 'your preset name',
-- other fields
-- do not forget about `lazy` field, if you want to delegate your preset activation to a user
}
```
Alternatively, you can create your preset file at `reactive/presets/yourpresetname.lua` and then load it:
1) Put your preset into a file, eg `reactive/presets/test.lua`
```lua
return {
name = 'test', -- should be the same as the file name
modes = {
i = {
winhl = {},
hl = {}
}
},
-- other fields
-- do not forget about `lazy` field, if you want to delegate your preset activation to a user
}
```
2) Load it from any other file that's executed:
```lua
require('reactive').load_preset 'test'
```
Then, if a user wants to configure your preset, they can do that from the `setup` function:
```lua
require('reactive').setup {
configs = {
['your preset name'] = {
-- here they can put custom configuration
},
-- alternatively, to disable your plugin they can specify a boolean value
['your preset name'] = false -- or true, if your plugin is lazy and a user action is required to enable it
}
}
```