https://github.com/TenviLi/awesome-hexo-plugins
🆒A curated list of awesome plugins related to Hexo.
https://github.com/TenviLi/awesome-hexo-plugins
List: awesome-hexo-plugins
Last synced: 6 months ago
JSON representation
🆒A curated list of awesome plugins related to Hexo.
- Host: GitHub
- URL: https://github.com/TenviLi/awesome-hexo-plugins
- Owner: TenviLi
- License: mit
- Created: 2019-02-20T11:21:09.000Z (over 6 years ago)
- Default Branch: master
- Last Pushed: 2019-02-20T11:58:02.000Z (over 6 years ago)
- Last Synced: 2024-05-21T08:06:44.344Z (about 1 year ago)
- Homepage:
- Size: 61.5 KB
- Stars: 75
- Watchers: 0
- Forks: 0
- Open Issues: 0
-
Metadata Files:
- Readme: README.md
- License: LICENSE
Awesome Lists containing this project
- ultimate-awesome - awesome-hexo-plugins - 🆒A curated list of awesome plugins related to Hexo. (Other Lists / Julia Lists)
README

# Awesome-hexo-plugins [](https://github.com/sindresorhus/awesome)
> 👓 推荐常用的 Hexo 插件
>
> 如果你有好的插件推荐,欢迎 pull requests 或 提出 Issues。
- [文章](#文章)
- [`hexo-auto-category` 根据文件目录自动生成文章分类](#hexo-auto-category-根据文件目录自动生成文章分类)
- [`hexo-renderer-markdown-it` 使用 markdown-it 作渲染器](#hexo-renderer-markdown-it-使用-markdown-it-作渲染器)
- [`hexo-related-popular-posts` 生成相关热门文章列表](#hexo-related-popular-posts-生成相关热门文章列表)
- [`hexo-description` 根据标记位置自动生成文章简介](#hexo-description-根据标记位置自动生成文章简介)
- [SEO](#seo)
- [`hexo-baidu-url-submit` 向百度主动提交链接](#hexo-baidu-url-submit-向百度主动提交链接)
- [`hexo-autonofollow` 外链自动 nofollow](#hexo-autonofollow-外链自动-nofollow)
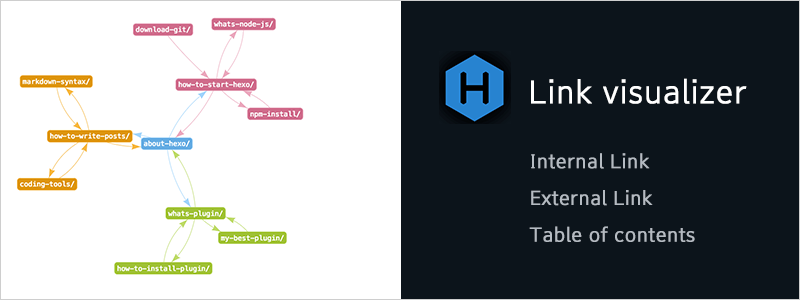
- [`hexo-seo-link-visualizer` 分析链接并可视化站点结构](#hexo-seo-link-visualizer-分析链接并可视化站点结构)
- [`hexo-baidu-url-push` 百度站长平台自动推送工具](#hexo-baidu-url-push-百度站长平台自动推送工具)
- [生成器](#生成器)
- [`hexo-generator-topindex` 置顶文章](#hexo-generator-topindex-置顶文章)
- [`hexo-generator-feed` 生成博客 RSS](#hexo-generator-feed-生成博客-rss)
- [`hexo-generator-sitemap` 生成 sitemap.xml](#hexo-generator-sitemap-生成-sitemapxml)
- [`hexo-generator-baidu-sitemap` 生成 baidusitemap.xml](#hexo-generator-baidu-sitemap-生成-baidusitemapxml)
- [工具](#工具)
- [`hexo-abbrlink` 生成文章唯一ID](#hexo-abbrlink-生成文章唯一id)
- [`hexo-nanoid` 用 nanoid 生成文章唯一ID](#hexo-nanoid-用-nanoid-生成文章唯一id)
- [`hexo-translate-title` 将汉字标题转成英文标题](#hexo-translate-title-将汉字标题转成英文标题)
- [`hexo-all-minifier` 压缩所有静态文件](#hexo-all-minifier-压缩所有静态文件)
- [`hexo-pwa` 支持PWA](#hexo-pwa-支持pwa)
- [`hexo-lazyload-image` 图片懒加载](#hexo-lazyload-image-图片懒加载)
- [标签拓展](#标签拓展)
- [`hexo-codepen-v2` 插入 Codepen 代码片段](#hexo-codepen-v2-插入-codepen-代码片段)
- [`hexo-tag-kbd` 支持 kbd 标签](#hexo-tag-kbd--支持-kbd-标签)
- [`hexo-tag-color-block` 颜色标签](#hexo-tag-color-block-颜色标签)
- [`hexo-tag-hint`](#hexo-tag-hint)
- [`hexo-tag-bilibili` 插入bilibili视频](#hexo-tag-bilibili-插入bilibili视频)
- [`hexo-ruby-character` Ruby character tag](#hexo-ruby-character--ruby-character-tag)
- [`hexo-github-card` GitHub 用户资料卡片](#hexo-github-card-github-用户资料卡片)
- [`hexo-caniuse` Can I Use CSS Features?](#hexo-caniuse-can-i-use-css-features)
- [`hexo-github` 追踪 GitHub 仓库 commit](#hexo-github-追踪-github-仓库-commit)
- [部署](#部署)
- [`hexo-deployer-git` 部署到 Git](#hexo-deployer-git-部署到-git)
- [美化](#美化)
- [`hexo-helper-live2d` 萌萌哒二次元看板娘](#hexo-helper-live2d-萌萌哒二次元看板娘)
## 文章
### `hexo-auto-category` 根据文件目录自动生成文章分类
最常用的文件管理策略,就是利用文件系统目录结构(树形结构 directory-tree)。
同样,为了便于管理大量的日志文件,采用目录结构是一种简便可行的方案。`hexo-auto-category` 根据日志文件(Markdown)所在文件目录自动分类,即自动生成`markdown`的front-matter中的`categories`变量。
```bash
$ npm install hexo-auto-category --save
```
**示例**
对于博客 `source/_post/web/framework/hexo.md`,该插件会自动生成以下`categories`
```yaml
categories:
- web
- framework
```
**配置**
在站点根目录下的`_config.yml`添加:
```yaml
auto_category:
enable: true
depth: 1 #生成到第几级目录分类
```
### `hexo-renderer-markdown-it` 使用 markdown-it 作渲染器
```bash
$ npm install hexo-renderer-markdown-it --save
```
### `hexo-related-popular-posts` 生成相关热门文章列表

该插件会根据文章指定的 tags 生成一系列的相关文章列表,所以发布文章请务必在 Front Matter 中指定 tags。
```bash
$ npm install hexo-related-popular-posts --save
```
**安装该插件后需要DIY你的主题**
First, add the following `popular_posts( {} , post )` helper tag in template file for article. For example , if you use [hexo-theme-landscape](https://github.com/hexojs/hexo-theme-landscape) , add a tag [here](https://github.com/hexojs/hexo-theme-landscape/blob/master/layout/_partial/article.ejs#L25).
```
<%-
popular_posts( {} , post )
%>
```
更多详细文档请移步 [tea3/hexo-related-popular-posts](https://github.com/tea3/hexo-related-popular-posts) 查阅。
### `hexo-description` 根据标记位置自动生成文章简介
If post has no description set, will auto use excerpt as `description`.
```bash
npm install hexo-description --save
```
之后在文章中标记 `` 标签即可。
**流程**
1. Origin post
```markdown
---
title: Example post
---
## excerpt
- list1
- list2
content
```
1. Origin excerpt
```markdown
## excerpt
- list1
- list2
```
1. Rendered excerpt
```html
excerpt
```
1. Finally we set pure excerpt text to description
```
excerptlist1list2
```
## SEO
### `hexo-baidu-url-submit` 向百度主动提交链接
主动推送Hexo博客新链接至百度搜索引擎,解决百度爬虫被禁止访问的问题,提升网站收录质量和速度。

```bash
npm install hexo-baidu-url-submit --save
```
把以下内容配置到`_config.yml`文件中:
```yaml
baidu_url_submit:
count: 1 ## 提交最新的一个链接
host: www.nuist.today ## 在百度站长平台中注册的域名
token: your_token ## 请注意这是您的秘钥, 所以请不要把博客源代码发布在公众仓库里!
path: baidu_urls.txt ## 文本文档的地址, 新链接会保存在此文本文档里
```
其次,记得查看_config.ym文件中url的值, 必须包含是百度站长平台注册的域名(一般有www), 比如:
```yaml
# URL
url: https://www.nuist.today
root: /
permalink: p/:title/
```
最后,加入新的deployer:
```yaml
deploy:
- type: baidu_url_submitter # 百度
```
执行`hexo deploy`的时候,新的连接就会被推送了。
**支持熊掌号**
```yaml
baidu_url_submit:
count: 1000 ## 提交最新的一个链接
host: alili.tech ## 在百度站长平台中注册的域名
token: xxxxx ## 请注意这是您的秘钥, 所以请不要把博客源代码发布在公众仓库里!
path: baidu_urls.txt ## 文本文档的地址, 新链接会保存在此文本文档里
xz_appid: 'xxxxxx' ## 你的熊掌号 appid
xz_token: 'xxxxxx' ## 你的熊掌号 token
xz_count: 10 ## 从所有的提交的数据当中选取最新的10条,该数量跟你的熊掌号而定
```
加入新的 deployer 即可
```yaml
deploy:
- type: baidu_xz_url_submitter # 百度熊掌号
```
### `hexo-autonofollow` 外链自动 nofollow
```bash
$ npm install hexo-autonofollow --save
```
注:`hexo-nofollow` 插件实在是让我头大,使用后会导致页面中多出许多莫名其妙的 ``,扰乱了博客页面排版。

我又一步步重新搭了一遍博客排查错误,最终发现 package.json 中删除 `"hexo-nofollow": "^1.0.5",` 即可完美解决问题。
### `hexo-seo-link-visualizer` 分析链接并可视化站点结构
```bash
$ npm install hexo-seo-link-visualizer --save
```
**Usage**
First of all , you should to add npm script. Please insert as follow code at `package.json`.
```json
"scripts": {
"show-article-map": "node node_modules/hexo-seo-link-visualizer/app/show-article-map.js"
},
```
Next , Please run server and excute npm script. (`$ hexo clean` be sure to run.)
```bash
$ hexo clean
$ hexo server
$ npm run show-article-map
```
Last , Please run server of link visualizer. Since the default URL is `localhost:1234`, open this URL.
**Options**
You can change plugin settings with as follow option. Please edit `_config.yml`.
```yaml
# hexo-seo-link-visualizer's option
seoLinkVisualizer:
enable: true
cache: cache/seo-link-visualizer.json
port: 1234
previewHost: localhost:4000/
categoryDepthLimits: 1
allowedSourcePath:
- _posts/
# - _drafts
ignoreLink:
int:
ext:
- amazon
- amz
- flickr
toc:
```
### `hexo-baidu-url-push` 百度站长平台自动推送工具
> ⚠ 该插件使用后会出现以下BUG:
>
> ReferenceError: path is not defined
一个hexo插件,使用百度JS链路自动推送方法,提交链接到百度
> 自动推送是百度站长平台为提高站点新增网页发现速度推出的工具,安装自动推送JS代码的网页,在页面被访问时,页面URL将立即被推送给百度。
```javascript
npm install hexo-baidu-url-push --save
```
其实就是向页面追加了以下代码
```html
(function(){
var bp = document.createElement('script');
var curProtocol = window.location.protocol.split(':')[0];
if (curProtocol === 'https') {
bp.src = 'https://zz.bdstatic.com/linksubmit/push.js';
}
else {
bp.src = 'http://push.zhanzhang.baidu.com/push.js';
}
var s = document.getElementsByTagName("script")[0];
s.parentNode.insertBefore(bp, s);
})();
```
## 生成器
### `hexo-generator-topindex` 置顶文章
```bash
$ npm install hexo-generator-topindex --save
```
**配置**
```yaml
topindex_generator:
per_page: 10 #Posts displayed per page. (0 = disable pagination)
order_by: -date #Posts order. (Order by date descending by default)
```
**使用方法**
这样,就可以在文章的 Front Matter 中指定 `top: 数字` 实现文章置顶效果了。
### `hexo-generator-feed` 生成博客 RSS
```bash
$ npm install hexo-generator-feed --save
```
You can configure this plugin in `_config.yml`.
```yaml
feed:
type: atom
path: atom.xml
limit: 20
hub:
content:
content_limit: 140
content_limit_delim: " "
order_by: -date
icon: icon.png
```
**使用方法**
In the [front-matter](https://hexo.io/docs/front-matter.html) of your post, you can optionally add a `description`, `intro` or `excerpt` setting to write a summary for the post. Otherwise the summary will default to the excerpt or the first 140 characters of the post.
### `hexo-generator-sitemap` 生成 sitemap.xml
```bash
$ npm install hexo-generator-sitemap --save
```
### `hexo-generator-baidu-sitemap` 生成 baidusitemap.xml
```bash
$ npm install hexo-generator-baidu-sitemap --save
```
## 工具
### `hexo-abbrlink` 生成文章唯一ID
```bash
$ npm install hexo-autonofollow --save
```
### `hexo-nanoid` 用 nanoid 生成文章唯一ID
```bash
$ npm install hexo-nanoid --save
```
### `hexo-translate-title` 将汉字标题转成英文标题
**安装**
```
npm install hexo-translate-title --save
```
**使用 **
1.配置hexo根项目下的`_config.yml`
```yaml
translate_title:
translate_way: google # google,youdao,baidu_with_appid,baidu_no_appid
youdao_api_key: '' # Your youdao_api_key
youdao_keyfrom: xxxx-blog # Your youdao_keyfrom
is_need_proxy: false # true | false
proxy_url: http://localhost:50018 # Your proxy_url
baidu_appid: '' # Your baidu_appid
baidu_appkey: '' # Your baidu_appkey
```
**注意**
> - 判断是否需要配置google本地代理,因为我在本地是开启时才能访问google翻译的,如果没有被墙,请将`_config.yml` 下的`is_need_proxy: true`改为false。如果设置为true,请设置本地代理地址
> - 目前google翻译,youdao翻译均可直接使用,百度翻译**使用APPID版本,无APPID版本均已完成**,APPID版本需要在[百度翻译开放平台](http://api.fanyi.baidu.com/)
> - 如果担心百度翻译开发平台的APP_ID和APP_KEY有泄漏风险,建议在百度翻译开发平台-》管理控制台的服务器地址一栏,填写好服务器IP即可
2.修改hexo根目录下的`_config.yml`
修改
> permalink: :year/:month:day/:translate_title.html
将`:title`修改为`:translate_title`即可,前面的路径也可按照自己的要求变更,例如 permalink: blog/:translate_title.html
### `hexo-all-minifier` 压缩所有静态文件
支持压缩 HTML、CSS、JS、图片,支持打包js,平均耗时20s,功能强大简单易用。
```bash
$ npm install hexo-all-minifier --save
```
Just put this line in the config file of your hexo-site to enable this plugin.
```yaml
all_minifier: true
```
If you need futher control of this plugin, please refer the options below.
```yaml
js_concator:
enable: false #Enable the Js concator. Defaults to `false`.
bundle_path: '/js/bundle.js' #The output path of the bundle script. It will be set as absolute path to the root dir.
front: false #Put the bundle script in the front of all scripts in body tag. Default to false, which means the bundle script will be placed in the back of other scripts.
silent: false #Disable logging optimize informations. Defaults to `false`.
html_minifier:
enable: true #Enable the HTML minifier. Defaults to `true`.
ignore_error: false #Ignore the error occurred on parsing html.
silent: false #Disable logging optimize informations. Defaults to `false`.
exclude: #Exclude files. Glob is support.
css_minifier:
enable: true #Enable the CSS minifier. Defaults to `true`.
silent: false #Disable logging optimize informations. Defaults to `false`.
exclude: #Exclude files. Glob is support.
- '*.min.css'
js_minifier:
enable: true #Enable the JS minifier. Defaults to true.
mangle: true #Mangle file names
silent: false #Disable logging optimize informations. Defaults to `false`.
output: #Output options. If it is empty, please remove it from the .yml file! Otherwise it will be set to `null`, which is different from `undefined`.
compress: #Compress options. If it is empty, please remove it from the .yml file! Otherwise it will be set to `null`, which is different from `undefined`.
exclude:
- '*.min.js'
image_minifier:
enable: true #Enable the image minifier. Defaults to `true`.
interlaced: false #Interlace gif for progressive rendering. Defaults to `false`.
multipass: false #Optimize svg multiple times until it’s fully optimized. Defaults to `false`.
optimizationLevel: 2 #Select an optimization level between 0 and 7. Defaults to `2`.
pngquant: false #Enable imagemin-pngquant plugin. Defaults to false.
progressive: false #Lossless conversion to progressive. Defaults to false.
silent: false #Disable logging optimize informations. Defaults to false.
exclude: #Exclude specific types of image files, the input value could be gif,jpg, png, or svg. Default to null. Glob is not support.
```
### `hexo-pwa` 支持PWA
`hexo-pwa` 使得 Hexo 站点将支持以下特性:
- [Web App Manifest](https://developer.mozilla.org/en-US/docs/Web/Manifest) - Users can add your site to mobile home screen
- [Service Worker](https://developers.google.com/web/fundamentals/primers/service-workers/) - Make your site available offline
```bash
$ npm install --save hexo-pwa
```
**配置**
You can configure this plugin in `_config.yml`.
```yaml
pwa:
manifest:
path: /manifest.json
body:
name: hexo
short_name: hexo
icons:
- src: /images/android-chrome-192x192.png
sizes: 192x192
type: image/png
- src: /images/android-chrome-512x512.png
sizes: 512x512
type: image/png
theme_color: '#ffffff'
background_color: '#ffffff'
display: standalone
serviceWorker:
path: /sw.js
preload:
urls:
- /
posts: 5
opts:
networkTimeoutSeconds: 5
routes:
- pattern: !!js/regexp /hm.baidu.com/
strategy: networkOnly
- pattern: !!js/regexp /.*\.(js|css|jpg|jpeg|png|gif)$/
strategy: cacheFirst
- pattern: !!js/regexp /\//
strategy: networkFirst
priority: 5
```
- manifest - manifest configuration
- path - the path of `manifest.json`, eg: `/manifest.json`
- body - the content of `manifest.json`, [manifest.json example](https://developer.mozilla.org/en-US/docs/Web/Manifest). `body` can be null, if not null, `hexo-pwa` will generate `manifest.json` with `JSON.stringify(body)`
- serviceWorker - service worker configuration
- path: the path of `sw.js`, eg: `/sw.js`, you shouldn't put sw.js in subdirectory because of the [service worker scope](https://developers.google.com/web/ilt/pwa/introduction-to-service-worker#registration_and_scope)
- preload - urls or posts that you want to preload
- urls: an array of the preload urls
- posts: the count of preload posts
- opts: the options for [sw-toolbox](https://googlechromelabs.github.io/sw-toolbox/api.html#options)
- routes - request routes and strategies, based on [sw-toolbox](https://googlechromelabs.github.io/sw-toolbox/api.html#options). **The routes order does matter.**
- pattern: url pattern, this config can be express-style or RegExp
- strategy: the strategy you want to choose. [All strategies](https://googlechromelabs.github.io/sw-toolbox/api.html#options): `cacheFirst`, `networkFirst`, `cacheOnly`, `networkOnly`, `fastest`. Caution: Log requests should use `networkOnly` strategy.
- priority - [plugin priority](https://hexo.io/api/filter.html) (default value is 10)
### `hexo-lazyload-image` 图片懒加载
```bash
$ npm install hexo-lazyload-image --save
```
**使用**
First add configuration in `_config.yml` from your hexo project.
```yaml
lazyload:
enable: true
onlypost: false
loadingImg: # eg ./images/loading.gif
```
## 标签拓展
> 💡 温馨提示
>
> 为方便未来可能的数据迁移,建议少用独有 markdown 语法。
>
> 并且 许多上古插件早已过时,作者已不再维护,极容易出现类似 **DeprecationWarning: fs.SyncWriteStream is deprecated** 等的问题。
>
> 其次,建议使用 `hexo-renderer-markdown-it` 作为 markdown 渲染器,功能强大,高效渲染。它可以将 `markdown-it` 的一套通用的生态体系带到 Hexo 上来。
>
> 如果你觉得这些都不是问题,那么,开始 enjoy 吧!👇
### `hexo-codepen-v2` 插入 Codepen 代码片段
```bash
npm install hexo-codepen-v2 --save
```
**Usage**
Create [Embedded Pen](http://blog.codepen.io/documentation/features/embedded-pens/) with following syntax:
```ejs
{% codepen slugHash default_tabs height width userId|anonymous|anon theme %}
```
**How to get arguments from CodePen embed**
This is something generated by `CodePen`:
```html
See the Pen Flow #1 by yuanchuan (@yuanchuan) on CodePen.
```
You can extract required arguments:
| Field | Value |
| ------------ | ------------------------------------------------------------ |
| userId | yuanchuan |
| slugHash | mKEmpj |
| theme | 33713 |
| default_tabs | html,result |
| height | 300 |
| width | This value should be adjusted according to your blog theme, by default it is `100%` |
All of this settings except for slugHash can be set in `_config.yml` under `codepen` property.
```yaml
codepen:
userId: "yuanchuan"
theme: "33713"
default_tabs: "js,result"
height: 500
width: "100%"
```
### `hexo-tag-kbd` 支持 kbd 标签

```bash
npm install hexo-tag-kbd --save
```
**用例**
```ejs
{% kbd Ctrl %} + {% kbd A %}
{% kbd Ctrl %} + {% kbd ALT %} + {% kbd DELETE %}
```
**几个特殊按键**
Enter
[](https://camo.githubusercontent.com/3b7f40a8c5b759271deaf1b3d4945cdd269294dd/687474703a2f2f692e696d6775722e636f6d2f546e58717a374c2e706e67)
Shift
[](https://camo.githubusercontent.com/8d2017bde155daf39d70f46fe355f80ee5c4c0e3/687474703a2f2f692e696d6775722e636f6d2f51646c753334622e706e67)
Command
[](https://camo.githubusercontent.com/36fdd2a3d32d16ecf65f77d4b43c0cdf17567166/687474703a2f2f692e696d6775722e636f6d2f365954354778512e706e67)
Option
[](https://camo.githubusercontent.com/4f51c3020739858eda80c2de98b0b1226d6b8263/687474703a2f2f692e696d6775722e636f6d2f4f624a344472792e706e67)
### `hexo-tag-color-block` 颜色标签
[](https://github.com/patrick330602/hexo-tag-color-block/blob/master/example.png)
```bash
npm i hexo-tag-color-block
```
**使用方法**
The full tag format is as follows:
```ejs
{% colorblock [color hex code] [width] [height] %}
```
Example:
```ejs
{% colorblock #f8dcf8 %}
```
**额外配置**
请访问
### `hexo-tag-hint`

```bash
$ npm install hexo-tag-hint --save
```
**Usage**
```ejs
{% hint 'body_text' 'hint_text' %}
```
### `hexo-tag-bilibili` 插入bilibili视频
```bash
npm install --save hexo-tag-bilibili
```
**Usage**
The full tag format is as follows:
```ejs
{% bilibili [av_id] %}
or
{% bilibili [av_id] [page] %}
```
example:
```ejs
{% bilibili 2333333 3 %}
```
### `hexo-ruby-character` Ruby character tag
Ruby character tag for Hexo, inspired by the [Ruby template](http://zh.moegirl.org/Template:Ruby) of [萌娘百科](http://zh.moegirl.org/).
```bash
npm install hexo-ruby-character --save
```
**Usage**
```ejs
{% ruby Base|top %}
```
→ Base (top)
Specifically, if the top field is in Chinese characters, it while be converted to Chinese pinyin, because the pinyin chatater with heads are not easy to type.
Followings are the examples.
```ejs
{% ruby 佐天泪子|掀裙狂魔 %}
```
→ 佐天泪子 (xiān qún kuáng mó)
Other languages like Japanese is also supported.
```ejs
{% ruby 超電磁砲|レールガン %}
```
→ 超電磁砲 (レールガン)
### `hexo-github-card` GitHub 用户资料卡片
Display a card for GitHub profile and repo in your [hexo](https://hexo.io/) blog. Implemented with [Github-cards](https://github.com/lepture/github-cards).
```bash
npm install --save hexo-github-card
```
Usage
Insert `githubCard` tag in your article:
```ejs
{% githubCard user:your_user [repo:your_repo] [width:400] [theme:Default] [client_id:your_client_id] [client_secret:your_client_secret] [align:text-align_position] %}
```
| Argument | Description |
| ------------- | ------------------------------------------------------------ |
| user | GitHub user name |
| repo | (Optional) GitHub repository name of the user. If omit then display only the user profile |
| width | (Optional) Widget's width. It should be a valid CSS width value. Default is 400. |
| client_id | (Optional) Your GitHub app client_id |
| client_secret | (Optional) Your GitHub app client_secret |
| align | (Optional) What kind of text-align is you want. Default is center. |
(Configuration are consistent with [github-cards](https://github.com/lepture/github-cards#widgetjs))
Example:
Display user profile only
```ejs
{% githubCard user:Gisonrg %}
```
Display a repo
```ejs
{% githubCard user:Gisonrg repo:hexo-github-card %}
```
### `hexo-caniuse` Can I Use CSS Features?
```bash
$ npm install hexo-caniuse --save
```
**Usage**
Create [The CanIUse Embed](https://caniuse.bitsofco.de/) with following syntax:
```ejs
{% caniuse feature periods|current %}
```
**How to get arguments from caniuse embed**
This is something generated by `caniuse`:
```html
```
You can extract required arguments:
| Field | Value |
| ------------ | -------------------------------------- |
| data-feature | Choose `caniuse` Feature feature |
| data-periods | Select the Browser Versions to Display |
### `hexo-github` 追踪 GitHub 仓库 commit
[](https://github.com/akfish/hexo-github/blob/master/capture.gif?raw=true)
```bash
npm install --save hexo-github
```
**使用方法**
Insert `github` tag in your article:
```ejs
{% github user repo referenced_commit [auto_expand = true | false] [width = 100%] %}
```
| Argument | Description |
| ----------- | ------------------------------------------------------------ |
| user | GitHub user name |
| repo | GitHub repository name of that user |
| commit | Commit sha1 referenced in the article |
| auto_expand | (Optional, default == false) true of false. Expand the timeline once synced if set to true. |
| width | (Optional, default == 100%). Widget's width. It should be a valid CSS width value. |
**例子**
```ejs
{% github akfish hexo-math b82e65 %}
```
## 部署
### `hexo-deployer-git` 部署到 Git
```bash
$ npm install hexo-deployer-git --save
```
**配置**
You can configure this plugin in `_config.yml`.
```yaml
# You can use this:
deploy:
type: git
repo:
branch: [branch]
message: [message]
name: [git user]
email: [git email]
extend_dirs: [extend directory]
ignore_hidden: false # default is true
ignore_pattern: regexp # whatever file that matches the regexp will be ignored when deploying
# or this:
deploy:
type: git
message: [message]
repo:
github: ,[branch]
coding: ,[branch]
extend_dirs:
- [extend directory]
- [another extend directory]
ignore_hidden:
public: false
[extend directory]: true
[another extend directory]: false
ignore_pattern:
[folder]: regexp # or you could specify the ignore_pattern under a certain directory
```
## 美化
### `hexo-helper-live2d` 萌萌哒二次元看板娘
向你的Hexo里放上一只萌萌哒二次元看板娘!
演示:
原作大大的博客:
```bash
npm install --save hexo-helper-live2d
```
详细配置过多,请查看
------
📘《从零开始的Hexo博客搭建教程》系列文章:
1. [从零开始的Hexo博客搭建教程(一):开始](https://www.nuist.today/h94Rf-/)
2. [从零开始的Hexo博客搭建教程(二):主题](https://www.nuist.today/0IxRfH/)
3. [从零开始的Hexo博客搭建教程(三):SEO优化](https://www.nuist.today/i5bofg/)
4. [从零开始的Hexo博客搭建教程(四):图床](https://www.nuist.today/JjDMWM/)
5. [从零开始的Hexo博客搭建教程(五):文章发布](https://www.nuist.today/1eC0kV/)
6. [从零开始的Hexo博客搭建教程(六):插件](https://www.nuist.today/hAbX6u/)
7. [从零开始的Hexo博客搭建教程(七):遇到的坑](https://www.nuist.today/A-fgp4/)